


Table of Contents Show
Lens information indicator
[/vc_column_text][/vc_column][/vc_row] [vc_row][vc_column width=”1/2″][vc_column_text] [/vc_column_text][/vc_column][vc_column width=”1/2″][vc_column_text]CineLenses from the manufacturer of the same name is more of an extensive database than a real app. The user will find a huge selection of different lenses for every application from many well-known (and unknown) manufacturers as well as the corresponding, very extensive specifications in a handy format. The collection is initially divided into spherical and anamorphic lenses, and a selection step further into primes, zooms, teles, macros, fish-eyes etc. If you want to find out more about a specific lens, you first click through the individual criteria to get to the manufacturers and from there to the respective product. In addition to a picture of the lens and basic information, a comprehensive list of focus ranges, focal lengths, T-stops, weight, length, year of manufacture and mount is displayed here.[/vc_column_text][/vc_column][/vc_row]
[vc_row][vc_column][vc_column_text]A small button next to each lens allows you to add the product to a shopping / wish list, which you can, for example, share with your camera ace or the producer (so that he laughs heartily and tells you which lenses you can’t get for budget reasons). A useful additional feature is the associated database of distributors, which can sometimes be very useful in foreign countries, but (who would have thought it) is very much geared towards the United States. There is only one distributor for Germany.
[/vc_column_text][/vc_column][vc_column width=”1/2″][vc_column_text]CineLenses from the manufacturer of the same name is more of an extensive database than a real app. The user will find a huge selection of different lenses for every application from many well-known (and unknown) manufacturers as well as the corresponding, very extensive specifications in a handy format. The collection is initially divided into spherical and anamorphic lenses, and a selection step further into primes, zooms, teles, macros, fish-eyes etc. If you want to find out more about a specific lens, you first click through the individual criteria to get to the manufacturers and from there to the respective product. In addition to a picture of the lens and basic information, a comprehensive list of focus ranges, focal lengths, T-stops, weight, length, year of manufacture and mount is displayed here.[/vc_column_text][/vc_column][/vc_row]
[vc_row][vc_column][vc_column_text]A small button next to each lens allows you to add the product to a shopping / wish list, which you can, for example, share with your camera ace or the producer (so that he laughs heartily and tells you which lenses you can’t get for budget reasons). A useful additional feature is the associated database of distributors, which can sometimes be very useful in foreign countries, but (who would have thought it) is very much geared towards the United States. There is only one distributor for Germany.For a price of 9 US dollars, CineLenses offers a wide range of lenses with helpful information for production planning. Whether you really need this app on location remains to be seen. If you prefer to plan on your PC, you can get the same features for free on the manufacturer’s website.
CineLenses
Extensive database of many manufacturers and lenses.
Platform: iOS and Android
Full version: 9 US dollars
Anti-flare calculator
[/vc_column_text][/vc_column][/vc_row] [vc_row][vc_column width=”1/2″][vc_column_text]At which frame rate, which shutter and which Hertz number does the picture flicker? And when does it not? Using a simple (and free) app, the DoP can calculate which angle needs to be set to prevent flickering of HMI or neon light in the image, especially when shooting at higher frame rates. To do this, you select the number of Hertz used (50 or 60, depending on which part of the world you are in), scroll continuously through the shutter angles or the desired frame rate using small wheels and thus obtain the optimum setting for the camera.The app does little more than replace the familiar blue (60Hz) and red (50Hz) cards, or to be more precise, transfer them to an app. If you still don’t want to do without the cards, you can also find them as an image in the app. If you often film with HMI or in neon light, shoot a lot in the United States or with high-speed cameras and settings, the FLICKERfree Calculator is a great help in smartphone format.[/vc_column_text][/vc_column][vc_column width=”1/2″][vc_column_text]

If you are often travelling abroad, shooting in HMI and neon light and/or using high-speed cameras, you can calculate the shutter angle free of charge using FLICKER.
FLICKERfree Calculator
Converter from shutter to frame rates and vice versa
Platform: iOS
Full version: free of charge
www.cinemaelec.com/flickerfreecalculator/[/vc_column_text][/vc_column][/vc_row] [vc_row][vc_column][vc_column_text]
Data volume calculator
[/vc_column_text][/vc_column][/vc_row] [vc_row][vc_column width=”1/2″][vc_column_text]Which codec generates which amount of data? How much disc space do I need to store 90 minutes of footage? How much 4K footage can I fit on a memory card? The free Data Calc app from AJA answers all these questions. The user selects either the data or the time calculation and can use various parameters such as codec, available storage volume or planned shooting duration to calculate how much storage space should be reserved or how much material can be shot until all cards/hard disc recorders are full.For example, the user can select that they have 64 Gbytes of memory available per card and are shooting in 4K in the XAVC codec and will receive the result that around 34 minutes of material can be recorded per card. Or you have edited a film of 100 minutes and want to export it in ProRES HQ. In this case, the memory requirement would be around 155 Gbytes. The selection of codecs is very extensive and operation is simple. What more could a budding data wrangler want?[/vc_column_text][/vc_column][vc_column width=”1/2″][vc_column_text]
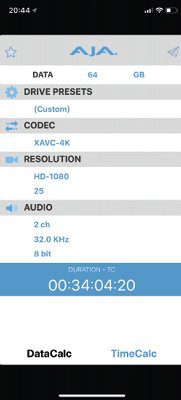
Which codec uses how much memory again? Can we manage with four cards for the shooting day? How big will the playout be exactly? All these questions are answered by the free DataCalc app from AJA.
Data Calc
Calculation of storage capacity or material duration
Platform: iOS and Android
Full version: free of charge
www.aja.com/family/software[/vc_column_text][/vc_column][/vc_row] [vc_row][vc_column][vc_column_text]
Sun Trajectory Actor
When is the sun where and how does it influence my picture? Adam Ratana’s Sun Surveyor is a very clear and functional app for planning scenery, interviews and other lighting design. Based on the current time and GPS coordinates, the software calculates the position of the sun and its advance until sunset. A 3D compass, a two-dimensional map view based on Google Maps, a live view using the camera and Google Street View (for accurate advance planning) are available as settings. Users will also find a detailed list of all sun-related data such as dawn and dusk, blue hour, sunrises and sunsets, etc.
One function that is particularly useful for planning shoots is the look into the future. Using a cleverly coloured scroll bar, you can view the position of the sun over the next few hours and days. If you already have a fixed shooting date for a production, you can also specify this using the date/time function and see directly at what angle the sun will be shining on location. The only thing you can’t plan with Sun Surveyor is the actual sun, but there are plenty of weather apps for that. Sun Surveyor costs just 10 US dollars and is one of the most useful apps we know (and use) for planning shoots.
Sun Surveyor
App for planning the sun’s rays and course
Platform: iOS and Android, full version: 1O US dollars
> www.sunsurveyor.com

Sun Surveyor is a very useful tool for reliable filming planning. It shows very precisely and in detail where the sun is (and when the filming location is in the shade).
Daily shoot planner
[/vc_column_text][/vc_column][/vc_row] [vc_row][vc_column width=”1/2″][vc_column_text]What does an app called Shotlister do? Correct, it lists shots. No more, no less, but it’s actually quite clever and clearly organised, with the option (for a fee) to share the shot list with the team at the touch of a button. If you use the simple version of Shotlister on your smartphone or tablet, you first create a new (film) project and a new scene in this project. Shots are then created within the scene, which can be set up quickly and intuitively with the help of a few settings (INT/EXT, time of day, shooting day, cast, etc.). In addition to each shot, the production manager or DoP also has the option of entering additional equipment such as dolly, crane, tripod, etc. as well as the planned lens and shot size.All shots can be freely rearranged while still in the planning stage or during the shooting day, with the updated shot list being automatically sent to all registered users’ smartphones, tablets and even Apple Watches. The prerequisite for this is that each user has a Pro licence for 14 US dollars per year. Owners of the Pro version also have the option of importing existing scripts from other programmes and generating a shot list from them. Those who prefer to work on a PC rather than on fiddly smartphones can also purchase the desktop version for 50 US dollars. The handheld version of Shotlister is available for iOS and Android, while the desktop version is only available for Mac OS.[/vc_column_text][/vc_column][vc_column width=”1/2″][vc_column_text]

Shotlists are actually essential for more complex film projects. Even more essential, however, is the ability to send all changes immediately and in real time to the end devices of team members and actors.
Shotlister
App for creating and managing shot lists
Platform: iOS and Android (desktop for Mac OS)
Full version: 14 US dollars
www.shotlister.com[/vc_column_text][/vc_column][/vc_row] [vc_row][vc_column][vc_column_text]
Focal length comparator (1)
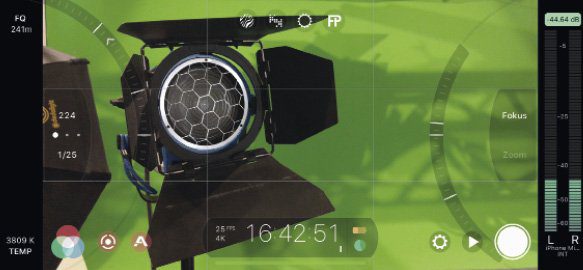
What directors wore around their necks a few decades ago as hardware to better set up or evaluate an image is now available as software for smartphones – a mobile viewfinder, such as Artemis Pro. The app allows you to select various popular cameras from the film and TV sector as well as the corresponding lenses. Depending on whether you opt for zooms or fixed focal lengths, a list of possible focal lengths appears, which you can expand or reduce to suit your own taste.
However, the actual functionality of the app only becomes apparent when using the camera, as Artemis displays the current camera image with different frames. For example, if you choose a 24 mm focal length, the image will be very open; if you opt for a 50, 85 or even 135 mm lens, the image section will be reduced accordingly. Of course, the user also has the option of selecting certain focal lengths and displaying them in full-screen mode (not just as a frame) and even recording photos or videos for comparison purposes.
The app’s other options include adding or removing your own framelines and virtual stand-ins to better judge the size of a section, using preset looks such as black and white, film stock and bleach bypass, and customising focus and exposure settings. With a price of 30 US dollars, Artemis Pro is not exactly cheap, but it pays for itself in shooting situations within a very short time, at the latest when the camera wizard does not have to screw the fifth lens in front of the camera to convince the customer of the choice of focal length. [/vc_column_text][/vc_column][/vc_row]
[vc_row][vc_column width=”1/2″][vc_column_text]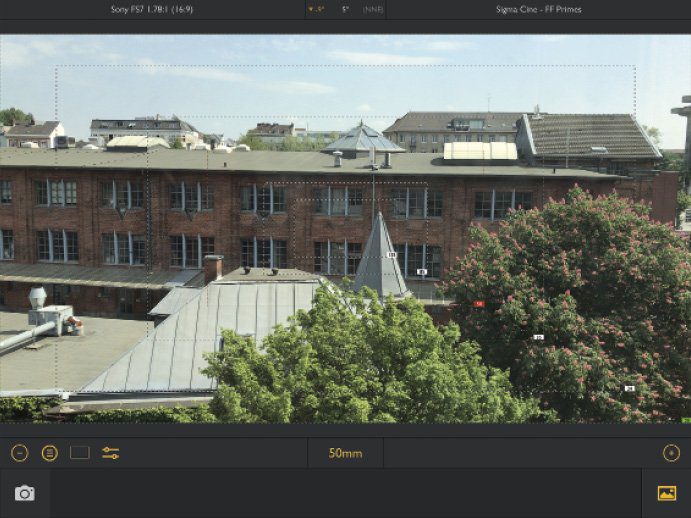 [/vc_column_text][/vc_column][vc_column width=”1/2″][vc_column_text]The simulations in Artemis Pro give the DoP a full view through various lenses. Virtual stand-ins and different apertures can also be displayed.
Artemis Pro
Virtual viewfinder with many additional options
Platform: iOS
Full version: 3O US dollars
http://www.chemicalwedding.tv[/vc_column_text%5D%5B/vc_column%5D%5B/vc_row%5D [vc_row][vc_column][vc_column_text]
Focal length comparator (2)
The Mark II Viewfinder from Dire Studio does essentially the same thing as Artemis Pro, albeit a little more complicated, but also more detailed in parts.
As with Artemis, the user first selects a camera from the list (which surprisingly does not include our generally popular Sony FS7) and a focal length (which in turn contains hardly any manufacturers but only generic specifications) and can then judge the image section based on the focal length frames displayed.
Mark II is somewhat more streamlined than Artemis Pro with quick access to the aspect ratio of the image, a black and white preview and image overrides. The settings also include programmable function buttons, image stabilisation, white balance and other helpful tools. A good organisation for comparison images is also included. Mark II costs just under 30 US dollars and is also in direct competition with Artemis Pro. However, we cannot give a clear recommendation for purchase, as both apps have their advantages and disadvantages.
Mark II Artist’s Viewfinder
Virtual viewfinder with many additional options
Platform: iOS
Full version: 28 US dollars
> www.artistsviewfinder.com

Ambient Light Analyser
[/vc_column_text][/vc_column][/vc_row] [vc_row][vc_column width=”1/2″][vc_column_text]The CineMeter II app transforms the iPhone into a simple light meter with corresponding additional information such as waveform monitor, colour temperature and aperture. The software accesses one of the smartphone’s two cameras and can be extended with a Luxi light meter attachment for just under 50 euros if required (although we have not tested this).In addition to the current camera image, CineMeter II provides a
Waveform display with (Y)RGB values, the shutter speed and an aperture calculated as a function of the ISO value. The user can also perform a white balance and define different colour temperatures. The other, somewhat hidden options include different ND filters, a still mode, warning settings for over- or underexposure and the intensity of waves and lines in the waveform display
Waveform display.
At 25 US dollars, CineMeter is not necessarily a cheap app, but it saves a lot of time when assessing lighting situations and provides all the (necessary) display functions that you would expect as a cameraman or lighting technician, especially with the Luxi attachment installed.[/vc_column_text][/vc_column][vc_column width=”1/2″][vc_column_text]
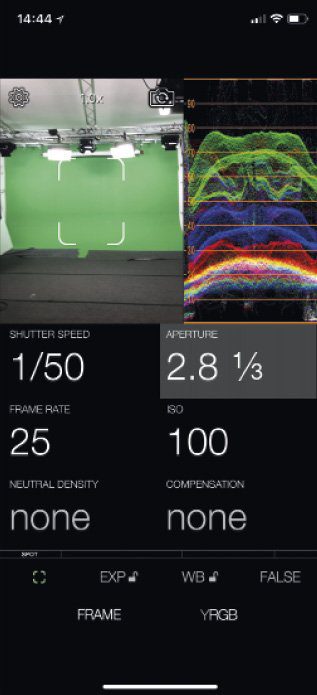
Everything at a glance: Instead of running around with a light meter and monitor, you can also use your smartphone, optionally with an installed luximeter.
CineMeter II
Virtual light meter with many display options
Platform: iOS
Full version: 25 US dollars
www.adamwilt.com/cinemeterii/[/vc_column_text][/vc_column][/vc_row] [vc_row][vc_column][vc_column_text]
Scene designer
If you want to set interviews or stage acted scenes, you often spend a lot of time writing down on the back of call sheets or the caterer’s paper napkin how you imagine the set-up and sequence of the scene for the cameraman, the actors and the rest of the crew. The Shot Designer app helps to remedy this situation with its simple operation and many functions. Scenes are created very simply by selecting either a male or female character, positioning them (as a top shot) and positioning the camera and lighting accordingly using drag-and-drop. You can also select simple props and name all elements individually.
One of the major advantages of the app (compared to paper napkins) is the option of splitting a scene into three individual images and playing them back like a film, i.e. simulating the movement of the actors and the camera. Other options include importing storyboard images to match the scene and using the camera to photograph scenes and integrate them into the shot. The Shot Designer is free of charge for individual scenes. If you want to design entire films, work together in a team or plan your work on the desktop, you pay 20 US dollars for the Pro version.

Shot layouts could hardly be easier to design: Characters, lighting, props and cameras can be added and moved along the respective movement axes using drag-and-drop.
Shot Designer
App for planning scenes with numerous options
Platform: iOS/Android, Mac OS and Windows (desktop)
Full version: 2O US dollars
www.hollywoodcamerawork.com/shot-designer.html[/vc_column_text][/vc_column][/vc_row] [vc_row][vc_column][vc_column_text]
Klappenschlager
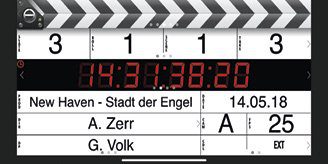
One of our favourite apps on iPhone and iPad has always been Movie Slate, a kind of virtual film clapperboard for syncing picture and sound (or cameras without timecode). As with a real film slate, you first write down the project name, director, DoP, camera name etc. in the app. You can also define the production logo and three other fields as well as the unit, time of day and INT/EXT.
To strike the clapperboard, the user simply clicks on the upper part of the screen (where the actual clapperboard is positioned). A three-second countdown sounds, then the flap hits and the app turns completely red. That’s it! The advantage of the app over a manual flap is that the time code (e.g. the real time) is displayed and that a take is counted up for each flap.
The virtual clapperboard runs during the recording so that a kind of log of the individual shots is created, which can be used later in post-production to allocate the settings. There are also numerous options for the camera and production data as well as a Pro version for synchronising between different devices and apps. Although Movie Slate is not exactly cheap at 30 US dollars, it saves time and nerves in post-production.
Movie Slate 8
Virtual slate with many
Additional functions
Platform: iOS
Full version: 3O US-Dollar
> www.movie-slate.com
Green wall assessor
Anyone who frequently shoots in front of a green or blue screen knows how important it is to ensure that the background is evenly lit so that post-production doesn’t turn into a nightmare later on. However, instead of using a light meter to scan the background centimetre by centimetre, you can use a small app to inspect the screen in its entirety and optimise the lighting if necessary (which of course also requires light – the app doesn’t do that).
The way the Green Screener works is actually quite simple: the background is divided into different areas of different shades of grey, depending on how bright the illumination is. You then select a target on the touchscreen of the iPhone or iPad and correct the background lighting until everything is an even green colour.
For just 10 US dollars, this tool is helpful, easy to use and can easily save several hundred dollars in post-production if a key is not sufficiently well lit and a lot of manual work is required.

Green Screener
App for optimising the lighting of green screens
Platform: iOS and Android, full version: USD 1O
> https://www.hollywoodcamerawork.com/green-screener.html
Camera optimiser simulator
Of course, the cameras in modern smartphones are not only very powerful in terms of light intensity and resolution, but can also be fully controlled via the apps supplied, such as Apple’s “Camera”. However, if you want a little more control and overview when shooting with your smartphone, you should take a look at Filmic Pro.
The app offers some functions that you won’t find elsewhere, such as the display of a small level monitor for the audio recording and a running (real) timecode. If you want to go deeper into the settings, you can first adjust the colour correction by either changing the colour temperature, performing an automatic white balance or actually shifting the colours. The lens area gives the user access to the aperture and focus and, depending on the device, the optical and digital zoom can also be used here. Other options include a zebra display for overexposed areas, blue focus lines and a black and white viewfinder. Additional settings also give you access to the integrated camera options such as stabiliser, image size, frame rate, guidewires and all the other frippery you need as a cameraman.
Filmic Pro actually only costs 15 US dollars and is therefore highly recommended for all users who use their smartphone for more than just baby pictures, birthday parties and Facebook Live. However, you should have a reasonably up-to-date smartphone, as Filmic Pro tends to skip frames on devices that are too slow, but does not consider it necessary to display this shortcoming in a warning message.
Filmic Pro
Clearly organised camera app with many useful
Functions
Platform: iOS/Android
Full version: 15 US dollars
www.filmicpro.com[/vc_column_text][/vc_column][/vc_row] [vc_row][vc_column][vc_column_text]
A little more hardware
If you’re often outdoors with your expensive device and may have to work on set in damp, cold or rainy conditions, you naturally want to protect it as well as possible. This is where two cases come in handy, which we tested just before the end.
The Urban Armor Monarch Series offers good basic protection for a comparatively low budget. The case is open at the front, so it does not completely enclose the device and therefore does not fully protect it from water and dust. However, the touchscreen can be operated freely and is not additionally covered. The material of the protective cover is a mixture of rubber on the corners and edges (to protect against nasty drops), a leather back and a durable, lacquered aluminium frame for overall stabilisation. In general, the protective cover is not particularly heavy, so it is hardly noticeable in terms of weight, and it is not much larger than it needs to be to ensure reasonably reliable protection; only the operation of the side buttons could be a little smoother. For 60 euros, Urban Armor Gear offers well-made, lightweight and seemingly reliable protection for the exclusive device.

The protective cases from Armor-X are somewhat less well made than UAG, but also offer all-round protection for the end devices. The iPhone case is made entirely of plastic and completely encloses the device, protecting it from water, dirt and sand. The back and cover are made of transparent film, which reacts more or less sensitively to touch – sometimes you have to press the glass/film a little more firmly to open an app or take a photo.
The real advantage of Armor-X, apart from the complete casing, is the mounting device on the back. Here, the user can mount any device to attach the iPhone to a bike, an arm, a (supplied) carabiner or even a tripod. For our test, we attached an iPad with an Armor-X case to a type of multi-arm, which we were then able to screw onto a tripod more or less without any problems, thus creating a multifunctional second screen relatively quickly. The so-called X-Mounts for the X-Armor cases all cost between 20 and 40 US dollars, so although they are not of high quality, they are sufficient and offer simple solutions for mounting iPhones and iPads on tripods or rigs without gaffa. An iPhone X case from Armor-X for complete protection costs 70 US dollars, while a case with an X-mount device and open front for the iPad Pro costs 35 US dollars.
Urban Armor Gear
iPhone X case (open): 6O US dollars
Urban Armor Gear
Samsung S9 case (open): 6O US dollars
> www.urbanarmorgear.com
Armor X iPhone case: 7O US dollars
Armor X iPad case (open): 35 US dollars
Armor X Multi-Arm G-Lock: 45 US Dollar
www.armor-x.com[/vc_column_text][/vc_column][/vc_row]