Table of Contents Show
By the way, all the footage is from my workshop on Nuke at FXPhd(www.fxphd.com)– and if you enter the code “DPFXPHD20” by the end of January 2024, you can get your membership for 20 per cent less – and of course there are many more great tutorials!

PxF – Kill Spill
When it comes to pulling a key, Nuke provides you with a whole cornucopia of tools. When it comes to editing the corresponding fill, however, things get pretty meagre. The Hue Correct Node is the closest thing to a proper despill tool, but it’s anything but intuitive. However, as is so often the case, the commu
nity has responded and there is a large, colourful bouquet of gizmos that can take over the tasks. In the last issue we already looked at “Despill to Colour”, today we’re looking at “PxF Kill Spill” from the Pixelfudger Suite by Xavier Bourque.
This is not only characterised by a really clear, simple interface, but above all by a tutorial that not only explains how the gizmo works in ten minutes, but also the underlying concepts so that you really know what you are doing when you turn the knobs. Pxf Kill Spill” usually delivers a very useful result the very first time you connect the tool.
The tool achieves this by comparing the channel to be despilled with the other two and calculating a corresponding limit. If the tool is now to carry out a green despill, it must not exceed the average value of blue and red. Once this has happened, the luminance is equalised. All this happens automatically. The limiter can then be used to increase or decrease the limit and the suppression can be used to change the weighting of the other two channels, in our example red and blue. If you don’t like the neutral background that has now been calculated, you can use the SpillTweak to adjust this value so that it also matches the background plate.

PxF – Screen Clean
The Pixelfudger Suite offers yet another tool that many of us have probably sorely missed. To explain it properly, we need to make a small digression in the direction of IBK. This “Image Based Keyer”, which is certainly one of the most popular and efficient keyers in Nuke, needs a cleanplate to create a good key
a cleanplate to create a good key. This was of course either created by the extremely responsible team or generated with the help of the IBK colour node.
What happens in the IBK under the bonnet is that all imperfections, dents, shadows and spots are removed from the actual keying plate with the help of the cleanplate. This cleaned plate is then the basis for the next key that is generated. The only annoying thing about this is that you cannot access this cleaned plate to use it in the chroma or primatte keyer, for example.
PxF Screen Clean now fills this gap. Clean Plate and Keying Plate are quickly connected, the Screen Type is filled in and the piercing pink, which is set by default, is replaced by a self-sampled colour. Prepared in this way, the plate can then be further processed to your own taste.

Additive Keyer Pro
I hear there are still some veterans who worked on Quantel equipment. Not only were these boxes bulky and expensive, they also had a feature that was the envy of all shake, nuke and flame artists – the Additive Keyer. In the meantime, however, not only have Quantel Henry and Editbox moved on to the eternal VFX hunting grounds, there are also several gizmos for Nuke that have brought the additive keyer into the twenty-first century.
An additive keyer is not actually a keyer at all – at least not in the sense that it separates pixels and the result then becomes part of the alpha channel. The additive keyer is much more of a very sophisticated merge node that comps parts of the foreground onto the background using min and max operations. This is extremely helpful for getting small subtleties such as edges, hair and motion blur into the comp. Three inputs are required for this: the foreground, the background and – of course – the cleanplate. The cleanplate and foreground are then used to calculate which parts should be screened into the comp and which should be multiplied.
So much for the theory. In practice, there is once again a large selection of additive keyers on Nukepedia, but we recommend the representative from Tony Lions here, as it has a few very nice additional features and is of course also part of the Nuke Survival Toolkit – quite rightly, by the way, this little gizmo has already saved quite a few keys.
These features include, for example, the option of working with a picked colour instead of a cleanplate and the option of packing the calculated difference matte into the alpha so that this matte can then be further processed downstream. On Tony’s YouTube channel there is, as always, a very good tutorial that illustrates the workflow well.

Point Cloud Keyer
If you’ve ever had a closer look at Primatte, you may already be familiar with the principle: the colours are plotted in a three-dimensional coordinate system and then you use the GUI to model a kind of bubble that defines which part of this coordinate system will then become part of the mask and which will not. And as powerful as this tool is, it is also very confusing.
Isaac Spiegel has taken the concept but shifted it to a two-dimensional coordinate system. The whole thing works as follows: The artist chooses a colour space. This does not mean ACES, Rec.709 or similar, but actually the way in which our RGB image fits into a two-dimensional coordinate system. To do this, you use the colour spaces that have already mastered this in the days of good old magnetic recording. The default and absolutely sufficient for most cases is yCbCr, or, so that it rolls off the tongue a little easier, Chroma Red/Blue. Based on this selection, a point cloud of the pixels present in the plate is now generated. This point cloud can now be displayed either solo or above the plate or a slapcomp. But what can you do with it? Well, the Point Cloud Keyer has a shape input that can be used to connect a Roto Node. We can now use this Roto to isolate the parts of the Point Cloud that we want to key.
Admittedly, this is a concept that is difficult to explain. But it is fascinating to paint your key with a shape. The tool offers the above-mentioned overlay function as well as scale and position values for the point cloud to ensure that this works well. If desired, this can also be displayed more densely and the axes can be swapped for display. In any case, the gizmo is a new and innovative approach to the problem of how to separate foreground from background.

Check Matte V4
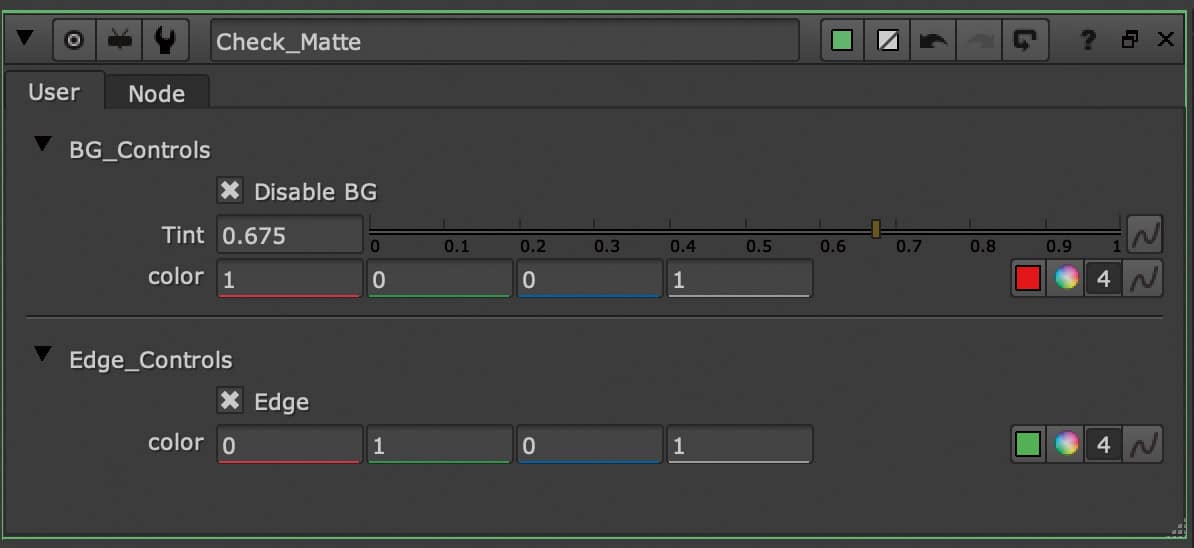
Jonas Almeida brings us this little quality control gizmo. As the name suggests, the whole thing produces a matte overlay, but with a little more functionality than Nuke would like to give us out of the box. The overlay colour can be freely selected, the BG can be switched on and off and all areas of the matte that are below 1 but above 0 are displayed as an edge in a second, freely definable colour.

Advanced Keying Template
Finally, Tony Lions once again contributes something to our keying arsenal. This time, however, it’s not a gizmo or a tool, but a template, i.e. a clear pipeline in which we can create our key. The individual steps, such as Core & Edge Despill, Core and Edge Matte, Cleanplate Generation and so on, are not only clearly labelled with backdrops, but the most obvious tools have also already been provided for us. A Primatte is already available for the Core Matte and an IBK for the Edge Matte. Even post processes such as light wraps have been taken into account.
Whether you want to work in such a rigid structure is something everyone has to decide for themselves. The template certainly helps to keep things organised and to take important steps into account. On the other hand, it very clearly defines a certain way of working, which may push the artist in one direction too quickly. But especially for people who are still struggling with the concept of node-based compositing or who like to work within a fixed structure, this template is certainly helpful. Even if you use it as a starting point or inspiration for your own template, it is certainly very helpful. Incidentally, there are two versions of the template: one uses “Stamps”, the tool we already presented in issue 22:06, while the other works without it.
Like the Additive Keyer Pro, the Advanced Keying Template is part of the Nuke Survival
Toolkit. On his YouTube channel “Compositing Mentor”, Tony Lions has published a multi-part and very comprehensive keying tutorial, in which not only the template, but also the exact task of each individual sub-area is explained in detail.


