


by Florian Genal
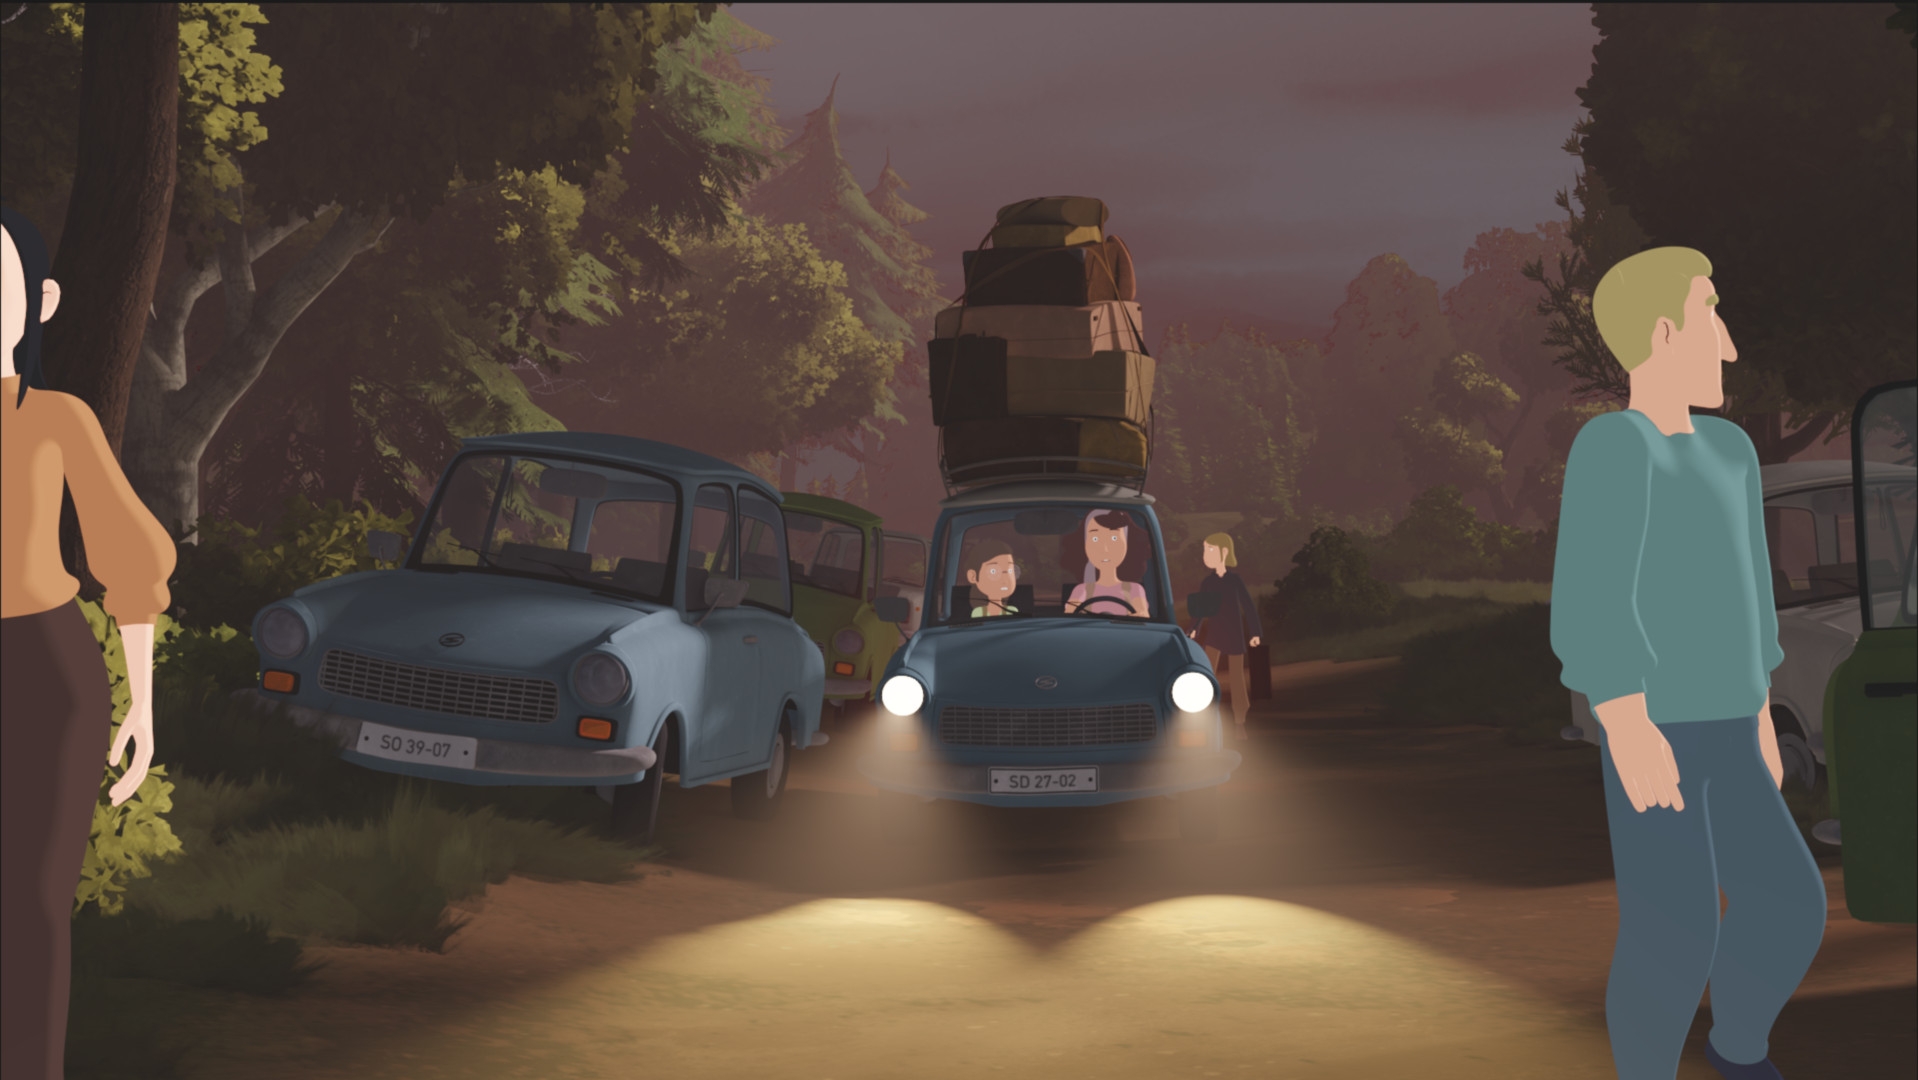
In the 2019 cinema film “Fritzi – eine Wendewundergeschichte” (“Fritzi – a miracle story of change”), viewers can experience an emotional journey through time. The film tells the story of the peaceful revolution in Leipzig in 1989 from the perspective of a 12-year-old girl called Fritzi. Five years later, the series “Fritzi und Sophie – Grenzenlose Freundschaft” (later F&S) is produced under the direction of Ralf Kukula, Matthias Bruhn and Thomas Meyer-Hermann and a team full of passion. In the eight 22-minute episodes, the TV series explores the themes of everyday life in the GDR and tells the story of Fritzi’s friend Sophie, who dares to make the dramatic escape to the West with her mother in order to start a new life in West Germany.
Pipeline overview
The cinema film was an excellent reference for the set models, animators and lighting artists. We wanted to capture the look and atmosphere of the cinema film, but at the same time create our own look that probably didn’t exist before. For the body animations we used motion capture and created special 2D toon shaders. Blender’s Grease Pencil Outliner, which was integrated into Blender just in time for the start of production, was used for the outlines. Everything was produced at 50 frames per second. There are a lot of large sets in the series, which were realised in 3D with great attention to detail. Internally, we treated the sets like an important character, as the realistic backgrounds are a very important part of the emotional story. 170 characters, including twelve main characters, plus demonstrators, animals and vehicles were a huge challenge for everyone involved. And that’s why we thought: let the individual departments have their say!
Storyboard/Animatics
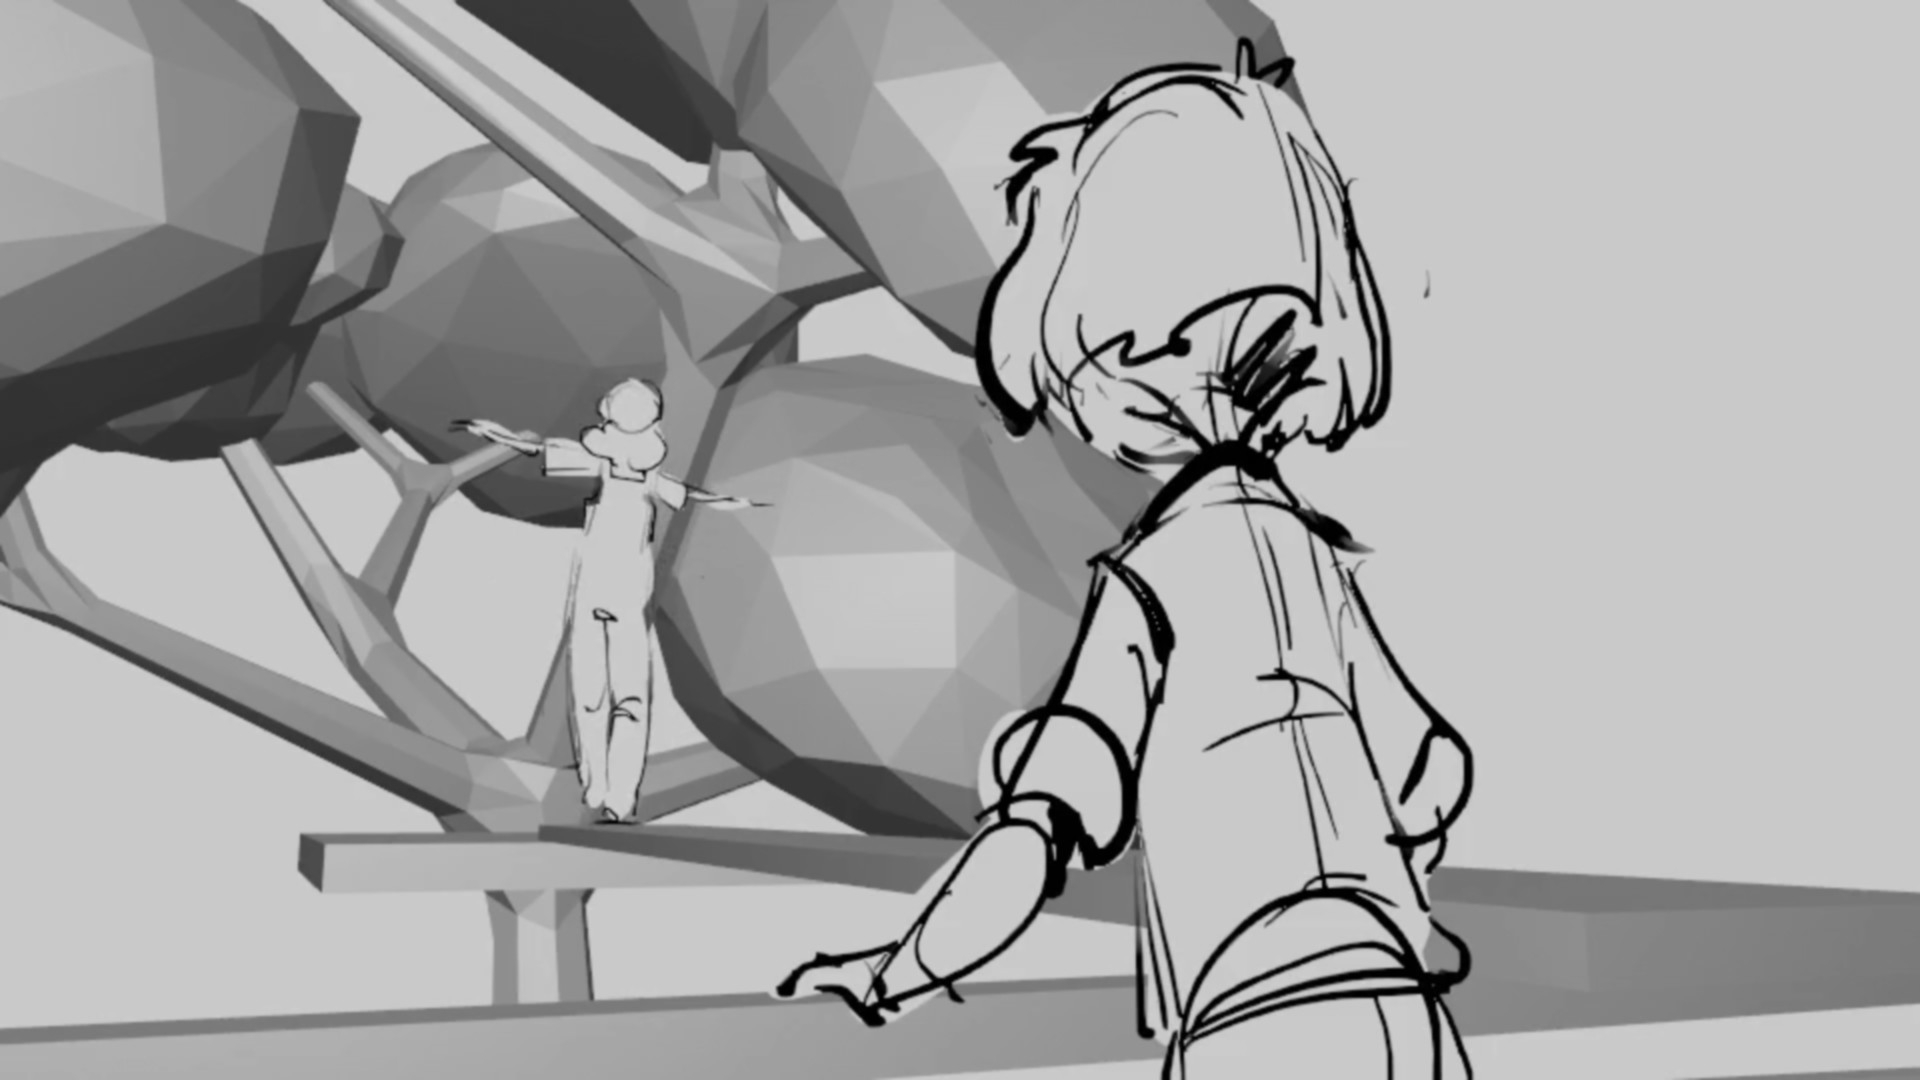
Hi, I’m Alex Tiedtke and I was responsible for the storyboards for Fritzi & Sophie. I admit it: I’ve been around since the Stone Age. When I did my first jobs at the end of the 90s, we were still using pen and paper. Then soon came the graphics tablets, then programmes like Toonboom Storyboard with a timeline, sound and the ability to move different layers past the camera at different speeds for an exciting parallax effect. For the most part, however, this has remained the case to this day. Even in 2024, storyboards are usually quick digital sketches of characters in the most expressive poses and expressions possible against a flat drawing plane with hints of background.
And then came Fritzi & Sophie
The production team approached me with the idea of using Blender in the storyboard. At the time, I had absolutely no idea what was in store for me – but as a good freelancer, my answer was of course: “Sure – great idea!”
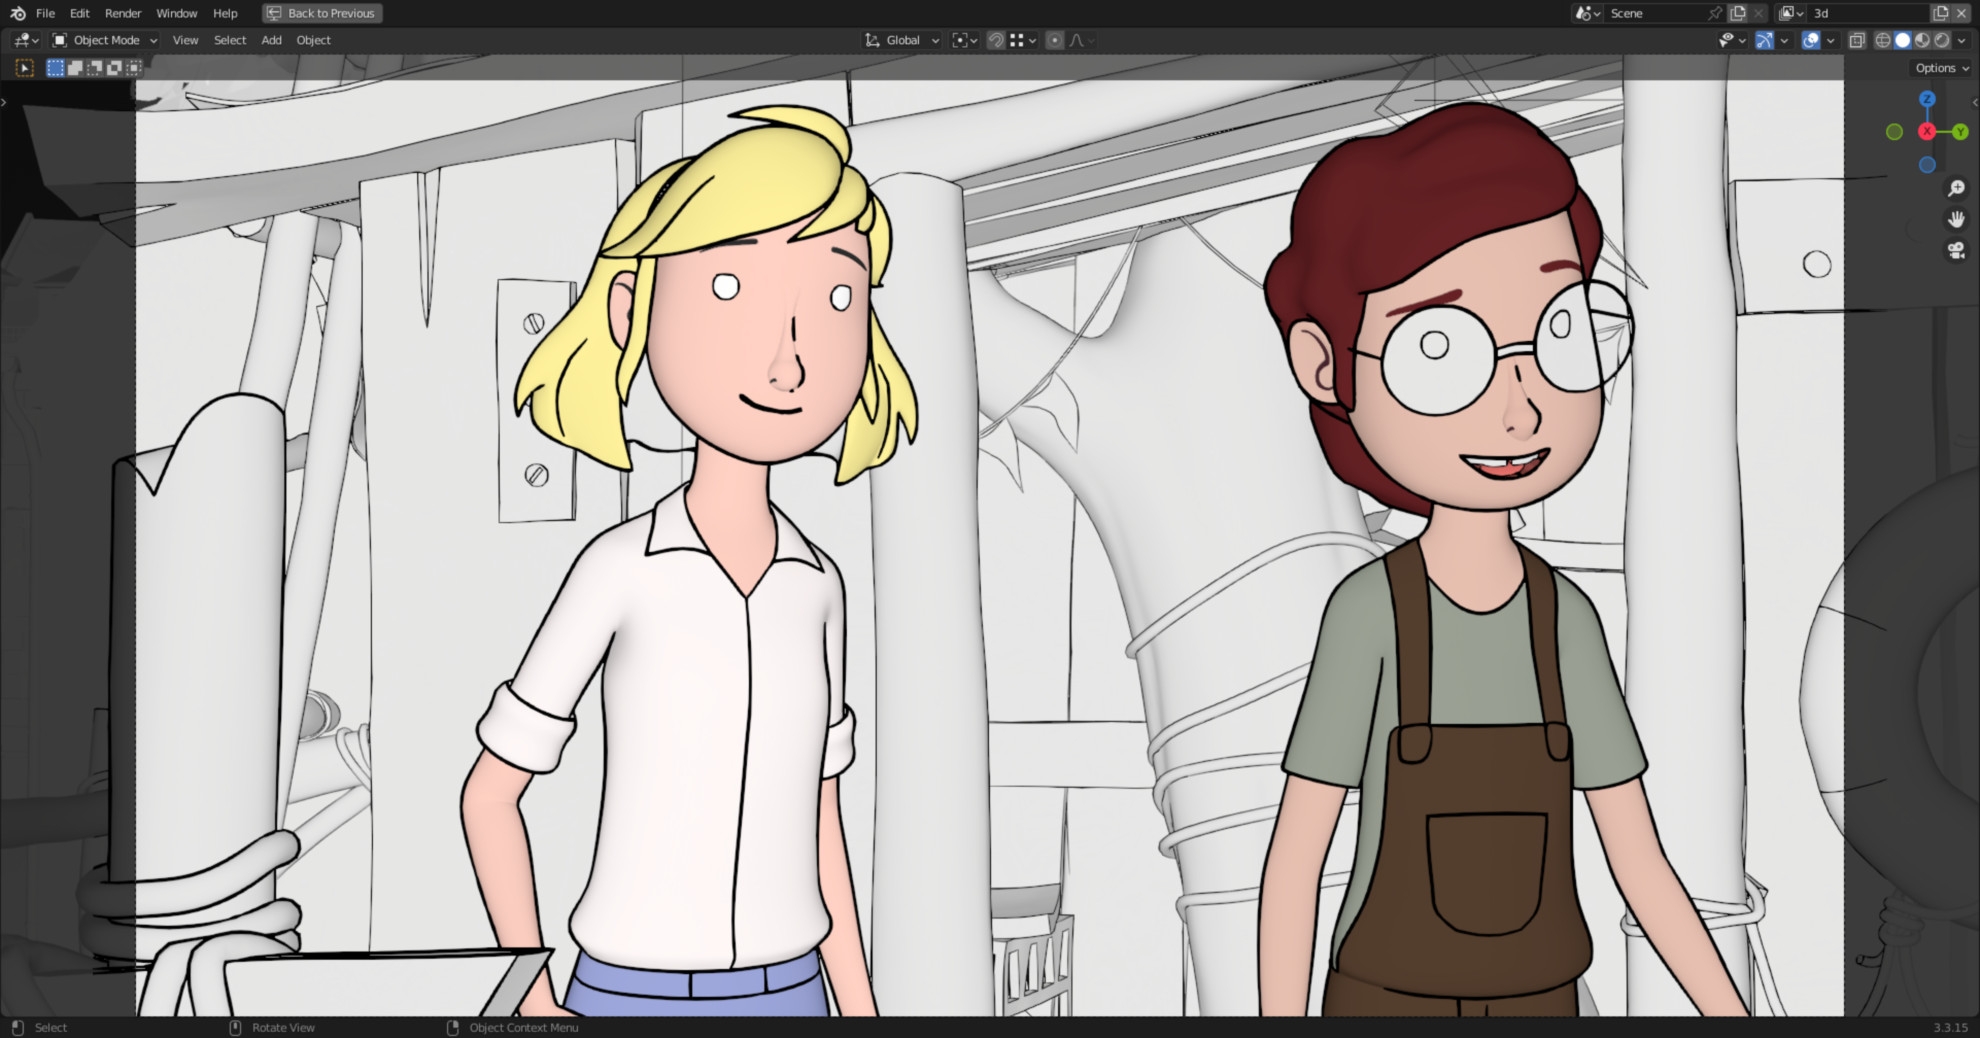
I started with a small test scene. There was already a blocking set for it: Sophie’s room with balcony and tree house tree. Install Blender, watch a few tutorials, how hard can it be? Well… let me put it this way: for someone who has never opened 3D software before, the beginning is, to put it mildly, a challenge. But: I was also quickly a little enamoured. The ability to move freely around a set with a virtual camera? Fantastic! In a conventional board, if things go well, I have a nice drawing as a reference from one or maybe two angles. In a 3D set, I can whizz around freely and literally discover the most beautiful shot.
And the best thing? Everything is just right: Perspectives, sizes and focal lengths are effortlessly correct. For me as a draughtsman, the Grease Pencil was the obvious choice for the figures and therefore my first approach. However, it quickly became clear that there were a few advantages of board work in 3D space that remained unutilised. If I wanted to change a camera angle significantly, my drawing would no longer work because the perspective would be distorted.

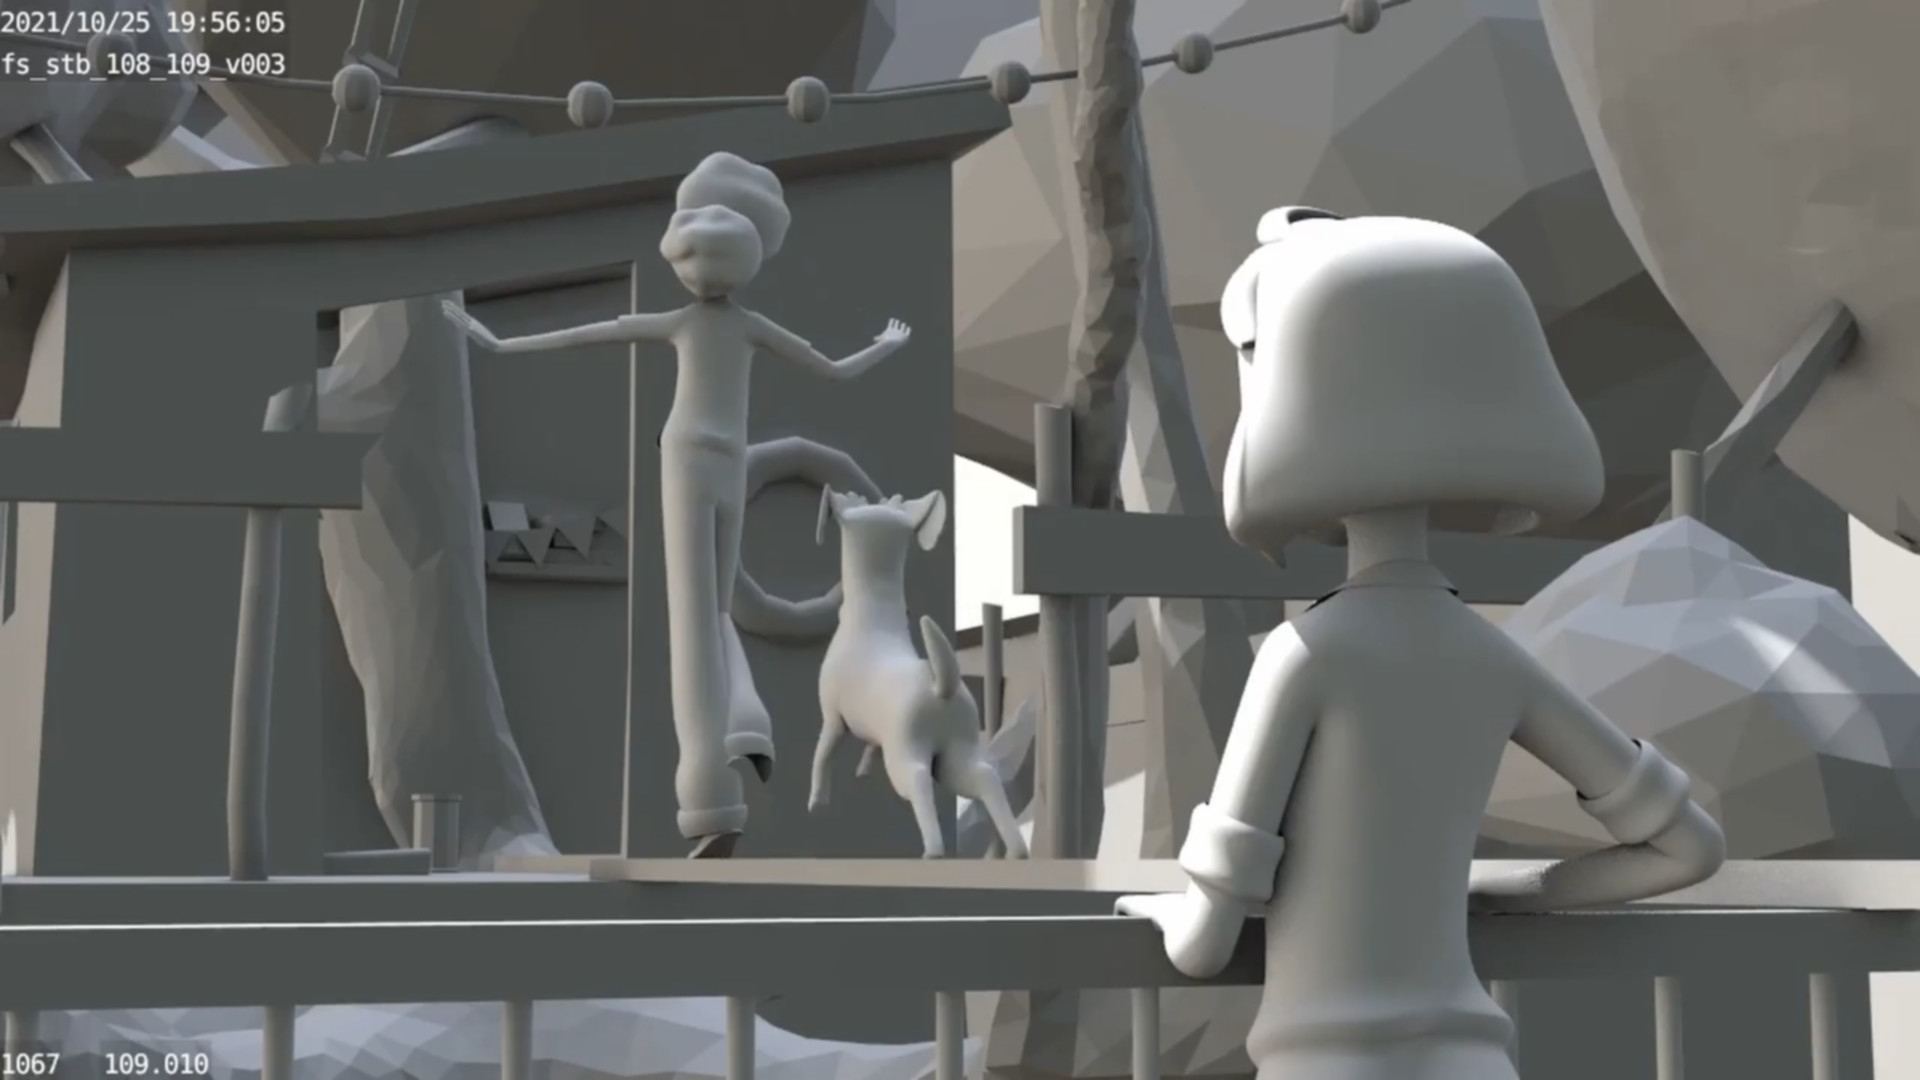
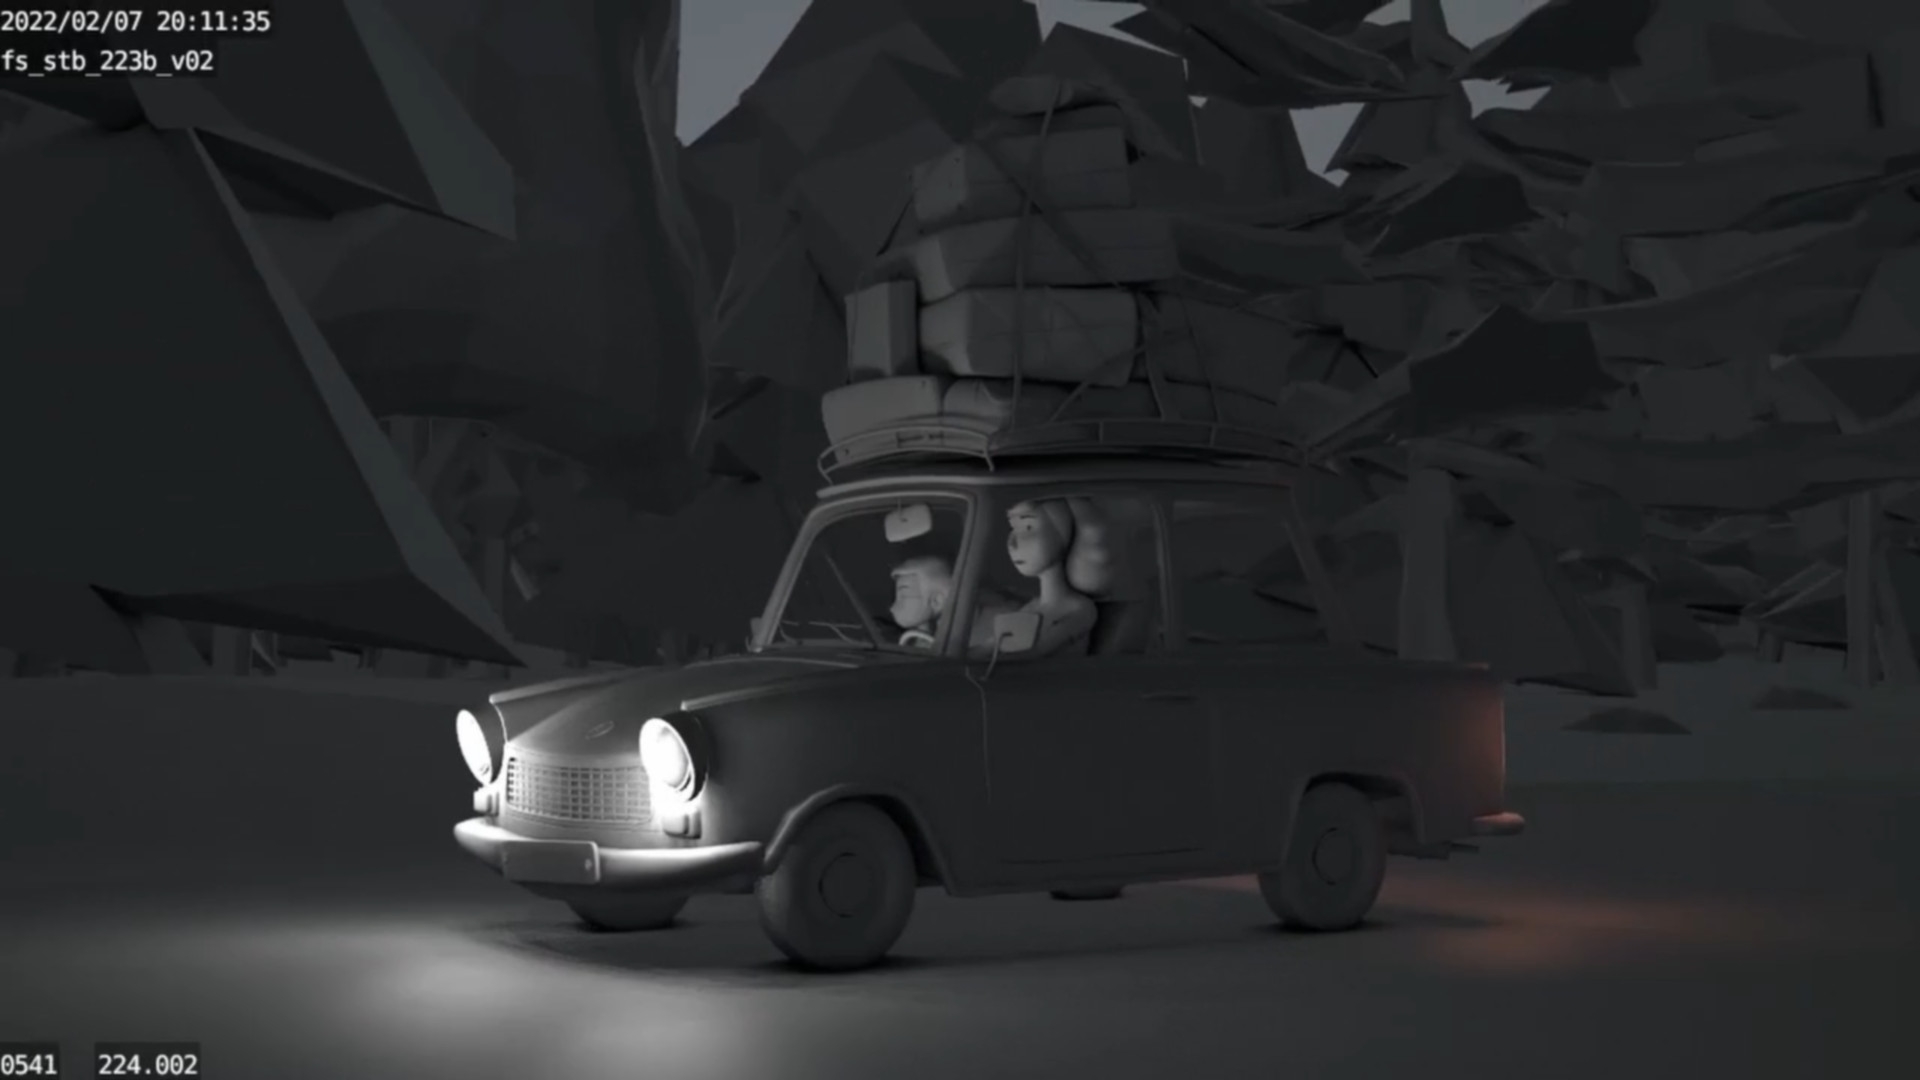
When my old friend and Blender Bunny Robert Schlunze joined the team, he suggested using animatable proxy characters instead. A simple Mixamo rig, a few quick and dirty Blendshapes and an eye rig tacked on for the facial expressions – completely sufficient for what we had in mind. The modelling department quickly delivered the necessary assets and we staged our 180 minutes in one blender file per location and sequence with sound, key poses, expressions, camera settings and movements. Where something was missing, quick kitbashing helped. If the door handle was huge, a tree in the way or a street 40 metres wide – even we noobs could remove, scale or move objects in the simple low-poly sets. The blocking sets adapted to the production were then sent back to the relevant departments as a “bulletproof” basis for development.
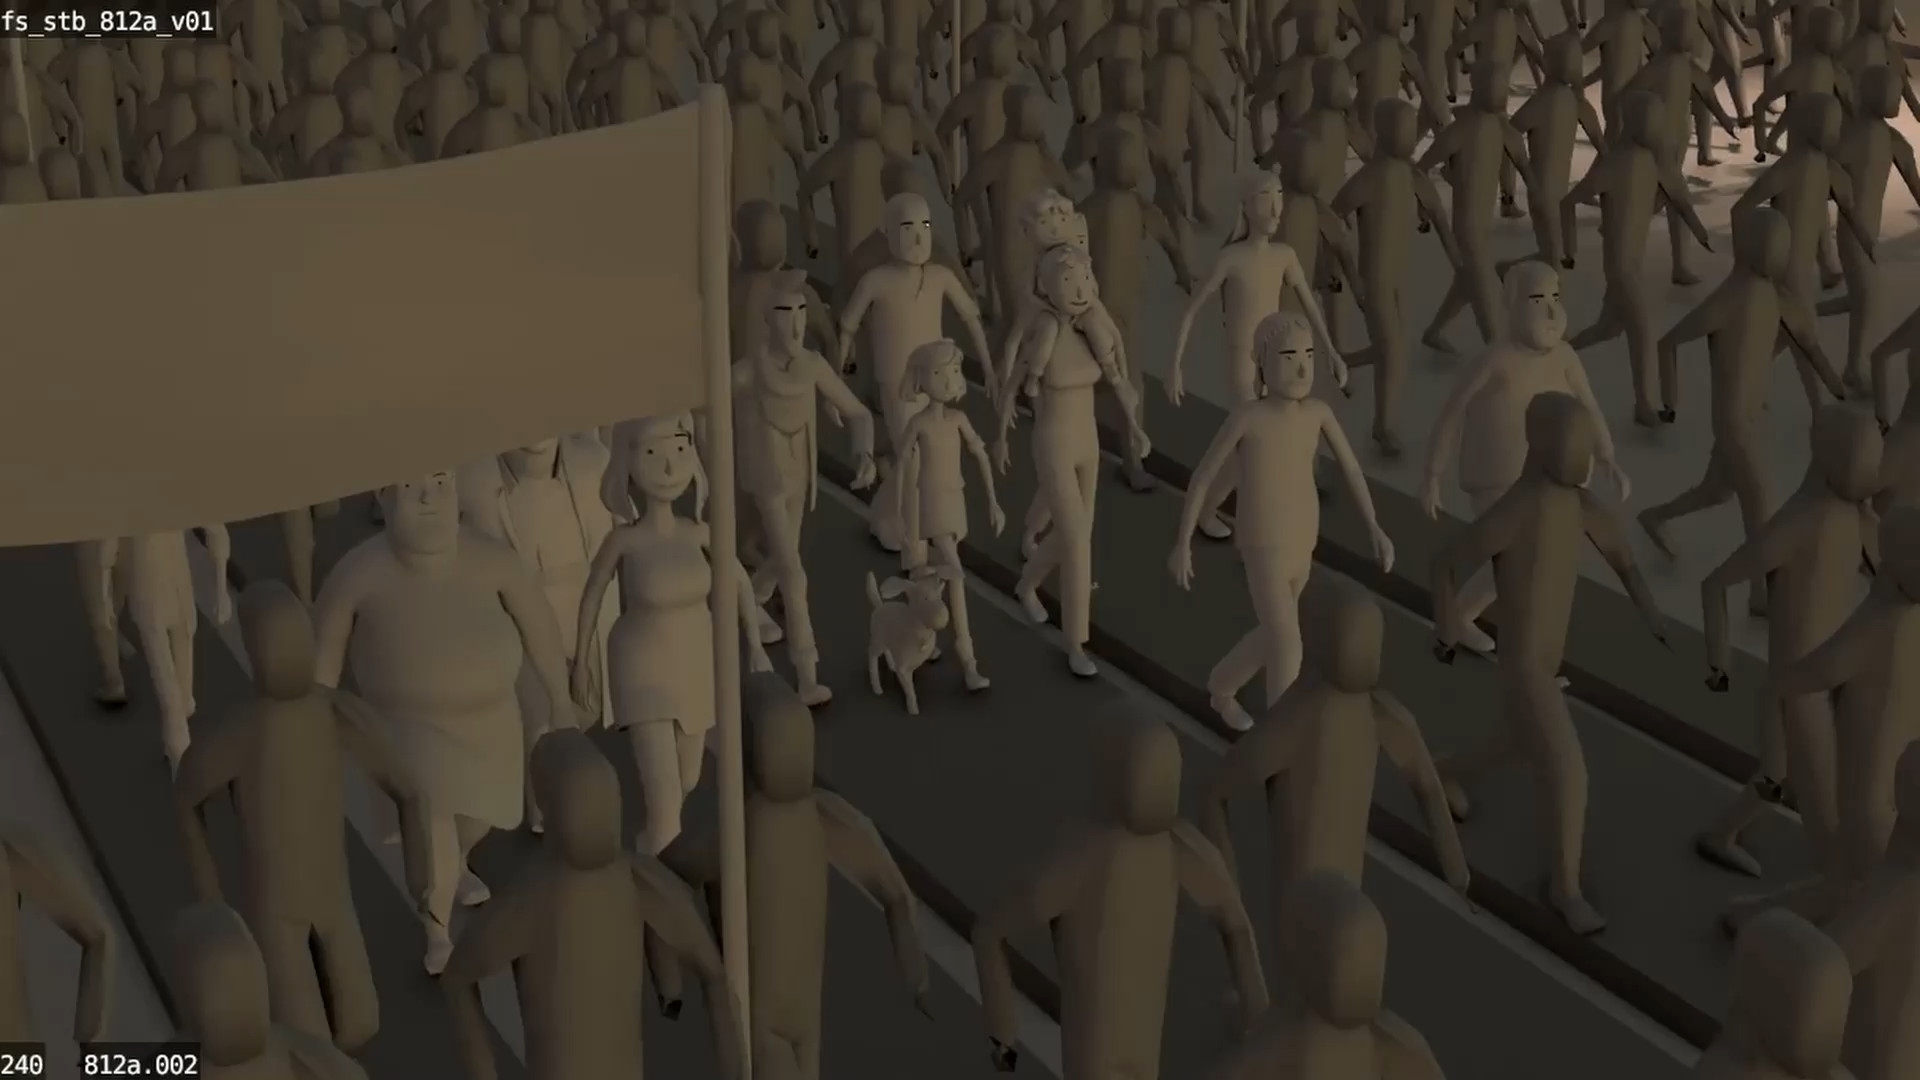
Along the way, we quickly realised other advantages. First of all, of course, the new freedom to free the camera in selected situations from the usual 2D right-left-up-down-in-out. A steady cam with the typical slight swaying – just one modifier away. Panning and moving, flying along, rotating around characters, attaching the camera to running characters or moving cars… everything works if it is needed and makes sense.
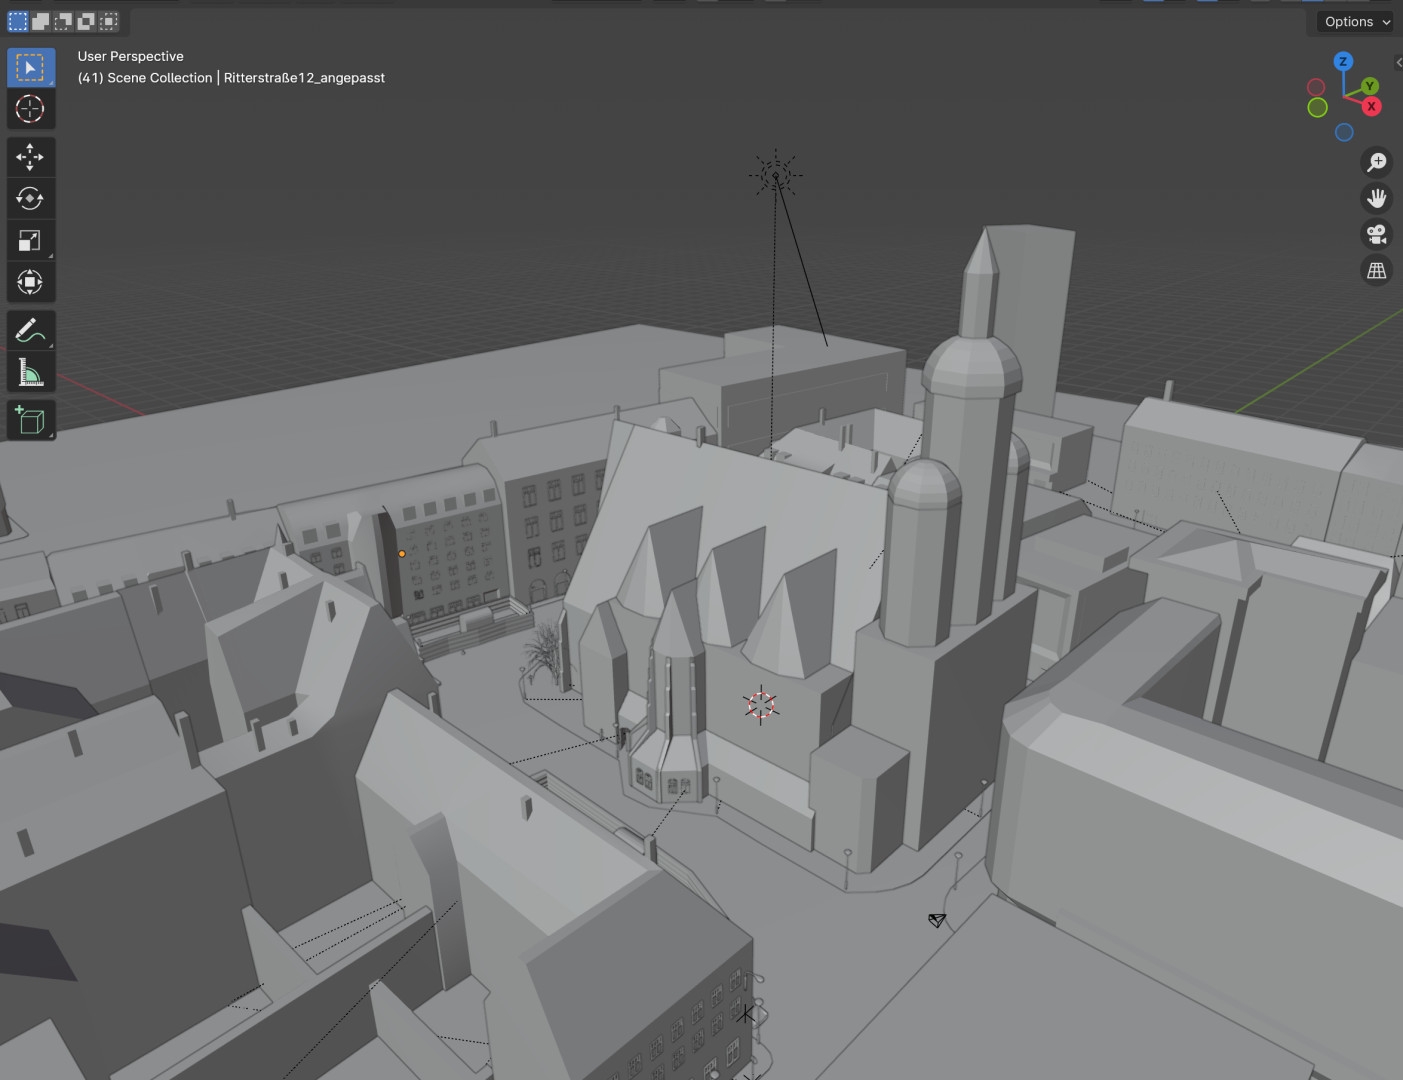
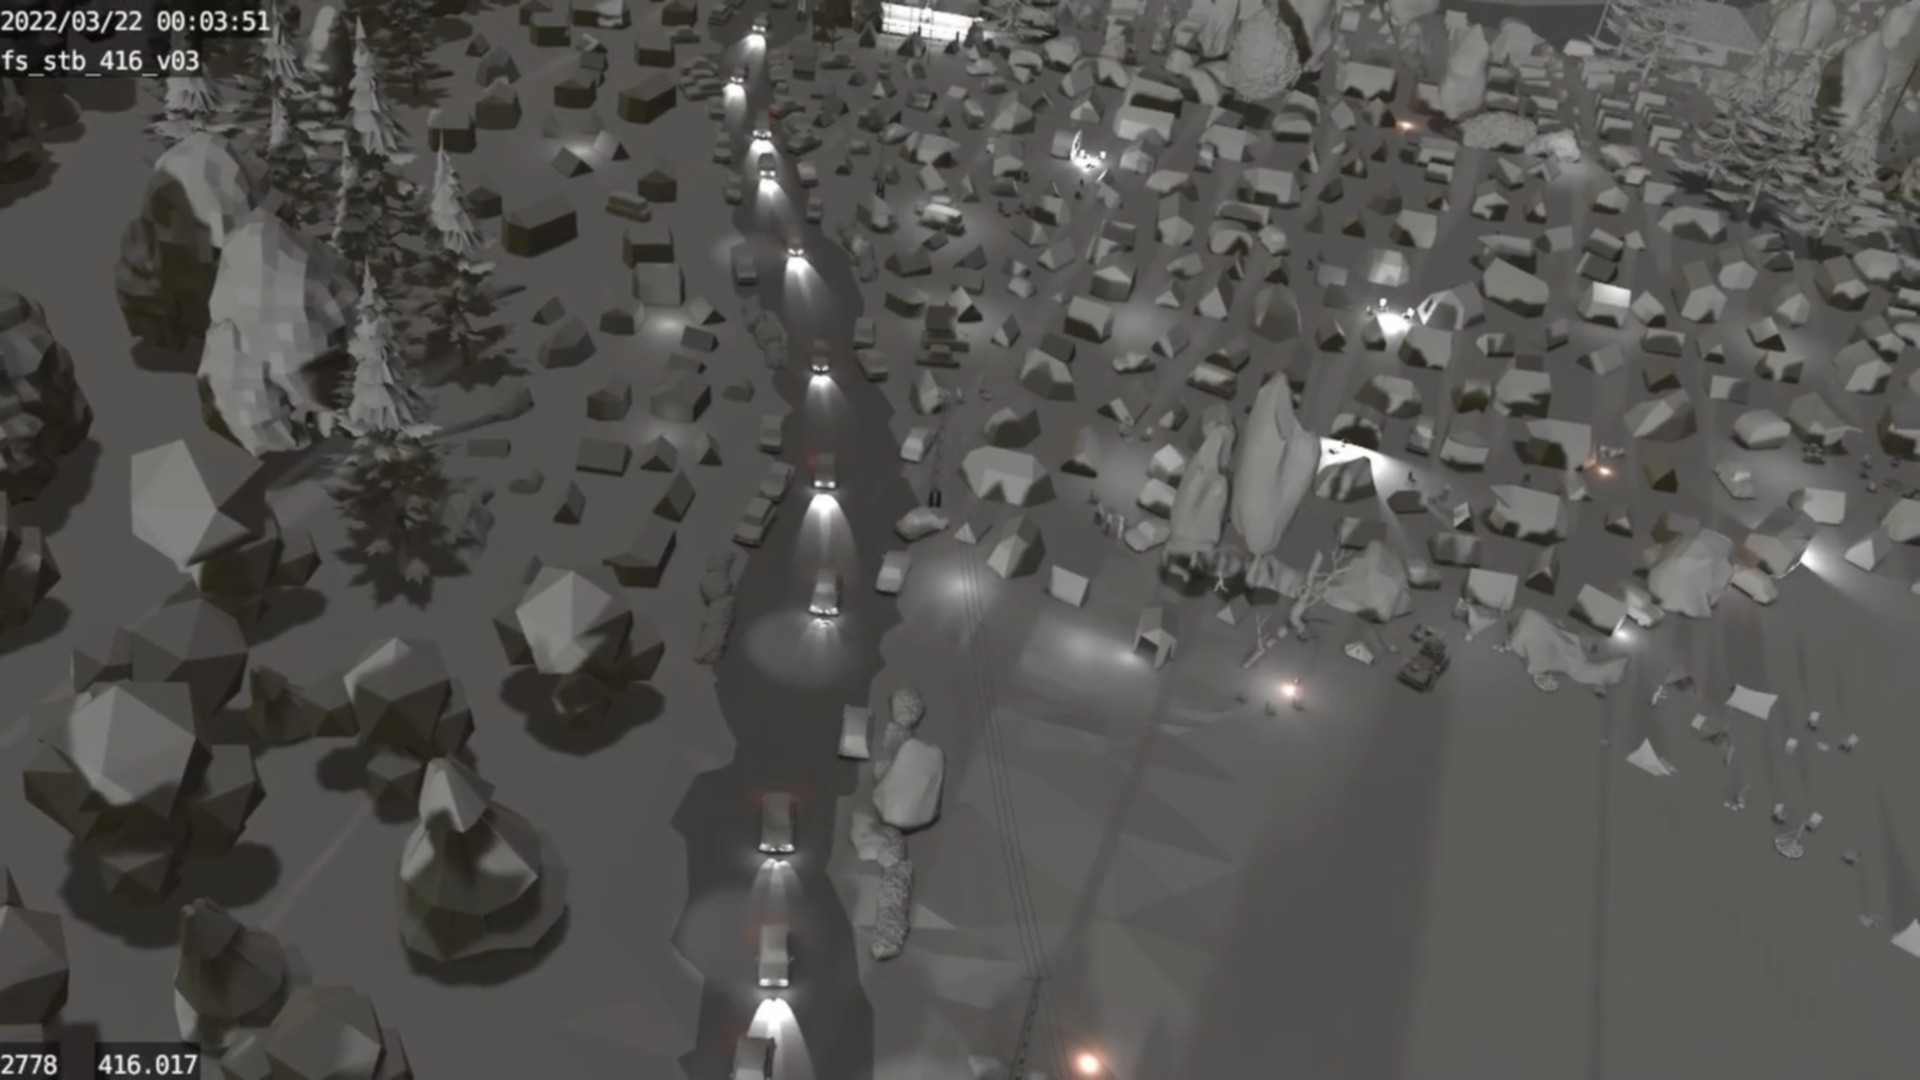
We were able to save every successful pose in a library and often even transfer it to other characters. A few lights simulate moods or times of day or help the composition with light and shadow. Crowds of people, which play a major role in a story set against the backdrop of the events of the peaceful revolution in 1989, can be realised in a dreamlike way through the magic of instances and particle systems. Continuity almost takes care of itself. Once an asset has been positioned, it remains in the same place in all subsequent settings. Complex sets, such as the entire St Nicholas Church full of people with its perspective-challenging pointed arch vaults? No problem.
I felt like a child in a sweet shop… So many new possibilities, so few limits. The tedious suddenly became easy. I had a lot of fun – even explaining our little trail through the Blender jungle to the new boarders. Since Fritzi & Sophie, I’ve been able to use this way of working in other German animated film productions. Let’s see… maybe this new storyboard production method will continue to develop in future 3D productions. I would be delighted!
Pipeline
Hi, my name is Elias Schwarze. As Technical Director, I was able to develop the pipeline and support the project in many technical aspects. I was also one of the operators during the performance capture. This project was a challenge in many ways. A TV series consisting of almost 180 minutes of 3D animation, the development of a new pipeline, performance capture, and the switch from 2D to 3D.
Fritzi & Sophie meant all this and much more. Switching tools and software was not enough, we also had to rethink and learn new ways of working. Automation was a much bigger issue for the pipeline than before, as was the development of better tools for our artists that were specifically tailored to production. Together with my colleagues Robert Lehmann and Michael Schieber, we developed a series of add-ons and plugins that we continually optimised and improved with growing insight and feedback directly from our artists. We wanted to leave as many dull and repetitive tasks as possible to the scripts so that our artists could concentrate even more on their actual creative work.
We also redesigned and modernised the backend for this production. The aim was not only to reduce unnecessary friction and costs, but also to become less dependent on third-party providers and at the same time to have more security and control over our own data. We had our own central server, which involved more administrative effort than rented cloud solutions, but also offered us more freedom and flexibility as we had full control over software and configuration. In future, we want to make our infrastructure even more flexible and efficient with the help of VPS (Virtual Private Servers).
The three cornerstones of the backend were running on our server: Mattermost, Kitsu and Perforce Helix Core. Mattermost is an open-source alternative to Slack, which greatly reduced our email-heavy conversations and enabled the quick, informal exchange of information within the team. Since we host Mattermost ourselves, we know at all times that all files exchanged always remain in our hands and on our server. Then came Kitsu, an open-source production tracker and an alternative to Autodesk Shotgrid and ftrack. Kitsu has developed enormously in recent years, from which we have also been able to benefit.
The third cornerstone was Helix Core, the version control system from Perforce. We needed a system that could manage, back up and version all our files. After all, we had to avoid losses in the event of errors, and no file could be edited by several artists at the same time. We found the solution in the games industry, which had already solved these problems many years ago. Since every version of every file is saved in Perforce, it was always ensured that there were never any major losses if mistakes were made. At the same time, it was essential to keep our production data accessible and up-to-date at three different production sites. We were also able to provide our freelancers and artists working from home with all the project data they needed at all times.
Performance Capture
The use of performance capture was also new for us. I supported the shoot technically as an operator. Thanks to the Xsens Link system we chose, we were very flexible in our choice of filming locations, as this system can also be used on the move. This proved to be helpful during the course of production, as we sometimes didn’t have enough space in our locations to show particularly long walkways. In these cases, we were able to simply go out and capture outside. With the help of a laptop or iPad, the technology could also be operated on the move.
For both our director and our actors, most of whom have a background in theatre, the work took some getting used to. But after the first shooting block, we had already developed a strong routine that allowed us to work through our tight shooting schedule with great efficiency. We moved more and more from shot-based work to planned sequences. On the one hand, this was an economic advantage, on the other hand, this way of working helped the actors as they were able to develop a better “flow” in planned sequences and were not constantly interrupted, as would have been the case with the shot-based workflow.
Although this meant that we had to adjust some scenes to the new length after the performance capture if the actor had played faster or slower than the animatic, it also meant that the actors were able to bring in more of their own ideas and also their own handwriting, which is actually more typical of live-action film. Overall, we went into this production with a lot of unknown variables. But now that we have successfully completed Fritzi & Sophie, we will continue to optimise and develop our pipeline so that we can realise further projects here in Central Germany more efficiently and with higher quality in the future.

Set Design
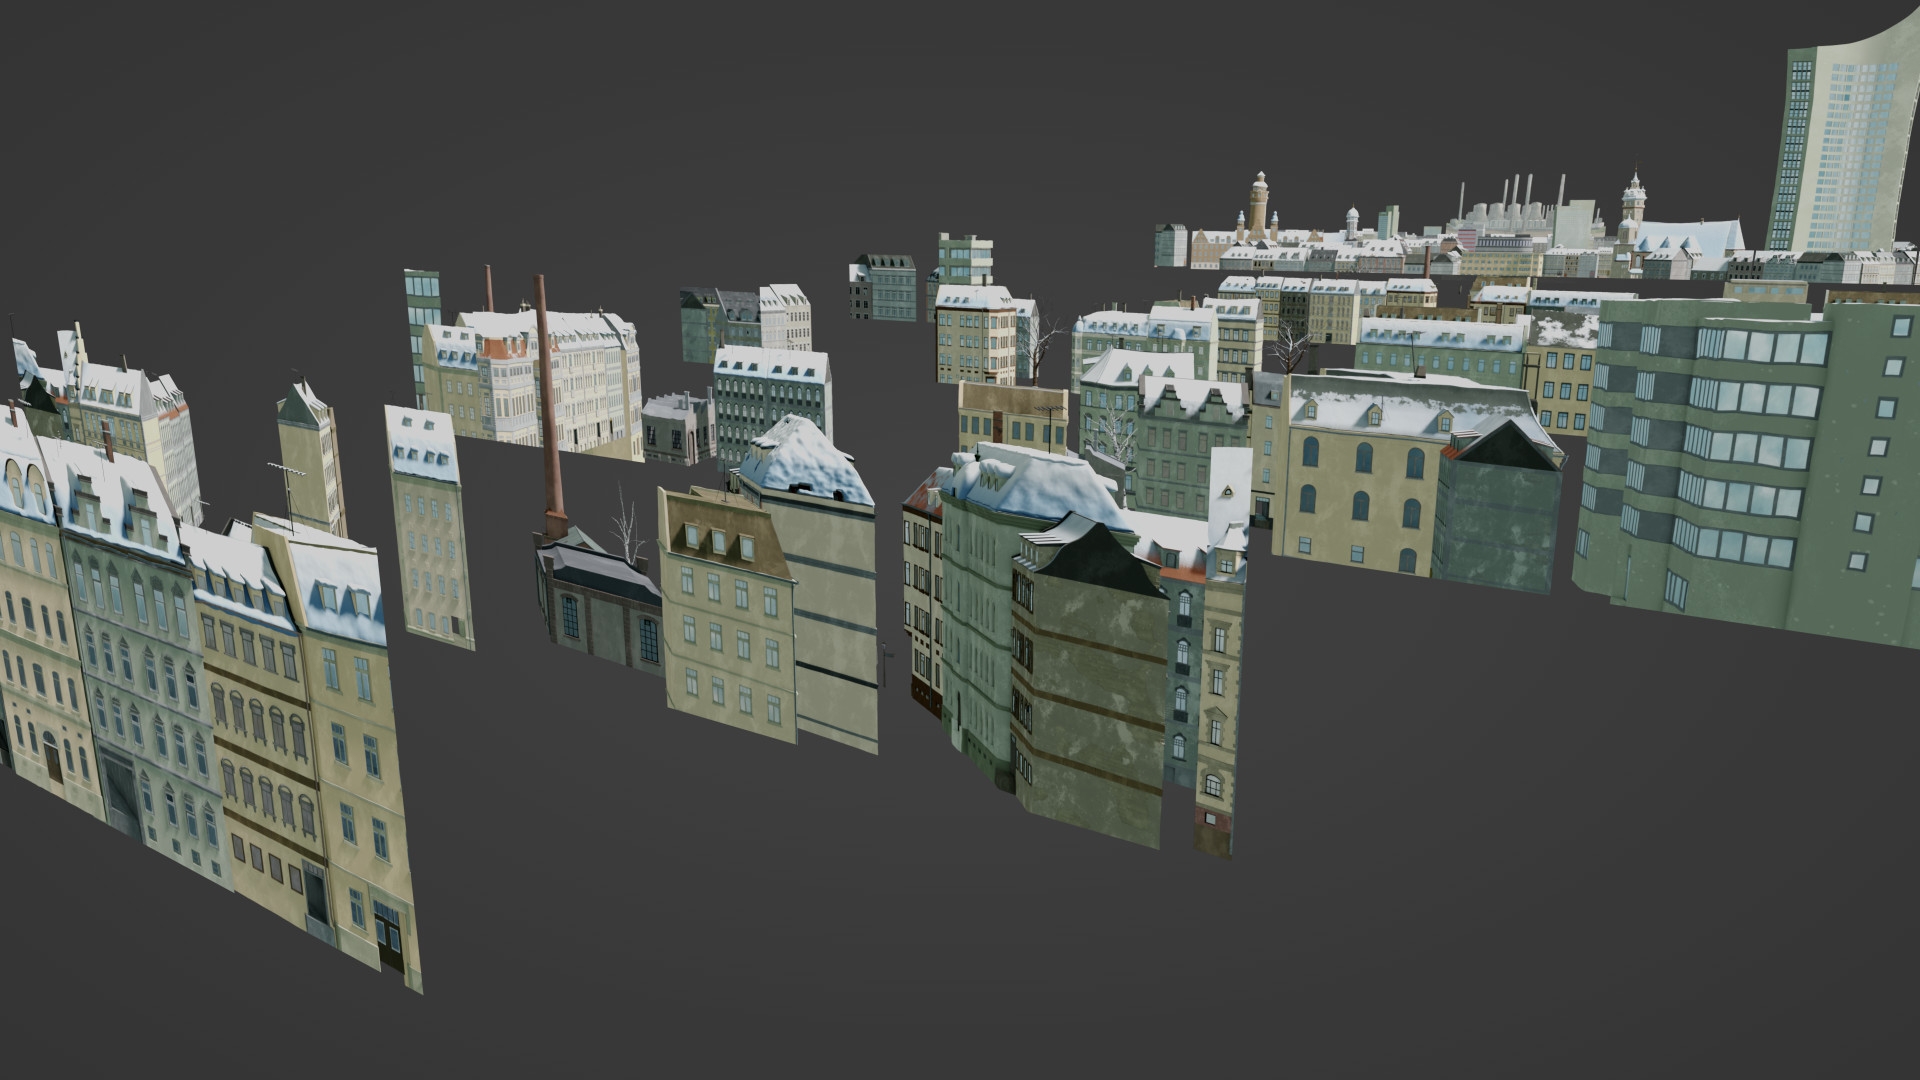
My name is Paul Siedler and I was responsible for the sets and lighting at Fritzi & Sophie as a supervisor. With over 70 different sets, the Fritzi & Sophie series includes a very wide range of environments that had to be created. These range from small indoor scenes such as flats and tents to large cities and landscapes, some of which are very different.
The two main categories into which we divided the sets are East and West Germany. These had to differ visually in order to show the scarcity in the East on the one hand and the abundance in the West on the other. The look of the East was largely determined by the cinema film Fritzi – Eine Wendewundergeschichte. However, due to the sheer number of sets compared to the cinema film, we had to choose a somewhat simpler form of representation in many places in order to keep to the production time frame. In contrast, the western sets, of which there were none in the cinema film, were new. The biggest contrast here was in the depiction of the cities, with large, sprawling buildings and crowded shops.
The biggest challenge was that we used the real-time renderer “EEVEE” for the entire production. Even though real-time rendering on its own is no longer an excessive problem in many areas these days, the combination with the outlines caused us quite a lot of difficulties. Especially with large sets such as cities and landscapes, we had to adapt workflows several times so that they could still be rendered with outlines. In the end, we treated each asset like a computer game and built it as low-poly as possible, as the performance of the outlines depends mainly on the amount of polygons they are applied to.

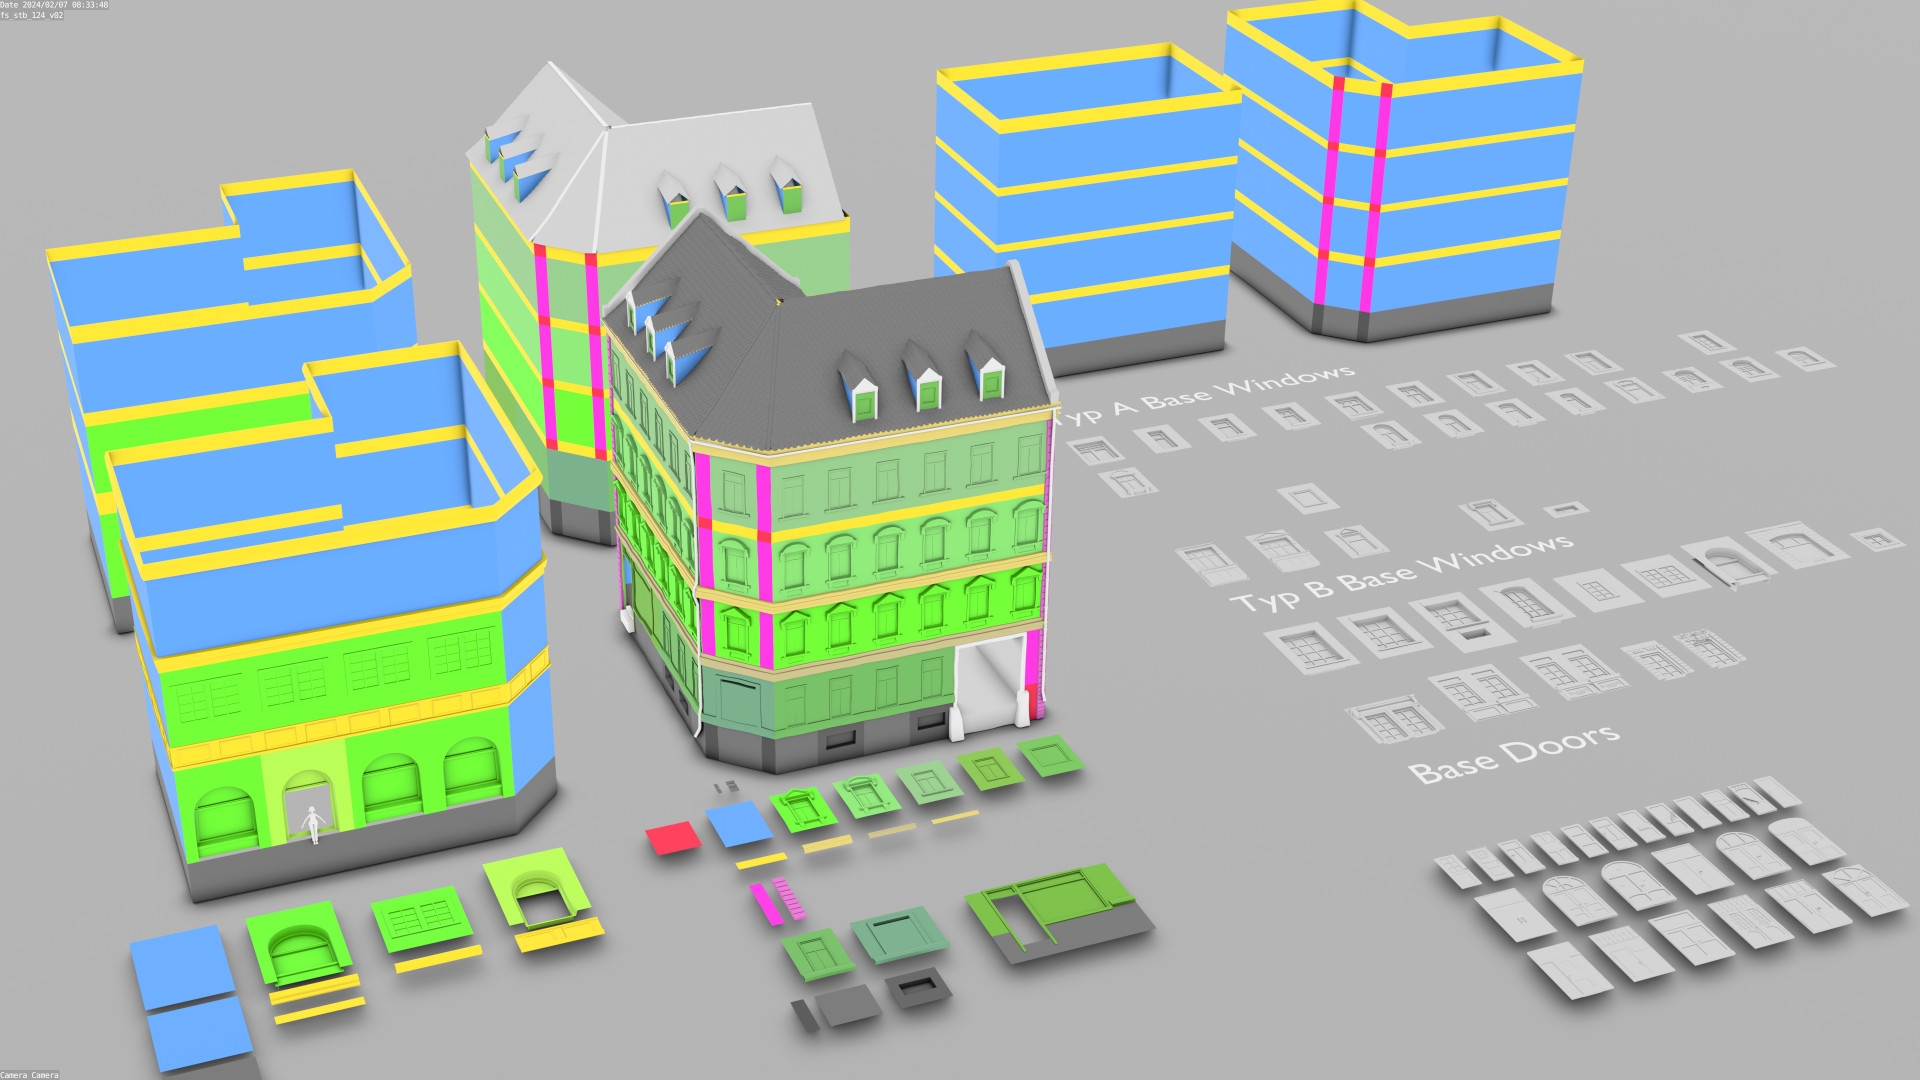
The trees made a particularly large number of changes during development. It quickly became apparent that large landscape scenes with lots of trees and outlines were impossible to render because Blender simply crashed. The solution for large quantities of trees was an add-on called “Instant Impostors”, which was able to project our trees onto a simple geometry in three dimensions. For the buildings, we developed a simple modular system that uses the Tissue tool to apply complex building parts to a simple basic framework. This framework could be customised as required, allowing variations for buildings to be created quickly.
In terms of lighting, we also had a very wide range. This meant that in addition to the large number of different sets, there were also different lighting situations in which a set could be located, from sunrise, day, to sunset and night. For the right performance boost when rendering, we also used little tricks from time to time, for example by rendering parts of a city as images and distributing them over several simple surfaces in the background.
Layout
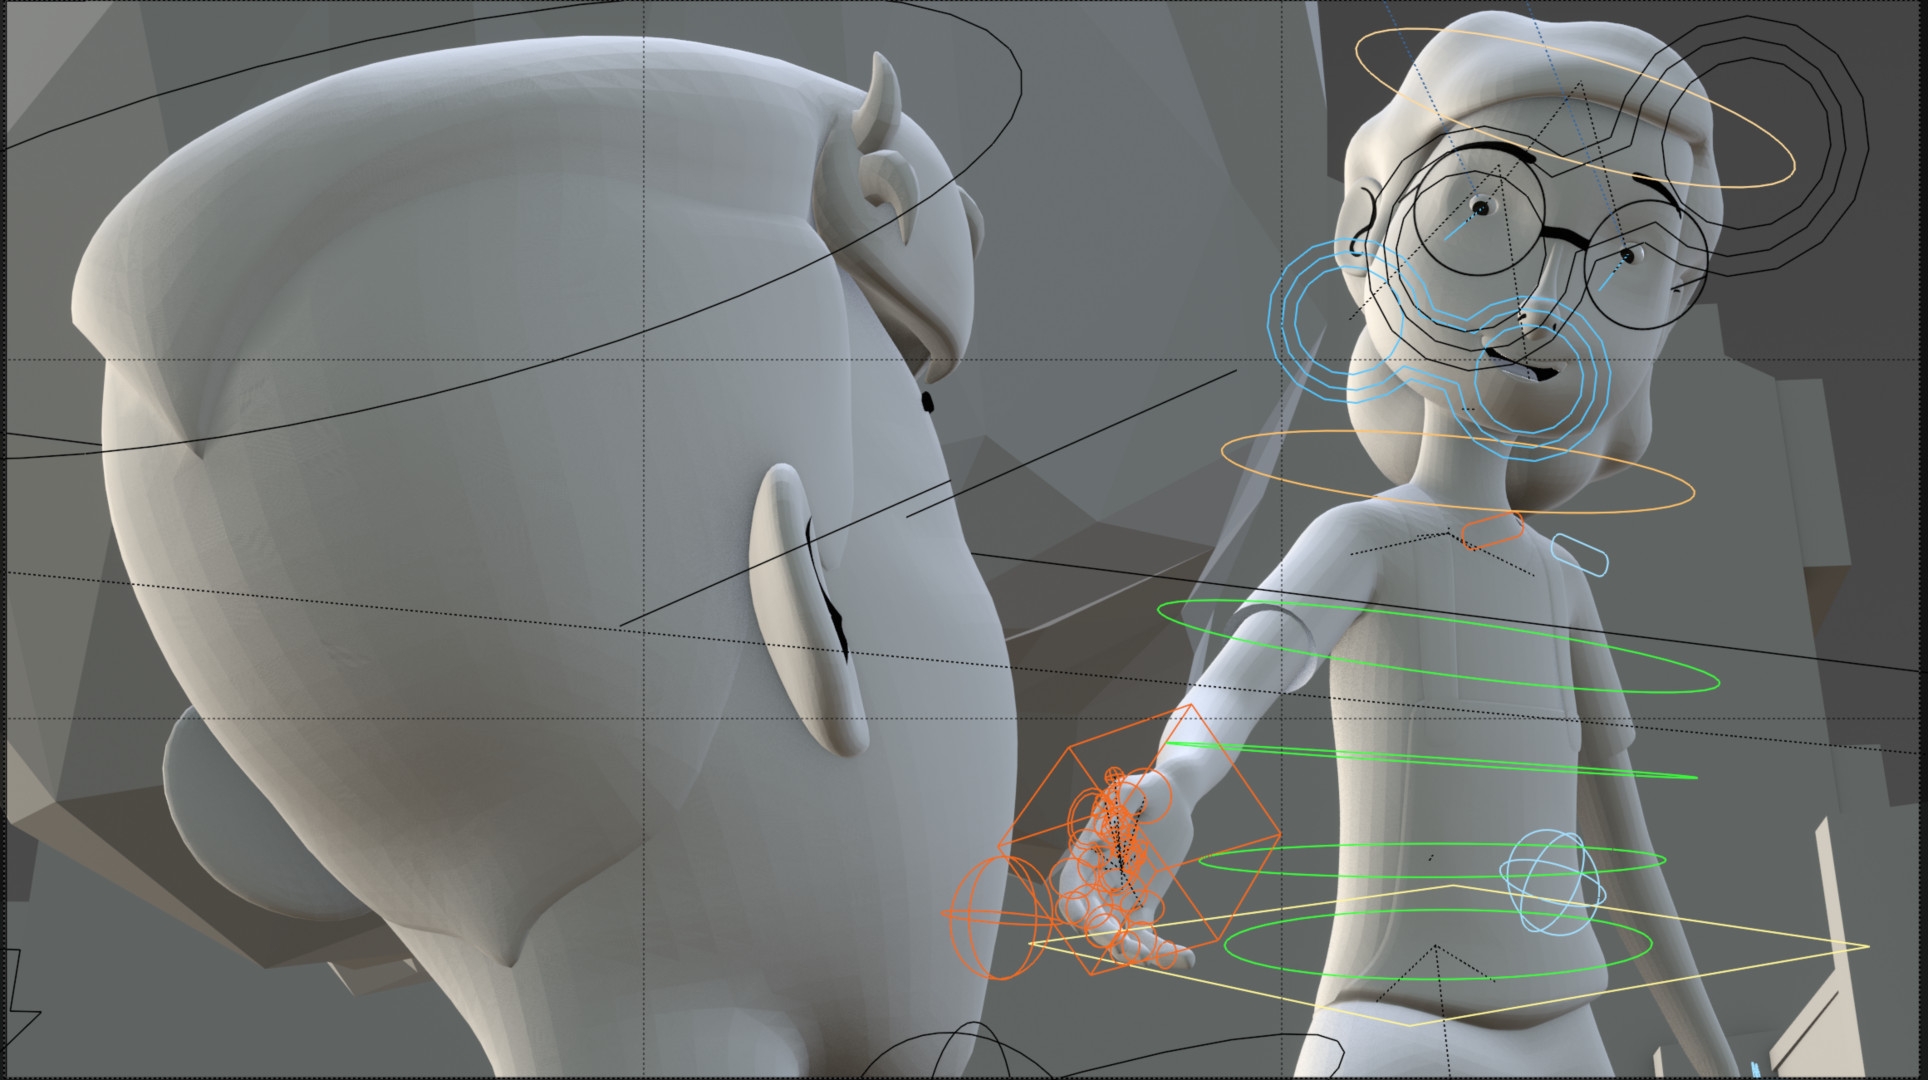
My name is Gideon Volle and I was layout supervisor at Fritzi & Sophie. Welcome to the wonderful world of layout! This is where the artistic specifications of the 3D storyboard and the digital assets are used to create the basis for the animation. In our case, we focussed particularly on the use of mocap data and the transformation of the 3D characters. A crucial step in the layout was the continuation of the 3D storyboard scenes already created in Blender.
The placeholders for sets and props were replaced by the final assets, and even the characters were given their final rigs. But “final” is relative, especially in the world of animation where everything is constantly in motion. Our assets were constantly updated during the layout process, which required regular updates via our server tool “Perforce”. This occasionally led to surprising results – from deformed characters to altered dimensions of the environment. Close co-operation with other departments helped us to overcome these challenges. In addition, we imported thousands of mocap data capturing every step and gesture of our characters. This data had to be carefully transferred to our characters’ rigs, which was largely automated thanks to scripts. Choosing the best take was an art in itself, and although the director had already made preliminary decisions, we often had to combine different shots to achieve the desired action.
The mocap data served as the basis for the movements of our characters in the layout. Even though adjustments were still needed in the animation, they provided a solid starting point. The original mocap data was then packaged into an NLA layer where we went through it, filtered out the best take and adjusted it to match the timing of the storyboard. This process was crucial to achieve the right dynamics and expressiveness in the scenes. The sequences were timed according to the storyboard, with particularly complex scenes with many characters and long walkways presenting a real challenge. The camera positions were defined and animated in accordance with the storyboard and in consultation with the director in order to achieve the desired dramaturgy. At the end of the layout process, a fairly detailed version of the sequence was created that contained all the elements – characters, movements and camera angles. From here, the animation could take its course and the magic of the animated film could unfold. The layout may seem like a puzzle where every piece has to be carefully placed, but in the end it becomes the basis for an animated masterpiece.
Of course, surprises are not uncommon in the production process. A Fritzi with 20-metre legs can make you smile, but ultimately it is this variety of challenges and improvisations that make every project unique. We are inspired by them, learn from our mistakes and grow together with our characters and stories.
Motion capture
My name is Patrick Knott. Full-time generalist, whether 3D, compositing or IT. At Fritzi & Sophie, I was responsible for many areas from start to finish: development of the animation & cleanup pipeline, prop modelling, rigging of props & vehicles, further development of the character rigs and compositing.
At the beginning of the production, it quickly became clear that in order to stay within budget and realise the animation output in the shortest possible time frame, we decided to use the motion capture process. All the studios involved already had a lot of experience in all forms of animation, be it 2D pose-to-pose, lay animation or 3D animation. But motion capture was completely new territory for most of them. The decision quickly gave rise to a host of new questions: Which motion capture system should be considered? How good and clean is motion capture anyway? What can be captured? Complex body movements, steps on a solid surface, interaction between several actors, the finest finger movements, even facial expressions and mouth movements?
Where are the limits? Can the real-captured movements be combined with our desired 2D look at all or does this mean that any cartoon charm that an animator would normally conjure up in the movements is lost? We did a lot of tests and tried out various systems. Rokoko, OptiTrack, Captury, X-Sense. The initial results were sobering. The movements often turned out to be too imprecise and unclean. Shaking characters, legs hovering above the ground, drifting, penetration and clipping during actions between several characters or in interaction with props.
Whether multi-camera-based, using depth sensors, markerless or with tracking dots or even tracking devices with in-built accelerometers, gyroscope sensors, etc. in various price ranges. Sometimes there were enormous problems with drift, sometimes with the precision of finger movements. It quickly became clear that there is no such thing as the “perfect system”. Simply “capture” and the animation is finished, unfortunately it wasn’t that simple. Even if you capture with the most elaborate setup under ideal shooting conditions. Unfortunately, a lot of the problems described above can only be fixed afterwards: CleanUp is the magic word here. However, this doesn’t have much to do with magic, but with a lot of painstaking detail work.
Animation
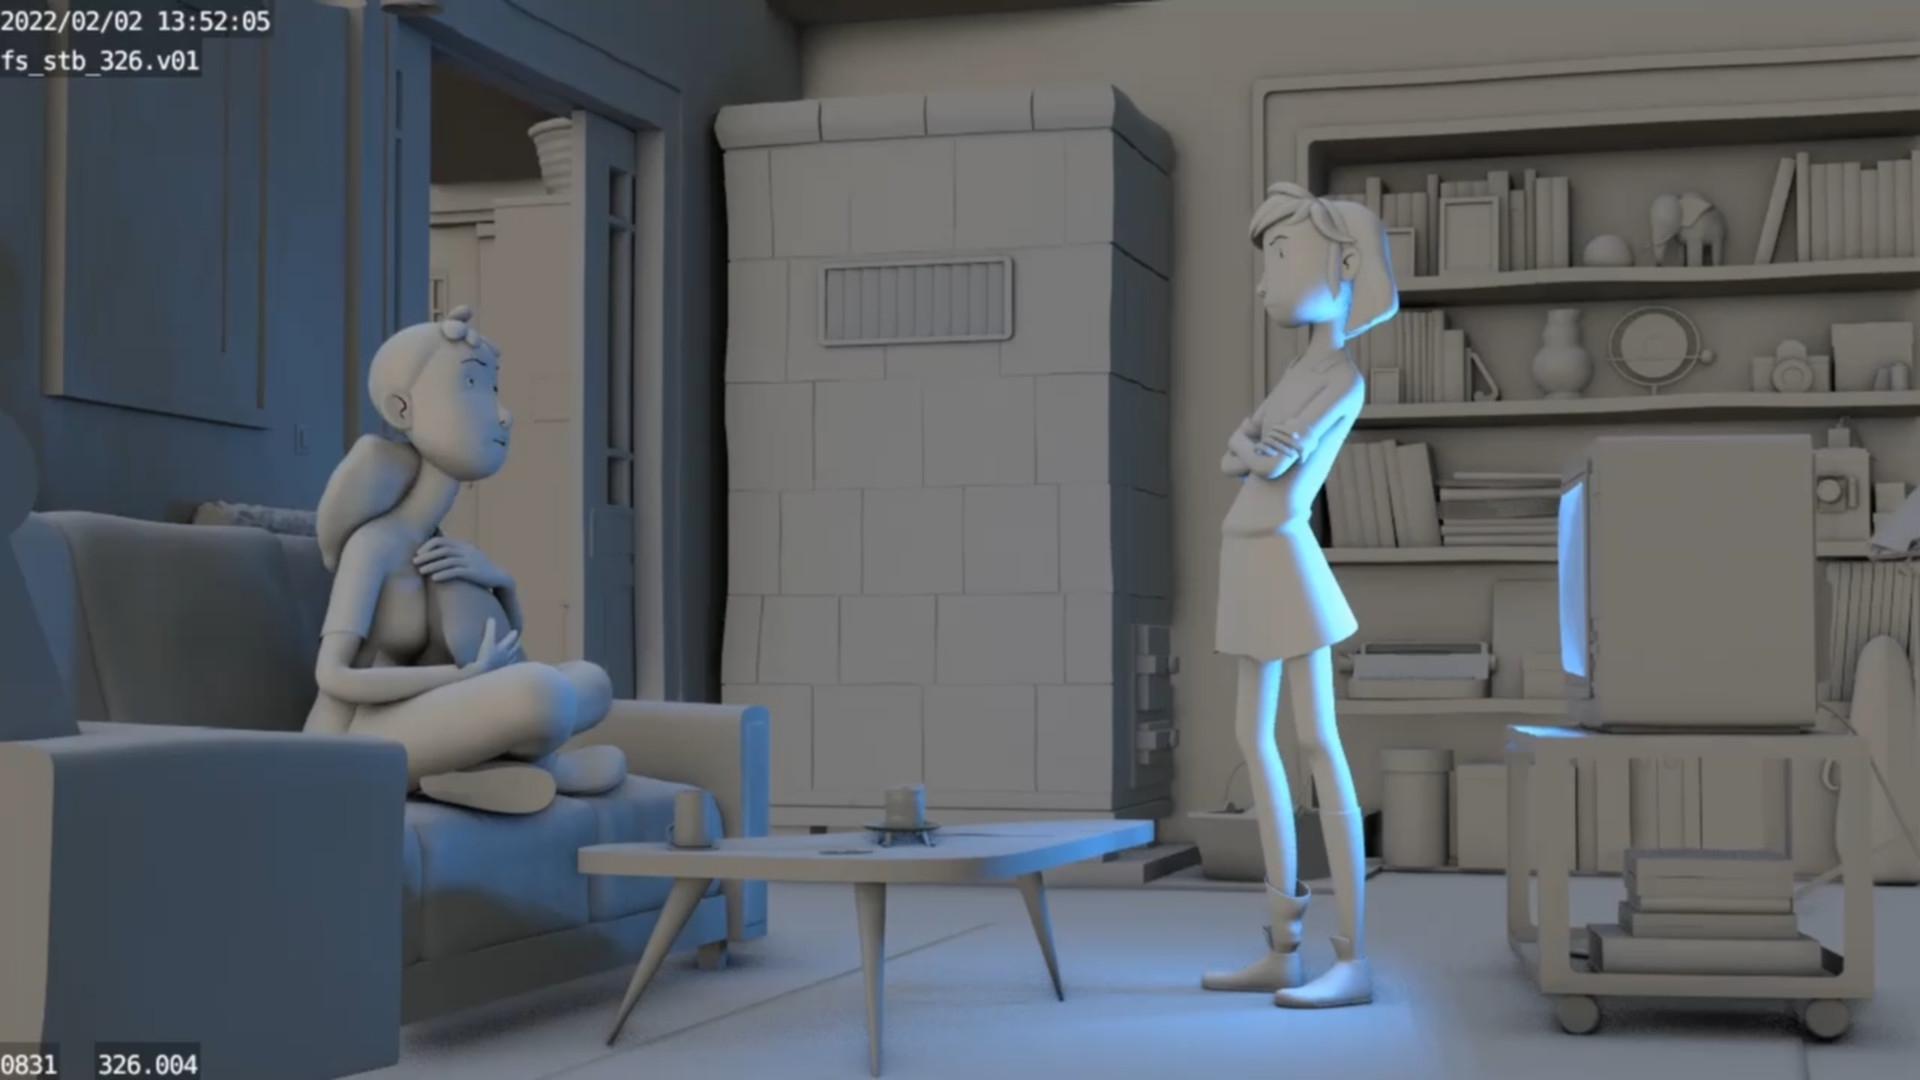
My name is Florian Genal and I was the animation supervisor for Fritzi & Sophie, among other things. After the layout department had worked its way through the large amount of mocap data for the actors, put everything in the right position and timed it, it was the animation department’s turn. The animations were divided into different areas and then edited and animated in sequence. First came the body animations, most of which were corrections to the mo-cap data.
As the characters have different proportions to our human actors due to the “Fritzification”, i.e. the design of our production series, there were always intersections, e.g. of arms and hands. But the animators also had to help out with contacts between the characters, such as hugs or interactions with objects. The motion capture caused problems, especially with smooth movements. To compensate for this, however, we got very nice, subtle movements that would not normally be animated in this way. For example, a small head movement with a mischievous smile. Our actors delivered a great performance.
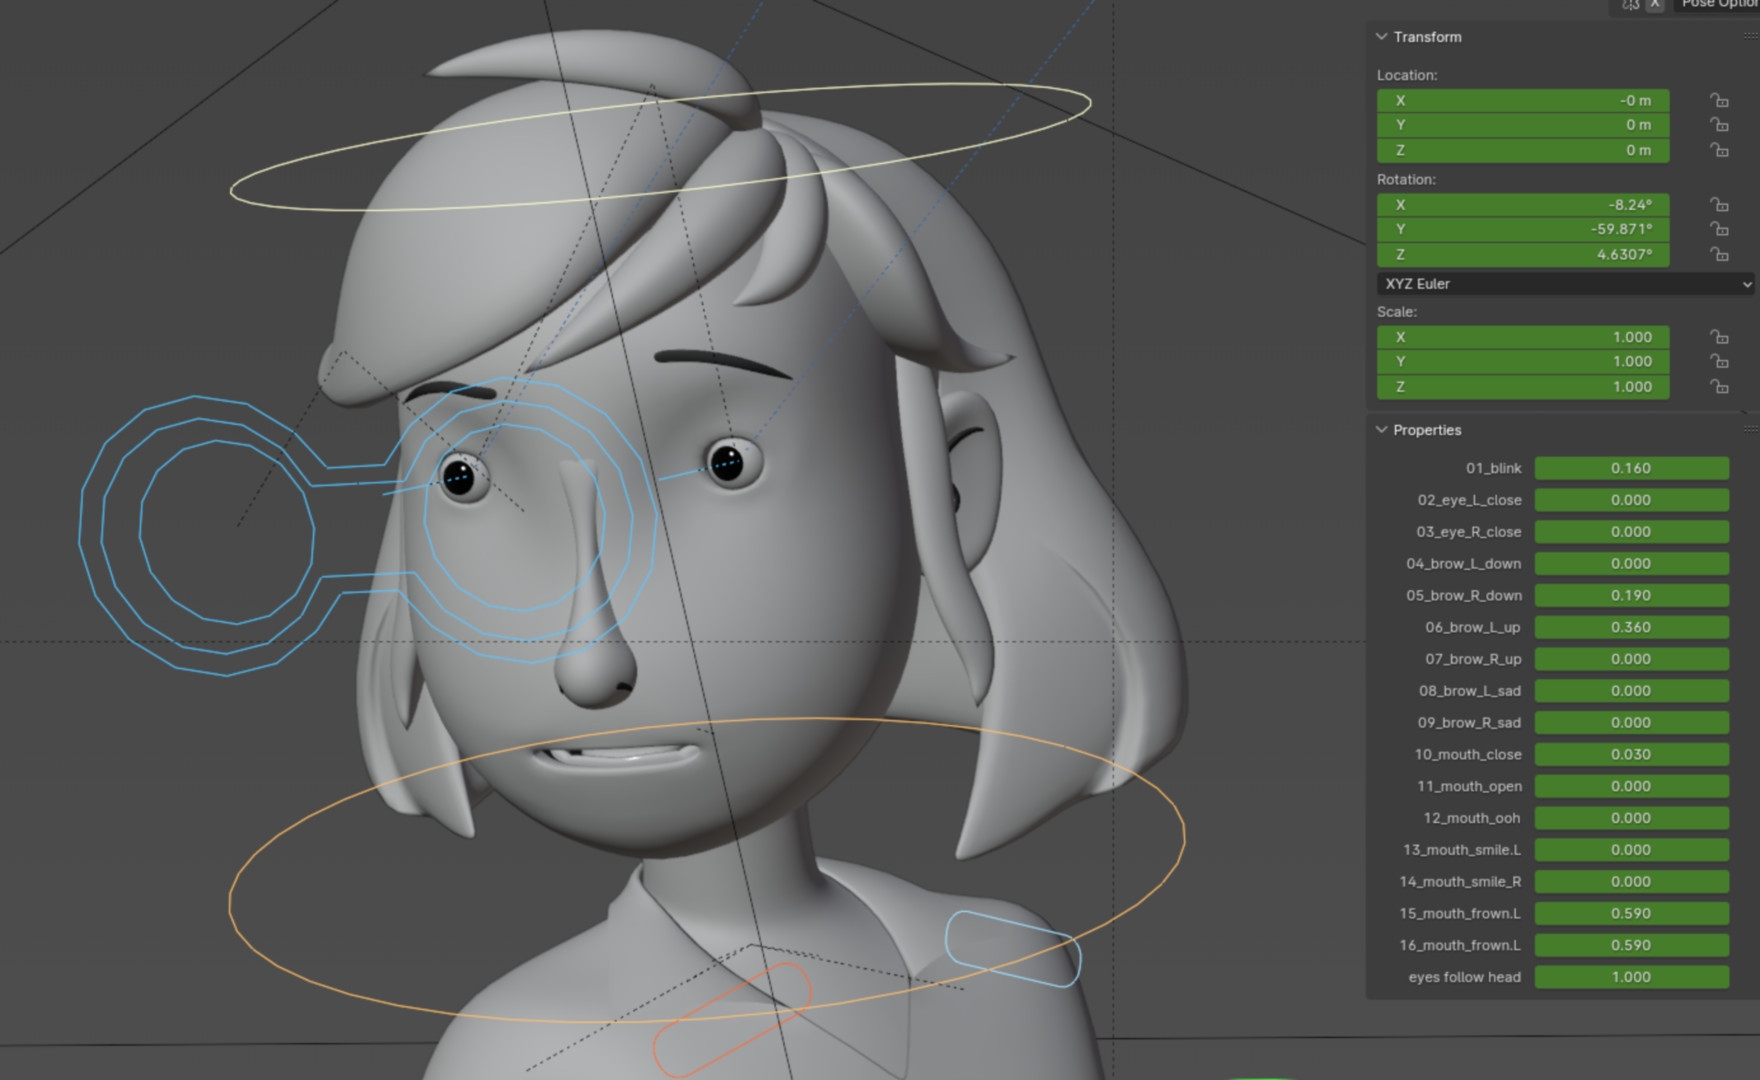
We used the mo-cap data exclusively for the body animations, except for the fingers. After many attempts and a lot of time invested, we decided against the mo-cap fingers as the correction effort was too great. A hand simply has too many bones. The then new Asset Browser in Blender was just what we needed. It had replaced the previous Poselibrary, came with a few additional extras and was a bit of a game changer. We created hand poses, which then formed the basis for the finger animations. We did the same with the facial animations and lipsyncs. We created pose libraries for all the main and supporting characters.
It was very helpful that we were able to use the video recordings from the mo-cap shoot as references for the facial animations. One of the main characters is a dog called Sputnik. We animated Sputnik and all the other animals in Fritzi & Sophie by hand. In the final step, we added additional animations, such as vehicles, but also additional characters to make the backgrounds more vivid.
Body CleanUp in Blender with the help of the NLA
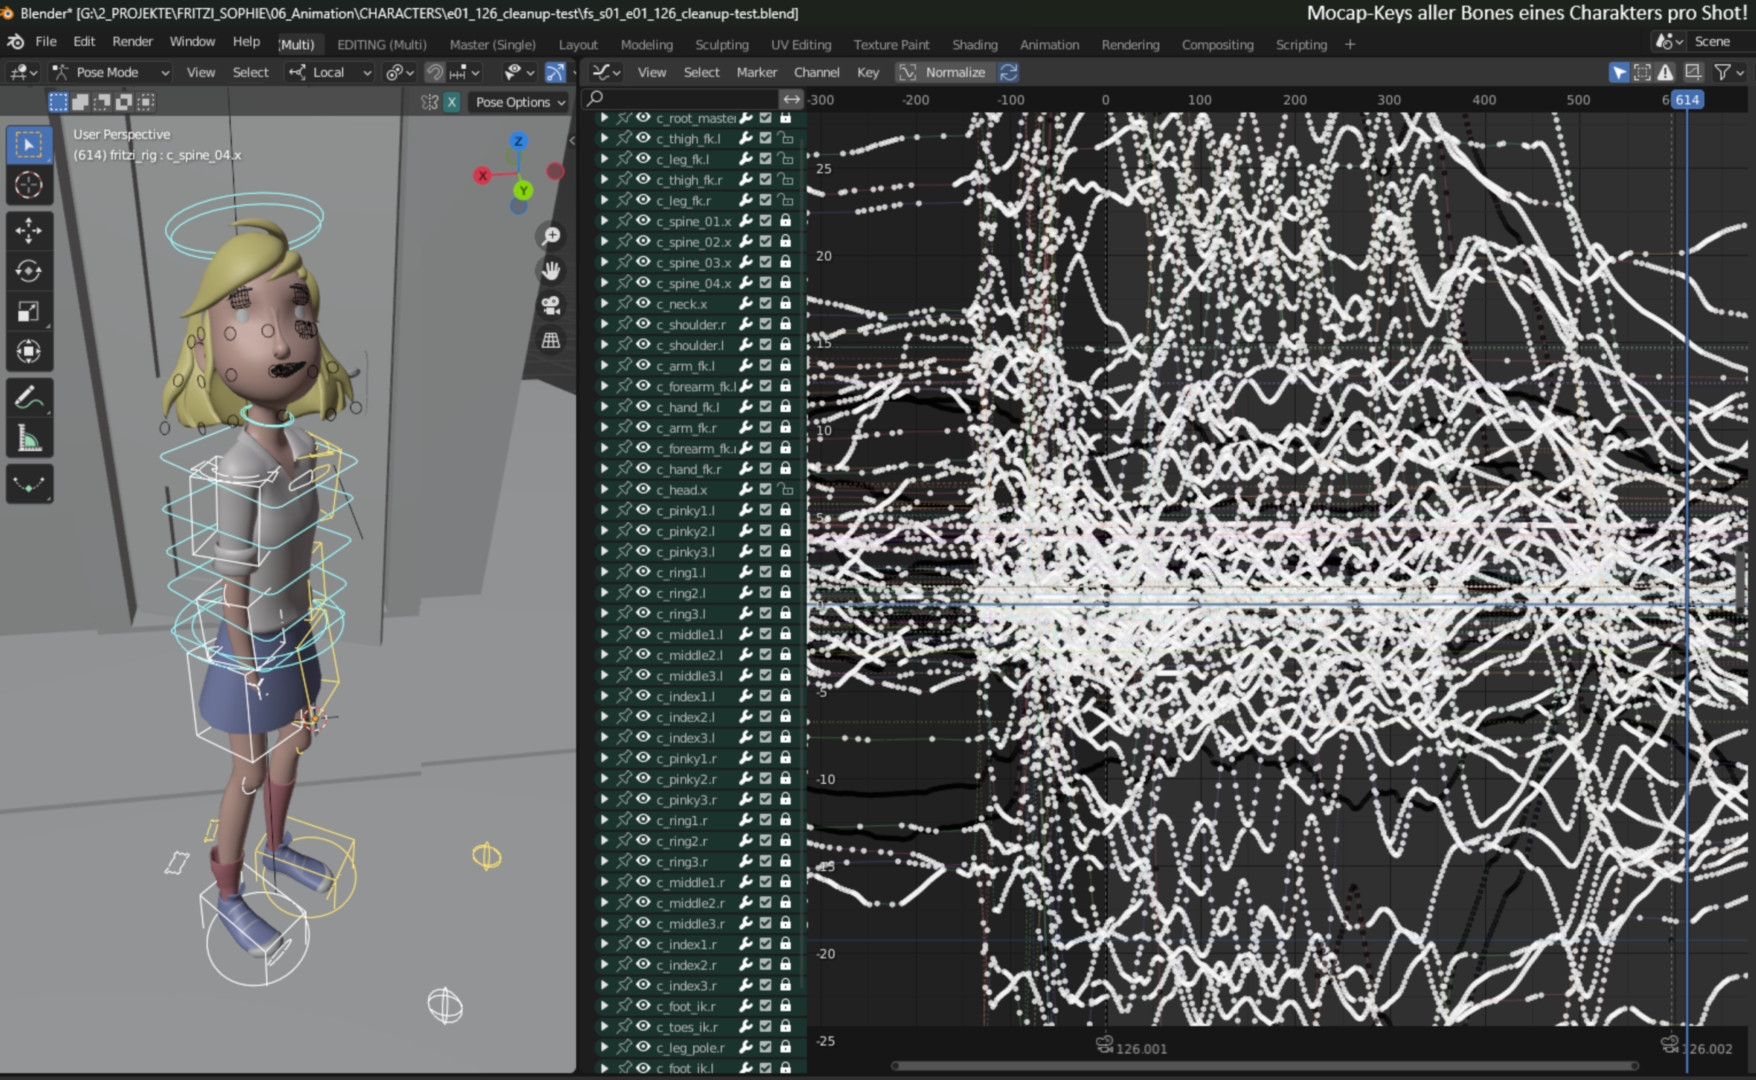
The question quickly arose as to how the CleanUp, i.e. fixing and improving the motion capture data, could be technically implemented and how we could make the process as simple and efficient as possible for our CleanUp animators. We came up with the idea of placing a kind of “correction layer” over the mo-cap data in order to be able to make corrective movements here. For example, lowering an arm slightly at a certain point or rotating the legs slightly higher at a certain point if, for example, the feet clip through the floor.
The obvious solution would be to make such corrections directly in the Mo-Cap data. However, this usually turns out to be far too time-consuming, as keys are created in the mo-cap data for every bone, every character rig on every single frame for every translation and rotation axis! Although it is possible to use tools available in Blender such as “Proportional Editing”, it was clear that working in the original mo-cap data had to be reduced to the absolute minimum for an efficient cleanup. For example, the smoothing of shaky and jerky movements in the mo-cap curves. Also the phased removal of mo-cap keys, e.g. to incorporate stagnation phases between movements. Or temporal shortening or lengthening of movements via graph scaling.
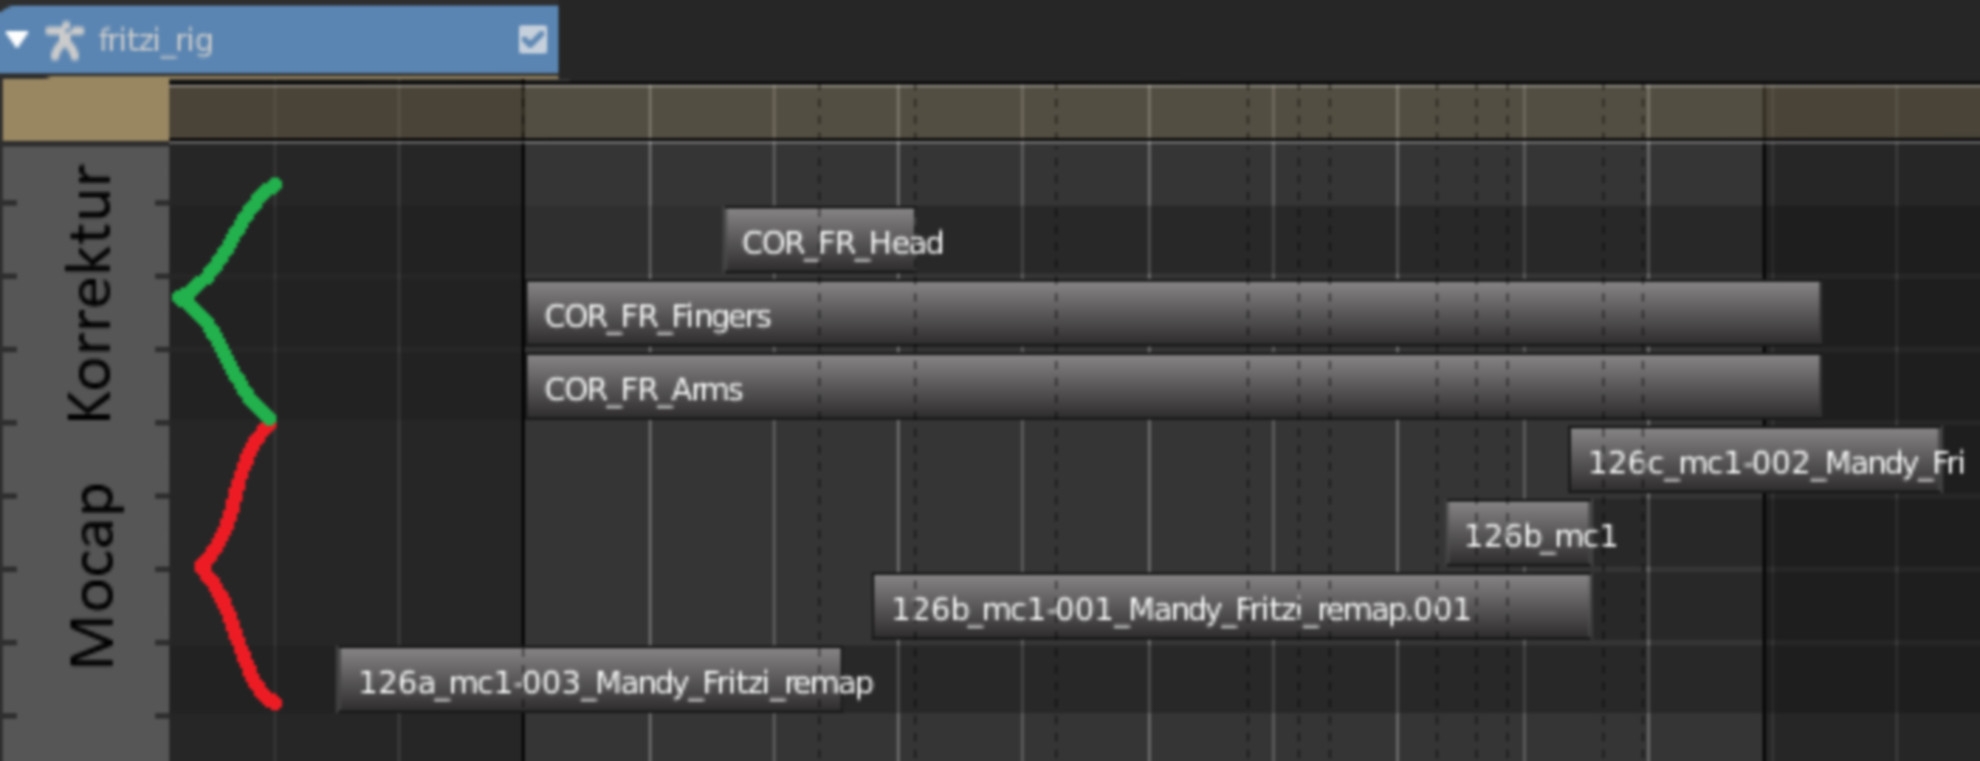
For all other corrections, we utilised Blender’s built-in Nonlinear Animation (NLA) system. This makes it possible to create animations on several levels. Just as you can layer audio tracks in a DAW (audio editing programme), you can layer several tracks with animation data (keys) in Blender and combine them with each other.
The Blender file from the layout was sent to the cleanup team. In a first step, we smoothed the movements directly in the Mo-Cap data and, if necessary, made temporal corrections. We then used the mo-cap data to create an NLA layer in which we made all our correction movements. Everything was possible here, from counter-animating incorrect mo-cap movements to incorporating completely new movements that had been lost or even forgotten in the mo-cap. This involved a lot of detailed work and corrections, sometimes frame by frame. However, it also contained the same building blocks and work that occur in every classic animation. It was therefore crucial for us that our cleanup team consisted exclusively of members with animation experience.
Mo-Cap cleanup rig instead of the NLA
Unfortunately, it quickly became apparent that the NLA system also had some limitations and problems. This gave us an ingenious idea: what if you didn’t have to separate the animation using a layer system, but could simply use additional bones in the rig that were specially designed for the cleanup? You would simply duplicate each bone and have the option of applying the cleanup to it. This way, both information, mo-cap and correction, would be available at all times. In addition, you can always see the effect of both levels at the same time: a “mo-cap cleanup rig”! In the months that followed, this theory was further developed. One major problem, for example, was how to couple two bones with different values (mo-cap and correction) so that both bones always “represented” both values and did not simply “drift apart” and take over the local axis of each other without causing an endless-loop disaster. Using a specially devised technique, it was possible to transfer information from bone A to bone B (and vice versa) without getting it back to bone A again. Such a value feedback could be prevented by a special use of “drivers”, which is why I also liked to call this technique the “driver diode”. Ultimately a kind of sleight of hand. However, at the time, this method was an important breakthrough for the realisation of our cleanup rig.
Expansion of the mo-cap cleanup rig
Over time, we were able to develop a few more techniques and Patrick Knott expanded our rig. These include the option of displaying only the raw Mo-Cap data at any time in addition to the cleaned data, so that a before-and-after comparison can be made at any time.
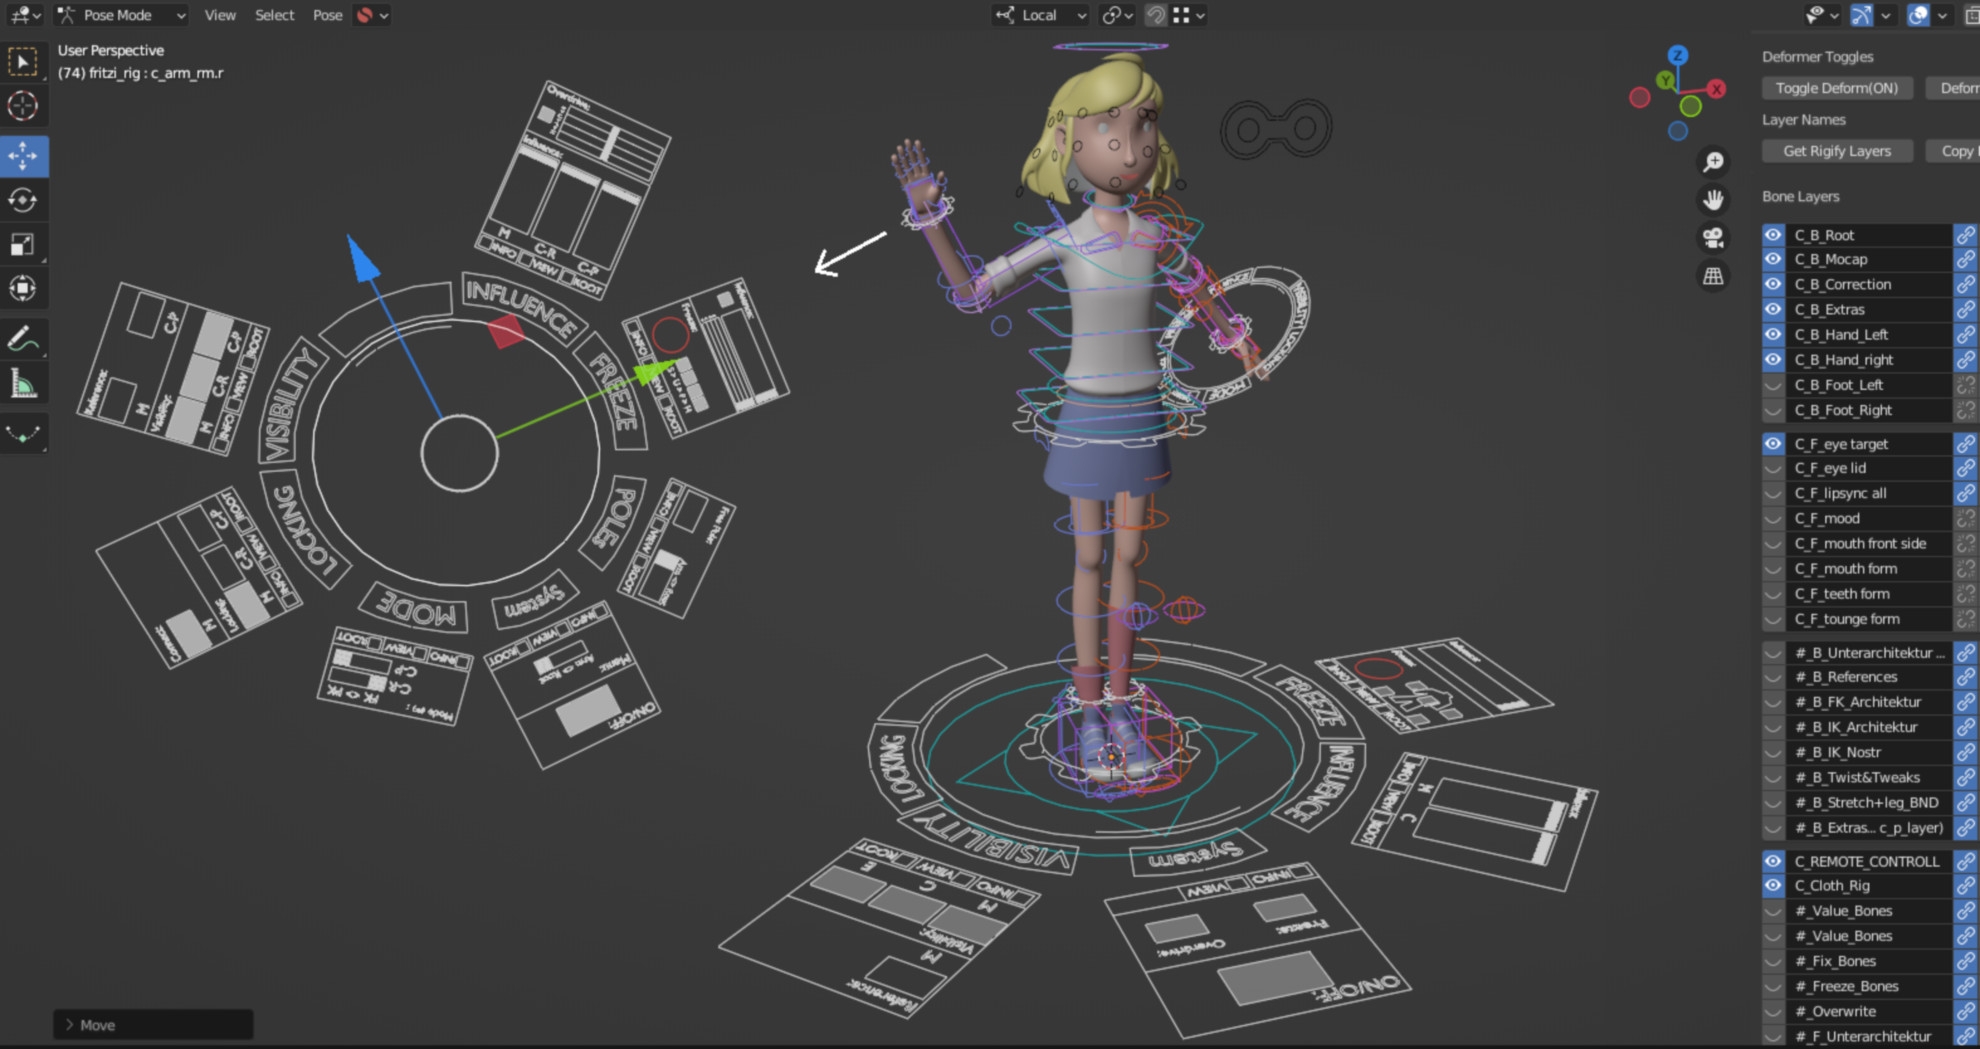
A further control level was also established within the arms, on which the correction could be made using tracking poles (similar to an IK rig control), as mo-cap data is unfortunately always only FK. In fact, attempts were even made to transfer the Mo-Cap data to the IK arms or even to completely merge IK and FK kinematics within the rig architecture, but in the end this was more like reaching for the stars.
Another interesting function was to be able to pause or freeze mo-cap movements for individual bones as well as the entire rig and to be able to fade back into the mo-cap animation at a desired point in time. Or to be able to amplify or attenuate the mo-cap data. By the end of the development period, our rigs had many new functions that were specially tailored to the needs of motion capture editing. To keep these functions as tangible and organised as possible for the animator, I built a custom UI consisting of bones into the rig. This actually turned out to be particularly useful and innovative. In fact, this was born purely out of necessity, as all our programmers were busy elsewhere at the time. For me as a rigger, this was the easiest way to accommodate the functionalities in a timely manner. Just try it out and do it. That’s what this production taught me.
Crowd simulation
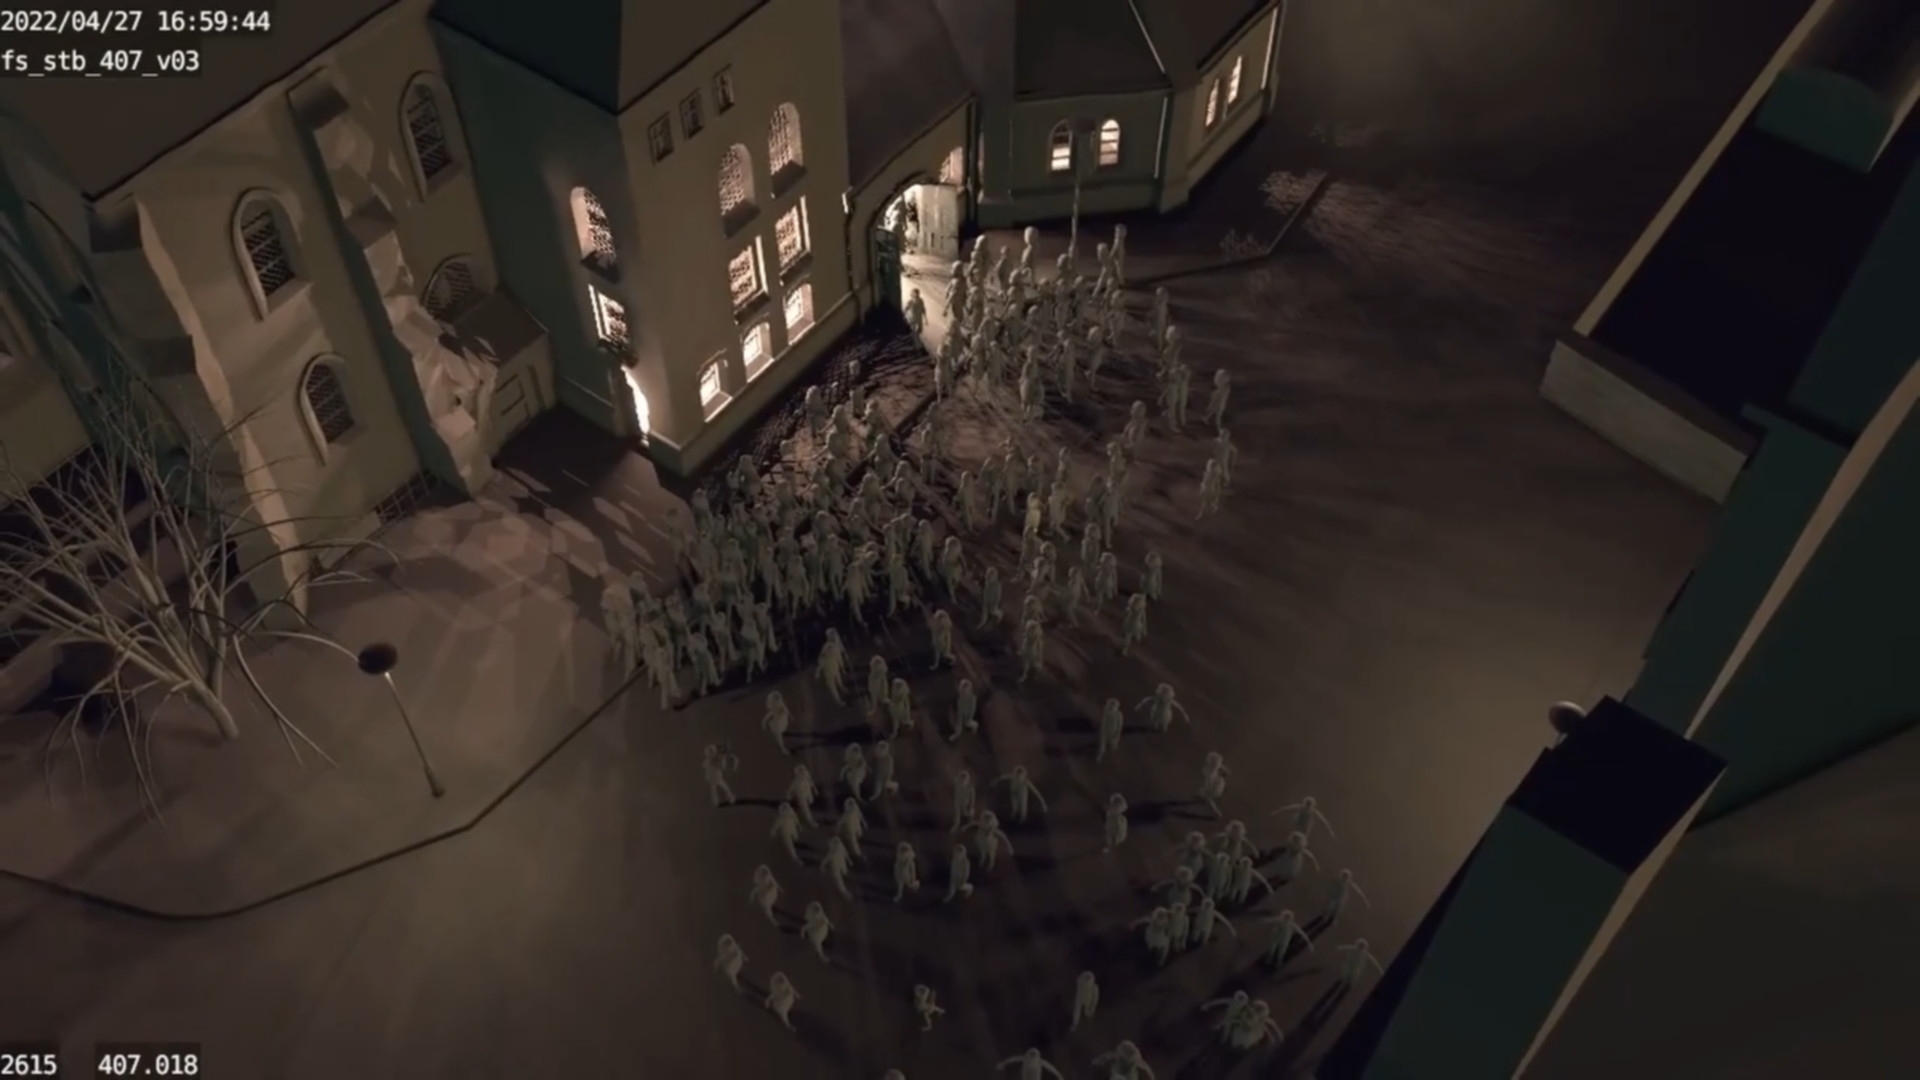
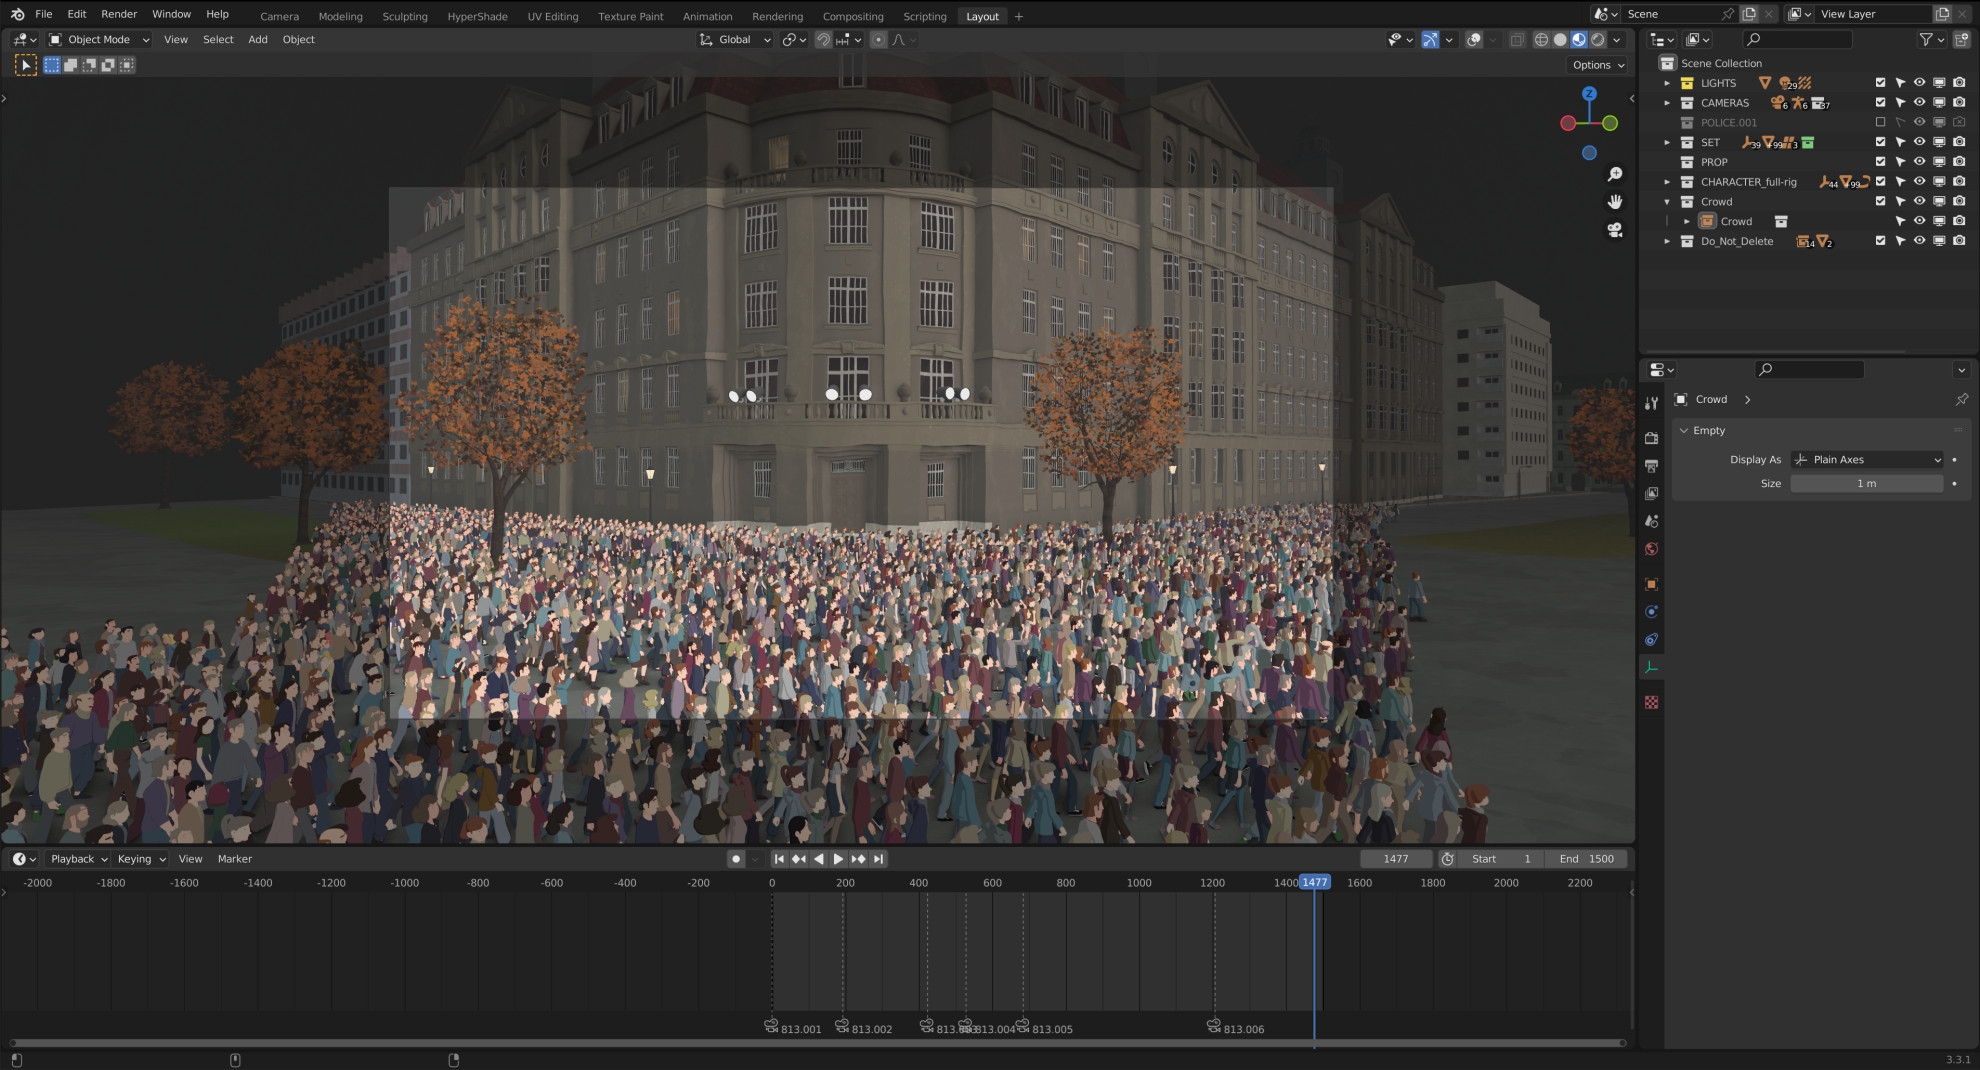
We are Stefan Kreller and Martin Schmidt from Raumkapsel in Kassel and were responsible for realising the crowd simulations for Fritzi & Sophie. This mainly involved the Monday demonstrations, which take place towards the end of the series. This included many shots in which crowd characters can be seen directly behind the main characters. Therefore, great importance was attached to the possibility of manual adjustments to animations and the positions of individual models in order to be able to respond to specific directorial requirements in individual shots. For this reason, we developed a procedural crowd pipeline in Blender in which all time-consuming steps could be automated using Python scripts.
Workflow
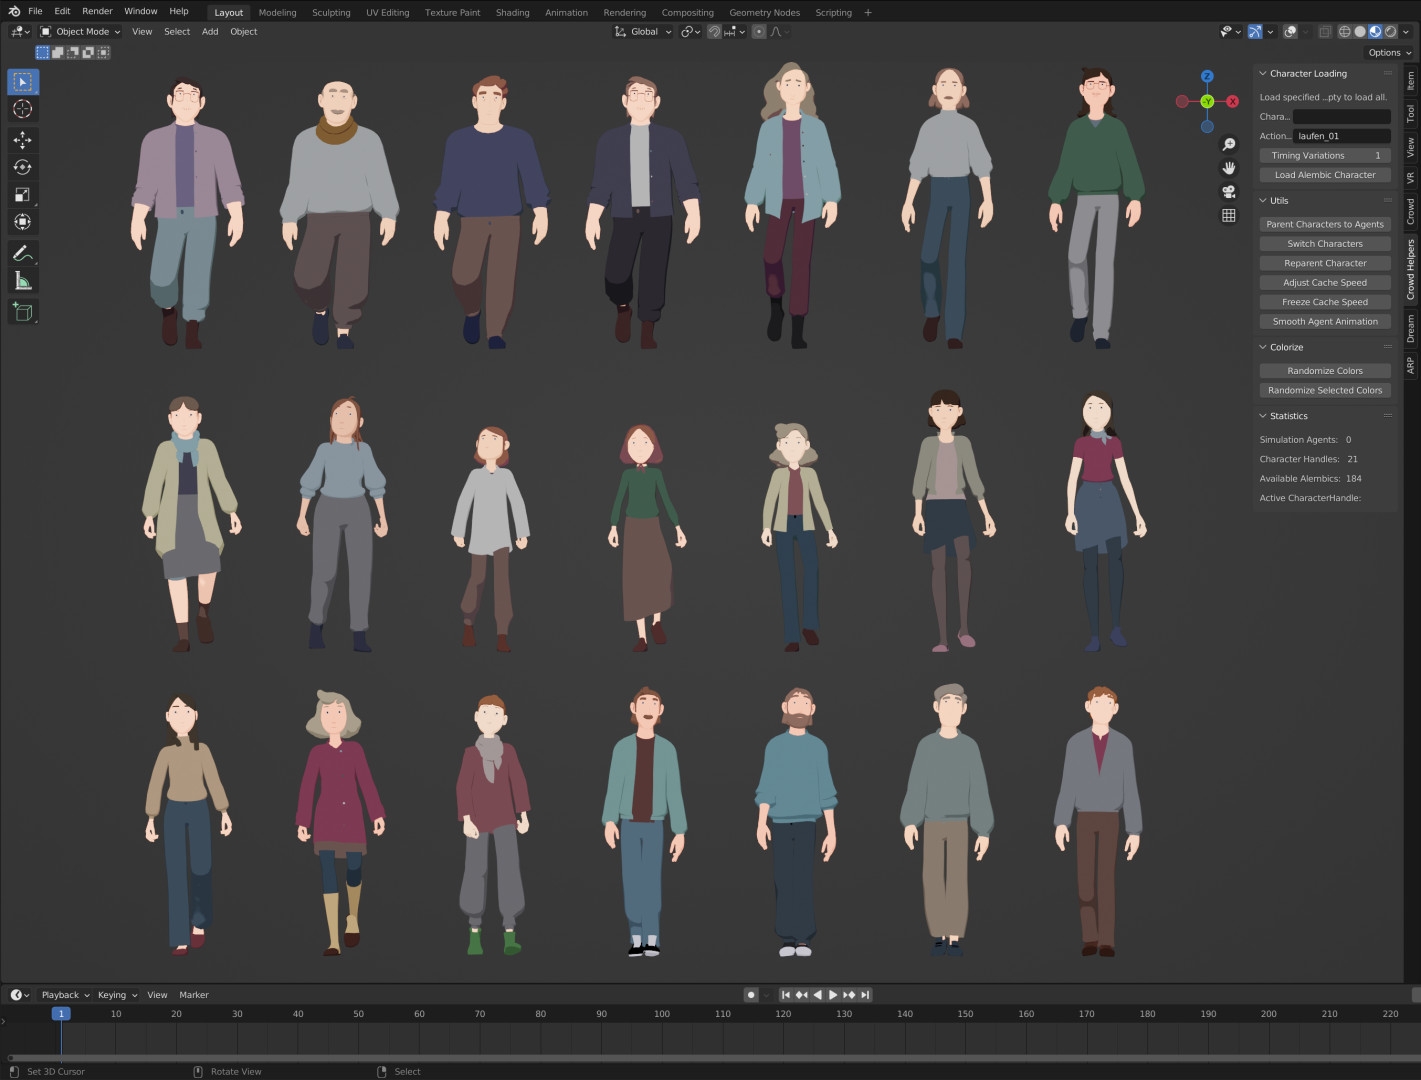
For the basic crowd simulation, we used the Blender add-on CrowdSim3D(crowdsim3d.com). For the crowd, 21 individual character models were available, each with several animations from motion capture data. The models were converted into Alembic caches, as Blender was able to process them relatively smoothly in large numbers.
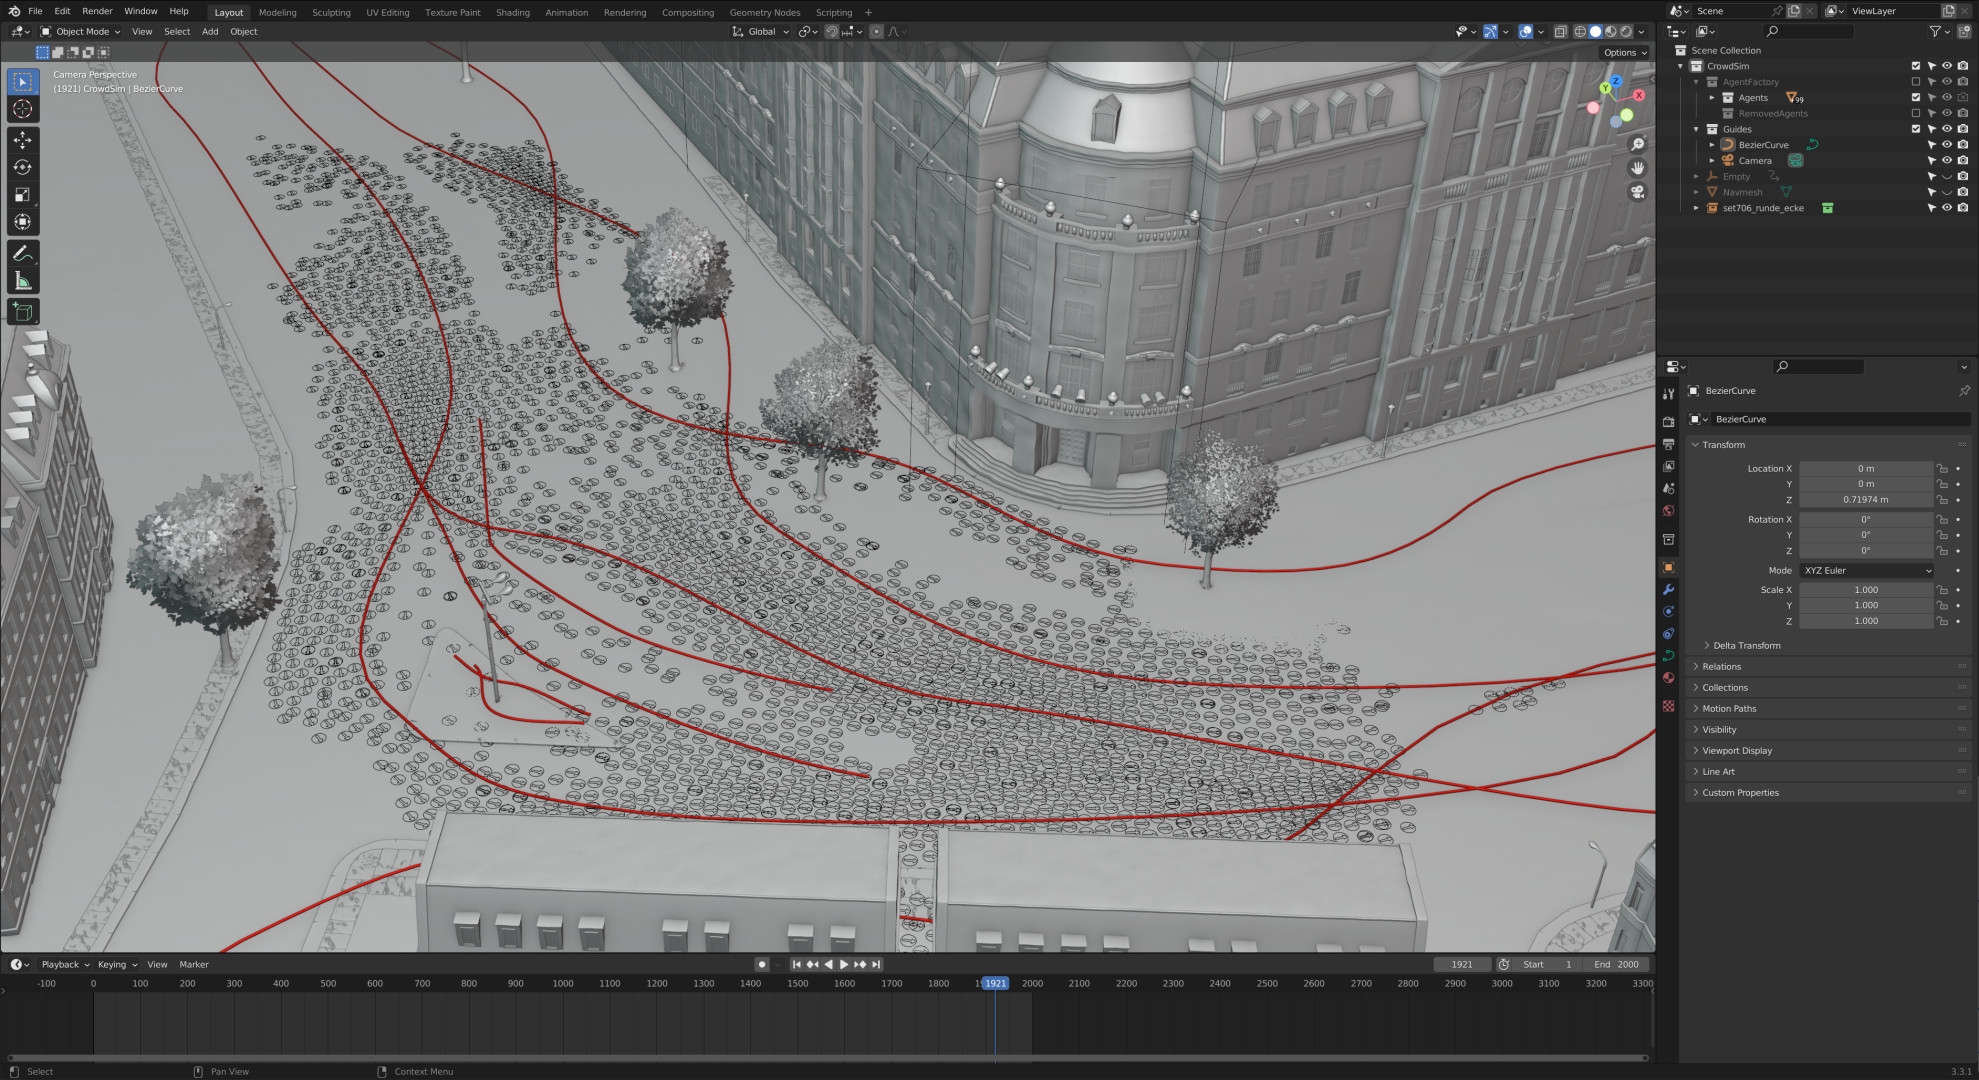
After simulating the rough crowd movement with a proxy model, the Alembic caches were automatically imported, randomly distributed to the simulated crowd agents and the original materials were linked. In a further step, the speed of the walk cycles was calculated and adapted to the forward movement of the crowd. To ensure the necessary variation within the crowd, the models were assigned random colours from predefined colour palettes for hair, tops and trousers during import. To enable subsequent manual adjustment of the colours without having to change the linked materials, the colours were saved in custom properties on each character, which the material could access via an attribute node. This meant that corrections could be applied directly in the final file, independently of the linked materials. Collection instances of larger groups of people were used to fill the backgrounds of particularly large crowd scenes, sometimes with over 10,000 characters, without affecting performance too much.
Challenges
An unforeseen problem was that Blender on Windows systems only allows about 500 Alembic caches at the same time. This limit, imposed by the standard C library, could only be circumvented during rendering by using a self-compiled version of Blender with a higher limit. The biggest challenge, however, was to keep the entire crowd workflow procedural so that changes to models, materials and animations were possible at any time. In this way, we realised a total of around 10 minutes of crowd sequences.
Line Art
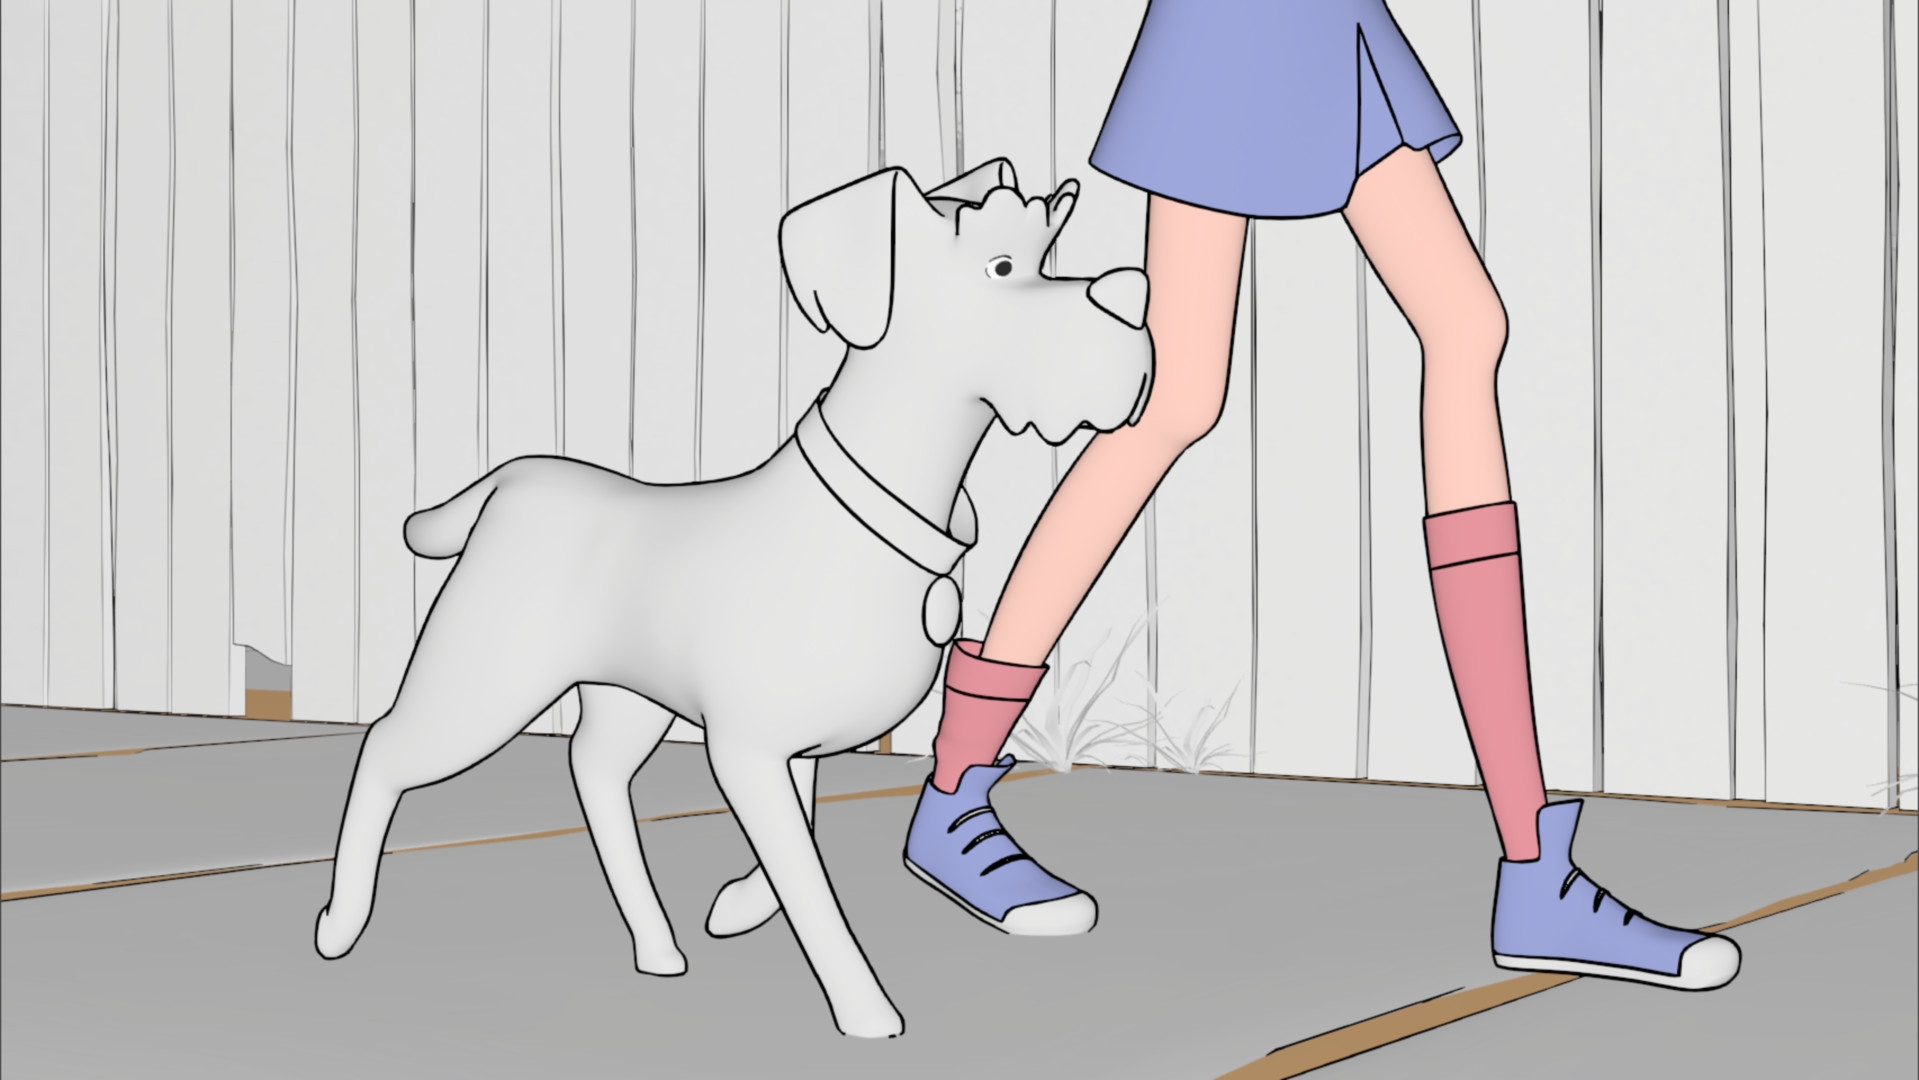
My name is Tsuyo Grohé and I was part of the line art team at Fritzi & Sophie. Line art is an essential part of classic cartoon looks and therefore important to achieve certain non-photorealistic rendering (NPR) styles in 3D. As a rule, line art consists of the outline, which visually separates objects from the background, and additional lines within the object surface.


Line art in Blender?
In Blender, you can use the Grease Pencil Tool to draw lines by hand for a hybrid 2.5D solution. Alternatively, the software can also create line art automatically. There are various techniques for this, all of which have their advantages and disadvantages. Here are three of the most common methods: Inverted Hull is the simplest way to create an outline for objects. This approach works by providing an enlarged duplicate of the mesh (hence the word “hull”) with a suitable material and inverted normals. The Solidify modifier can be used for this in Blender.
Inverted Hull offers comparatively the fastest performance and is visible in real time in the viewport. However, it usually looks poorer in quality than other types of line art, especially in close-ups, and allows little or no control over details such as the lines within an object. Freestyle is Blender’s own NPR engine for creating line art. Because Freestyle works with post-processing, the line art is only visible in the rendering result. With the right settings, however, it can deliver a visually higher quality result than the inverted hull.

In addition to the outer contour, Freestyle also supports lines that are defined by a specific crease angle, i.e. the angle between two neighbouring faces, as well as edges or faces marked on the mesh. When creating the lines, all objects within a view layer are loaded and therefore a relatively large amount of memory is required for rendering. With Blender version 2.93, a new line art modifier for Grease Pencil was added, which can also generate outlines. Some of its options are based on those of the Freestyle technique, but the biggest innovation is that Grease Pencil Line Art can be viewed directly in the viewport and offers more flexible options. Unlike Freestyle, Grease Pencil is vector-based instead of pixel-based.
The TV series Fritzi & Sophie is one of the first major productions in Germany to use the line art modifier. In order to achieve a line style in 3D that comes as close as possible to the template of the 2D animated cinema film Fritzi – eine Wendewundergeschichte (2019), our team developed its own add-ons for our workflow. This allowed us to create the line art object with the required modifiers with just a few clicks each time.
In the next step, we sorted all objects in the scene into different collections in order to assign properties for the line art. This included whether an object should have line art and what it should look like. We separated the line art of the characters from that of the environment to enable precise editing in compositing afterwards. The lines were coloured in post-processing and given a texture that makes them look as if they were drawn with chalk.
It is also crucial that the lines become thinner the further away they are from the camera. We set the line thickness of the environments to one value per shot, but the setup for the characters is controlled by drivers that adapt to the movement of the characters through the room. We had three different line widths for each. For example, the outlines around the characters’ eyes are thinner than those of the body and the outlines of the teeth and tongue are even thinner.
Like probably every major production, this one was not without its challenges. For the line art, these were mostly unwanted lines that appeared where we didn’t want them. Or vice versa: lines that were not visible even though they were supposed to be there. This was caused by all kinds of factors: for example, a line automatically appeared on a Sharp Edge every time. Or the line art settings of an object were set incorrectly, or a hidden object was blocking the line, and so on. In addition, the lines sometimes started to flicker. In most cases, the flickering was caused by the booleans used to animate the characters’ mouths.
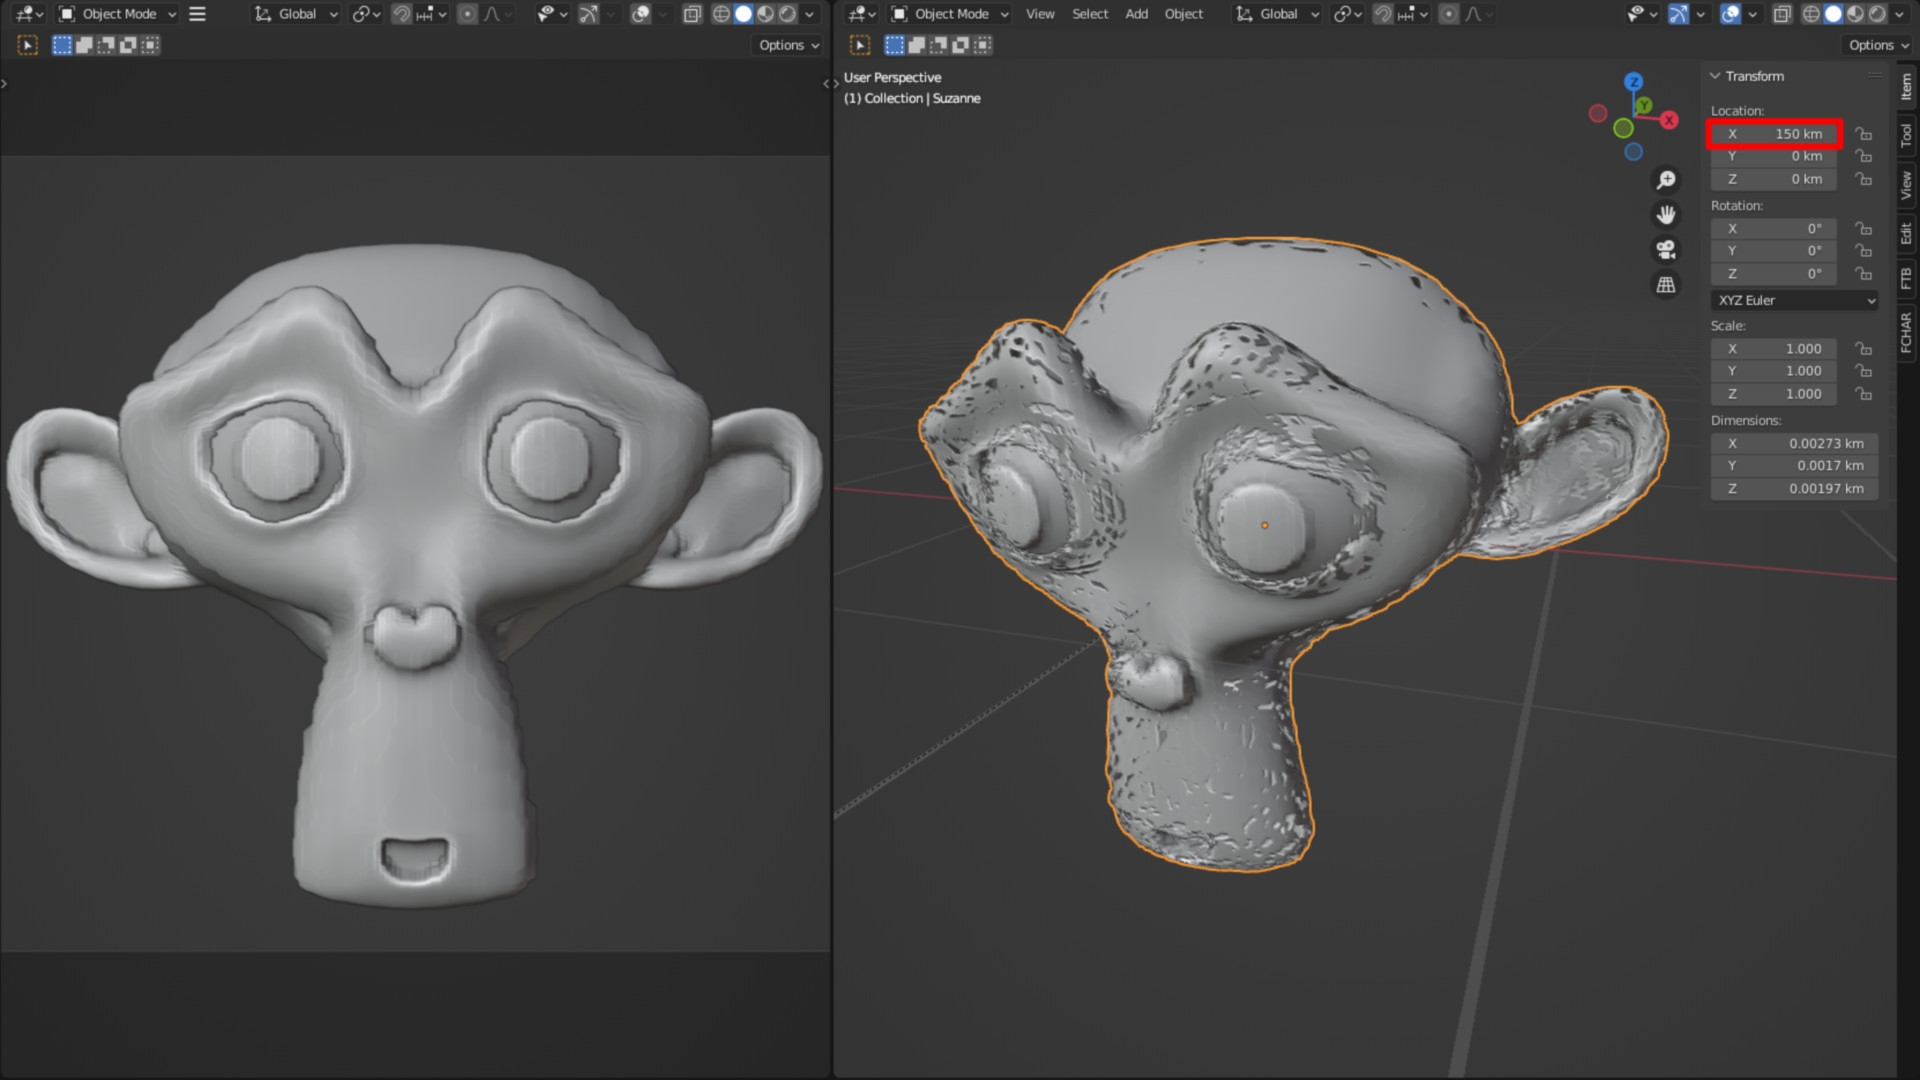
Even if an object is too far away from the World Origin, the lines start to flicker. Or to be more precise: the entire mesh starts to flicker and the lines flicker with it. For example, there are a few scenes in the series in which long car journeys can be seen. And because we initially animated entire sequences in one go in Blender instead of individual shots, the car was sometimes many kilometres away from the source. This results in rounding errors and the modifiers can no longer keep up. This can be easily recreated in Blender by moving a mesh with a subdivision modifier on it a few thousand kilometres away.
Incidentally, this phenomenon not only affects Blender, but also other 3D programmes that work with a coordinate system of this type. In a few cases, we had to move the entire set to fix the problems. In addition, there were some serious performance bottlenecks – mainly caused by too many polygons, materials and particle systems. Once the scene reaches a certain level of complexity, the frame rate in the playback drops sharply, even causing the programme to crash. The whole thing is further slowed down if line art is also calculated. This is because the lines for each individual vertex within the camera view are calculated per frame. Before the line art can be displayed in real time, it must be baked.
This means that it is converted into a mesh and then no longer adapts to changes in the animation or camera. However, it can now be treated like a mesh, i.e. it can be rendered on a different view layer than the rest of the scene. To improve performance, we have decided to dispense with line art for objects that are either never directly visible in the frame or are far away from the camera. So that we could still use lines on the trees in large forest scenes, we used the inverted hull method in some places. By default, it is not possible in Blender to render an inverted hull separately from the underlying mesh. Only with the help of a script were we able to control the visibility of the solidify modifier per view layer.
Grease Pencil Line Art is currently the most flexible method of creating line art in Blender. Precisely because the modifier allows many possible options, it tends to be difficult for beginners to understand. However, as a comparatively new tool, it is constantly being developed further. For example, the Grease Pencil will be revised for upcoming Blender versions and the Line Art Modifier will become its own Geometry Node in the future.
Compositing
My name is Jan Mildner and I was compositing supervisor and responsible for the final look of Fritzi & Sophie. Rendering was done in single frames with Blender Eevee in OpenEXR Multilayer format. Passes were AmbOcc, Beauty, Plant-Alpha, Z-Pass, Sky, Char-Vectorlight, Char-Diffuselight, Volume, Spectacle-Alpha, Char-Normals, Environment Outlines, Char-Outlines, FX (Rain/Fire) and Cryptomatte. The comp was made in Fusion (Studio) by Blackmagic.
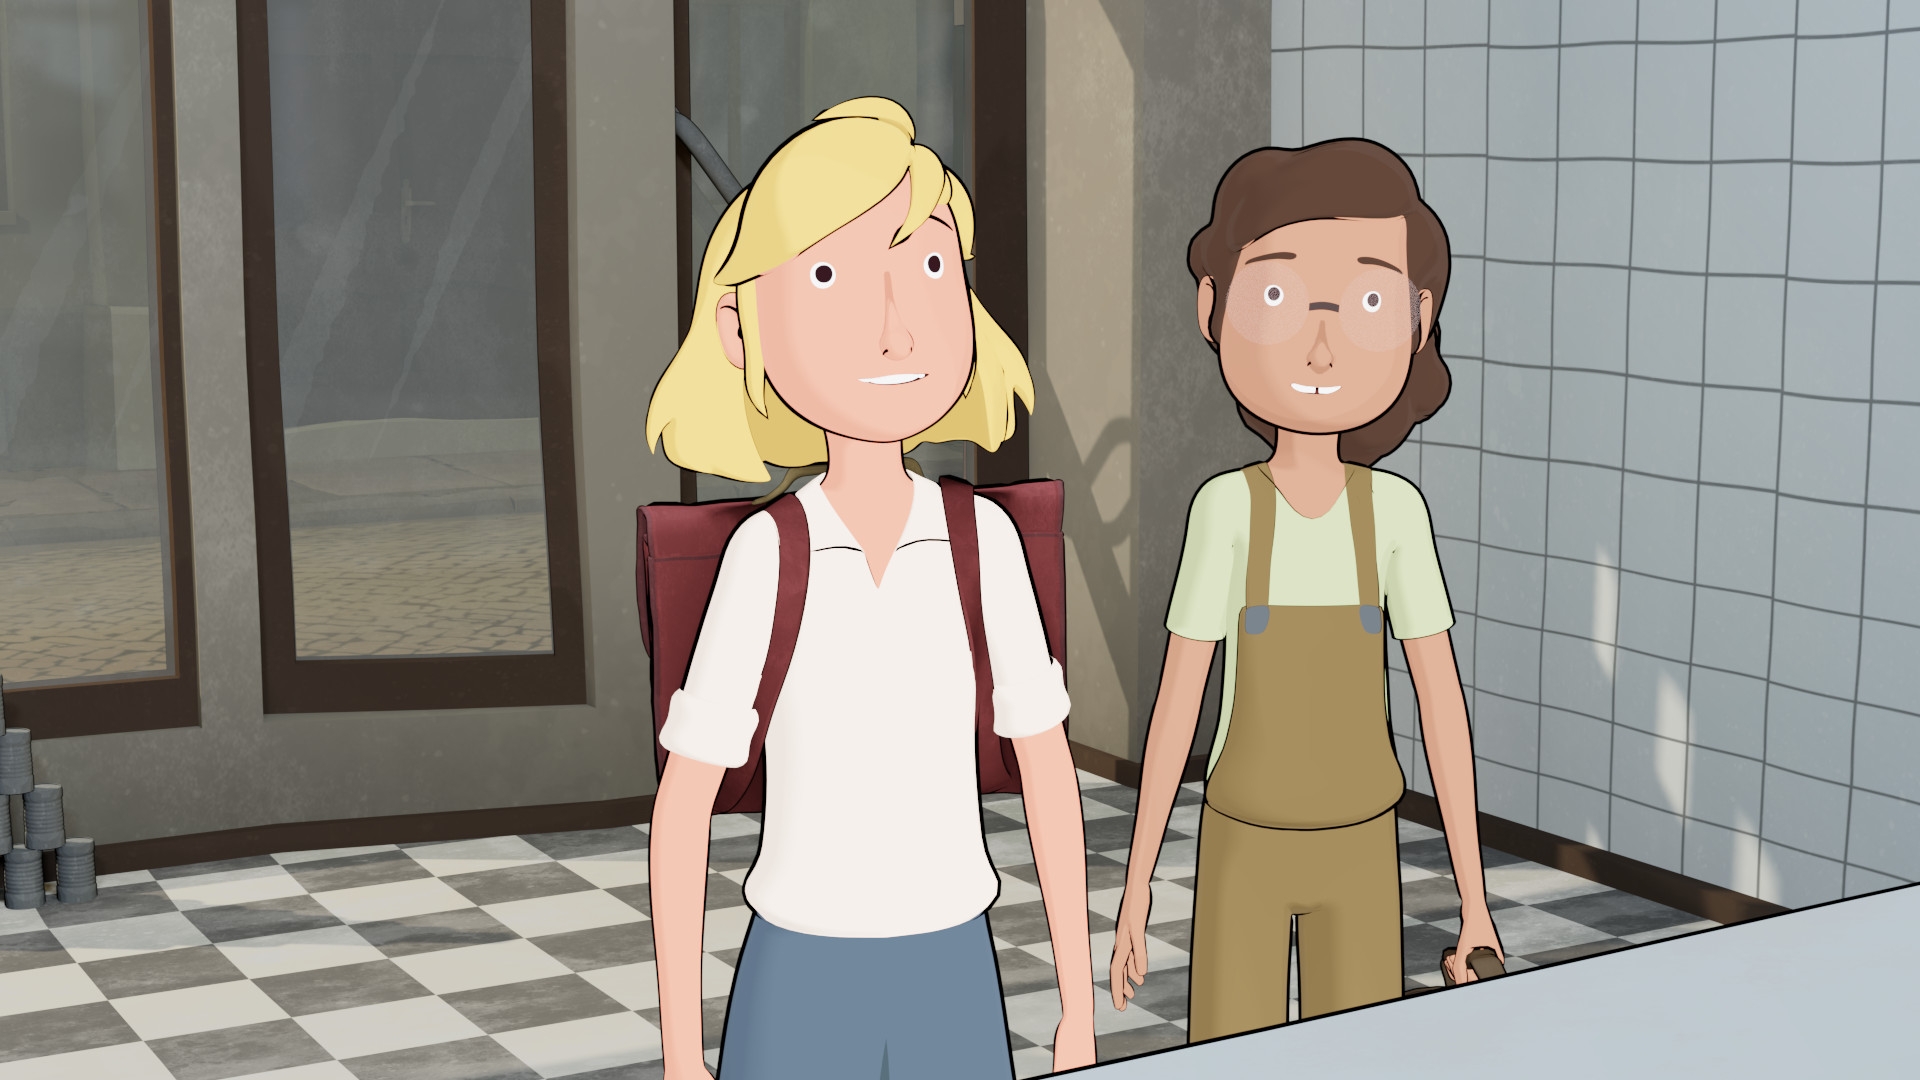
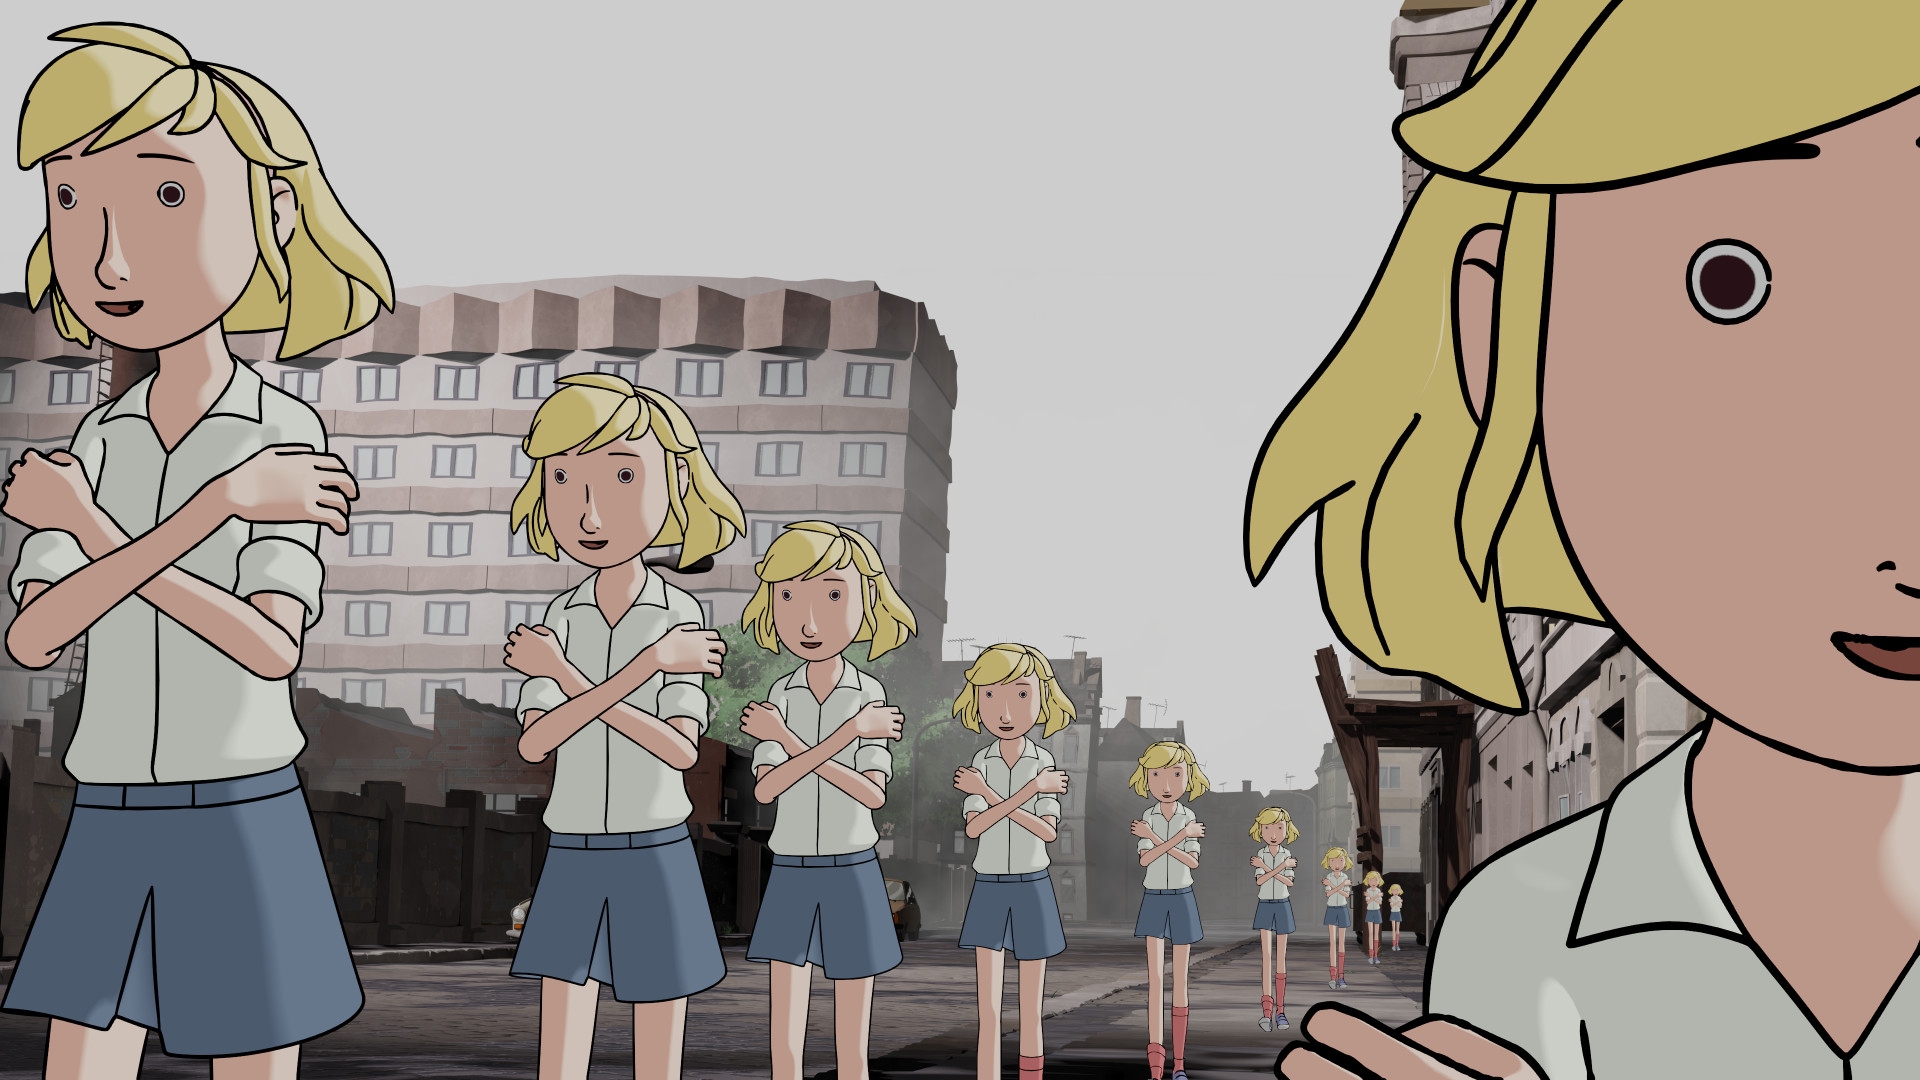
This is where the beauty pass with the sky and the outlines for the characters and backgrounds were put together. These were given the desired look. The character outlines were monochrome and were given a structure similar to that of a hand-drawn chalk engraving. The outlines of the backgrounds took on the colours of the objects, so they are in the final image. Neither was possible in Blender and could therefore only be done in the comp.
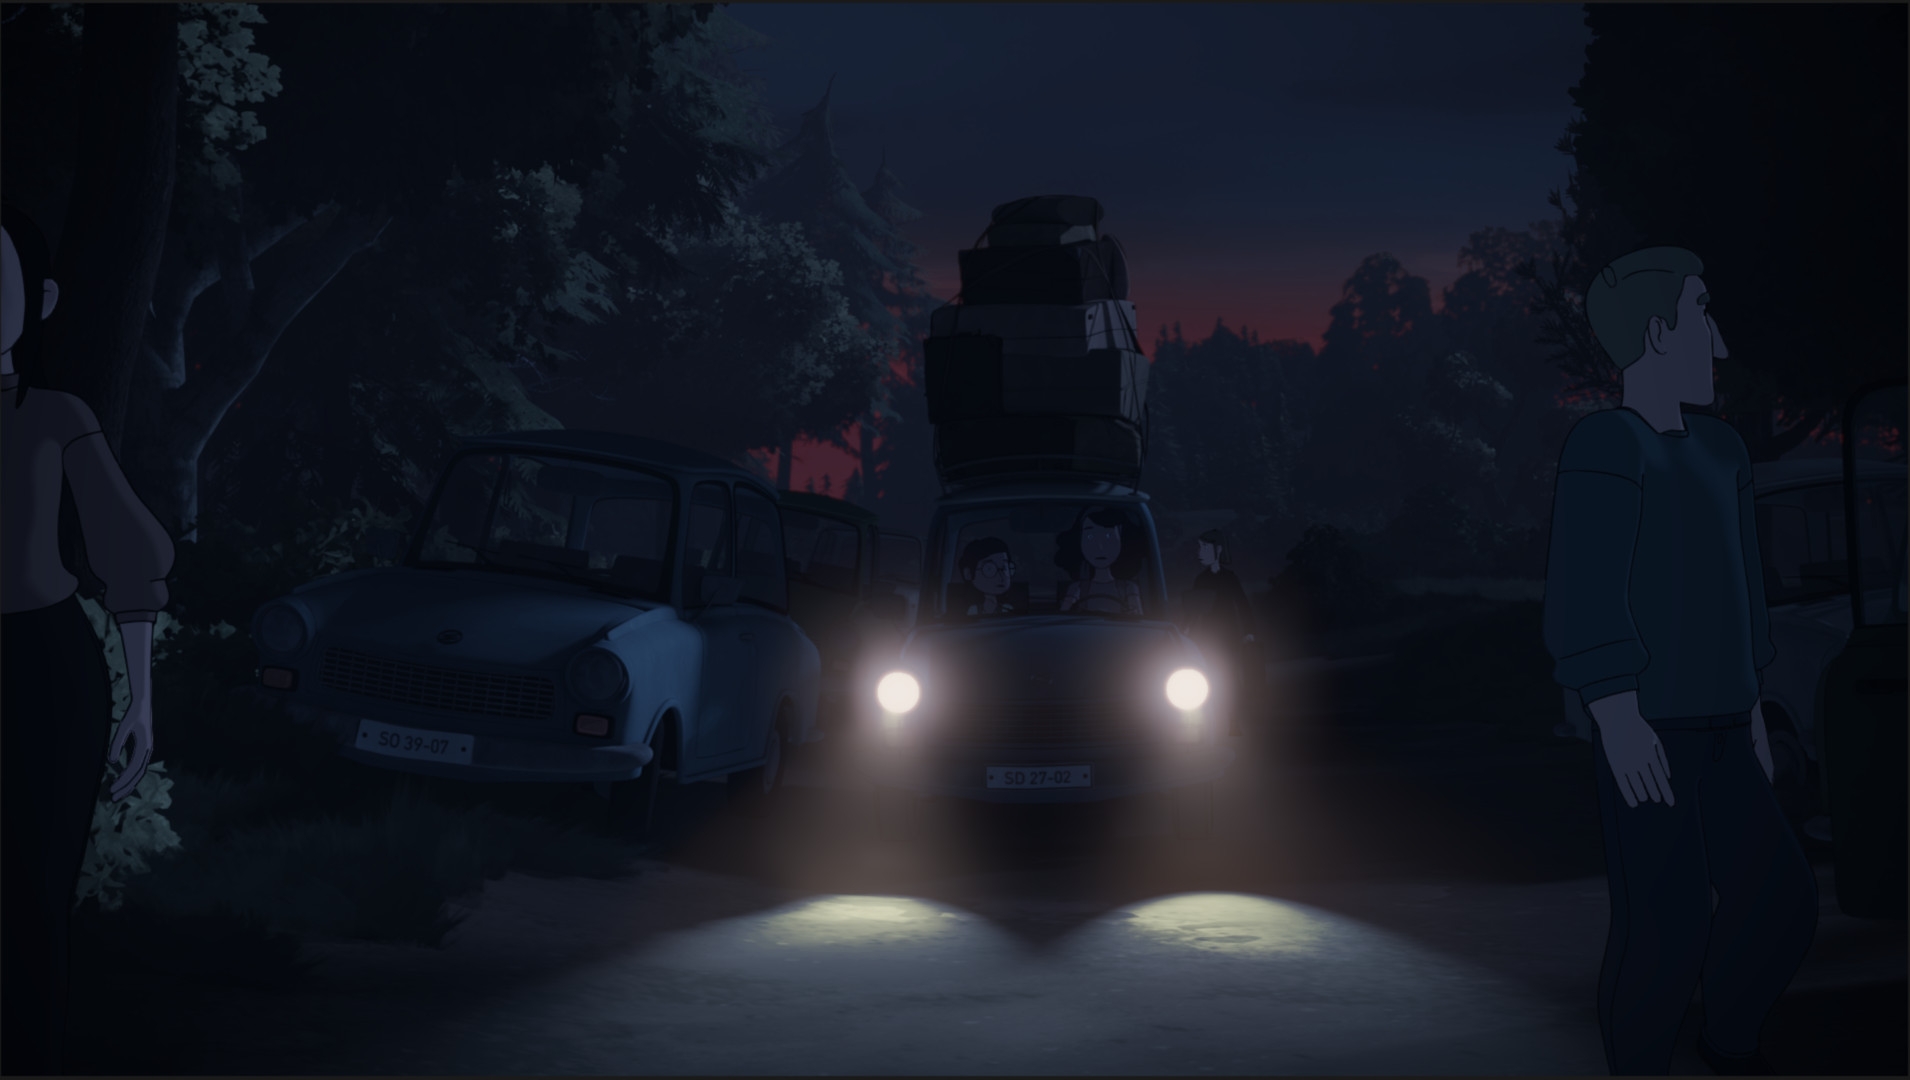
As our 2D shader meant that the characters were not affected by the set lighting and were always displayed as if it were a summer day by default, all the necessary shot adjustments had to be made in the comp. Additional highlights and rimlights could be added to the characters via the character normals if required. Grading the night shots proved to be very time-consuming because the colours in the entire shot were often not blue enough and skin tones moved strongly towards red as soon as they were darkened. Of course, some depth of field also came into play, which was also added entirely in the comp. Headlights, torches and streetlights (i.e. all the highlights) were also not visible on the characters and had to be recreated in the comp.
Frequent problems included clipping errors, for example when a shirt blinks through a jacket, or when the booleans of the faces repeatedly showed unwanted deflections. Transparent objects such as spectacle lenses and windows were also a challenge. On the one hand, they were very noisy and the Z-pass, which was used for grading and depth of field, perceived transparent objects as opaque, meaning it could not look “behind” them. The partial transparency of the grasses made clean grading difficult.
The most important tool in the comp in this project were the cryptomats, where individual elements in the image could be easily selected via Gizmo and used as a mat. You could either select entire objects and characters or just individual parts such as hair. Especially with moving images, it is essential not to have to mask certain areas manually using a polyline or similar in order to colour, fix or change them precisely. For the basis of the final grading, all shots were exported in single images as EXR single layer with 16-bit float linear (without LUT).
Conclusion
Fritzi & Sophie was an interesting and extraordinary project for me – and I really enjoyed working with the team – so once again a big thank you to all my colleagues, and I’m looking forward to the next project with you!
Florian Genal is a freelance 3D artist/generalist. After training in business administration, he studied character animation at Animaton Mentor and has worked on numerous projects. www.FlojoART.com
- Director: Ralf Kukula, Matthias Bruhn, Thomas Meyer-Hermann
- Producer: Ralf Kukula, Richard Lutterbeck, Thomas Meyer-Hermann
- Production management/company management: Christoph Kukula
- Production management: Christian Asmussen
- Co-producers: ARD, MDR, WDR, SWR
- Screenplay: Beate Völcker
- Dramaturg: Martin Muser
- Art Director & 3D Storyboard Supervisor: Alex Tiedtke
- Technical Director: Elias Schwarze
- CG Supervisor & Blender Mentor: Christoph Werner
- Character Design: Olaf Kamin
- 3D Modeler Character Lead: Fynn Große-Bley
- Rig Supervisor: Sophie Fink
- Prop Supervisor: Mikola Debik
- Vehicle Supervisor: Patrick Knott
- Set Design Supervisor: Sven Höffer
- Set & Lighting Supervisor: Paul Siedler
- Layout Supervisor: Gideon Volle
- Animation Supervisor: Florian Genal
- Crowd Animation Supervisor Space Capsule Animation: Stefan Kreller
- Outlining Supervisor: Tsuyo Grohé
- Render Consultancy Virtual Republic: Michael Klein, Steffen Duenner
- Rendering Supervisor: Josie Steinmetz
- Compositing Supervisor: Jan Mildner
- Editing: Francie Liebschner
- Editing & Grading: Stefan Urlaß
- Sound Design & Mixing: Florian Marquardt
- Music: André Dziezuk
- Production Coordination: Bianca Just, Sabine Kraft and Moana Klein
- Editorial management: Anke Lindemann
- funded by: BKM/FFA/MDM, Film- und Medienstiftung NRW, MFG Baden-Württemberg, Additional Funding Saxony
- Production studios: Balance Film GmbH, TrickStudio Lutterbeck GmbH, Studio FILM BILDER GmbH
Thanks to the entire Fritzi team!