


Table of Contents Show
Render simulations
Houdini is best known for creating simulations: Water, fire, smoke and breaking things, i.e. house collapses, spaceship explodes etc. And this is exactly what Mantra is designed for, i.e. rendering these SFX/VFX special effects. As a rule, it’s not about stills, but about animations.
In such a simulation, gigabytes of data are often generated per frame. In terms of simulation times, the calculation of a simulation can sometimes take several hours per frame. SideFX has a cool clip for H15: “One Billion Particles” https://vimeo.com/142517418. The whole thing needs to be rendered with Mantra after the simulation. To do this, the Houdini simulation has saved data for each frame on the HardDisc or the file server. These are then particles, geometries, which are enriched with attributes. Without these attributes, Mantra would not be able to render fire, for example. The shader then accesses an attribute for the temperature, for example, and displays it in a different colour depending on the temperature value.
This is very simplified, but it is usually much more complex. This interaction between Houdini and Mantra is also very flexible and can be customised as required. Houdini is extremely open, almost completely open source: every tool and every shader can be customised as far as possible. From a certain level, this is also necessary, and you have to familiarise yourself deeply with the material. These endless possibilities don’t make working with Mantra any easier at first, because even if we want to solve something that seems simple at first, we quickly come across this multitude of possibilities. It often takes a lot of experience to judge what the best solution is. The only thing that helps here is the nonchalance that we need when working with Houdini anyway.
Basics
Unfortunately, learning Mantra is not made easy. Some of the documentation is really very good and explains many things very clearly. In other places it is missing or even out of date. The material library supplied is not exactly extensive. Many of the shaders are more of a starting point and need to be adapted or further developed as required. The Ocean shader is a welcome exception.
In Houdini 16, the so-called Mat context has been added to replace the previous Shop context. However, this change is not yet 100 per cent complete. As far as I could find out at FMX, Houdini 17 will probably finalise this fundamental change as far as Mantra is concerned. Furthermore, SideFX has indicated that IPR, i.e. interactive rendering, will be significantly faster in terms of the first pass. A denoiser could also be coming, and Crytomatte will be further expanded. It won’t stop there, but I’m not allowed to say any more here. We will hopefully do that in the October issue of DP.
Principled Shader /
Classic Shader / DIY
Mantra comes with two classic surface shaders: the Principled Shader and the Classic Shader. The Classic Shader was named Mantra Surface Shader until H16. Both shaders are super shaders that make it possible to display many surface properties. A great deal of knowledge about rendering is required to work with the Classic Shader.
The Principled Shader is new and makes the creation of most materials much easier. It is very similar to the so-called Disney shader. One of the cool features is that most of the parameters can be set from zero to one. Since H16, the Principled Shader also has a round-edge feature that rounds off hard edges. So if you don’t want to delve too deeply into Mantra, you can use the Principled Shader to set most of the surface properties: Specular, Anisotropic, Reflection (Metallic), Coating, Transparency, Subsurface Scattering, Sheen, Light Emission, Bump and Normals and Displacement. It should be mentioned at this point that Displacement is fast.
DIY Shading (Do it yourself Shader)
Mantra makes it possible to create shaders yourself. There are core versions of the Principled Shader, the Classic Shader and Hair, Skin and Car Paint. And there is the Material Builder, which can do nothing at all (see image above). It has only generated the possible inputs and outputs. So if you want to build a shader completely yourself, you will get your money’s worth. Another way to build shaders yourself is to use shader layers. Shader layers are one of the new features in H16. It allows shaders to be physically layered correctly. Displacements can also be mixed. There is a very good masterclass video on this from SideFX
(bit.ly/h16_masterclass_shading).
Rops – Render Operators
Houdini and Mantra are node-based. This is not only about the shaders, but also about the render setup. In the ROP, the render operator, the render settings are defined, i.e. which render mode is used, which quality the rendering should have and which AOVs should be output. These ROPs can be connected in series with the batch operator. They are then processed in sequence. With the pre/post operator, one rendering is always executed before another if the second requires the results of the first. The wedge operator makes it possible to render test renderings of a frame with different shader settings.
Render checkpoints
Mantra is able to continue renderings that are not completely finished, so we can interrupt a long rendering and resume it later. Even in the event of some crashes, for example due to insufficient RAM, we can resume rendering if we have released the RAM beforehand. I think this is a very cool feature, as rendering can sometimes take 24 hours. This is especially great for freelancers.[/vc_column_text][/vc_column][/vc_row]
Environment HDR Lighting
HDR environment lighting is certainly not a particular strength of Mantra, although the necessary basic functions are available. Unfortunately, the HDR environment can only be rotated and cannot be adjusted in size, so it is always infinitely far away. Gamma or colour corrections can be implemented within COPS (compositing as preprocessing). There is an urgent need for improvement here, whereby portal lights as well as matte shadows and so on can be realised.
Unfortunately, the whole thing is not quite as simple and intuitive as I would like it to be. But Mantra is not designed for product or architectural visualisation in the classic sense, the priorities have so far been elsewhere. However, anyone who wants to have more control and influence over the lighting setup will get their money’s worth. I was really pleased with the improvements in H16.5 and now get tolerable render times even when using HDRs in the lights and in interior scenes.
Vex Vops
Vex is the shader language from Mantra and has a C-orientated syntax. Vex is also the programming language for creating geometries, particles or volumes in Houdini. I first learnt Vex in Mantra and can now edit particles or geo with Vex. Vex, by the way, stands for Vector Expressions. And then there are the Vops, i.e. Vex operators. These are the graphical, i.e. node-based display form of Vex. Vops are basically the same both here in Mantra and for geometry. With Vex and Vops it is possible to create your own shaders or procedural textures – certainly not easy, but very powerful.
Pipeline
Houdini and Mantra are very much geared towards being used in teams. The tools and functionalities available for this are optimised for division of labour, and as teams often involve a complex division of labour, Houdini’s tools are often very powerful, but also very complex as a result. A somewhat more complex scene usually consists not just of one file and perhaps the textures, but of several files containing parts of the geometry or shaders. So if you use Houdini and Mantra alone, you often have to deal with functionalities that make you think of the famous cannons and sparrows.
Stay calm and don’t oversample
Of course, in the end everything should be rendered beautifully and without noise, but no more should be calculated than necessary (oversampling). Tip: First render only Direct Light and increase the quality in the lights until it is noise-free, because this quality only affects Direct Light. Then use AOVs or Extra Image Planes to find out where the noise is coming from. The statistics that Mantra can output can be very helpful when optimising. Set the verbose level to 3 and you will see the statistics in the console.
Attributes & UVSs
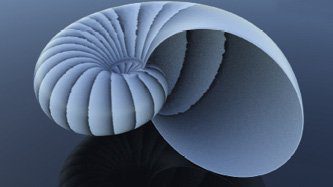
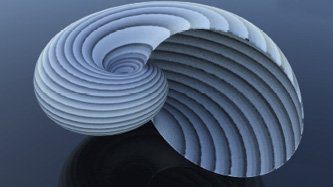
Attributes are one of the basic building blocks of the Houdini concept, and this is seamlessly continued in Mantra. Mantra accesses these attributes, which can be on Points, Verts, Prim or in Detail, when rendering. The obvious ones are the normals (N), UV coordinates (UV), colours (Cd) or, when it comes to particles, age, life, velocity, force, mass, drag or size (Pscale) and a few more. These attributes are used by the mantra shaders. And it’s easy to create your own attributes and build shaders that use these attributes. These examples only scratch the surface, there is much more. UVs are also just another attribute in Houdini, firstly for UV 2D unwrapping for texture paint and the like, and secondly for parametric UVs. These are important for procedural texturing. For example, with the Nautilus I have a UV that follows the shape of the snail so that the procedurally created pattern adapts nicely to the geometry.
IFD – Instantaneous Frame Description
Before Mantra can render a scene, Houdini must generate IFD files. A separate IFD file is generated for each frame. This contains all the necessary information about geometry, lights, materials, camera, etc. What is special here, however, is that an IFD file does not have to contain the geometry data. The geometry can either be stored separately in packed disc primitives or even generated procedurally during the rendering process. The best example of this is the hair, which is passed to Mantra as curves. Mantra generates the geometry. This has many advantages: The IFD files thus remain very small, and geometry data that is repeatedly required in different IFDs only needs to be available once.
Alembic integration must also be mentioned in this context, because what applies to packed disc primitives is also the case with Alembic Archive. Unfortunately, IFDs are not available for indie users of Houdini, but many of the advantages are still valid.
Material Stylesheets & CVex
Material stylesheets are a very powerful and unfortunately somewhat technical solution for distributing materials to geometry and, in particular, packed geometry. In addition, individual parameters of a material, which can then also be located on different geometries, can be overwritten. This is complemented by CVex Shader – C stands for Contextual. There are great video tutorial masterclasses on these functions from
SideFX. I’m using stylesheets more and more for simple scenes where they’re not really necessary, but it’s the only way to get used to this workflow. Stylesheets and CVex are evaluated last when the rendering process is started, i.e. first the scene is created as usual and passed to Mantra, then the stylesheet and CVex are used to adjust attributes and shader parameters. Here are two examples to give you an idea of what this makes possible.
- We want to render hundreds of objects, for example bottle caps, which only differ in terms of texture as far as the shader is concerned. Normally we would now have to create hundreds of shaders or just one and then only overwrite the texture path parameter for each crown cap.
- We have created the IFD files for an animation. Now we want to render the same animation again with different materials. Now we can use a previously created stylesheet to exchange all materials for a clay shader, for example.
Packed Disc Primitives
Packed primites or packed disc primitives are a very cool concept. It enables the rendering of many parts, i.e. millions of trees, particles or similar. Especially if the old micropolygon rendering is sufficient, i.e. without raytracing, scenes can be rendered that would otherwise never have fitted into the RAM. Mantra then only loads the packed disc primitive that is to be rendered. The bounding box attributes must be correct for this. But even if we render with PBR, packed disc primitives are helpful. The geometry is not saved in the IFD file, but each tree or house has its own file. This makes the IFD files very small and keeps the network traffic low, especially in a render farm. It has even more advantages, but once again that goes beyond the scope of this article.
Mantra Engine Procedurals
Mantra Engine Procedurals are mainly used when things get hairy – i.e. when hair needs to be rendered. Mantra then creates the geometry, as the hair is transferred from Houdini as splines/line objects. However, geometry can also be created by the Houdini Engine Procedurals during the rendering process. However, this requires an additional engine licence. This is also a relatively new feature for advanced users, which is probably not yet used much in productions.
Particles
The rendering of particles is certainly one of Mantra’s strengths. After all, the renderer was developed for Houdini, which is known for Hollywood SFX and recently won an Oscar for it. By default, particles are rendered as small spheres, but they can also be rendered by Mantra as sprites or geometry. Millions of particles are no problem for Mantra, provided there is enough RAM. However, if you want to work with Houdini and create film-like SFX, you should have at least 64 Gbytes of RAM in your computer.
Volumes
When I ask what the strengths of Mantra are, this is one of the areas where Mantra really shines. Volume rendering is sort of the same as rendering transparencies. Mantra is fast here, but it’s still not fast, especially if you want the volumes to have depth. Stochastic Transparency is one of the possible optimisations that can shorten rendering times considerably. However, this can also have undesirable consequences – it all depends on the scene.
NPR / Micropolygon Rendering
NPR (Non Photorealistic Rendering) is one of Mantra’s strengths. It starts with the rendering of particles, but doesn’t stop there. Custom shaders can be as minimal or as complex as necessary because we can really start from scratch. And yes, even that is not simple, but rather complex. But this character is exactly what I like about Mantra: I can influence everything as deeply as my level of knowledge allows. Mantra has various render modes – as a rule, we use PBR, or Physically Based Rendering. MPR – Micropolygon Rendering – can be useful if SFX or non-photorealistic rendering is required.

Extra Image Planes – Arbitrary Output Variables AOVs
Mantra renders for compositing. What I’m trying to say is that it’s not just about beautiful, photorealistic beauty. It’s about providing compositing with all possible AOVs and render passes that are needed to adapt the rendering to the producer’s or art director’s ideas without having to re-render. This starts with masks and continues with passes that only display the indirect light of a light source, for example, or Z-Depth, Velocity (for motion blur), AO or similar; these AOV passes can be freely defined. This is very convenient but also very complex. It is important to note that an extra pass, for example the Indirect Contribution Pass for each light, does not increase the render time. What does increase, of course, is the RAM requirement and the time to save the whole thing to HD.
3D textures
3D textures are one of my favourite features in Mantra. And I’m not talking about the 3D texture node (which is also cool), but the ability to use point clouds and volumes as textures. The 3D texture node makes it possible to use an image stack as a volume texture, perhaps best known from MRIs used in medical diagnostics. What I find even cooler, however, is the use of point clouds or volumes as textures. This makes it possible to procedurally generate 3D textures with geometry that is converted into a volume.
Categories
Categories or also includes and excludes for lights or geometries can be set very coarsely – i.e. which light affects which object. You can also decide here whether only the direct or also the indirect contribution of a light should be rendered. There is no end to the optimisation.
Nautilus Procedural Model
And to anticipate questions: I created the Nautilus or Ammonite fully procedurally in Houdini. I used both classic Booleans and volumes. It is a work in progress for video tutorials that I will be recording soon. Unfortunately, I’m not as far along as I had planned by the deadline for this article, so the really nice pictures will come later.
Conclusion
Mantra is a powerful renderer that is geared towards Hollywood-style workflows. But that doesn’t mean that we can’t work with it in smaller setups. It’s also getting easier and easier and the Principled Shader, for example, is a great help. H17 won’t be long in coming, and I’m eagerly awaiting the noise reduction in particular. If you have a full version of Houdini, you can run Mantra on all available computers. And indie users of Houdini get a great renderer in addition to Houdini for around 250 euros per year. There are providers for cheap farm rendering that also render indie files. And one of the Indie restrictions has been mitigated: It is now possible with Indie to render animations up to 4K. Previously, this was limited to 1920×1080. There is no resolution limit for stills[/vc_column_text][/vc_column][/vc_row]