


Table of Contents Show
While it used to be common for studios to develop their own tools over a period of years, Prism Pipeline offers an alternative. This is accessible to everyone and in version two, Prism can be used to plan and implement workflows for a wide range of CG projects in no time at all.
by Richard Frangenberg
The latest version of Prism Pipeline 2 has now been released and in the following we will introduce you to the latest features and give you a preview of what to expect in the future so that you know whether it might be time to rebuild your pipeline. But let’s start at the beginning…
A brief overview
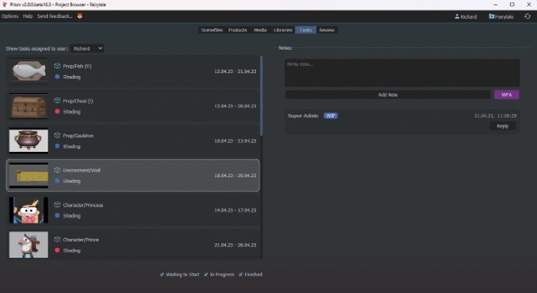
For those unfamiliar with Prism, here’s a quick overview of its basic features. Prism is a pipeline software with the aim of simplifying and automating the work steps of CG productions. The focus is on simple set-up and intuitive use by artists – even without prior technical knowledge. The main functions include the creation of folder structures, organisation of assets, shots and tasks as well as the versioning of scene files, geometry caches, rendered images and, of course, automated import and export between different DCCs. There are plug-ins for many other functions that extend the functional scope of Prism as required. Prism can be used both as a standalone tool and within all common DCCs. The basic functions are available in all DCCs and are extended with DCC-specific functions. For example, in Maya Prism can load the assets as Maya references and in Houdini simulations can be easily exported with a Prism Filecache Node.
Where is Prism used?
The majority of projects realised with Prism are 3D animations and VFX projects, but Prism has also been successfully used in 2D animations, games and other real-time projects. The complexity ranges from the first student films to major Netflix series and feature films. Some of the more well-known projects in which Prism has been used include the HBO series “House of the Dragon” and the Netflix film “The Kitchen”. The ease of installation and operation makes it easy for freelancers working alone to increase productivity. For smaller studios without their own pipeline department, Prism offers the opportunity to work efficiently without having to invest a lot of money and time in developing their own pipeline. On the other hand, Prism is also used by studios with dozens of employees. These studios usually have a pipeline department or TDs who can expand Prism with plug-ins.
New features in Prism 2
But enough of the preamble: we wanted to talk about version 2! The latest version comes with a host of new plug-ins and features in the core application. Highlights include OpenUSD support, integrations for ZBrush, Substance Painter and Unreal Engine, a completely redesigned link with Shotgrid/Flow and new links with Kitsu and Ftrack. Speaking of which: Here you can find a complete list of supported tools:prism-pipeline.com/plugins At the same time, UI and performance have been improved. In addition, users now have much more flexibility in their projects. The folder structure and file names can be customised using templates and options for import, export and render settings can now be preset for the entire project. Other new functions include a new user permission system with which users can be assigned to specific roles across projects and a new launcher with which specific DCC versions can be defined per project. So much for the overview, let’s get into the details.
OpenUSD
Pixar’s OpenUSD is increasingly becoming the long-awaited standard in the CG world. It is much more than just another file format to send 3D geometry back and forth between DCCs – being able to edit complete scenes (including lights, materials, render settings etc.) independently of a specific DCC or renderer opens up completely new workflows that would not be possible without OpenUSD. These USD scenes can reference other USD scenes in different ways, allowing multiple artists to work simultaneously on a single scene. This new type of collaboration has huge potential, but also brings with it a certain amount of complexity. There are dozens of terms in the world of USD, the meaning of which can only be recognised after painstaking familiarisation. The good news is that not everyone who uses OpenUSD needs to know how OpenUSD works. USD support in Houdini, Maya, Blender, Unreal Engine and other DCCs is getting better and easier to understand with every update. Unfortunately, to utilise the full potential of USD, it is not enough to just export an asset as USD. Instead, pipeline tools are needed to automate the referencing of USD files with each other. Only then can workflows be automated and, for example, multi-shot workflows be implemented efficiently. Large studios invest a lot of resources in their USD pipelines, but it has been difficult for smaller studios to really utilise USD. Developing a USD workflow for smaller studios was one of the main goals of Prism 2, and in the first announcement of Prism 2 (yes, that was still in 2021) a first USD workflow was already presented. In the following months, this workflow was further developed and feedback from beta testers was regularly implemented. With the release of Prism 2, small studios now have a comprehensive USD workflow tool at their disposal. However, USD support is implemented in Prism as a plug-in, so that everyone can decide for themselves if and when the time is right for them to switch to a USD workflow.
How does the USD workflow work?
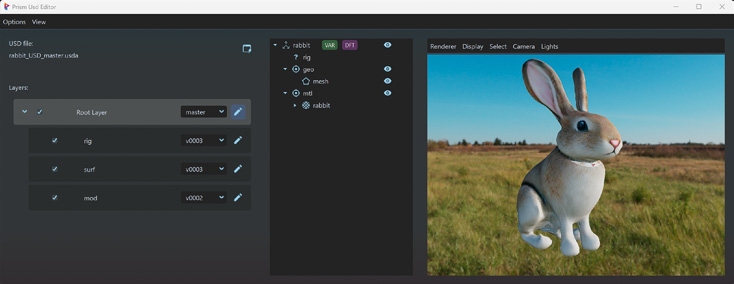
Prism automatically creates USD files for each asset and shot. An additional USD file is created for each department, which is added as a layer to the asset/shot USD file. This allows multiple artists to work simultaneously on different tasks of the asset/shot and see the combined result of all layers at any time. Combining the individual layers can be imagined as Photoshop layers that are put together to form the final image. If the material of an asset is changed, only the surfacing layer in the USD asset is replaced. As the USD asset is referenced in the shots, these shots can be rendered directly with the new material without any department having to re-import the asset. This “working in department layers”, which are combined, is just one of many USD features. Other USD features such as Variants or Instances are mostly optional and can be used as required. To create or edit USD files, Prism offers an extensive USD Editor. Layers can be created, deleted or sorted within a USD file. All objects (USD prims) in the USD file can be viewed in the “USD Scenegraph Tree”. New prims can be created here or existing prims can be renamed or deleted. USD Variants can also be created in the Scenegraph. This allows different variations of the geometry or material to be created in an asset USD file, for example. If the asset is later referenced in a shot, the geometry or material can be changed to a different variation with a single click. This can be very useful if an asset is duplicated very often in a shot and not all instances should look the same. Within the DCCs, Prism uses the USD tools available there, among other things. Houdini currently has by far the best USD toolset, but Maya also has good support in the latest versions. Prism can also work with USD files in other DCCs such as Blender and Unreal Engine. However, it should be noted that the official USD support in Blender and Unreal Engine is still quite experimental. In newer versions of Nuke, ZBrush and Substance Painter, Prism can import and export USD files. More DCCs will be added in the future – we are working hard on it! To make the USD workflow as easy as possible for artists, Prism automatically recognises which department the artist is currently in. These default settings make it easy to get used to the USD workflow, but can also be adjusted at any time if necessary. In the following, we will go through the individual departments and explain how the basic USD workflow works with Prism. Of course, other departments can also be added or omitted, depending on the project.
Modelling
USD changes very little in the modelling department. As usual, the geometry is created in a DCC such as Maya. The name and hierarchy of the objects are of great importance for the following departments. The model is then exported as a USD by clicking on a shelf tool. In the background, Prism recognises that you are currently working in the modelling department and automatically uses the necessary settings for the export. In addition to Maya, the model can of course also be created and exported in ZBrush, Houdini or other DCCs.
Surfacing
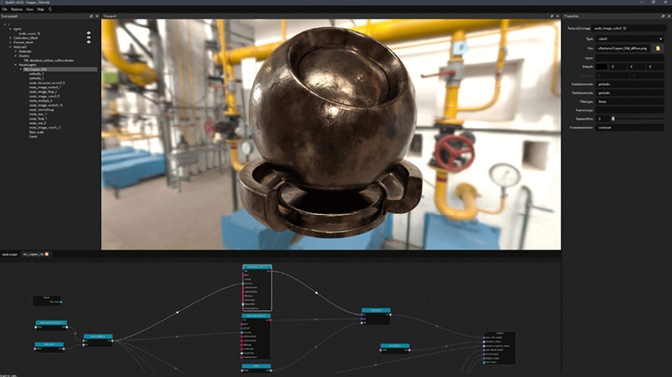
A great strength of USD is that complex materials can be saved in USD files and thus rendered by different renderers in different DCCs – with almost identical results. In practice, there are still differences with some renderers and not all materials can be rendered by all renderers. In many cases, however, this already works very well and support is constantly improving. One term that is frequently used in this context is MaterialX. This MaterialX is an open source material standard that is supported by more and more renderers. Materials in a USD file can be MaterialX materials, but do not have to be. Both Houdini and Maya since version 2024 (with LookDevX) can create and edit USD materials in a Node Editor. These materials can be exported using Prism and automatically linked to other USD files. Many studios rely on Adobe Substance Painter to create textures. Prism makes it very easy to import USD assets into Substance Painter. When exporting textures, Prism also has the option of creating a MaterialX file. This material is automatically assigned to the asset. This allows the materials to be viewed directly in Prism Standalone on the 3D asset. To edit the material further, the asset can now be imported into Houdini or Maya.
Rigging
Rigging is a department that is neglected in most USD workflows. Bones can currently be saved in USD files, but constraints or expressions, which would be necessary for more complex rigs, are not (currently) supported by USD. This will be added in future versions of USD, but currently rigs have to be entered in other ways. One option is to save the rig not as a USD, but as a Maya scene (.mb), which can be referenced from a USD file. However, this process requires several steps and is very tedious to implement manually. Prism automates this process so that the rig can be exported with virtually one click and automatically added to the USD asset. Animators can import a single USD file containing environments and props as well as character assets with the Maya rigs.

Turntables
In order to evaluate the appearance of an asset, turntables are usually created where the asset and/or lights can be rotated. Prism has a USD Turntable Editor that can be used to configure turntables, e.g. the HDRI, the duration or the asset position. This configuration can then be saved as a preset and applied to all assets in the project. The turntables can either be rendered locally or sent to a deadline render farm. This fast way of generating turntables is independent of DCCs and problems with the assets can be detected at an early stage.
Layout
In larger studios, there is often a layout department that sets up the shots and takes care of set dressing and camera animations. In smaller studios, this step is often carried out by the animators. In a USD workflow, the layout step is necessary to reference the assets in the shots. Prism can automatically create the layout USD file for each shot.
Animation
The animator can now import a single shot USD file which contains the complete layout of the shot including all assets. Assets with a rig can now be animated and exported with a click on the export shelf tool. The animation USD layer only has information about the point position at the individual frames of the animation. Materials or UVs are not saved in the Animation USD Layer. However, this is not a construction site, it is intentional: the materials of the asset can be adjusted later without having to re-export the animation.
Lighting
When it comes to lighting USD scenes, Houdini currently offers the most options. In other news: Water is still wet. Although USD scenes can also be rendered in other DCCs, for the sake of simplicity we will focus here on the lighting workflow in Houdini. And yes, I’ll leave “Houdini for the sake of simplicity” as it is. Node-based work in Houdini allows the lighting of several shots or complete sequences to be created in one scene. Prism can import the desired shots into Houdini Solaris. Prism creates ready-made nodegraphs for each shot, which can then be added to by the Lighting Artist. The USD scenes can now either be rendered directly in Houdini or submitted to a deadline render farm. Prism also offers the option of exporting the complete scene to a USD file before Houdini renders it. This can improve performance and of course save Houdini licences.
USD Conclusion
The use of USD makes it easier to automate work steps and realise them more independently of specific DCCs and renderers. With the right pipeline tools, USD offers both large and small projects the opportunity to organise the workflow efficiently and flexibly – much more than would be possible with conventional pipelines. Currently, the complexity of USD and the experimental implementation in some DCCs are obstacles for some studios to change their workflow, but these problems are literally getting less and less every day. Almost all DCCs are currently working hard on USD support. SideFX, Autodesk, Adobe, Blender Foundation, Epic Games and many other companies have made USD a key focus and are committed to making USD the standard in the animation/VFX industry. Prism offers the most comprehensive and user-friendly USD pipeline currently available on the market. We will continue to implement new USD features into Prism and make the workflow as easy to use and understand as possible, so that the USD workflow becomes the first choice for small studios, students and freelancers. But that’s not all – Prism 2 offers even more new features.

ZBrush
Anyone who has ever tried to write a plug-in for ZBrush knows that it is much more difficult than for most other DCCs. As a result, many studios have not even integrated ZBrush into their pipeline and models and textures are often still exported manually. With Prism 2 there is now also a Prism – ZBrush integration. This makes it possible to version ZBrush projects in an organised manner within the project structure. This allows you to jump back to older versions if required and ZBrush projects from members can be easily found and opened. Asset import is significantly simplified by Prism, as the desired asset can simply be selected in a library window and folders no longer need to be searched through manually. In addition to geometry, diffuse and displacement maps can also be exported. Prism takes care of folder creation and file naming so that this step only requires a few clicks.
Substance Painter
Another new plug-in is the Substance Painter integration. Similar to other DCC plug-ins, Prism takes care of the versioning of the scene files and the asset import. Various file formats such as Alembic, FBX or USD can be used. For the export of textures, Prism offers a separate export window with settings for the resolution, whether an export preset should be used and which maps should be exported. The export of multiple UDIMs is also supported. The exported textures are automatically versioned and can then be viewed in the Prism Library. From there, they can be brought into other DCCs to create materials for the assets.
Unreal Engine
The enthusiasm for real-time engines in recent years has probably not gone unnoticed by anyone. Well-known studios such as WetaFX create impressive short films in Unreal Engine and Epic Games invests a lot of money in the development of animation tools in UE. The potential time savings are motivating many smaller studios to test Unreal Engine, and many are already using it in their productions. The new Prism plug-in for Unreal Engine makes it possible to link the workflow of DCCs such as Houdini and Maya with Unreal Engine. The exchange of assets plays a central role in this. The UE plug-in works slightly differently to most DCC plug-ins in Prism. While Prism Houdini saves and versions scenes within the Prism project folder, Unreal projects can be stored outside the Prism project. Versioning of UE files is done using a version control system such as Perforce, which takes a different approach to Prism but works very well with UE. The Prism project is linked to the UE project and Prism can be used within UE to import assets from the Prism project into the UE Content Browser. For film projects, complete shots can also be imported from Prism into the UE Sequencer. Prism creates UE LevelSequences with the appropriate frame ranges and imports cameras and assets for each shot. Cameras and other objects can then be exported from UE back into the Prism project using Prism. A typical use case would be, for example, that the camera layout is made in UE and this camera is then to be exported to Maya so that the animator can animate a character to match the camera perspective. In the usual case that UE is used for rendering, Prism can render the content of the UE sequencer so that each shot ends up in the correct shot folder. Prism also takes care of the versioning of the rendered images. Prism can optionally submit the UE project to a deadline render farm for rendering. Prism is then used to import the rendered shots into Nuke or Resolve for post-processing.
Shotgrid, Ftrack, Kitsu
Prism focuses on file management, but a successful project also requires good time and task planning. The most widely used project management tools in the animation industry include Shotgrid, Ftrack and Kitsu. For the best file and project management experience, there are new plug-ins in Prism 2 to link any of these three tools to Prism. For the sake of simplicity, only Shotgrid or more recently Flow or formerly Shotgun will be mentioned in the following section, but all features apply equally to the Ftrack and Kitsu integration. As soon as Prism is linked to Shotgrid, all assets and shots are synchronised between Prism and Shotgrid in real time. When a new shot is created in Shotgrid, it is also immediately visible in Prism. Prism also reads metadata such as frame ranges, descriptions and thumbnails directly from Shotgrid. Departments and tasks are also synchronised – artists can therefore open Prism within their DCCs and change the task status or add notes; the changes are then automatically transferred to Shotgrid. Conversely, artists can see in Prism which Shotgrid/Flow tasks are assigned to them and no longer have to jump back and forth between DCC and Webbrower. And it is simply clearer and more convenient. Another function of the integration is the publishing of renders, playblasts and caches from Prism to Shotgrid. Prism also handles the conversion of image sequences to videos (if required), which can be played in Shotgrid/Flow.
User permissions
The new “Studio” plug-in offers cross-project settings with which an admin can manage entire teams. Individual users can be assigned roles that have different authorisations. For example, you can specify which users can create shots and who is authorised to edit the project settings. Admins can assign users to specific projects so that artists only see the projects they are involved in. Very practical, especially for studios with several projects! Environment variables and numerous user settings can also be set centrally for all users using the Studio plug-in.
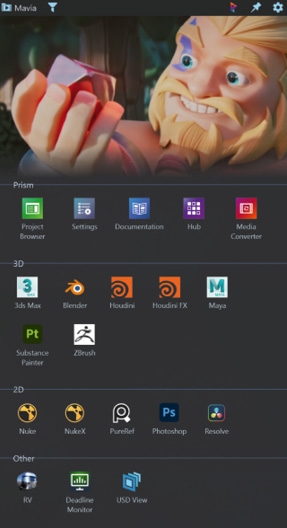
Launcher
With the Prism Launcher, you can access all the tools and resources that the artist needs for a project from one place – centrally for the entire project or studio. Specific versions of DCCs can be configured per project. Environment variables can also be defined for DCCs so that, for example, you can configure which project should load which version of a particular Houdini plug-in. Website links, e.g. for the studio’s internal documentation and tools such as Media Player, can also be added to the launcher. Everything you always want to have at hand – and that varies from team to team.
Easier setup
Installation and project creation have been greatly simplified: Prism can be installed locally or on a central server. Silent installation for automated setup without user interaction is also easy to do. Plug-ins can now be installed and updated via the Prism Hub. From over 20 plug-ins, you can select the ones that offer the desired range of functions. There are numerous minor improvements when setting up projects. For example, you can now create dozens of shots with hundreds of tasks with just a few clicks. Project presets can be created to create future projects with the desired presets. Even artists without any technical know-how can install and use Prism in just a few minutes.
Extensibility
One of the most important features in Prism is the ability to create plug-ins to add new features or modify existing ones. This gives studios the ability to customise their workflow. But instead of developing your own pipeline as before, you can use the basic functions of Prism, and in Prism 2 it has become easier to write plug-ins. A plug-in can now be created with a single Python file with less than 10 lines of code. There are numerous sample plug-ins in the documentation and some studios have released their plug-ins to the entire community. Studios have already written their own plug-ins for Gaffer, Fusion, Cinema4D, After Effects, Katana and other DCCs. However, smaller plug-ins such as those for copying files to certain folders or tracking working time on certain tasks are also popular extensions.
Further innovations
There are numerous other new features that we have not covered in detail here, but are nevertheless worth mentioning. These include new integrations for DaVinci Resolve, PureRef and OpenRV. A new media converter enables the conversion of media between different formats and OCIO colour spaces.
Dreams of the future!
There is no doubt that USD and MaterialX will play a bigger role for most studios in the future. New versions of these two tools will be released every few months and Prism will adapt and integrate new features. Among the long-awaited features announced for upcoming USD versions are the representation of animation curves and keyframes in USD files, which would allow animations to be exchanged between DCCs without baking, and “OpenExec”, which makes it easier to display rigs in USD. For Prism, it is a long-term task to simplify the complicated USD concepts so that artists can benefit from USD and MaterialX without a long familiarisation period.
New DCC integrations
There is a wide range of DCCs used by studios, and our goal is to develop Prism plug-ins for more and more tools. Deciding which DCCs to support next will depend heavily on demand. A Cinema4D plug-in is currently at the top of the list and is expected to be released later this year.
Editorial
Another focus in the coming months will be the exchange of editorial data between different tools. Information about shot length, sequence etc. will be easy to send back and forth between tools such as DaVinci Resolve, Nuke Studio, Unreal Engine Sequence, OpenRV and other tools. Multi-shot workflows in Houdini will also benefit from this. This development will be based on the open source standard OpenTimelineIO to guarantee future-proof and modern functions.
Linux
Prism 2 is currently only available for Windows. For small studios and freelancers, Windows is the preferred OS due to its ease of setup and user-friendliness. For larger studios, however, Linux is the first choice due to its better performance, stability and configurability. Now that the Windows version of Prism has been released, we are also working on a Linux version – and will have updates for you in the coming months.
Long-term plans
Our goal is and remains to make the work of 3D artists easier with user-friendly tools. Of course we have ideas for the distant future, but these are not set in stone. New DCCs such as EmberGen are under discussion, but in a year’s time there may already be new DCCs that nobody is talking about today. Open Source Software (OSS) will continue to play a central role for Prism in the future. OSS such as OpenEXR, OpenVDB and Alembic are already indispensable and newer OSS such as OpenUSD, MaterialX, OpenTimelineIO and OpenAssetIO will play an increasingly important role in the industry and also in Prism in the future.
Open Source Core
As with Prism 1, the core application of Prism 2 is open source and free for everyone to use, as are many of the plug-ins, such as the integrations for Houdini, Maya, 3ds Max and Blender. The free version can be easily downloaded from the website or from GitHub. Some of the newer plug-ins, such as the OpenUSD integration, require a paid Prism Plus licence, which can be tested free of charge for 30 days. For larger teams, the Prism Pro licence is available, which provides extended support and access to beta functions, among other things. In the documentation you will find guides for the first steps with Prism in general as well as specifically for the USD workflow. Click here for the free download and more information: prism-pipeline.com In addition to e-mail, we also offer support via our Discord server. Many users share their experiences and workflows with Prism there. New functions can be suggested there and the more people support an idea, the more we prioritise it in our roadmap. We also offer live demos and training sessions on various functions, as well as the development of customised plug-ins.
Conclusion
We are very proud of Prism 2 – with USD, the links to the tools from the various sectors and the general “usefulness”, we believe that it is a real relief for many artists. We can’t yet say what Prism 3 will look like – but come to our Discord (prism-pipeline.com/discord) or the forum (prism-pipeline.com/forum) and tell us what you’d like to see!