Table of Contents Show
Every collaboration begins with the exchange of media. DaVinci Resolve supports this with a proxy workflow, which has been supplemented with an external proxy generator in version 18. In this article, we look at the entire collaboration process – from media exchange to joint work with editing, VFX, colour correction and audio.
Application scenarios
Blackmagic Cloud can be used in a wide range of different application scenarios. Here are three examples with increasing complexity:
Example 1: Solo operator with multiple workstations
If I have one computer in the studio and a second at home or mobile, I can continue working on cloud projects from any workstation without interruption. I don’t have to worry about project import/export or any special IT infrastructure.
Example 2: Outsourcing video editing based on proxies
An external video editor handles the editing independently, based on proxy media that can be quickly shared online. If required, I can open the project read-only and view the current status without intervening. Once the edit is complete, I take over the project, make corrections in the timeline myself as required or do the colour correction based on the original files. Blackmagic Cloud guarantees that I am working on the latest version of the project. No export/import of project files and no confusion with version numbers.
Example 3: Comprehensive multi-user collaboration
During a shoot lasting several days, media is added to a DaVinci Resolve project on a daily basis. Clips are pre-sorted into bins on set and initial metadata is entered manually or via CSV upload. Dailies are created from the project or reviewed directly in Resolve. Proxies are created and automatically synchronised overnight with a cloud service. An editor working remotely starts editing in parallel based on the proxies. It uses the created bins and metadata for orientation. Towards the end of the cut, VFX artists, colourists and sound mixers come on board and work completely in parallel on the original media. If necessary, several VFX artists or colourists work simultaneously on different shots in the timeline. The progress can be viewed live by everyone.
Requirement for network or cloud storage
DaVinci Resolve is agnostic towards the storage solution used. Blackmagic Cloud does not change this. This means that how I store and transfer my media is up to me. From cloud storage (Dropbox, Google Drive, One Drive, etc.) to the classic in-house FTP server to the hard drive in the package dispatch, everything is possible – and (as soon as the data is available) has practically no influence on further work.
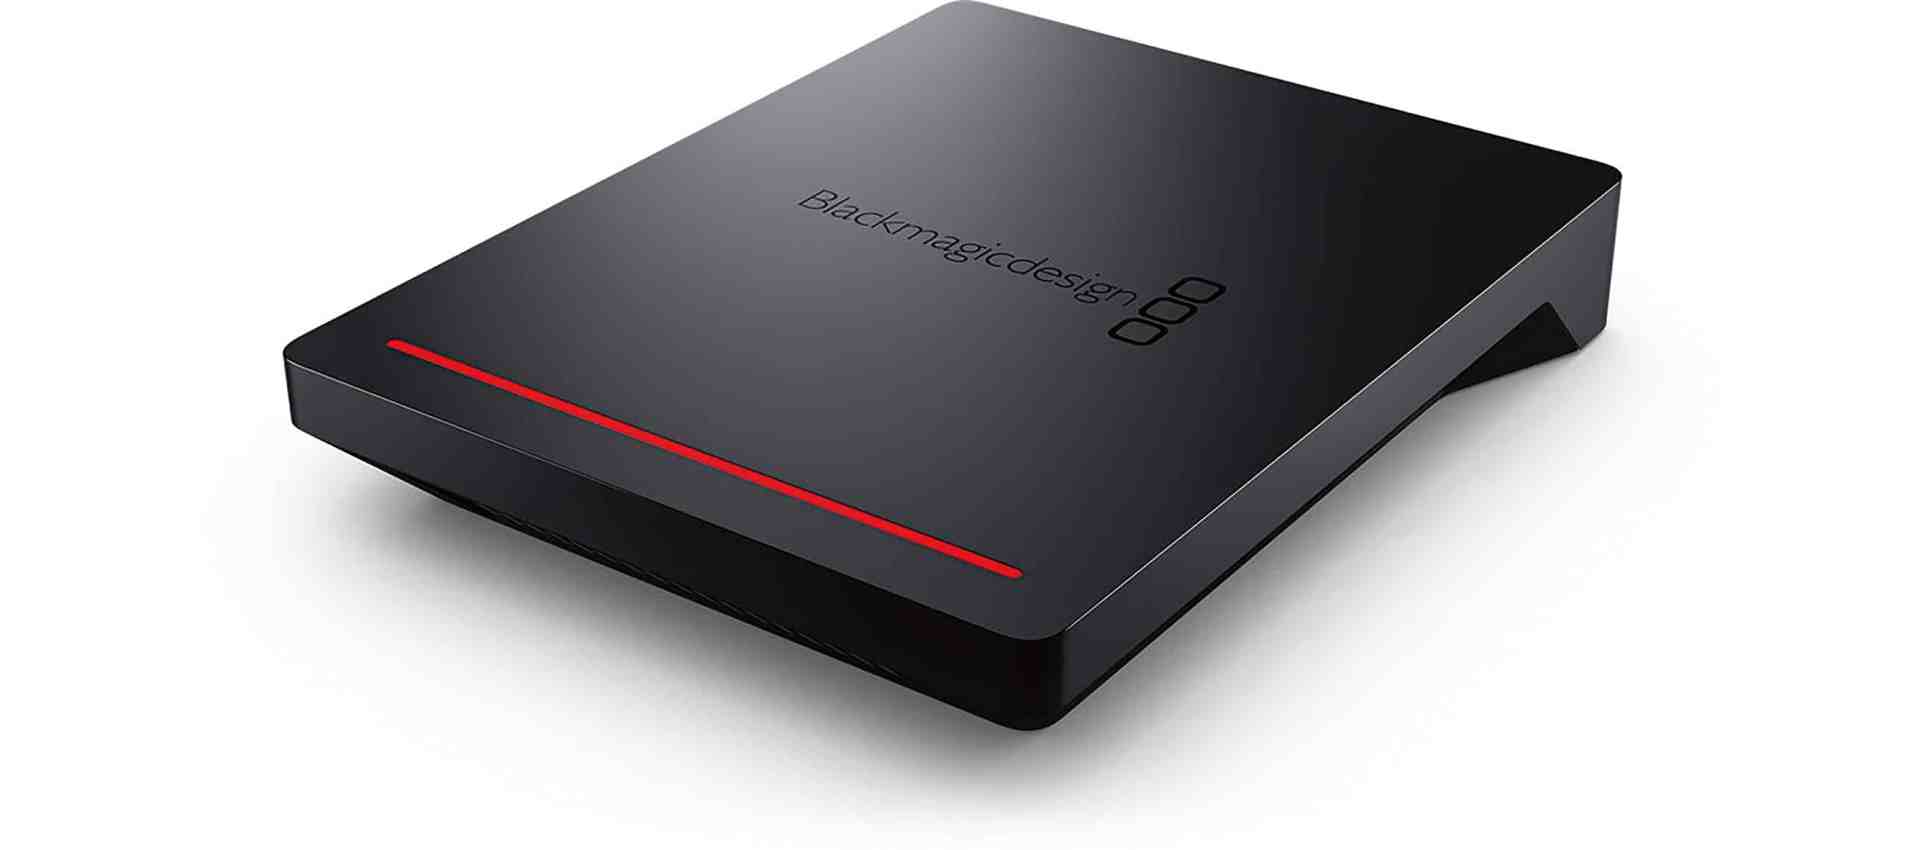
Blackmagic Design now offers its own storage solutions under the Cloud Store or Cloud Pod. These are on-site network storage solutions with a built-in option for synchronisation via external cloud services. Google Cloud and Dropbox are currently supported. For a more detailed look, see also the article “Teamwork in Resolve 18” by Prof. Uli Plank, which can be found on p. 40 of DP 05:22.
For this article, I carried out tests with the smallest version, the Cloud Pod, to see whether a storage solution from Blackmagic Design brings fundamental advantages to the workflow. This is only partially the case. The device’s internal integration with Dropbox and Google Drive allows media synchronisation without a computer. Anyone who uses these services and wants to synchronise overnight when the computer is switched off will welcome this.
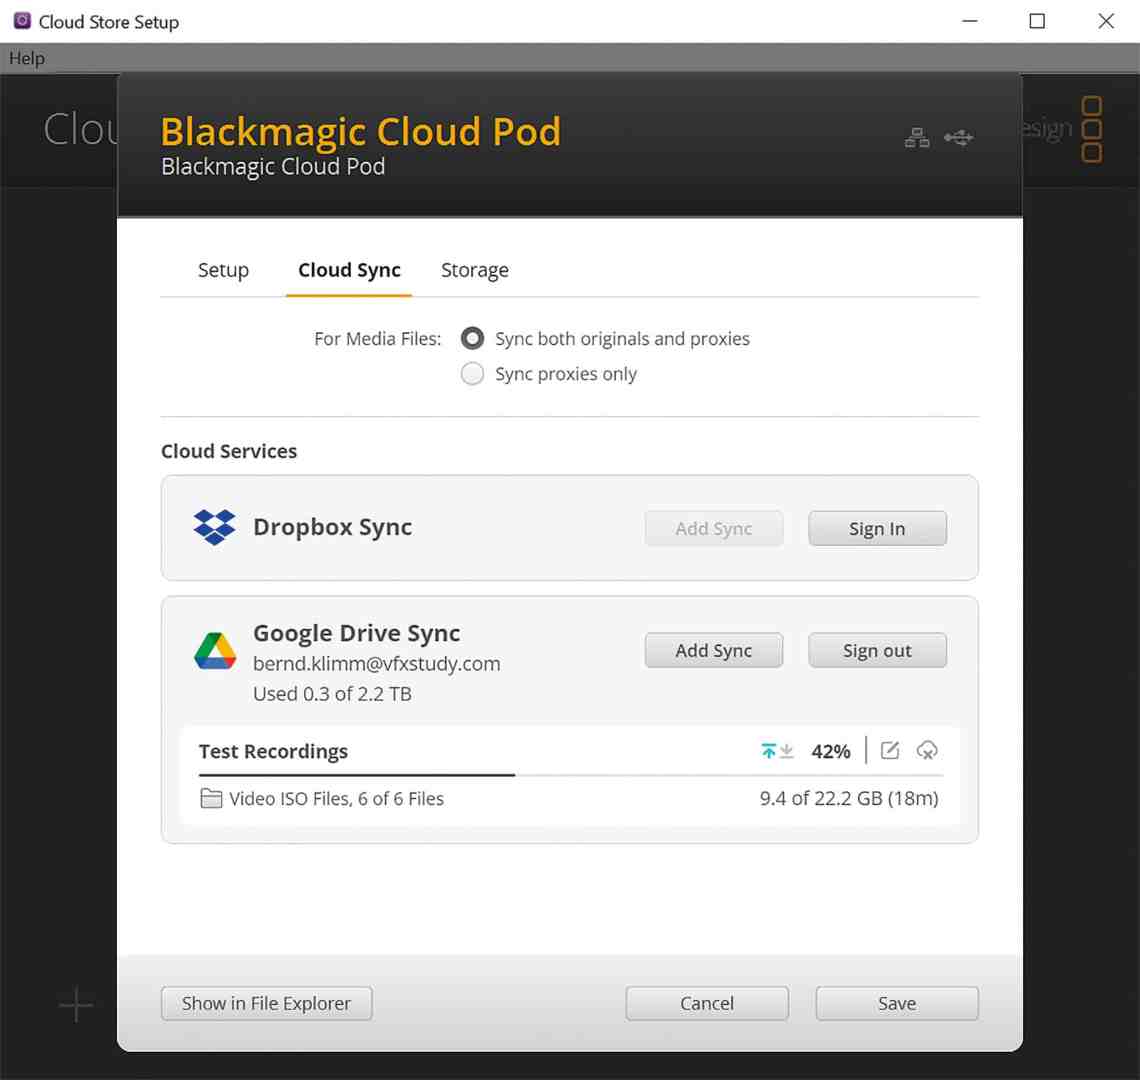
However, this is also possible with storage solutions from other providers. One advantage of the Blackmagic Design solution is that proxies created with the Blackmagic Design Proxy Generator are automatically recognised. These proxies are transferred with priority or synchronisation can also be restricted to proxies only. However, the Proxy Generator is not the best solution for every workflow and a restriction to proxy media is not always sufficient, as we will see below.
Proxy workflow with generator
Despite a broadband connection, sending large quantities of video material is often difficult. Very often, however, the exchange of smaller proxy files is initially sufficient for editing. Original media is later used for VFX and colour correction and only for the material actually used.
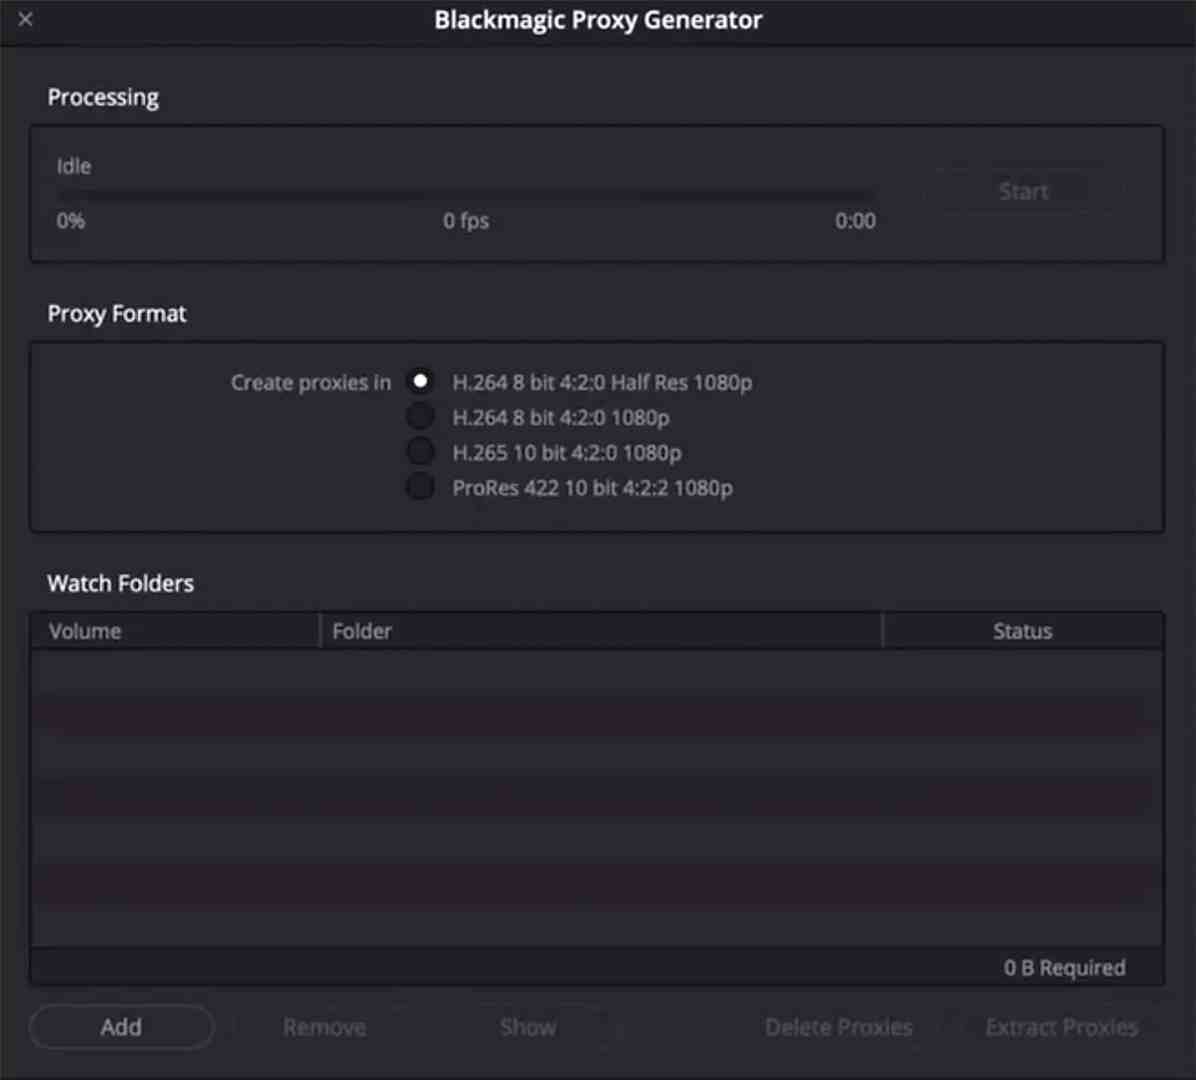
Proxy media can be created in various ways in Resolve or externally. Blackmagic Design automatically includes the Blackmagic Proxy Generator with DaVinci Resolve 18. This is a simplified tool for proxy creation with few configuration options. The user selects one or more watch folders for the original media. One of the preset 1080p proxy formats is then selected. Under Windows, two H.264 and one H.265 preset are currently available – under Mac, there is also a ProRes variant.
There are no further setting options. Click on Start and the tool creates proxy files for all videos in the folders and subfolders listed under Watch Folder. As long as the tool is running, it continues to monitor the folders and new videos that are added are automatically picked up. This makes the Proxy Generator very easy to use and it can also run in the background or even on several computers in the network in parallel. For parallel proxy creation with several computers, it is sufficient if they all have access to the same network storage. No further configuration is required. The app is simple and robust, but also not very flexible. One of the main problems is the storage location of the proxies. These end up in “proxy” subfolders of the original folder structure.
This allows DaVinci Resolve to automatically recognise the proxies and make them available in Resolve without additional linking. However, it also means that additional files end up in the original folder structure, which are handled differently from the point of view of backup, archive and online synchronisation with cloud services. Users of the Blackmagic Cloud Store or Cloud Pods have an advantage in the last point. In the settings for synchronisation with the cloud, synchronisation can be restricted to proxy media.

Otherwise, the proxy generator only offers the option of exporting the proxies after stopping the proxy creation. This creates a copy of all proxies from the watch folders in a different location. The original proxies can then be deleted using Delete Proxies. However, if video files are to be added continuously and proxies are to be created repeatedly, this procedure is hardly suitable. Previously exported proxies are copied again (or overwritten) when exporting a second time. Deleted proxies are recreated as soon as the generator is restarted on the same watch folder.
If you still want to use the proxy generator in this situation, you must either manually fish out the proxy subfolders in the file system and copy them yourself or create new folders each time you add new media – and create separate watch folders. There is another catch to mixing proxy files and original media: other files often have to be passed on for collaboration in addition to proxy videos. For example, graphics, photos or separate audio recordings. Even with the Blackmagic Cloud Store, I have to separate these files from the original data in the file path or copy them out in order to be able to transfer them with the proxies but without the original videos.
So it seems logical to create the proxies and any copies of other files in a separate folder right from the start. This folder does not require a backup, can be shared in any way and can be deleted without hesitation once the collaboration has ended.

Proxy workflow within DaVinci Resolve
The proxy workflow within DaVinci Resolve makes exactly this possible. In the project settings, I can set both the format and the resolution of the proxies in the “Master Settings” under “Optimised Media and Render Cache”. All ProRes variants are also available here under Mac and the comparable DNxHR options under Windows. Under the “Working Folders” I can determine the storage location for the
Proxies and, for example, specify a folder here that is synchronised with my preferred cloud solution. I then select all the clips in the media pool for which proxies are to be created and can start the generation by right-clicking “Generate Proxy Media”.
Working with proxies
If I have created proxies using one of the above methods, they are immediately available in DaVinci Resolve. If I have created proxies externally, I must then link them in Resolve. To do this, I select all the media in the Media Pool for which proxies are available and right-click on “Relink Proxy Media”.
Once the proxies have been linked in the project, they are also available to all employees in the cloud project, provided the files have been exchanged and the path mapping has been taken into account (see left). I can see which proxies are available via the List View in the Media Pool. The “Proxy” column shows the resolution of the linked proxy file or “None” if there is no proxy. The “Proxy Media Path” column points to the file on the hard drive. (I can configure the column display by right-clicking on the title bar of the List View). Proxies can be necessary, helpful or undesirable in different phases of the project. In DaVinci Resolve, I can choose between three options under “Playback -> Proxy Handling”:

i select “Disable All Proxies” when I need to be absolutely sure that I am working with the best quality, for example during colour grading or before final rendering. If original files are missing at that time, the corresponding clips are displayed with “Media Offline” and are therefore easily recognisable.
“Prefer Proxys” is recommended for editing if the computer is not powerful enough to work smoothly with the originals.
“Prefer Camera Originals” is particularly helpful if original data arrives with a delay in the remote collaboration. This allows me to start working based on proxies while the original data is being downloaded in the background. As soon as new clips are available in the original, Resolve automatically switches to the original during the next playback.
When proxies are active, Resolve indicates that proxies are being used with a small preview icon in the timeline, in the Media Pool and in the clips bar (Colour, Fusion).

In the example, “Prefer Camera Originals” is set as the proxy handling and the original file is not yet available for the second clip.
Set up cloud project
Firstly, all project members set up a free account at cloud.blackmagicdesign.com. The accounts remain free of charge and do not require any means of payment. Only the creation of a project library is subject to a fee and is currently charged at USD 5 per month.
Project Library
After logging into the Blackmagic Cloud in the browser, I select “Project Server”. Project Libraries are now created and managed here. A project library in Resolve is a database in which projects are created or loaded. This can be any number of Resolve projects, but it should be noted that only the entire library can be shared in a cloud library and there are no access restrictions within the library. The number of users is also currently limited to 10. A single library should be sufficient for most users. However, if you want to work in parallel with different teams on different projects, you may need several libraries to separate the projects and teams. Libraries can be deactivated at any time (even temporarily); in this case, the remaining monthly credit will be credited.
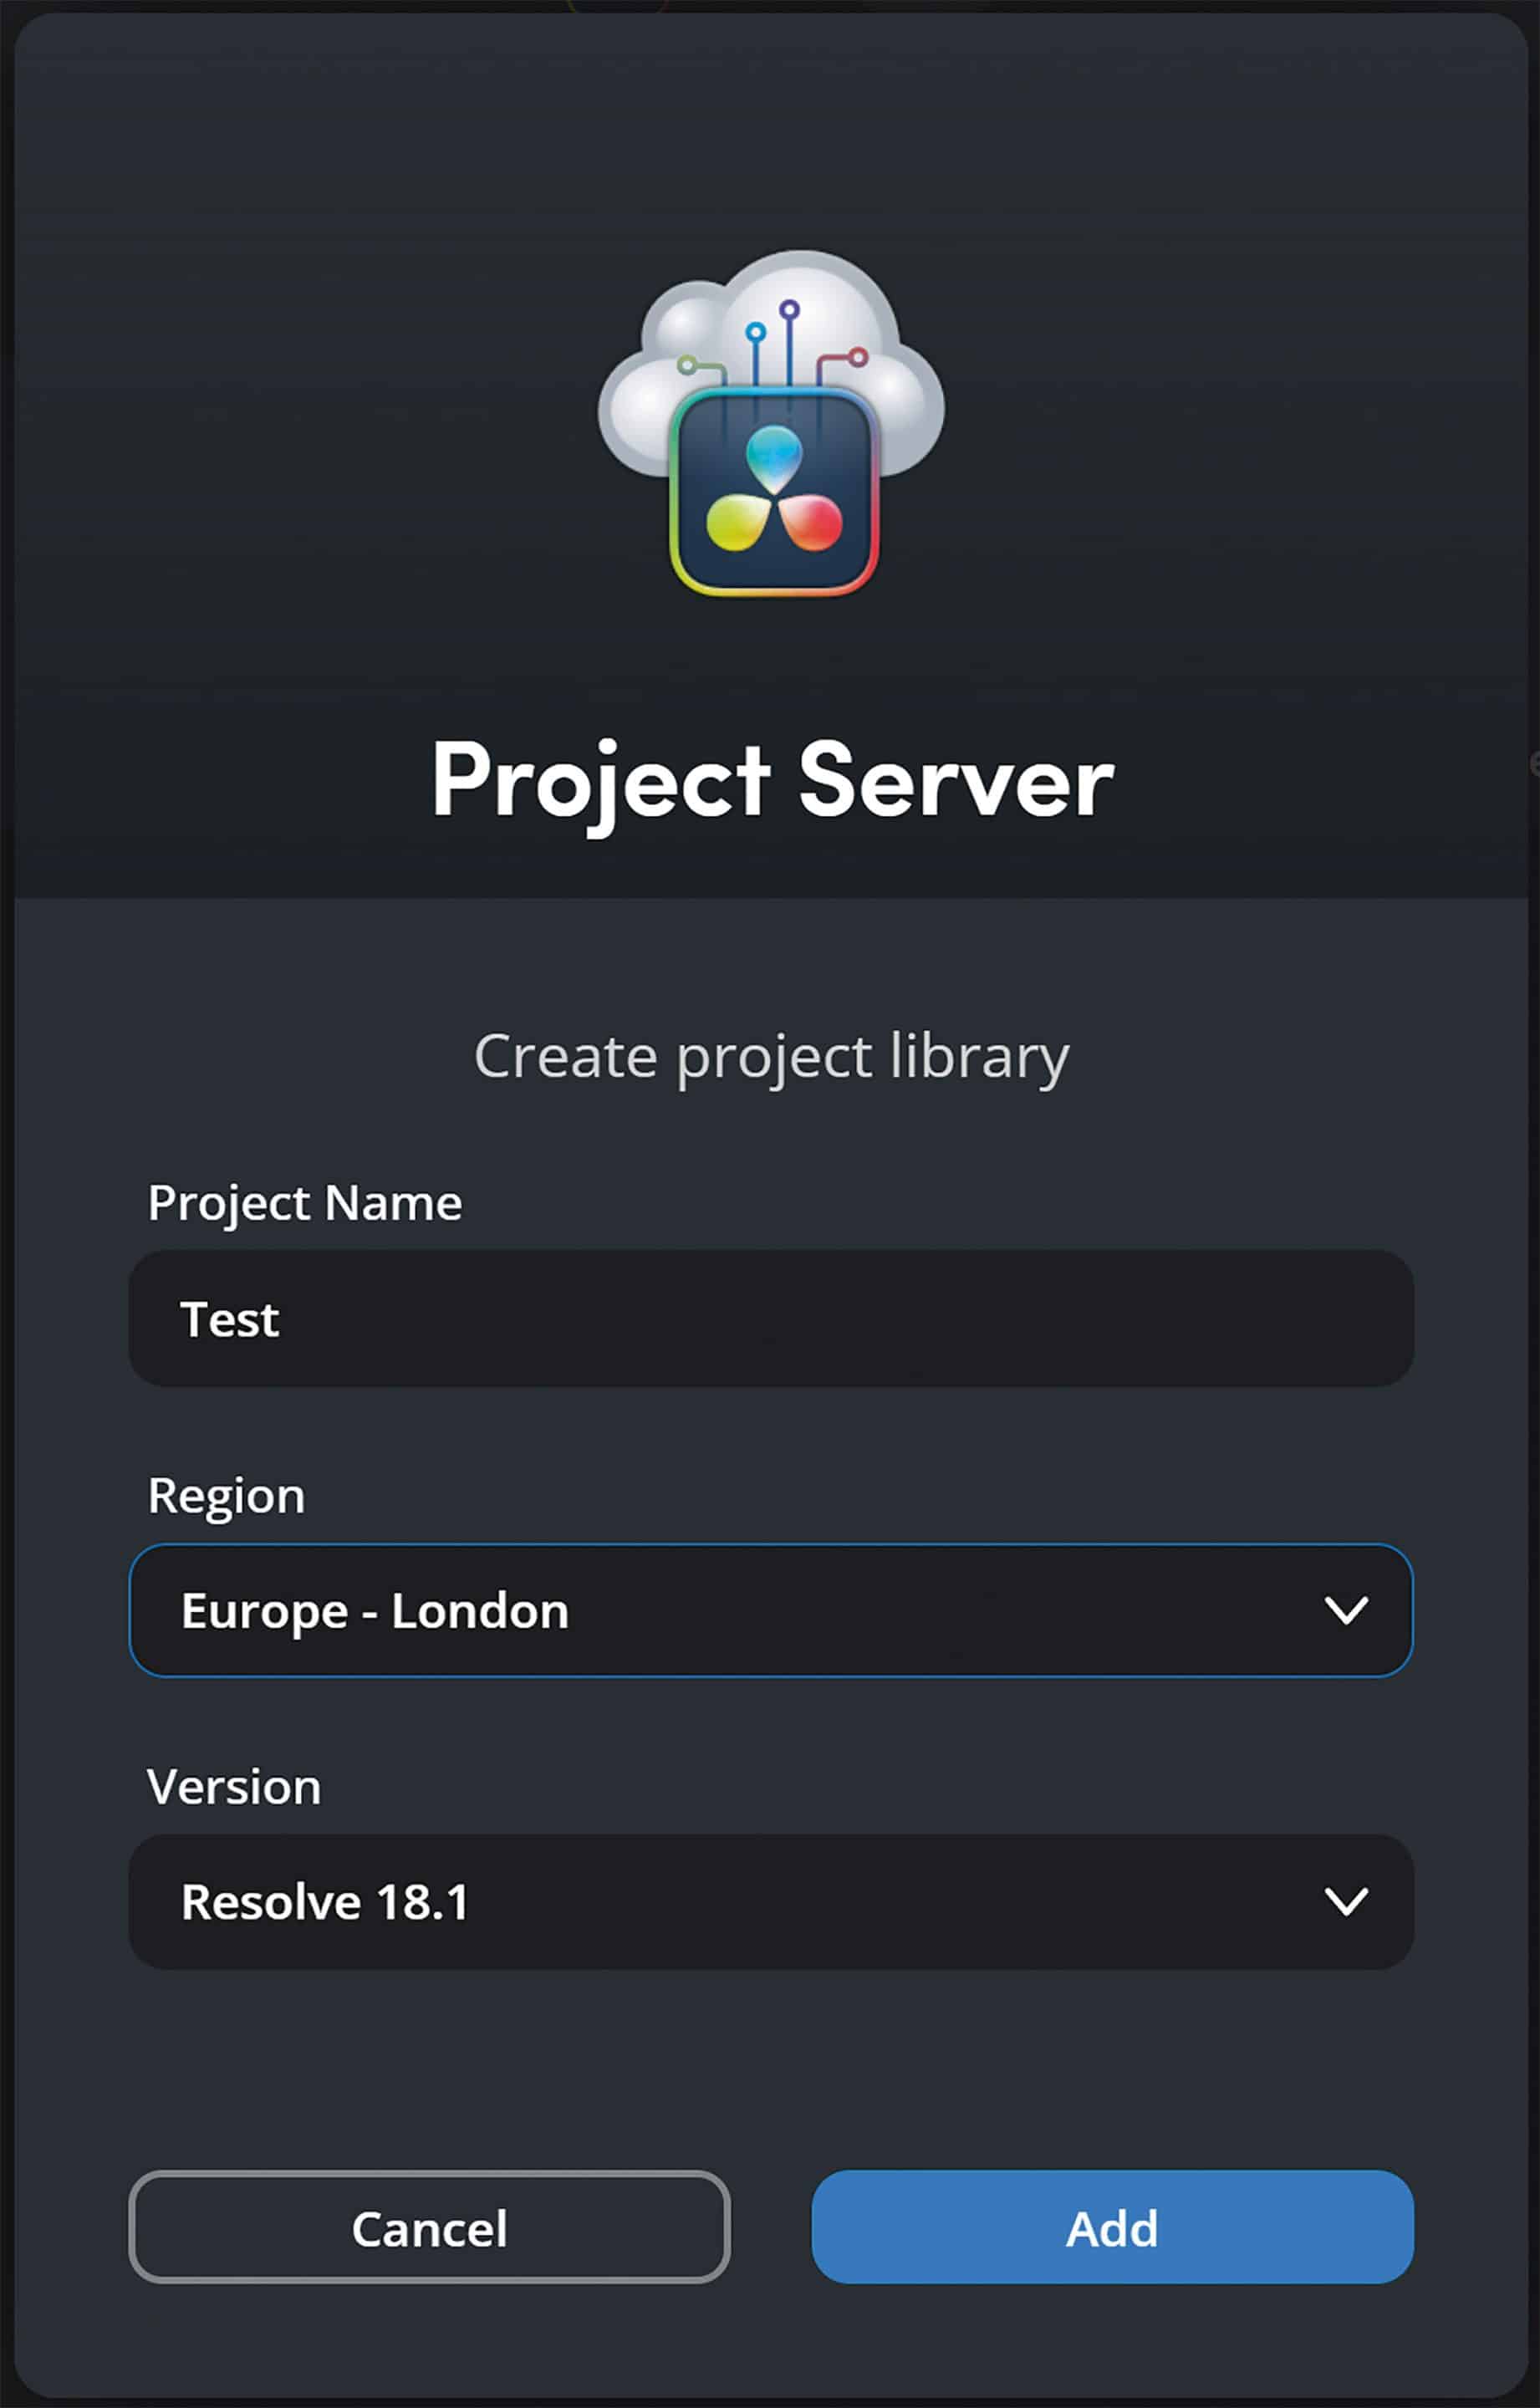
of Blackmagic Cloud via the browser. The server location
and Resolve version are determined.
I add a new library via “Add Project Library”. I specify a region for the library when creating it. This determines the server location. In principle, any location can be selected, but a location close to the project team members promises shorter latency in communication. The DaVinci Resolve version is also selected. Minor updates in Resolve have no influence on the library. After major releases (for example from v.18.0 to 18.1), however, the Resolve library must be updated. This applies both locally and in the cloud. After such an upgrade, the library is no longer compatible with previous versions and all employees must update DaVinci Resolve accordingly.
The Project Library can only be registered and created via the web browser. However, I can also log in directly from the Resolve Project Manager under “Cloud” and manage, share and add projects to the library from there. If necessary, I can use the “Show/Hide Project Libraries” button to expand the Project Libraries on the left. Clicking on “Details” shows details about the library and gives me the option of inviting other employees via “Share”. To share, I only need the e-mail address with which the employee has previously registered. The members of the library receive an email notification and can now also access the library via their Resolve Project Manager.

Cloud Project
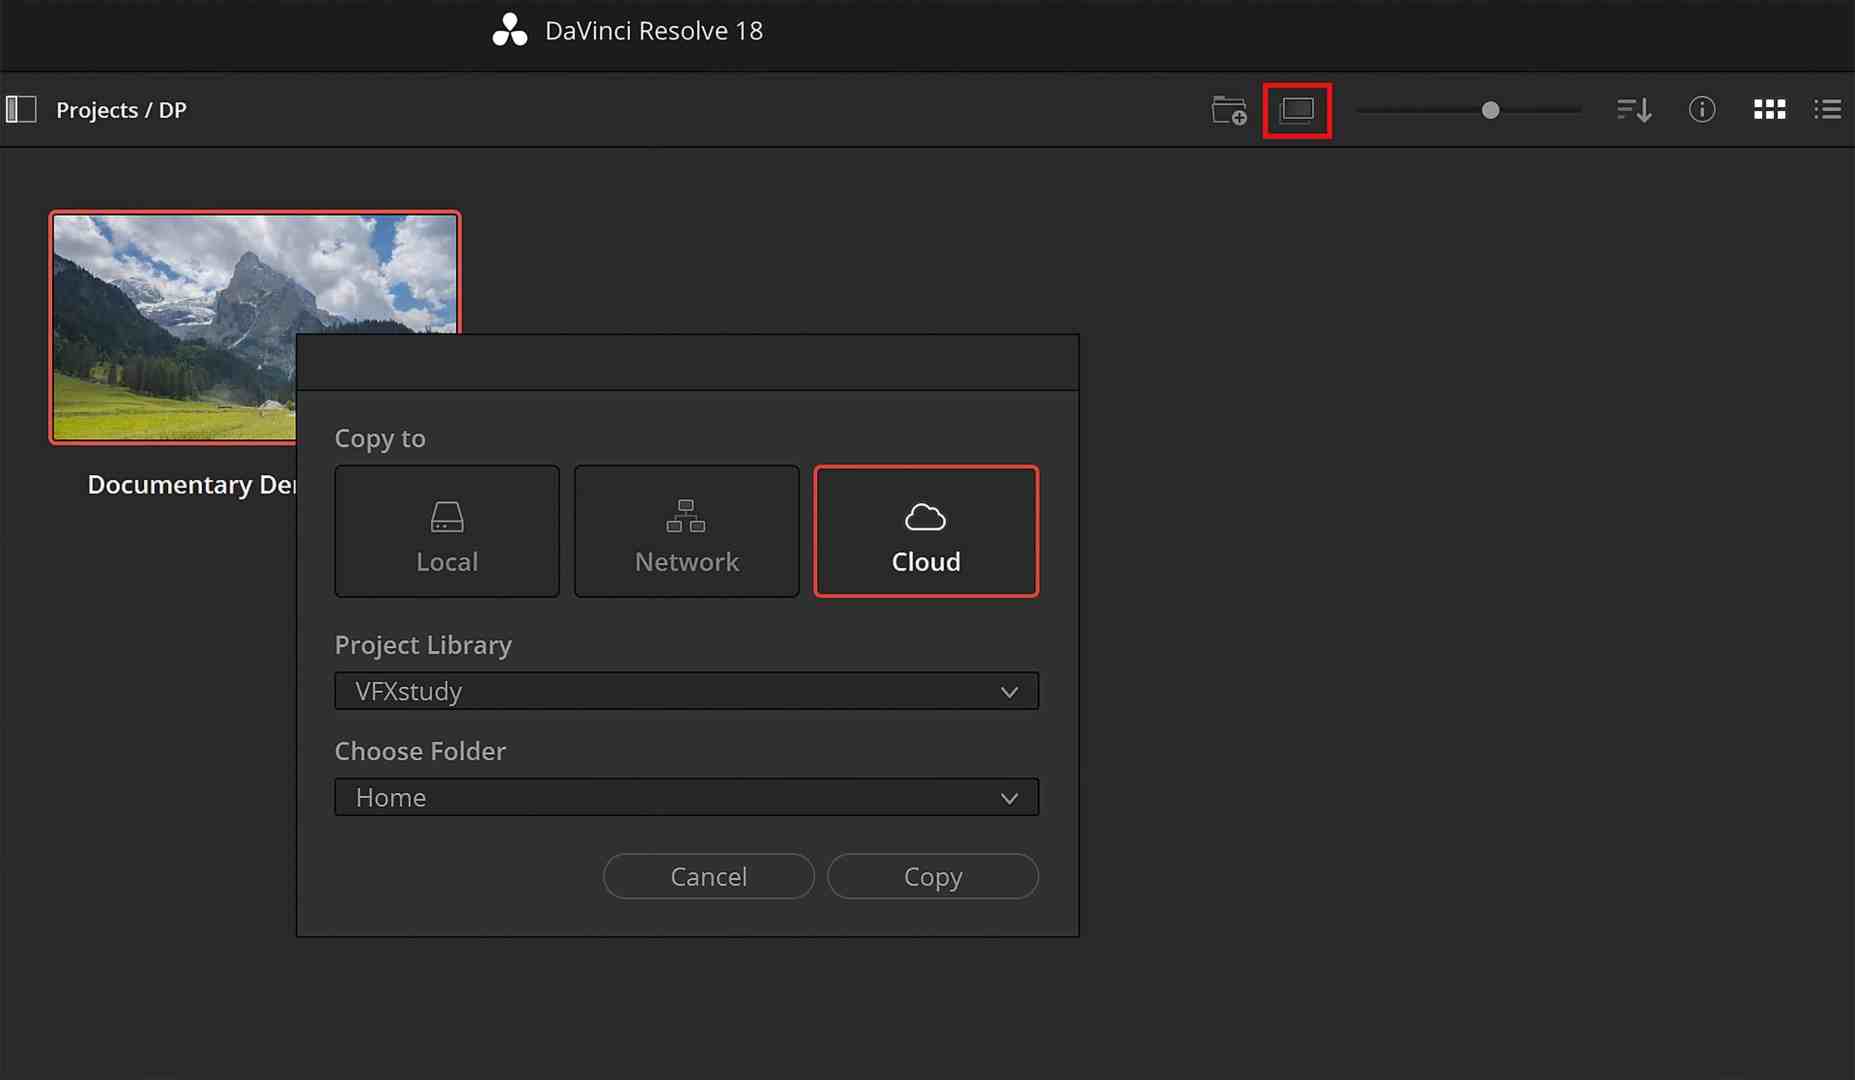
A cloud project is essentially nothing more than a regular DaVinci Resolve project that is stored in a cloud library for synchronisation purposes. It can be exported and copied in the same way as other projects. This makes it easy to move a project from “Local” to “Cloud” or vice versa. For example, I can create a project locally and only move it to the cloud later for collaboration. To do this, I select the project under “Local”, click on the “Copy Project to” button – and select the Cloud Library in the dialogue.
Once the collaboration is finished, I copy the project back and can remove the Cloud Library without hesitation – and save the monthly fee. Alternatively, I can also continue to use a library for completely different projects by removing completed projects from the library and then removing or adding members according to new project requirements.
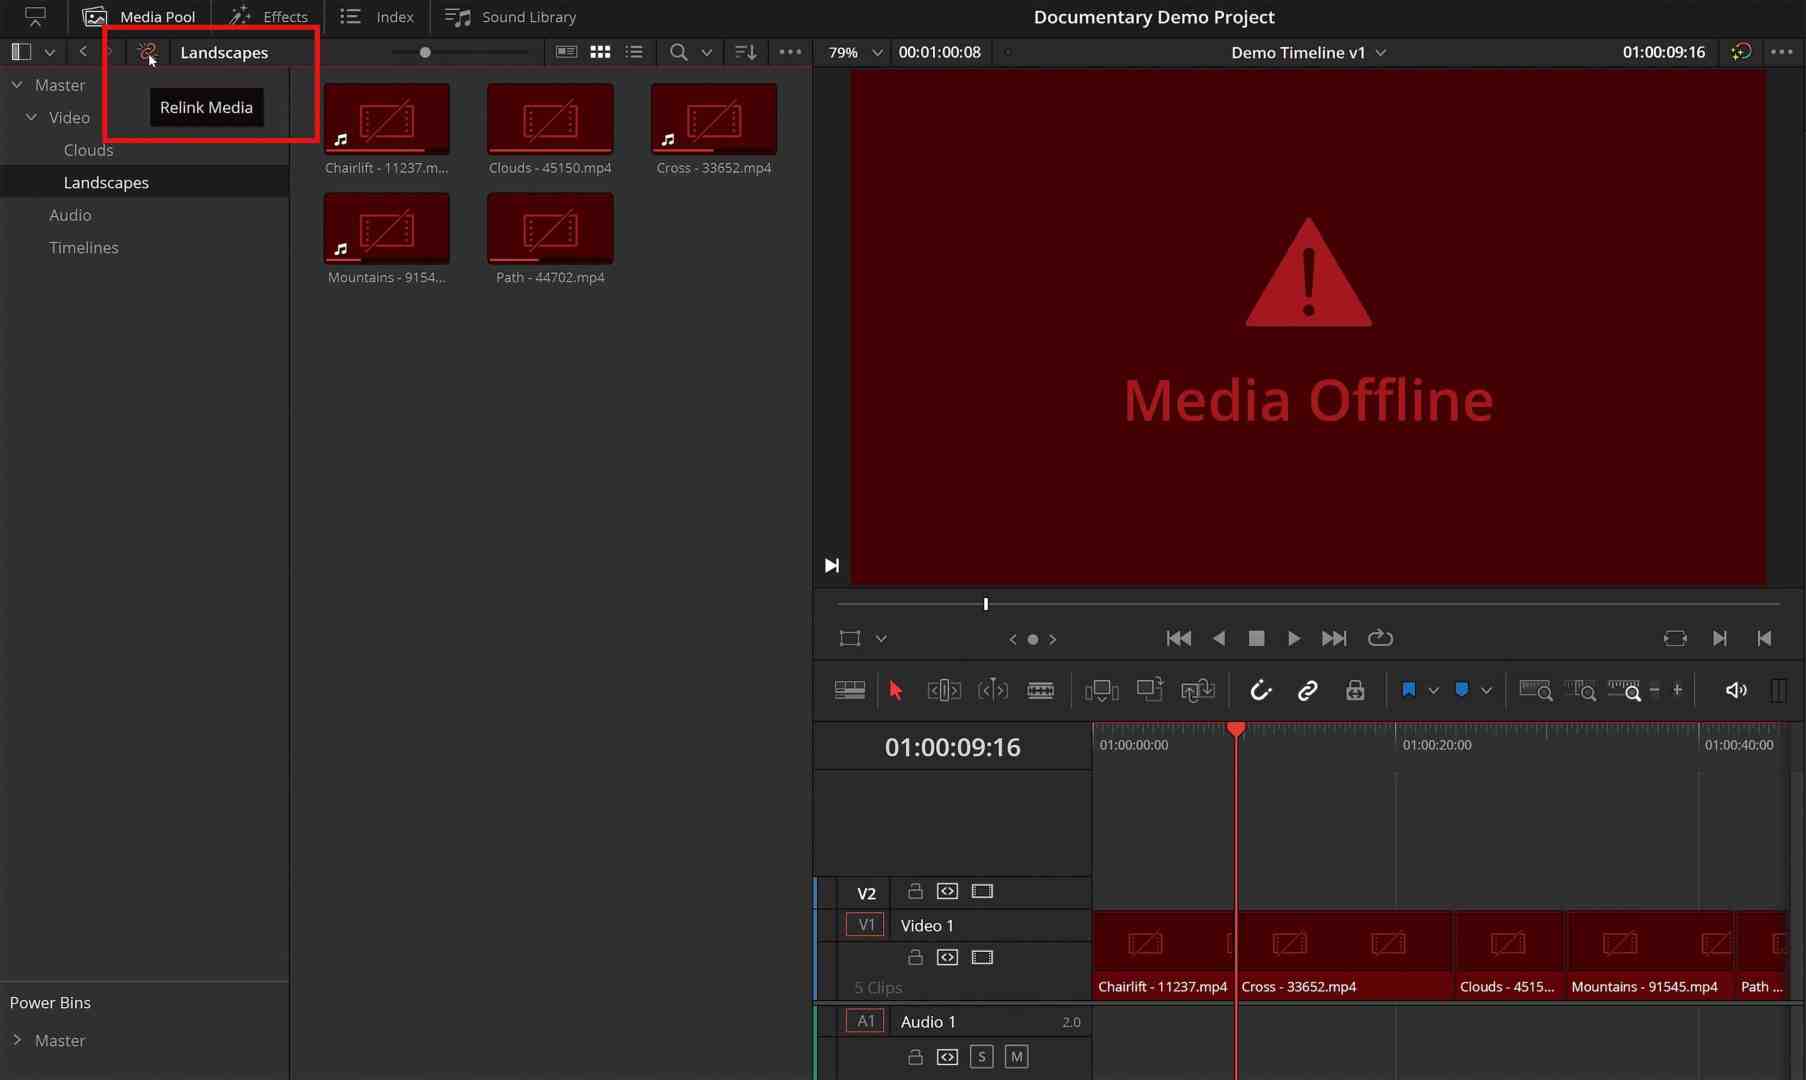
Working in the cloud project: Relinking and path mapping
When working locally, as well as in the cloud, DaVinci Resolve must have linked the media used in the project. This means that Resolve knows the corresponding file path for each clip in the media pool. When new projects are loaded or file paths change, media initially appears as “Media Offline” and can be reassigned by clicking on “Relink Media”. The same procedure now also works in the cloud, but local paths are now created for each user in the path mapping. In our tests, this has always worked without any problems, but we have received isolated reports of problems with proxies. If there is a problem, we recommend the following:
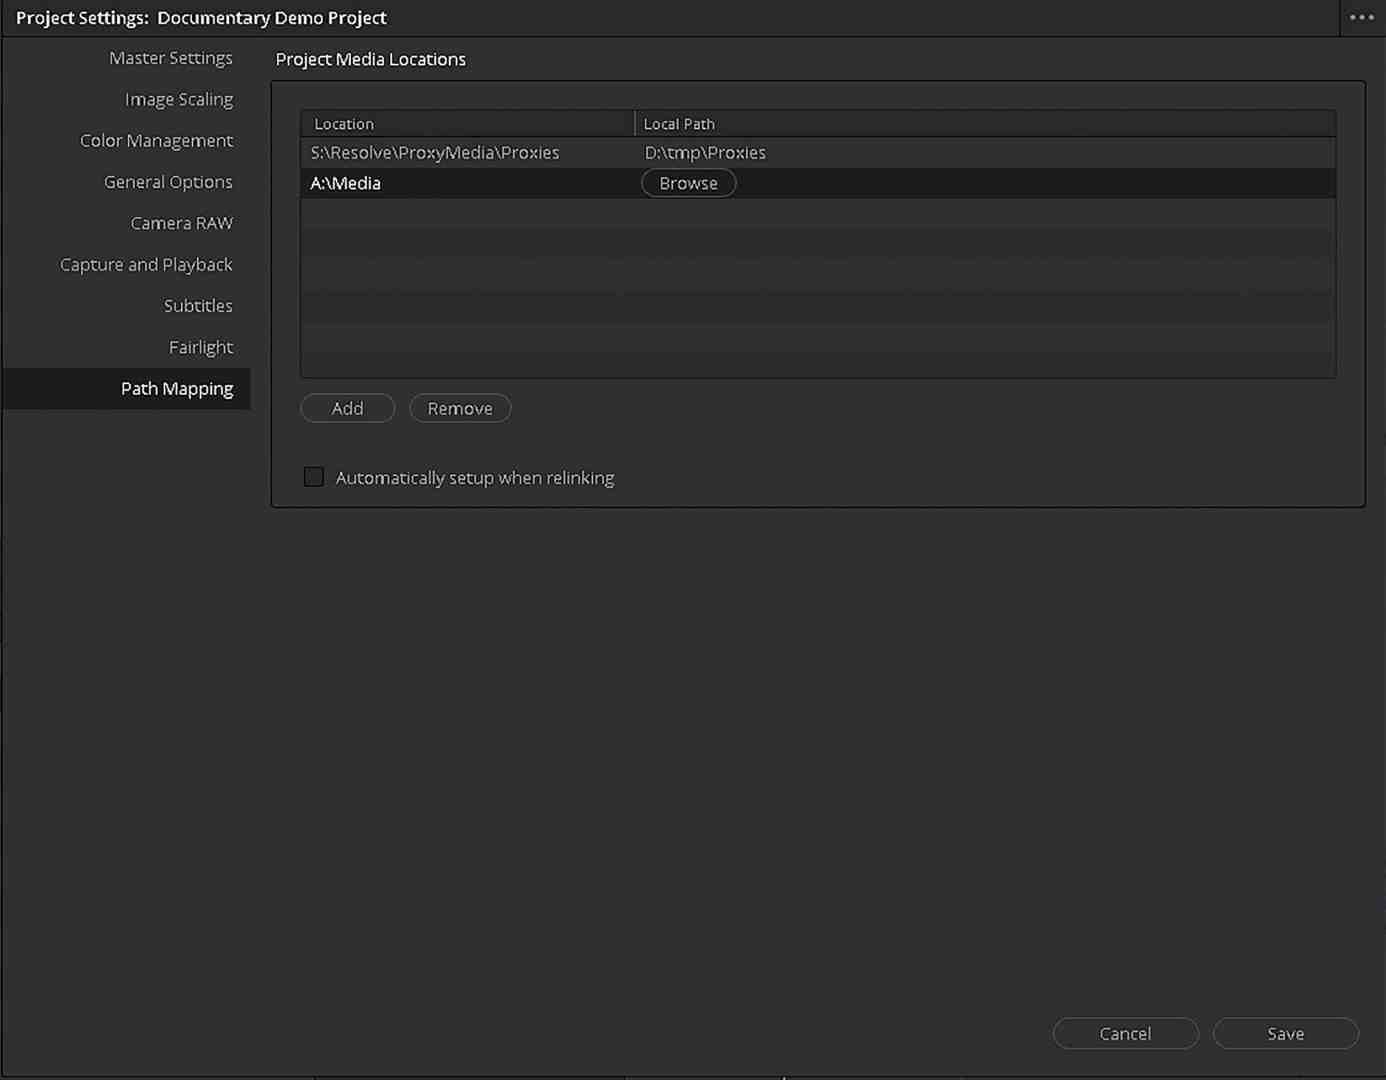
Initially, we limit ourselves to a few “main folders”. For example, a “Media” folder and a “Proxies” folder and agree within the team that the substructure below these main folders will never be changed when exchanging data. This means that a file “Media/Videos/Landscape/0001.mov” also ends up on all computers under the same sub-path of the “Media” folder (i.e. “/Videos/Landscape/”) as soon as it is downloaded.
In the project manager under “Path Mapping” we should now find exactly this “main folder” with the corresponding local path. If something goes wrong, we can change the local paths here again. If you want to be absolutely sure, you can switch off the automatic linking from the start. In this case, I add my “main folders” via “Add” on the computer on which I created the project. I then ask all employees to enter the local paths via “Browse”. The “Relink Media” function is not required.
Not all media must be available when creating the paths. If the data exchange has not yet been completed, media that are not available remain offline until they are available in the paths specified in the path mapping. In this way, an employee can start with the existing media or proxies – and recognise in the media bin as soon as further clips become available.
Single User Project
Regardless of whether I copy an existing project to the cloud or create a new project there via “New Project”: In both cases, the project initially starts as a single user project. This means that it can only be edited by one person at a time. All members of the library have access to the project, but only the first employee who regularly opens the project has write access. If the project is already being edited by another member, a lock symbol appears and the project can only be opened read-only.
If team members are not working on the project in parallel, the single user project has advantages. Everyone has access to the current status at all times if required; there is no risk of versions getting mixed up during handover. At the same time, the person working on the project has full access – and the certainty that no one will change anything in the meantime.
Multi-user collaboration
For closer collaboration, the project can be released for editing by all team members via “File -> Multi User Collaboration” while it is being edited. From now on, all members
Access to all functions in Resolve. A locking mechanism ensures that employees do not get in each other’s way.
Locking mechanism
True to the motto “first come, first served”, DaVinci Resolve allows the user who tackles an object (timeline, bin, …) first to edit it. This object is temporarily blocked for other users. This means that they only have read authorisation and can see the progress. In detail, this works as follows.
Bin
If I click on a bin in the Media Pool that is not being edited by another employee, I automatically receive a lock on this bin. I can edit the bin and, for example, rename clips or create subfolders. Other users see my thumbnail next to the bin name. This allows users to recognise that the bin is locked for editing. If I don’t want to edit it, I can unlock the bin for others by right-clicking via “Unlock Bins”.
Attention: The bin remains locked even if I close the media pool. This makes it very easy to accidentally lock a bin in which another employee wants to work. Unfortunately, Resolve does not show me in the Media Pool whether I have already unlocked a bin manually or not. One solution could be to create a dummy bin with your own name – and get into the habit of always selecting this bin when I’m not doing anything else in the Media Pool. That way, I have a “Bernd_Unlock” bin and know that I’m not disturbing anyone as long as I have this bin selected.
Conversely, if I am organising media while other members are active in the project, it is advisable to lock all relevant bins manually by right-clicking “Lock Bins” at the start of the work. This way, I can be sure that no one will interfere with me in the future. However, the manual lock is cancelled as soon as I close the project.
Timeline
The timeline is also locked as soon as I open it first from the Edit Page, Cut Page or Fairlight. The lock applies to editing and audio, but not to work in the Colour or Fusion workspaces. This means that only one editor or sound mixer can work in a timeline at the same time. If editing assistants or several editors are in the project, they should either work one after the other or on separate timelines in parallel – and merge them later.
However, a locked timeline can be viewed by everyone at any time without editing rights. If I close the timeline, it is automatically unlocked. Alternatively, I can right-click in the Media Pool to manually unlock the timeline via “Timeline -> Unlock Timeline” – and keep it open without editing rights.
Fusion and Colour
If I switch to the Fusion or Colour workspace, all existing timeline locks are automatically removed. Instead, the lock is now at clip level. This means that the clip on which I am in Fusion or in the colour page is locked for editing. This means that several VFX artists and colourists can easily work on different clips in a timeline at the same time. Working on VFX, colour and sound in parallel also generally works smoothly.
Working in parallel with editing is also technically possible, but should be carefully considered and coordinated if at all necessary. It is technically possible for the editor to shorten or remove a clip that the VFX artist or colourist is currently working on.

A problem arises when an employee inadvertently locks timelines or bins. As long as the employee has the Resolve project open, only they can remove the lock. If the employee is not available, there is no way for even the administrator of the Project Library to remove it. Even if I remove the employee from the library, the lock remains active as long as the project is still open. The only way out is to copy the corresponding timeline, the bin or, in the worst case, the entire project – and continue working on the copy. Improvements would be desirable at this point. An administrator unlock and possibly a timeout on inactivity would be useful.
Updates
If I have an object (bin, timeline, clip) open while a colleague is making changes, a small refresh icon appears to indicate that the object has been changed in the meantime. If I click on this icon, the object is refreshed. Otherwise, I always get the current version when I open a new object. This update mechanism is good and simple. It prevents automatic updates, for example during playback, from causing confusing jumps; at the same time, it is easy to stay up to date.
Communication
Communication is the be-all and end-all of any team project. This is where Resolve is only of limited help. The in-built chat function is rudimentary. There is a shared chat for all employees who have opened the project. When a colleague sends a message, a speech bubble lights up red in the bottom right-hand corner of the page navigation. This is easy to overlook or even not visible at all if the page navigation is hidden. The chat is also not saved; it is not possible to write to individual team members privately; there is no status display for members – and no sharing of screenshots.
Fortunately, there are of course enough advanced communication tools from other providers that you can rely on here. I have also found it useful to do a short screensharing session with a new employee first. This allows me to see if everything has worked out with the path mapping, explain the existing project structure and discuss what the colleague should and shouldn’t work on.

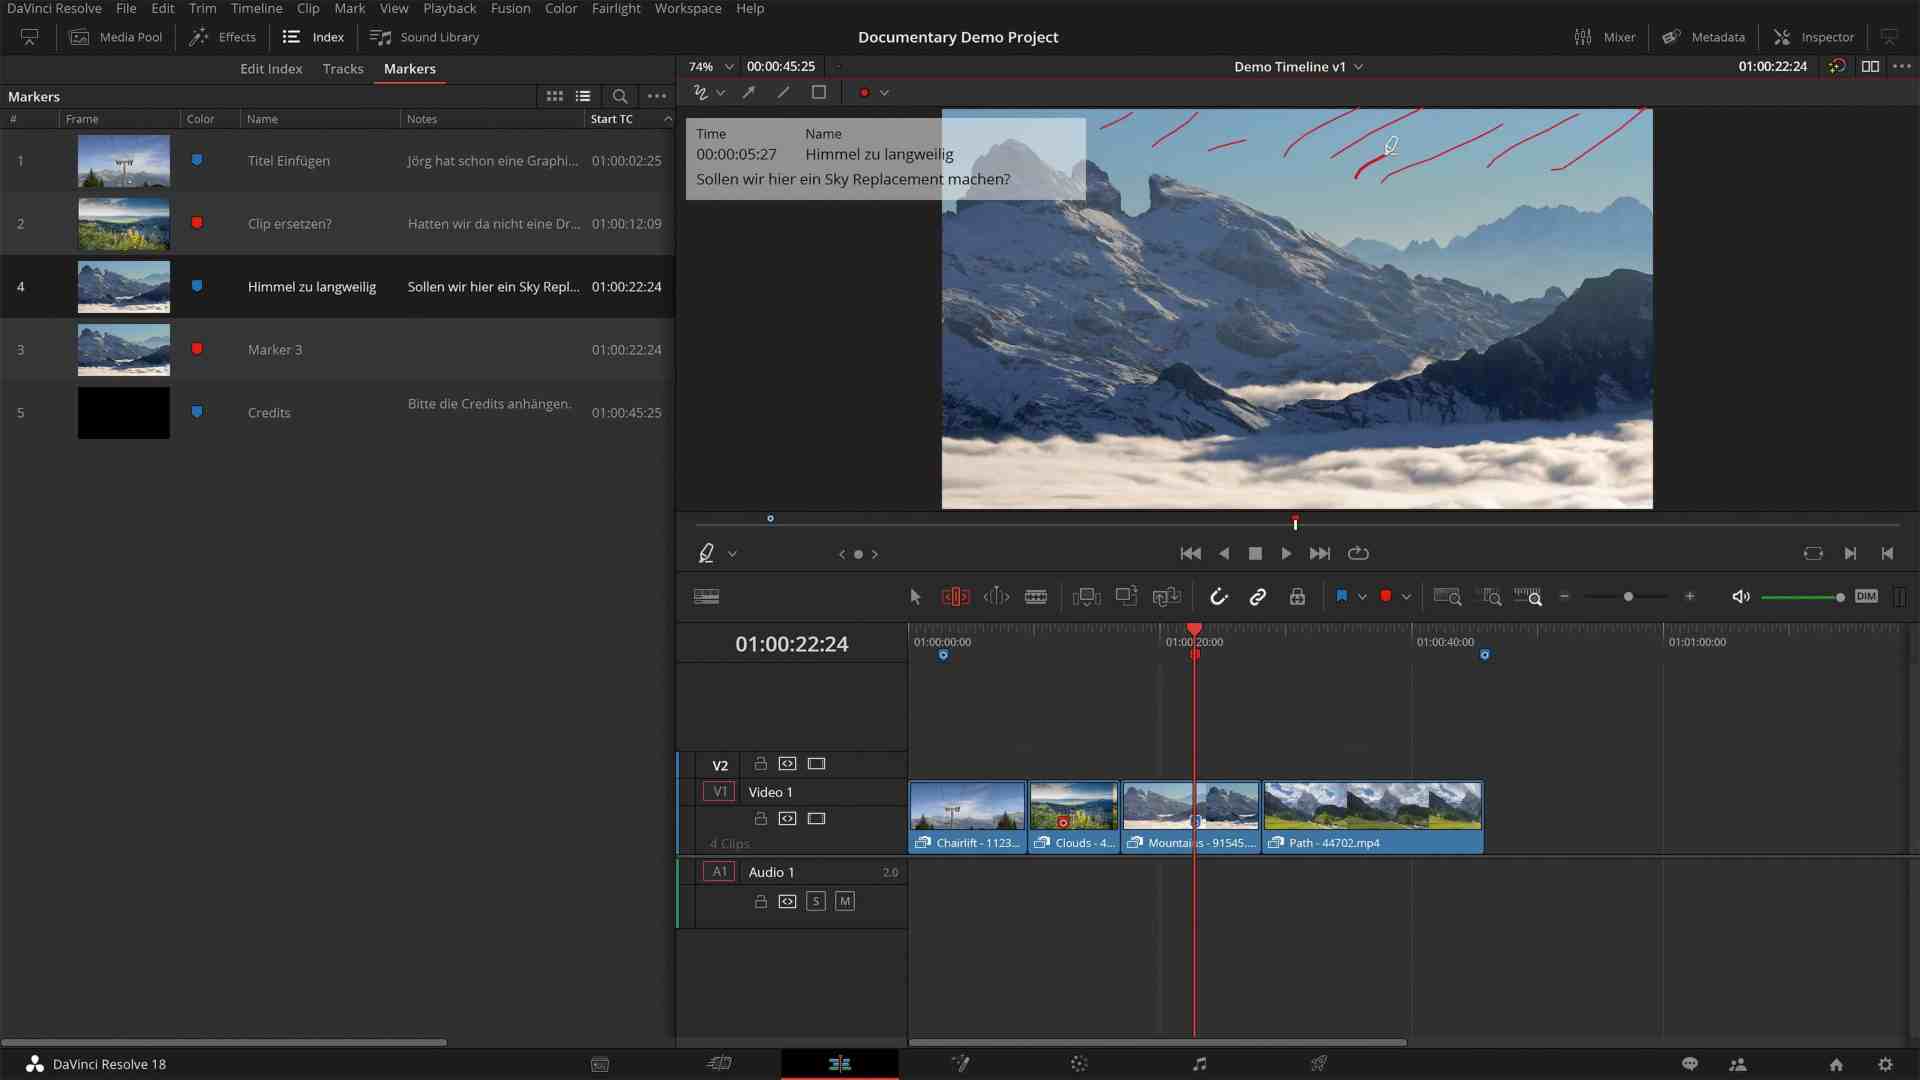
In the following, I can use the marker function in DaVinci Resolve very well to ask specific questions about individual clips in the timeline or to make comments. Markers can contain “annotations”, i.e. markings directly on the image. Team members can use different colours. In the index, I can see all markers at a glance and click on them to navigate.
Backups
With several employees, the risk of something going wrong increases. DaVinci Resolve does not have a cross-user editing history. In addition, the locking mechanism described above only works as long as I have the project open. This means that there is no way to save your own work progress in the project. If I leave the project, any member of the library can change my work or even delete the entire project without leaving a trace.
Of course, basic trust and discipline should be a matter of course when working in a team. Nevertheless, I want to protect myself from the worst-case scenario. Regular project backups are the best way to do this. Unfortunately, the automatic backups currently (version 18.1.2) do not work for Cloud Library projects. Hopefully Blackmagic Design will improve this soon. If the worst comes to the worst, I would like to be able to view an earlier version of the project, compare it and go back if necessary – or extract and re-import individual older timelines.
If you have the right programming skills, you can automate local backups of your cloud projects using Python script. Otherwise, the only way out is to manually export or copy projects from the project manager; preferably at least daily and definitely after important milestones, such as after the review with the customer.

in rack-mountable versions.
Another alternative is to use the backup at library level. In the details of the cloud library, I can use “Back Up” to back up the current status of the entire library with all projects in the cloud
back up. However, if I want to view this backup later, I have to restore it as an additional library. This also incurs the monthly fee for the second library. In practice, this is not dramatic, as I can deactivate the additional library again after a short time (the remaining amount of the monthly fee is credited). Nevertheless, the process seems unnecessarily cumbersome and this backup option cannot currently be automated either. No matter what my backup procedure looks like, I should test it once before the worst comes to the worst!

Cloud vs Network
The collaborative elements offered by Blackmagic Cloud are also all available when working together via an in-house network. So if all employees can work in the same network (for example via VPN), then I can set up a network library as a Postgres database on a local server instead of a cloud library. This saves the monthly costs for Blackmagic Cloud and may make sense if the corresponding IT infrastructure with support is available anyway or is also used for other purposes. For smaller companies and freelancers who otherwise do not need a VPN connection and do not operate a server 24 hours a day, the costs of an in-house network solution will probably exceed the costs of Blackmagic Cloud.
Conclusion
Collaboration via Blackmagic Cloud offers many advantages for collaboration over the Internet. It makes teamwork in DaVinci Resolve much easier and also enables parallel work on a joint project without a special network setup. The improved proxy workflow in version 18, with and without proxy generator, also works well in principle; this can be integrated into your own workflow as required. Storage solutions from Blackmagic Design (Cloud Pod, Cloud Store) can be used, but only improve the workflow in certain situations.
If a new storage solution is planned, I would also take a critical look at the Blackmagic Design products independently of DaVinci Resolve from an IT perspective and compare them with alternatives.
Even in the beta phase, Blackmagic Cloud is already productive and useful for me. In my opinion, the lack of automatic backup in the cloud is the biggest stumbling block. For the time being, every project should have a reliable alternative. Other difficulties, such as accidental locks of timelines or bins, can be annoying but won’t stop the project; this should be avoidable with a bit of practice in the team. Good communication within the team is always crucial and that doesn’t change with Blackmagic Cloud. However, it does facilitate handovers between different areas
in post-production – and, above all, enables real parallel work without major overheads.


