


Table of Contents Show
The developers are naturally more hesitant when it comes to adding new features and are happy to postpone them until the next cycle.
With a medium release, which includes the current version 4.1, clean-up work and improvements usually take place. This is the case again this time. Many of the new features that were introduced in Blender 4.0 have now been polished again.

Kuwahara filter controllable
One example of this is the Kuwahara filter in the Compositor, which was introduced in Blender 4.0 and can be used to give images an oil painting look. This can now optionally be executed with higher precision, which should achieve a better result for images with HDR dynamic range and at particularly high resolutions with a slightly longer execution time. The size of the filter area is now no longer static, but can be influenced via a socket. This makes it possible, for example, for image elements to look more picturesque or blurred the further away they are from the camera.
Viewport compositor finally complete
The depth pass required for this now also works in Eevee and the Workbench engine and is supported by the Live Compositor. This allows you to display the compositing result in the viewport. In Blender 4.1, all nodes are now supported for the first time. Only the Render Layers node is limited to the image, alpha and depth passes. The latter is also not yet available with cycles and outputs the depth in normalised coordinates and not the absolute distance of the pixels to the camera sensor as in rendering. The developers therefore recommend attaching a normalise node directly to the depth pass if you want to use it in the viewport. This ensures that the result does not suddenly change during rendering.
The Split Viewer node has been replaced by a new node called Split. Like its predecessor, it divides the image into two halves, either along the X or Y axis. This allows two effects to be compared directly in one image. Unlike the Split Viewer node, it has an image output, so it can no longer be used purely for viewing, but can also be used to post-process or save the result. The Pixelate node has a new property size. Previously, you had to switch a node in front of the pixel effect to scale it down and a second node behind it to scale it up again. This can now be dispensed with and the size can be set directly in the node. The inpaint node can be used to remove ropes, markers and other small details from images and videos by extending the edge pixels of an area defined via a mask or the alpha channel inwards. In Blender 4.1, it now uses the Euclidean distance instead of the Manhattan distance, which should ensure a more even fill. In addition, the node now works in two steps, which means that there should no longer be any artefacts at the point where the fills converge. Previously, a clear line was usually visible there, but now the area looks soft and blurred.
Detail improvements have also been made to a number of other nodes. The Defocus node now calculates the bokeh radius more accurately, which means that the results match the output of render engines better.
The Sun Beams node now produces softer beams and the anti-aliasing of Z Combine and Dilate has been improved. The Double Edge Mask node works between 50 and 250 times faster and also utilises the edge pixels, whereas previously it was shifted one pixel inwards. The crop node now makes an image disappear completely if the upper border is below the lower border, whereas up to Blender 4.0 it would have inverted the crop in this case. The flip node now works in local coordinates. This means that the image no longer moves away when the source is moved. The UV map node now has a choice between anisotropic and nearest neighbour filtering. This simplifies some NPR workflows such as palette-based remapping of colour tones. More interpolation options may be implemented in the future.
With the keying screen node, two-dimensional colour gradients are generated by sampling points on a source image. The idea behind this is to fill the colour input of a keying node with a gradient in order to compensate for uneven illumination of a green screen. The gradients created in this way were previously characterised by hard edges and linear gradients. The new version in Blender 4.1 uses Gaussian interpolation, which ensures a buttery smooth result. The compositor is now only executed if its result is actually displayed somewhere, for example with a viewer node or in the image editor. For the entire node tree, you can now select whether it should be calculated with full or automatic numerical precision. The latter uses half the bit strength for previews, which means that the calculations can be performed faster and with less memory, although this can lead to increased artefacts.
Eevee Next only in the next release
In the last issue, we reported that we were looking forward to Eevee Next, a modernised version of the Eevee real-time render engine supplied with Blender. This was actually supposed to be integrated into Blender 4.0, but was then postponed to Blender 4.1. And then came the news that it still does not meet the developers’ quality requirements and will only be released in Blender 4.2. In Blender 4.1, the light probes in Eevee were renamed from Reflection Cubemap to Sphere, Reflection Plane to Plane and Irradiance Grid to Volume. The changes are not purely cosmetic, but also affect the Python API.
OpenImageDenoise on the GPU
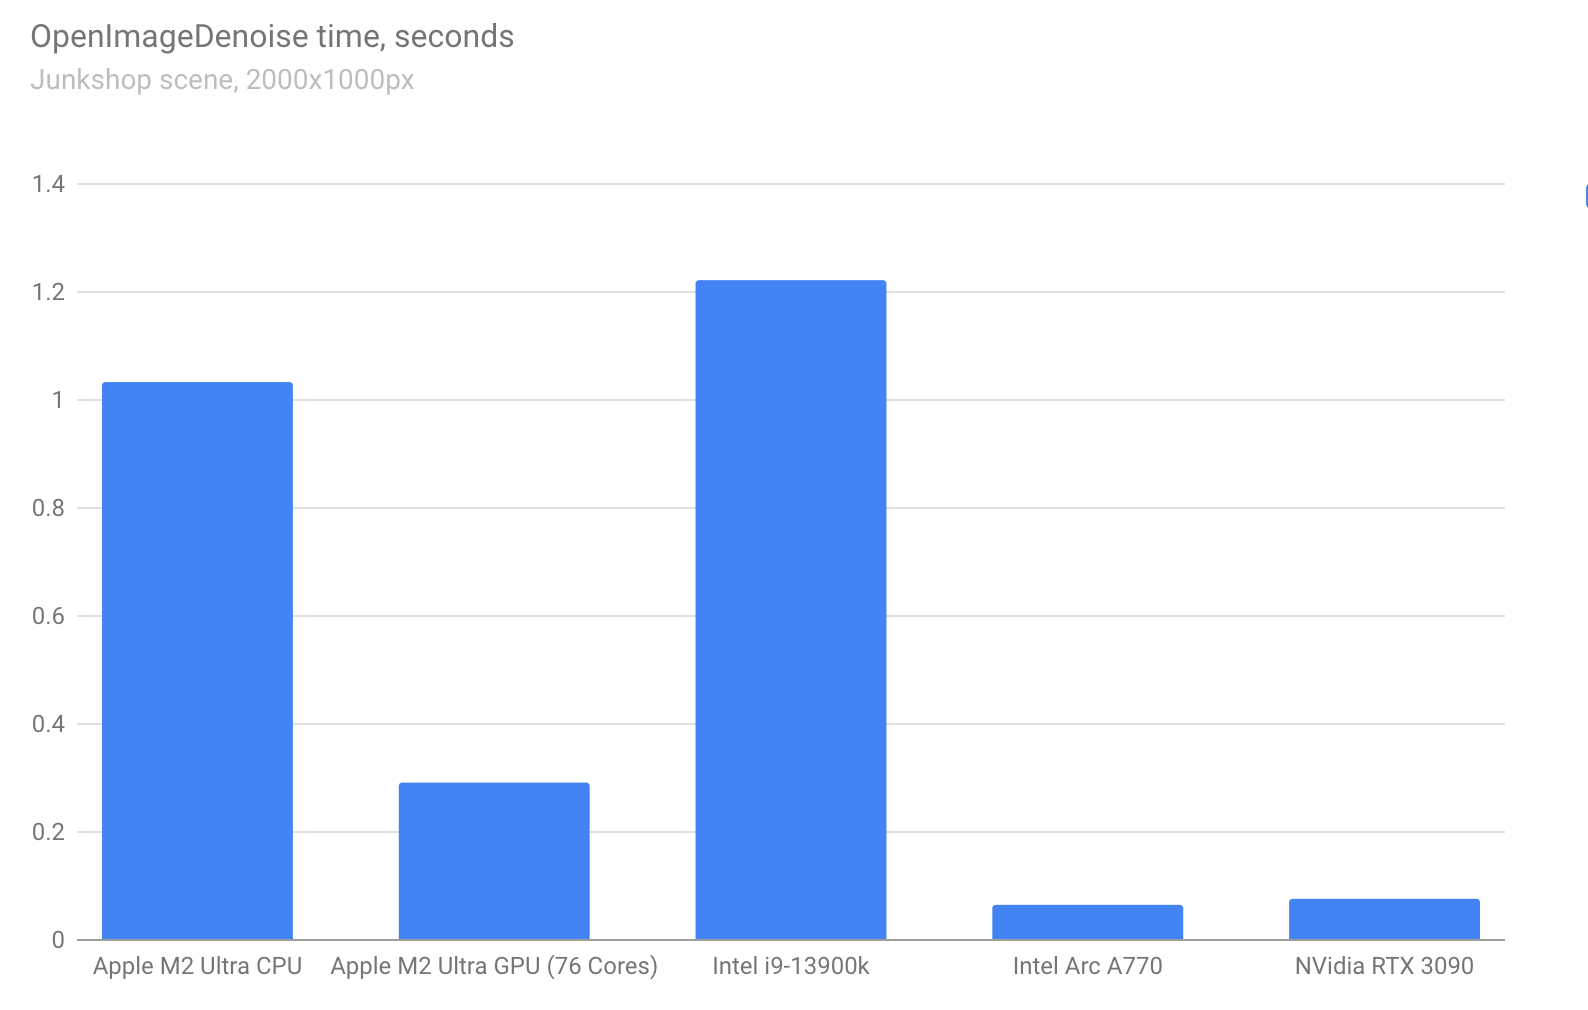
After rendering with pathtracing-based render engines such as Cycles, which is included in Blender, there is usually a post-processing step in which the image noise typical of pathtracing is removed. Blender comes with two solutions for this. OpenImageDenoise from Intel and the OptiX Denoiser from Nvidia. Previously, only the latter could be used on the graphics card, which meant that users of non-Nvidia hardware were excluded from the acceleration. This meant that with OpenImageDenoise, noise removal often took longer than the actual rendering. In Blender 4.1, OpenImageDenoise now also works on the graphics card. Specifically, Nvidia GPUs from GTX 16xx, TITAN V and all RTX models are supported, as well as Intel graphics chips with Xe-HPG architecture or newer and Apple Silicon with MacOS 13.0 or newer. AMD GPUs are not yet supported due to stability issues. If you are using a graphics card with an AMD RDNA2 or RDNA3 chip, you can switch to the alpha version of Blender 4.2, where support is already enabled. The developers have used the splash screen from Blender 2.81 as the basis for a benchmark. There, an Apple M2 Ultra GPU with 76 cores is more than three times as fast as an M2 Ultra CPU. An Intel i9-13900k CPU even takes around 15 times as long as an Nvidia RTX 3090.
Hardware support further expanded
If you are using an integrated graphics card from AMD with the RDNA3 chipset, you can now use it for rendering on the CPU. Rendering performance on the CPU under Linux has been improved by around 5 per cent across all benchmarks, which is particularly relevant for render farms and cloud rendering.
Improvements in video editing
Blender comes with its own video editing editor. The Video Sequence Editor (VSE) has received performance improvements in various areas. The timeline should now update three to four times faster for more complex projects. Colour management, audio resampling, reading and writing of frames and parts of the code for image transformation have also been optimised. The glow effect now works between six and ten times faster, wipe can even be calculated up to 20 times faster. Gamma Cross is now four times faster, Gaussian Blur one and a half times faster and Solid Colour twice as fast.
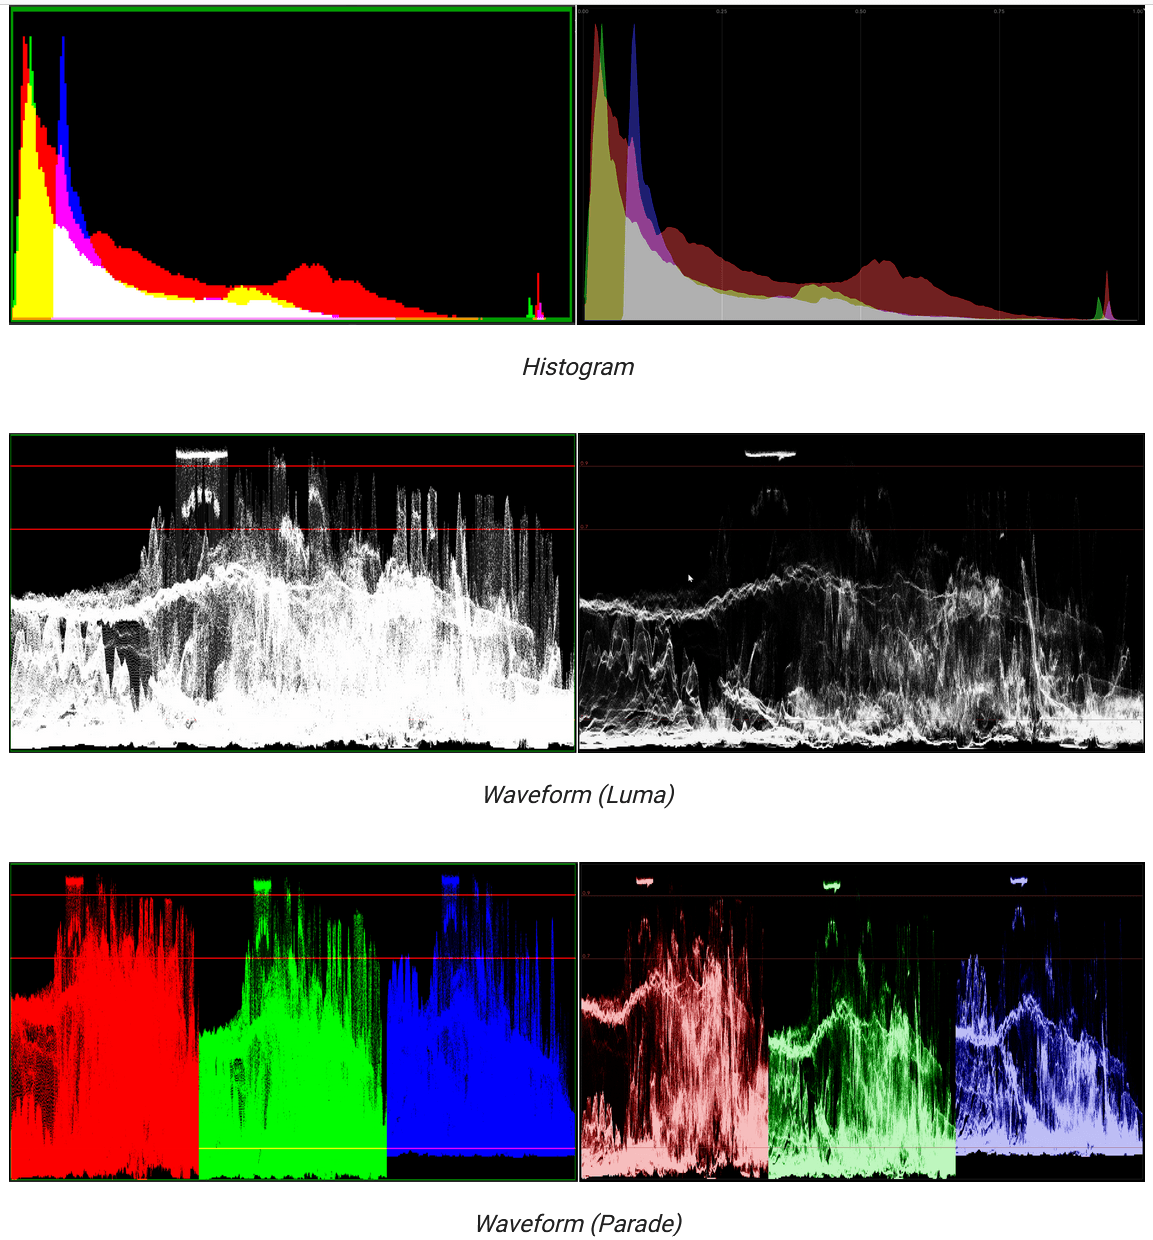
New scopes
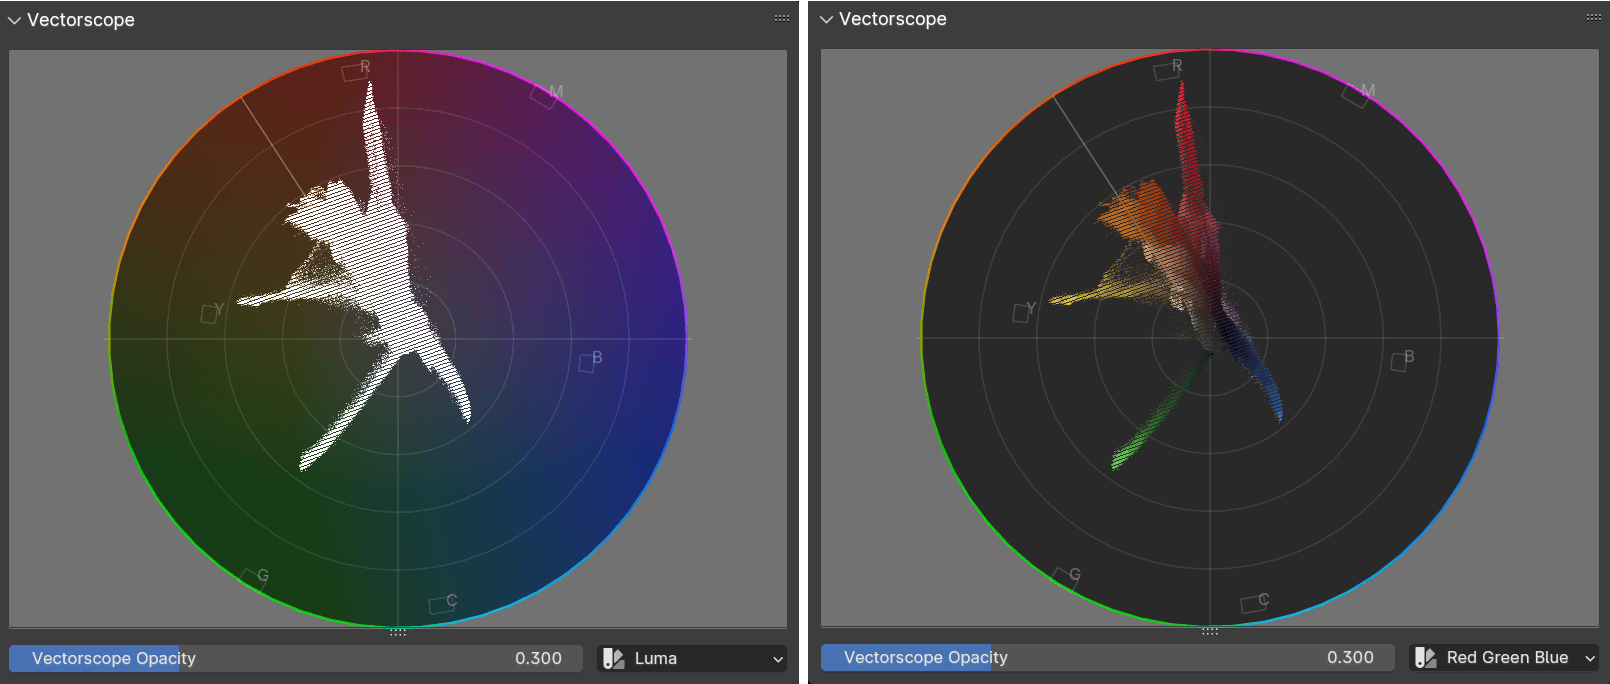
The Luma Waveform is calculated eight to 15 times faster and has also received an optical update. The display has also been improved and now shows more information. The RGB Parade variant, in which the individual channels are displayed separately, now uses less saturated colours and slightly additive blending to make it more pleasant for the eyes. The histogram now also displays more information, is now less saturated and is also displayed faster thanks to GPU acceleration. The Vector Scope now retains its aspect ratio and has been given a line that corresponds to the average Caucasian skin type. It can also be coloured, making it less abstract.
Audio waveforms as standard
In the Video Sequence Editor, the waveforms are now displayed by default for audio strips. As these are usually symmetrical, you can restrict the display to the upper half.
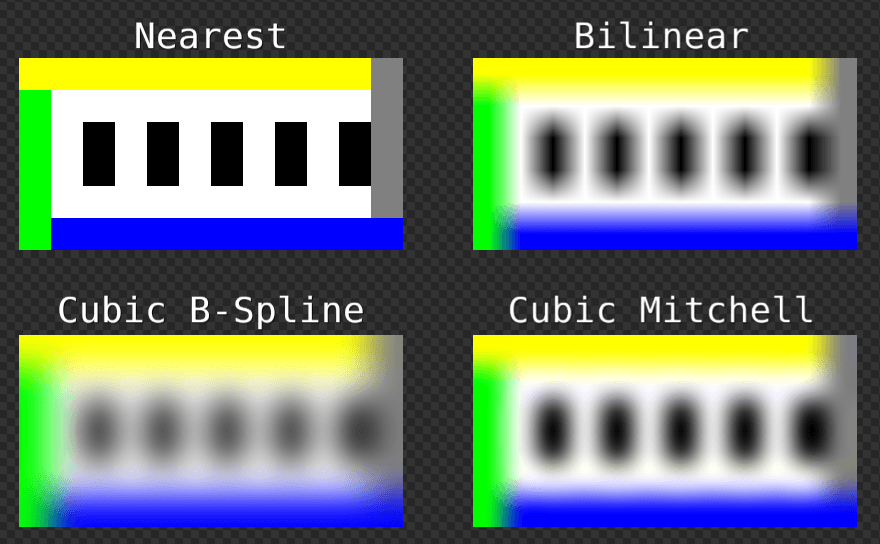
Automatically the best filtering
Cubic interpolation is now also offered when rotating and scaling strips. This was previously only available in the transform effect strip. Performance has also been improved at the same time. Cubic interpolation is offered in the B-Spline variant, which is also used elsewhere in Blender, and the Mitchell variant, which is usually better suited for images. The bilinear filter no longer produces a transparent border at the edge of the image when it is scaled up and a whole series of errors have been eliminated where images were shifted by one pixel at a time, resulting in annoying gaps. The subsampled3x3 filter has been replaced by a generalised box filter, which also performs well when images are scaled more than 3×3 smaller. By default, the filter that is expected to produce the best results in the situation is now applied to a strip. If a strip is not scaled or rotated and its position is only changed in integer steps, Nearest is selected as the filter. If an image is enlarged by more than double, Cubic Mitchell is used; if it is reduced by less than half, Blender 4.1 uses the Box filter and in all other cases the interpolation remains with Bilinear.
Outliner
In the Outliner, you can now double-click on a collection icon to select all its children. An Expand/Collapse All entry has been added to the context menu. This expands or collapses the entire hierarchy. Previously, this option was only available via the Shift A shortcut. Previously, it was not possible to apply modifiers to objects in the outliner; an entry has also been added to the context menu for this.
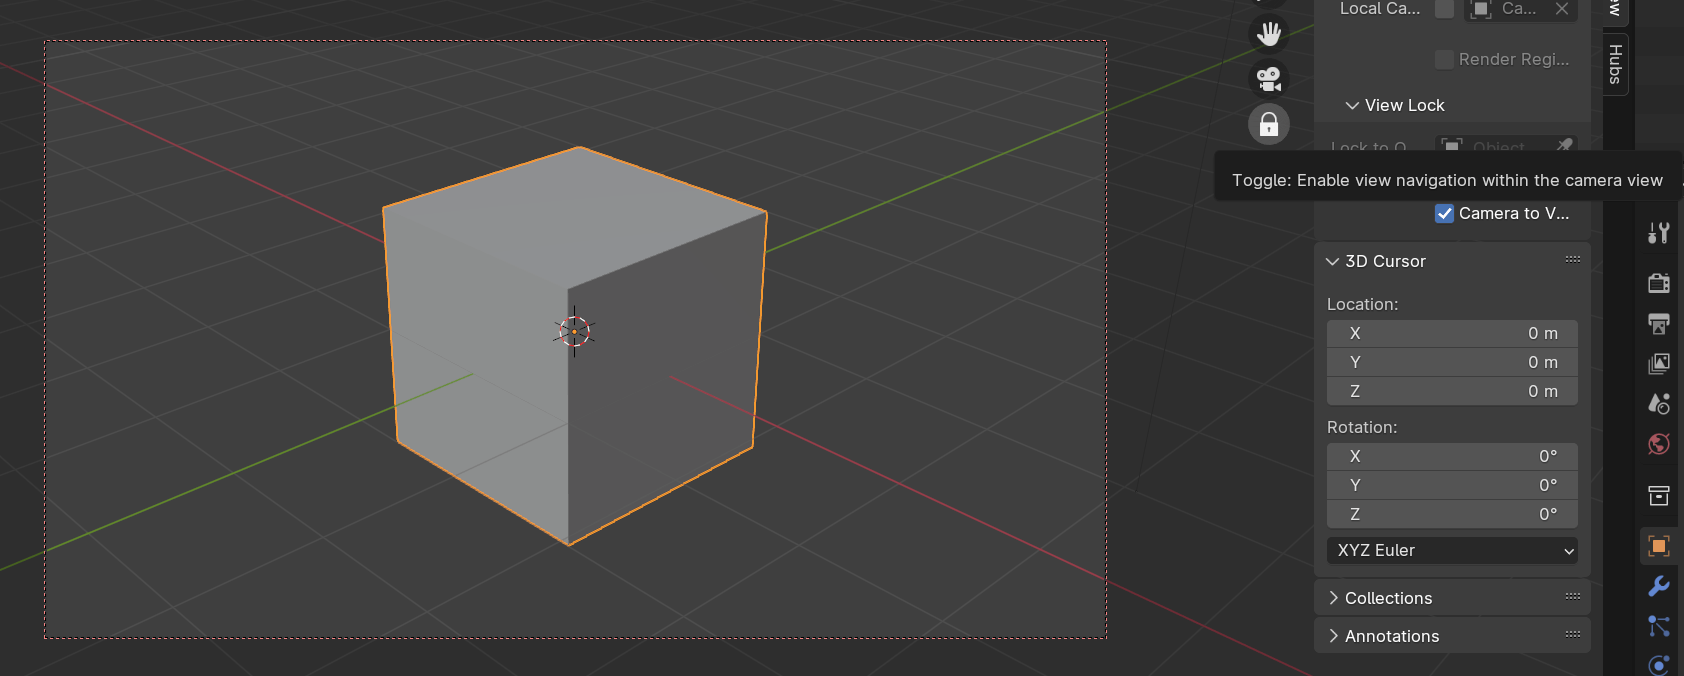
Lock Camera to View is now a gizmo
Companies normally collect biometric data from the users of their software in order to improve the user interface. This could be heatmaps that show where users click particularly frequently or simply statistics on which functions are accessed how frequently and which menus are visited how often. Anyone who has concerns about data protection here is on the right track. This is also the reason why the Blender developers do not collect any such data. Instead, the development of the interface, like the rest of Blender, follows the open source approach. And that means mock-ups, demo implementations and constant discussions between programmers and users. The process can be perceived as tough, but it is the price of privacy. One example is the Lock Camera to View feature, which allows the camera to follow the user’s movements in the 3D viewport. This allows a camera to be positioned in the same way as you would otherwise move through the 3D viewport, which is why this function was particularly popular among beginners. If they knew about it at all, because it was located in the view tab sidebar, which is hidden by default. Quite deep in the interface for such a frequently used function. And so the idea of introducing another viewport gizmo came up years ago. This appears when you look through the camera and has a padlock as an icon. This small but useful change has now finally found its way into Blender 4.1.
UI detail improvements
Tooltips in the file browser now show the Blender version in which a file was saved and metadata such as resolution for images or frame rate for video files. The tooltips are also displayed in the Open Recent menu, where the preview image can also be found. While you are working on a project, Blender automatically saves to the temporary directory every two minutes by default. If Blender crashes, you can then restore your project via File -> Recover -> Auto Save and continue working. However, it could happen that you save your project manually and then save it again immediately afterwards using Autosave. In Blender 4.1 the counter is now reset every time you save manually.
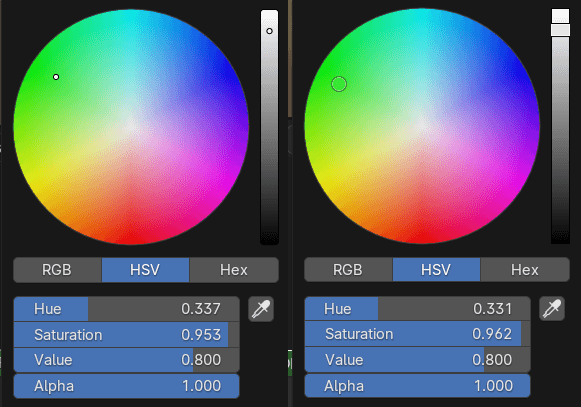
With the colour picker, the selected colour and brightness are now displayed directly in the respective cursor, making it easier to read. In addition, many other details have been added to the interface, from optimising the rounding of the corners of pop-up and conventional menus, to higher quality shadows for these menus, to the animation markers, whose line is no longer drawn by the marker itself. The text that is used as default when adding a text object is now translated into the language in which the interface is used. So if you have set your interface to Spanish, you will now be greeted by “Texto” when you add a text object.
Import and export via drag and drop
External files in the formats Alembic, Collada, OBJ, OpenUSD, PLY, and STL can now be imported into Blender using drag-and-drop. The reader will have noticed that these are formats whose exporters and importers are not realised in Python, but in C. STL has been added in Blender 4.1 and should now work three to ten times as fast as the previous implementation in Python, which will still be supplied for a few versions but will be removed from Blender in the long term. In future versions of Blender, support for drag and drop will also be added for formats whose import and export are implemented in Python. This will be made possible by a new callback, which also gives developers of external add-ons the opportunity to implement drag-and-drop.
USD & Co
The exporter for the Universal Scene Description Language (USD) now supports armatures and shape keys, while the importer supports the instantiation of objects, collections and USD primitives on a point basis. These are loaded as a Point Cloud object with a Geometry Nodes setup with an Instance on Points node. The import can also be extended using Python hooks, making it easier to integrate Blender into in-house pipelines. The import and export of Stanford PLY files now supports Custom Vertex Attributes and when exporting to OBJ format, objects whose shading is completely set to Flat or Smooth are exported between 20 per cent and 40 per cent faster.
News on the glTF front
The glTF exporter can now optionally optimise the generated files for display with OpenGL using gltfpack by reordering the mesh data in such a way that memory consumption and draw calls are minimised. UDIMs are not supported by glTF. They are therefore now split during export, with each tile receiving its own material. Unused images and textures can now still be exported, e.g. because they are still needed later in an interactive application, and anisotropy is now supported for materials.
Bake bake Geonodes
Geometry nodes now allow intermediate results from node groups to be saved via baking. Previously, baking support was only available for the Simulation Zone. Data is now better deduplicated in the cache, which means that the file size should be significantly smaller in some cases. The caches should no longer be lost after an undo and volumes can now also be baked. The auto-smooth option for meshes has been replaced by a modifier node group asset. At the same time, you now have full control over the custom normals of a mesh in the geometry nodes.
Growth in the Geometry Nodes
The new Active Camera node returns the currently active camera, the Index Switch node allows you to select any input via an index and the Sort Elements node can be used to redefine the vertex order of a mesh. Split to Instances can be used to split a mesh into individual parts based on an ID and the Blackbody node known from the Shader Editor is now also available in Geometry Nodes.
New rotations step by step
There is a new Rotate Rotation node for rotations, which replaces the Rotate Euler node and is easier to use. This is part of the gradual introduction of the new Rotation Socket, which has been introduced in Blender 4.1 for the following nodes: Distribute Points on Faces, Instance on Points, Rotate Instances, Transform Geometry, Object Info and Instance Rotation.
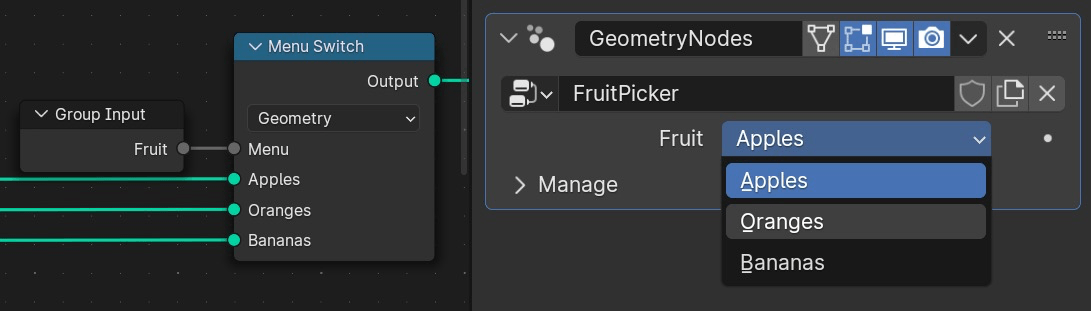
Home-made Geometry Nodes
One of the design goals of geometry nodes in Blender is that users should be able to recreate high-level nodes completely with on-board tools. Until now, however, this was only possible to a limited extent, as some nodes work with drop-downs, a control element that you could not yet recreate yourself. In Blender 4.1, it is now possible to define your own drop-down menus via the menu switch node, which finally closes this gap.
Conclusion
Blender 4.1 offers detailed improvements across the board. A successful intermediate release, for the grand finale in the form of Blender 4.2 LTS we are still waiting for EEVEE Next.