


Table of Contents Show
Talent. A relic? Creativity. An algorithm? 3D artists who have agonised through thousands of hours of tutorials, often accompanied by the miserable soundscape of distant Indian intersections, are now looking at upcoming tools like “Sora” with interest and intimidation. Is what my brilliant YouTube mentor from the other side of the world taught me in his flat really becoming superfluous? No! Image Generative AI is powerful, no question. But as anyone who has dipped their toes into the world of LUTs and ready-made scripts knows, the magic word is control, and anyone who believes that an art director can now fulfil their own correction requests with text-to-image command input (“prompten” for short) is wrong… Because gaining control over the AI-generated image requires more than a weekend course in “prompt engineering” at an adult education centre.
We gain control over Computer Generated Imagery (CGI), just as we CGI artists have always done, not through prompts and magic words, but through dedicated software. The one we will be talking about is ComfyUI. And if you’re afraid of the art director using it to carry out the next change loop himself, you’re probably also afraid of the “creative” from the advertising agency stealing your Houdini files and opening an FX department with them tomorrow.
ComfyUI?
ComfyUI is a node-based interface for Stable Diffusion – and offers maximum control over Image Generative AI. It’s about more than the simple mid-journey principle: I write a prompt and it generates an image – that would be pure surface scratching. With the help of Stable Diffusion and ComfyUI, I can not only create images on command, but also extract a good depth path from a real photo – and much more. Beyond the gamble of prompting, I can gain control over an image in a way that Midjourney cannot. I can generate a mountain during the day and just change the time of day or the position of the sun. I can mask out the main character from footage at the touch of a button, faster than the After Effects police allow. And I can create 3D models from images and text input. And that’s what we’re going to talk about today.
What can you actually do?
If you have experience with nodes and a solid understanding of compositing, Houdini, Maya or Blender, then you are well equipped to benefit from ComfyUI. If you’re just looking for a 1-click solution to create deepfake porn, ComfyUI is definitely not for you. Unlike Midjourney, for example, where you just need to be able to type a few words (and if you don’t know how to do that, you could dictate it to the AI you trust), the bare “text to image” image generation wouldn’t do justice to the tool’s capabilities. It’s very easy to set up, but understanding it and being able to use it in a controlled manner requires the skillset of an experienced mid- to senior-level 3D generalist. Not only to get what you want in a controlled manner, but also to understand where the potential lies. The average user would probably be put off by the node-based interface, but not the 3D artist who feels at home in Maya’s Hypershade, Nuke, Houdini and the Geometry Node Editor.

Installing and setting up ComfyUI
Installing ComfyUI is simple and can be done in just a few steps. Here is your guide to getting everything up and running quickly. First you need a programme for unpacking files. 7Zip or WinRAR are top choices here. (A little tip: the trial version of WinRar is also sufficient)
Download ComfyUI
Then go to the ComfyUI page on GitHub github.com/comfyanonymous/ComfyUI Under ‘Installing’ you will find a direct link to the download. Download the 1.4 gigabyte 7-Zip file. Unzip the downloaded file into a folder of your choice. And ComfyUI is installed!
Indispensable: The ComfyUI Manager
Not just a recommendation from me, but an absolute must-have is the ComfyUI Manager, which you can find here.
github.com/ltdrdata/ComfyUI-Manager. I’ll explain why it’s so important in a moment. First, navigate to the custom nodes directory: Open the Windows Command Prompt by clicking “Search” in the taskbar, typing “cmd” and pressing Enter. Then navigate to the custom nodes directory in your ComfyUI folder by copying the path and entering, for example, “cd D:\ComfyUI\ComfyUI_windows_portable\ComfyUI\custom_nodes”. (Attention! This is my path, it may vary for you of course.) Press Enter. Clone the ComfyUI Manager: Copy the following command into the command line: git clone https://github.com/ltdrdata/ComfyUI-Manager.git and press Enter. This will clone the ComfyUI Manager into the directory. This may take a few seconds. Restart ComfyUI: If you now restart ComfyUI, you will find the menu item “Manager” in the sidebar on the right-hand side. The manager is an extremely powerful tool that allows you to do the Gitclone fiddling you just did to install the manager only once. Without the Manager, you would have to install every other plug-in in the same cumbersome way. The Manager, on the other hand, offers you a database in which all ComfyUI plug-ins are stored, which you can then install at the touch of a button. Not only that, you will later learn that ComfyUI node set-ups, also known as workflows, can be shared from user to user using drag & drop. If a user shares a workflow with you for which you have not installed the necessary custom nodes, the Manager recognises this immediately and automatically installs them for you.
Selecting and activating the stable diffusion variant
You have now installed ComfyUI. What you still need is a suitable AI image generation model. Modifications of Stable Diffusion 1.5 and Stable Diffusion XL are currently the means of choice in the open source world – and you can find a huge selection of all kinds of Stable Diffusion models at civitai.com.
Installing the model
Once you have decided on a model, download it from www.civitai.com and move the model file to the models/checkpoint folder within your ComfyUI directory. You have now installed ComfyUI and the Manager and set up a ComfyUI model. Now you are ready to go!
First steps: Starting ComfyUI
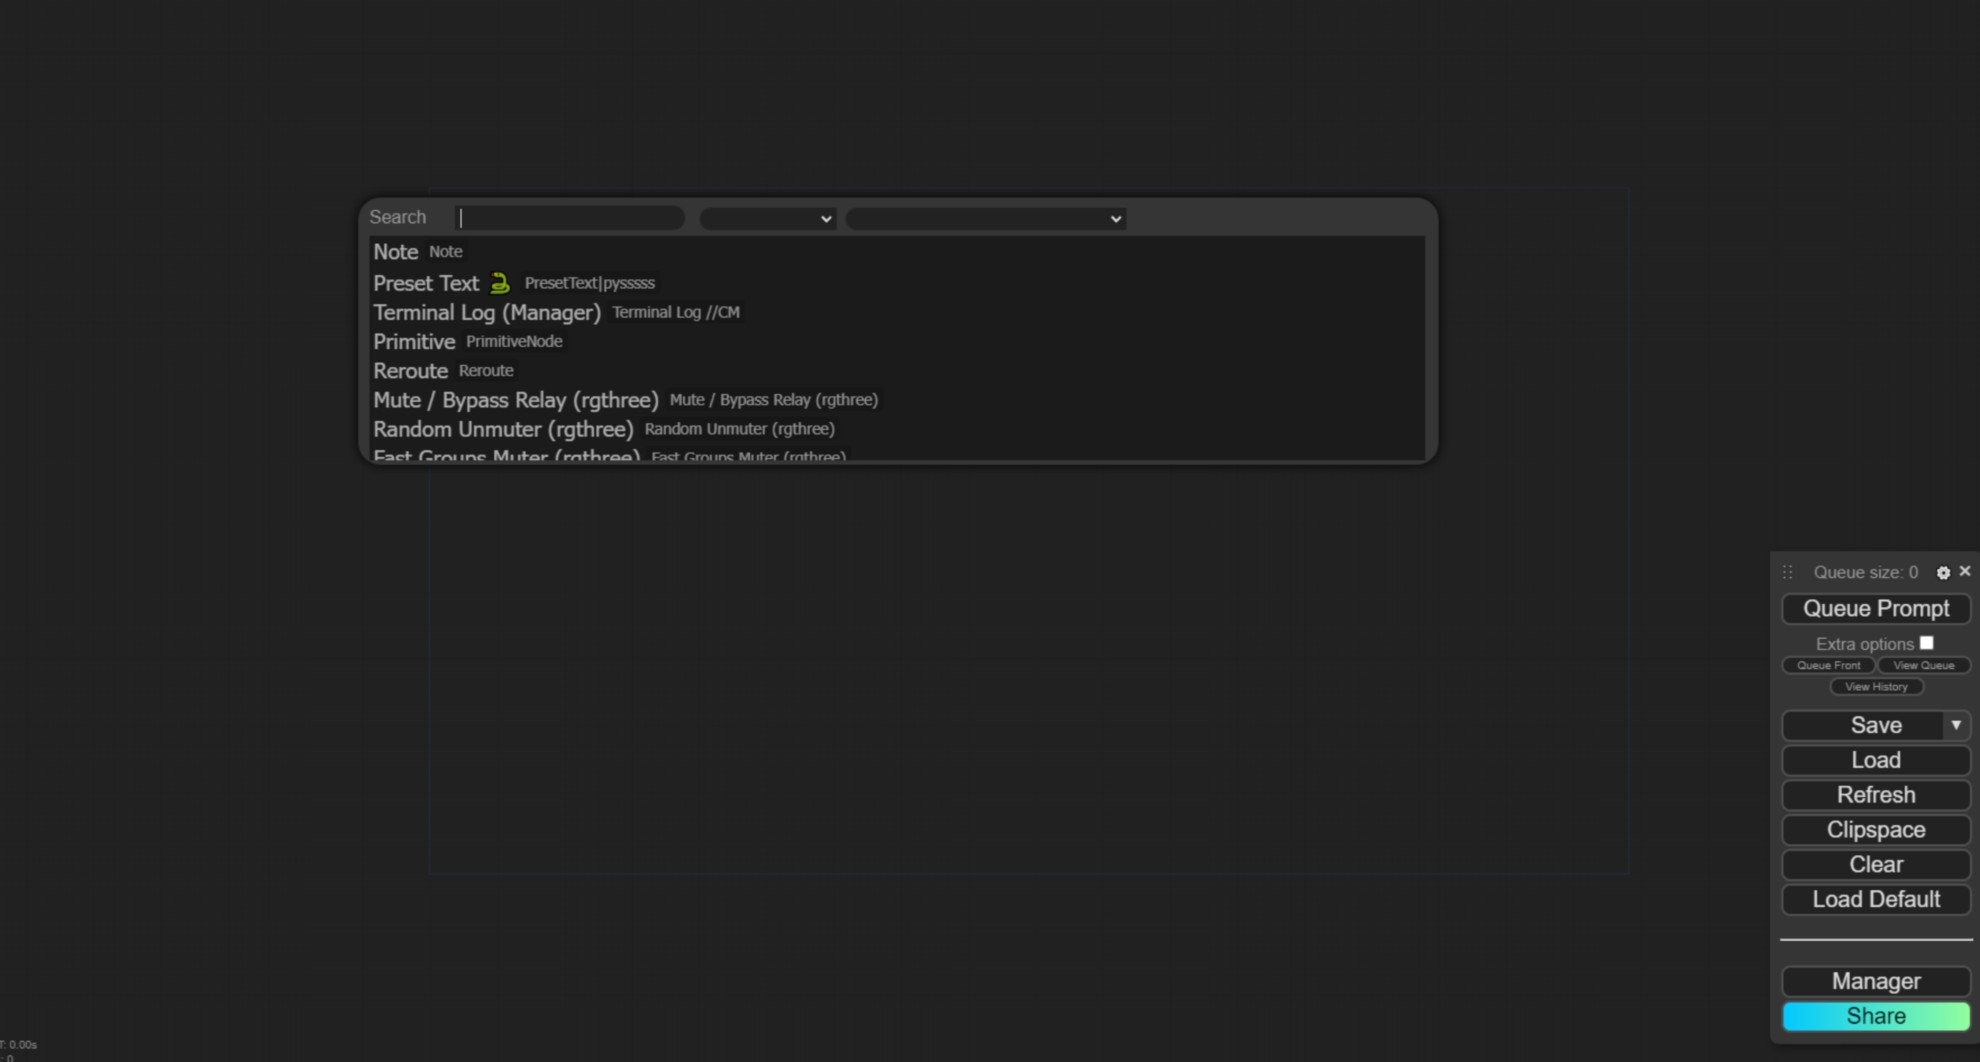
To start ComfyUI, all you need to do is double-click on NvidiaGPU.bat in the ComfyUI Windows Portable folder. If you do not have an Nvidia Gpu, select runcpu.bat – but be prepared for a considerable loss of performance without a Gpu. After starting, the console loads all the necessary data. This may take a few minutes, especially when starting for the first time after restarting the PC. Once opened, ComfyUI presents itself in a grey window. On the right-hand side you will find a self-explanatory menu bar. Double-click in the grey area to open the search, which you can use to navigate for nodes.
Hardware requirements
In order to use ComfyUI optimally, a powerful workstation is required. If you are not sure what the difference is between a workstation and a conventional PC, then ComfyUI might be above your requirements (psychologically I mean). However, for 3D generalists, your own PC should already be sufficient. Recommended: A RAM of at least 32 gigabytes, ideally 64 gigabytes. Plus a graphics card: an RTX3070 or similar, but as is so often the case, bigger is better. And last but not least, a processor: a modern I7 or similarly powerful. With this equipment, you are well equipped to use ComfyUI in a relaxed manner.
Off to the full! Moodboard, layout and happy art directors
In large studios, a google-savvy intern is hired to find as much input and reference material as possible on the internet. But what if you can’t afford a google-savvy intern and are too busy to google yourself?
ComfyUI: Your unpaid intern
This is where ComfyUI comes into play. If I’m looking for inspiration for a very specific topic, I can of course search Pinterest and Google Images. But I can also get inspiration in parallel by writing a prompt that describes exactly what kind of inspiration I’m looking for.
Inspiration instead of plagiarism
And while, realistically speaking, I have often found just 20 useful inspirations in Google images after an hour, ComfyUI creates 100 images for me within 20 seconds. if these are all too strict and single-layered, I can play with different variables to change the randomness and prompt fidelity so that the programme adds unexpected combinations to my initial request.
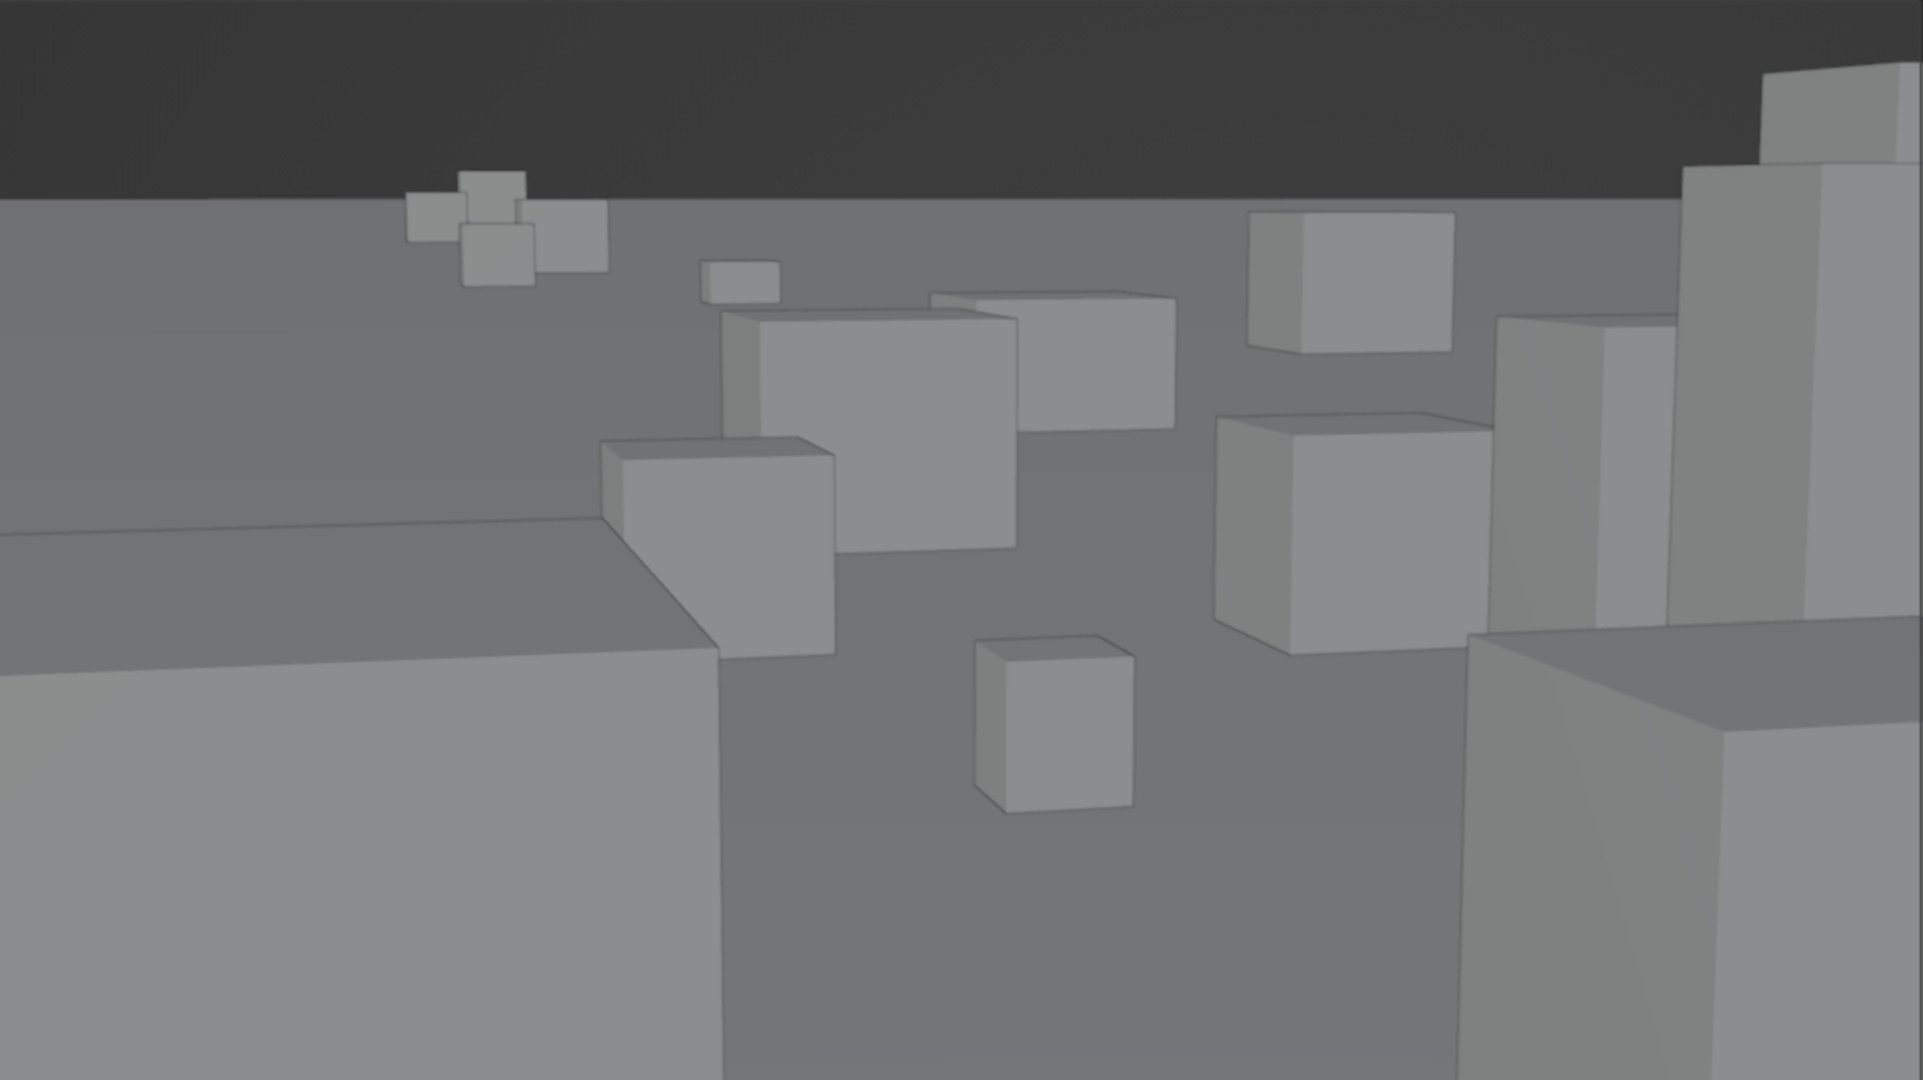
Blocking
The blocking. The first animatics traditionally consist of grey and dark grey and slightly greyer cubes and spheres, which are representative of cars, boats and houses. Sometimes a difficult image to decipher, not only for the art director. And this is where ComfyUI can help. How about using proxy assets instead of cubes in greyscale? So that the people who have to continue working with the layout at the end and have to create real 3D models can visualise much better whether they are dealing with the Venus de Milo or a stone in this cube.
Installed, what now?
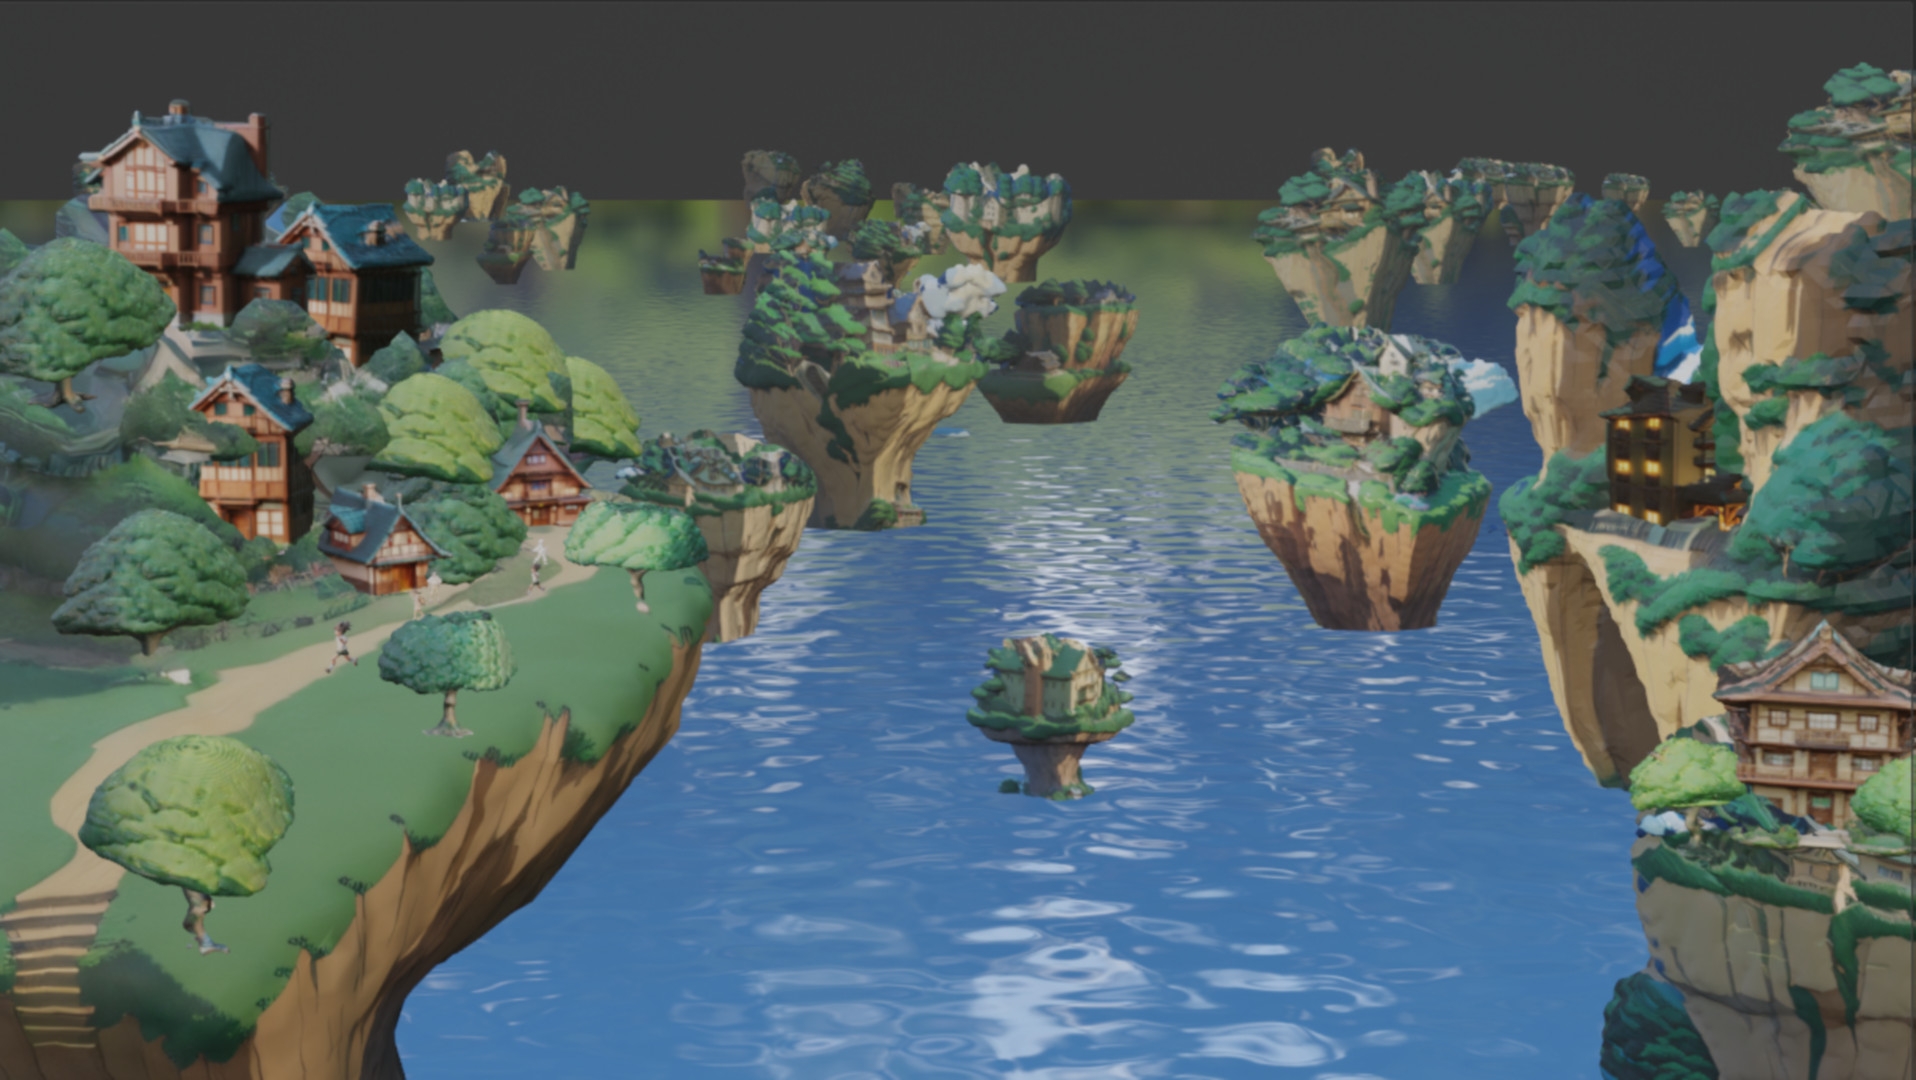
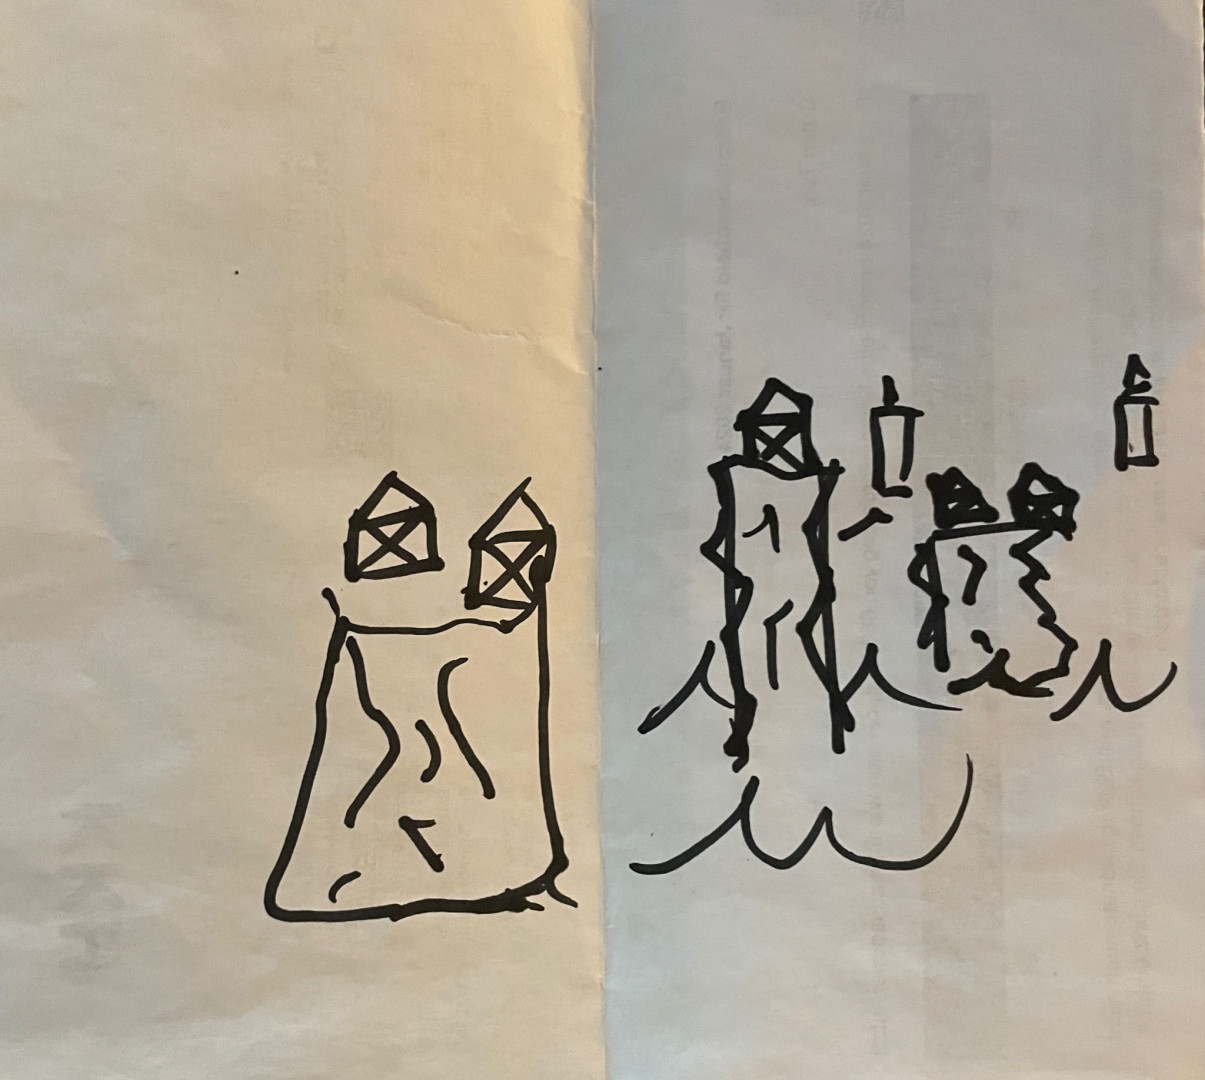
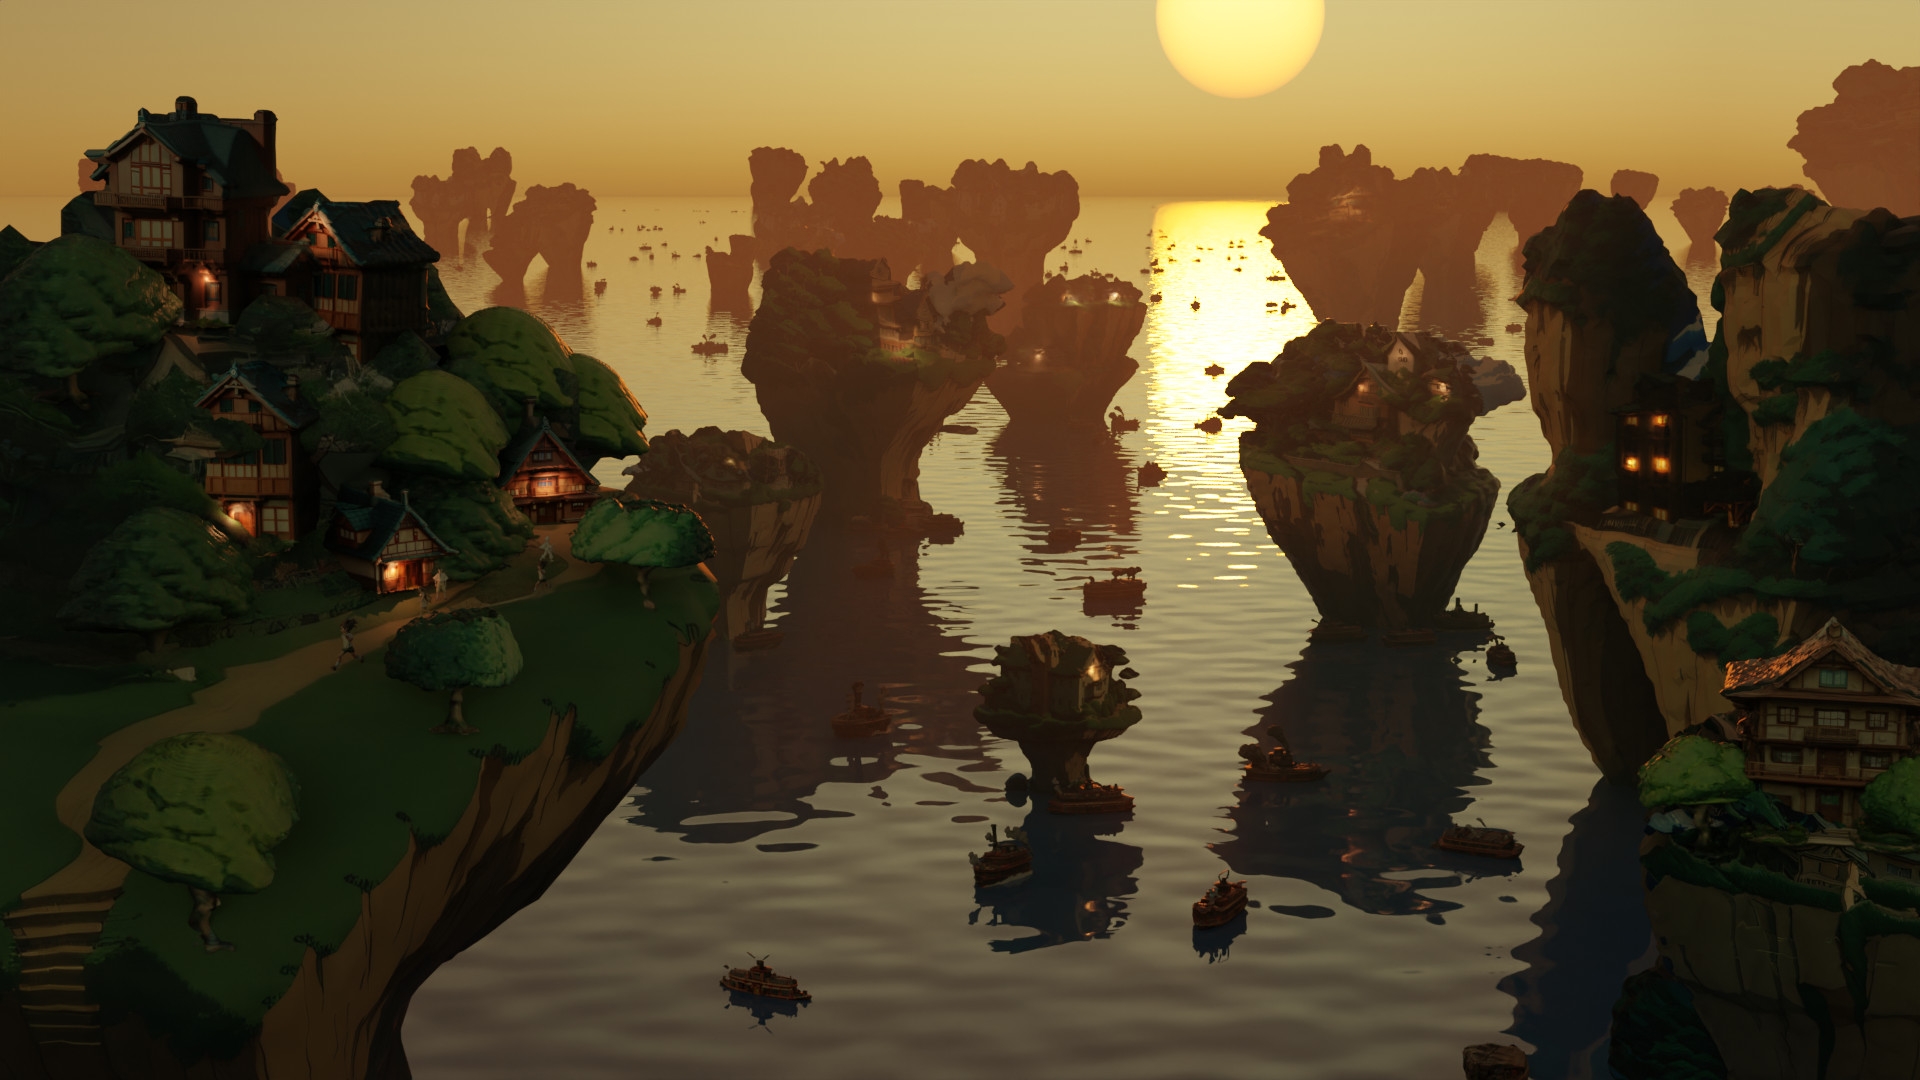
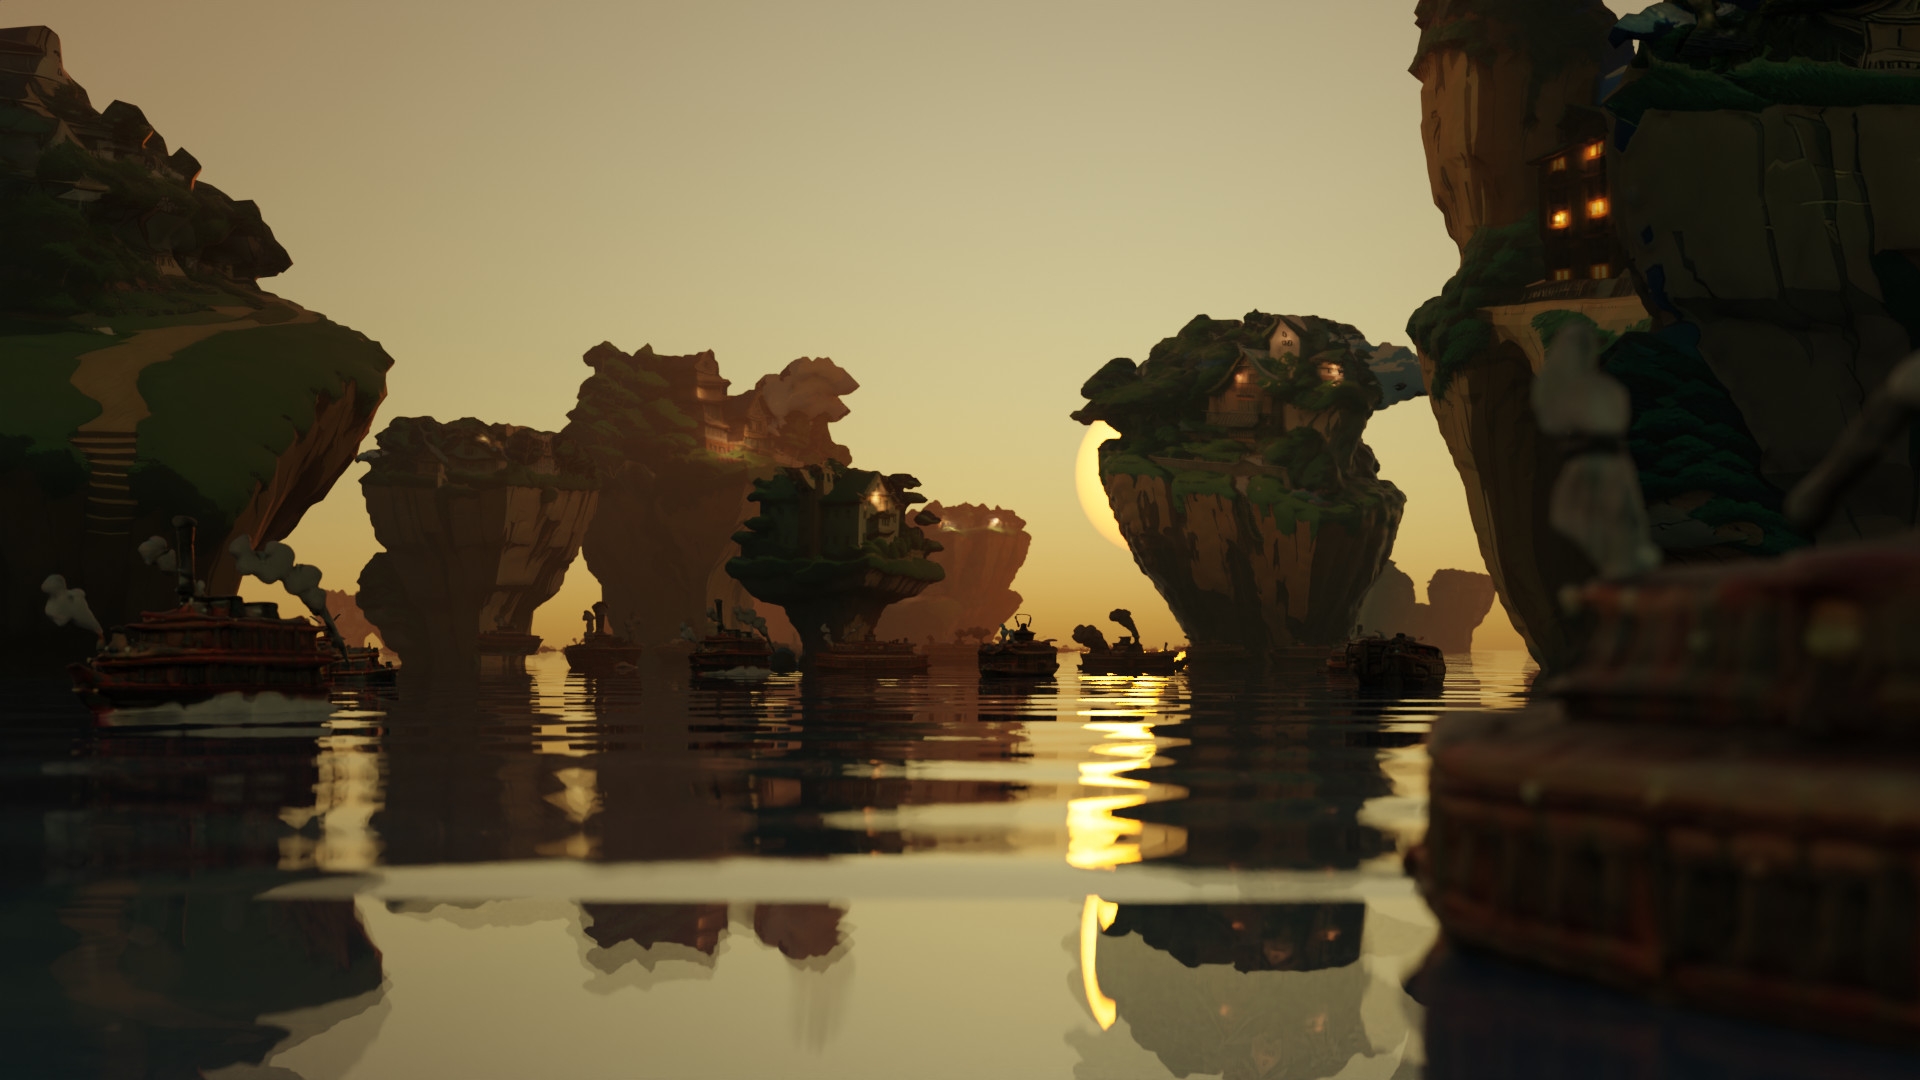
Let’s create a workflow together. As a “demonstration task”, which has nothing at all to do with what films we watched last night, lay out a village in anime style. I’m imagining bunches of houses standing on rock pillars in the water. Boats sail between them. I’m sure you’ve heard these or similar details from your art director before. Can you visualise anything like that? Me neither. That’s the well-known art director problem, when you talk first and then try to listen to yourself in order to understand what you’re saying. What we need here is a communication bridge between us and the confused thoughts of an art director. Maybe the art director will even give you a scribble on the back of his last payslip. Which will look something like this.
We’re building a Ghibli-style village
Here we are with the art director’s doodle and his idea. Instead of having a long back and forth discussion with the art director to understand what he even means, we can let ComfyUI do the talking, because we’ve already got it set up and ready for this exact moment. You haven’t? Then it’s about time. Let’s get started with our first node tree.
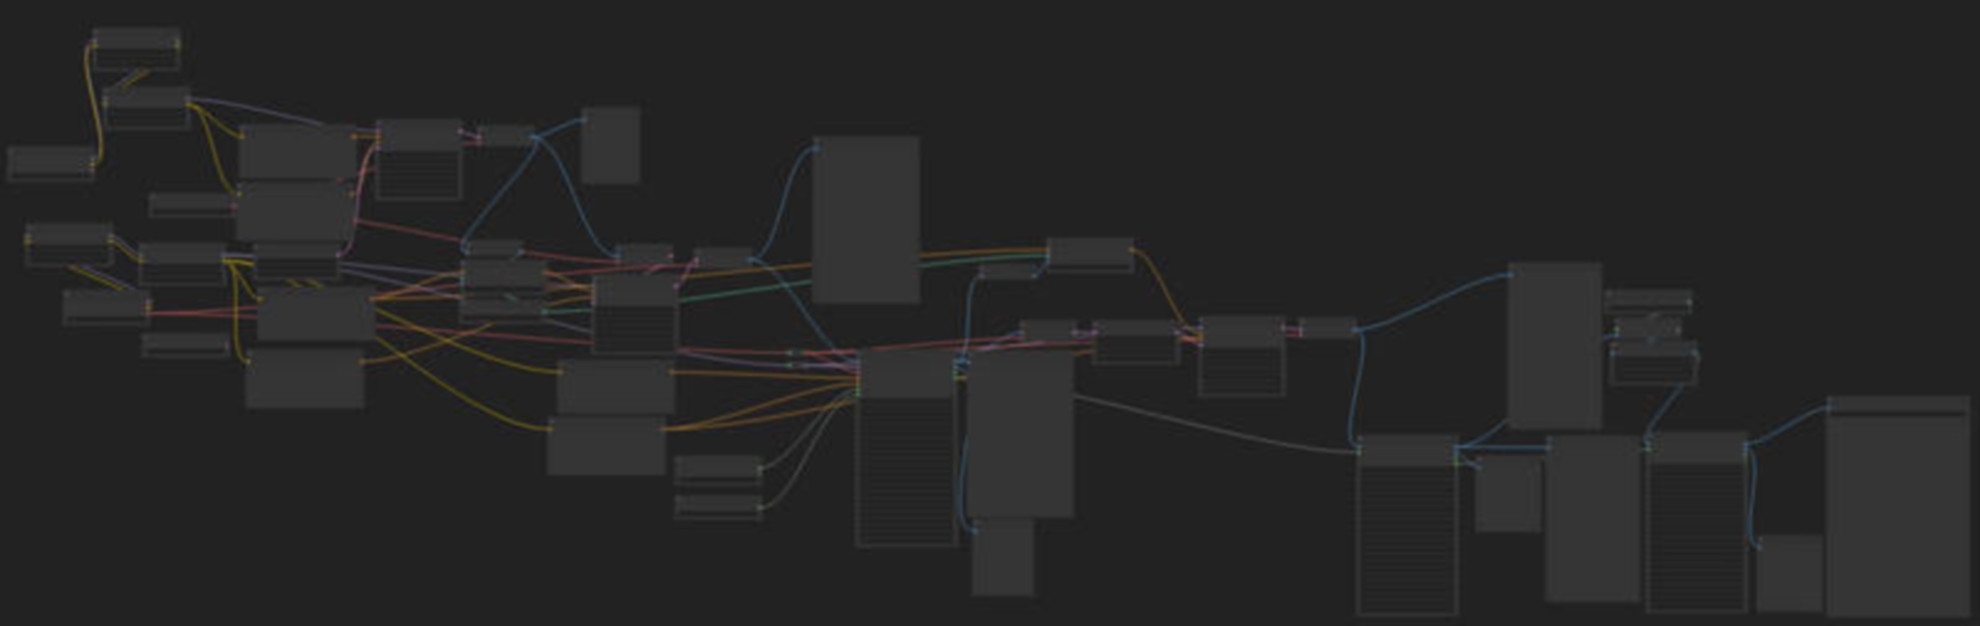
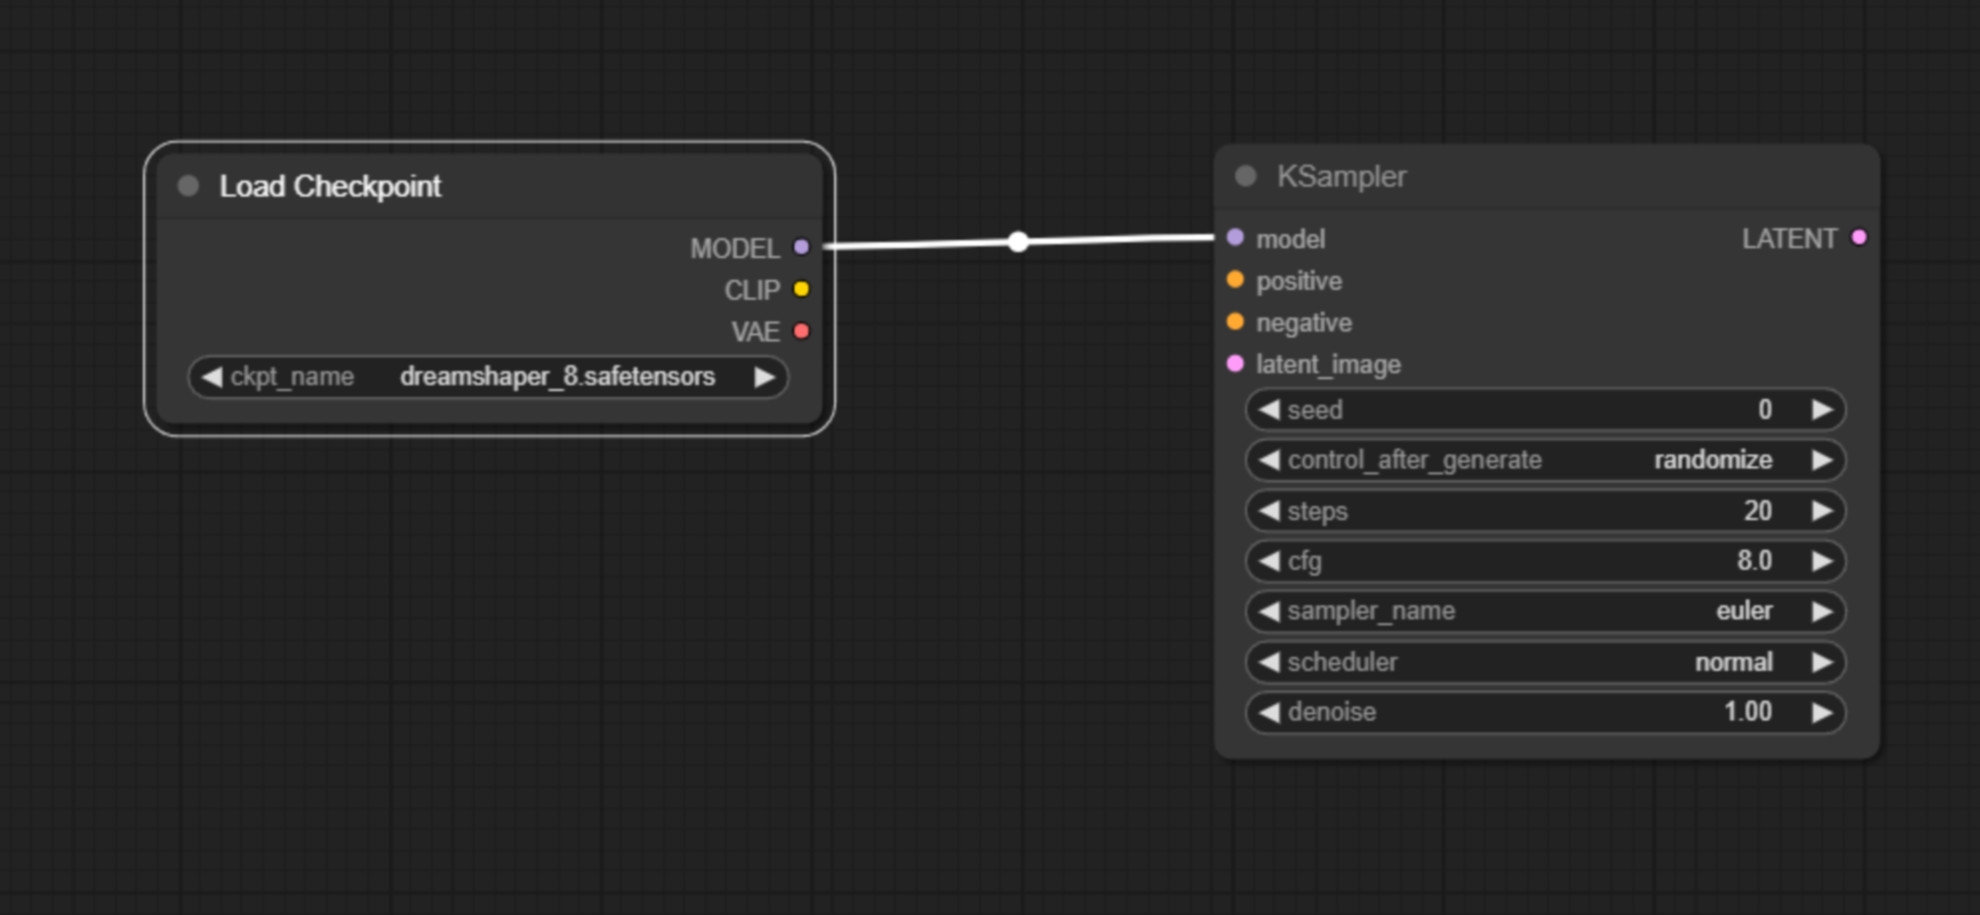
A first node tree
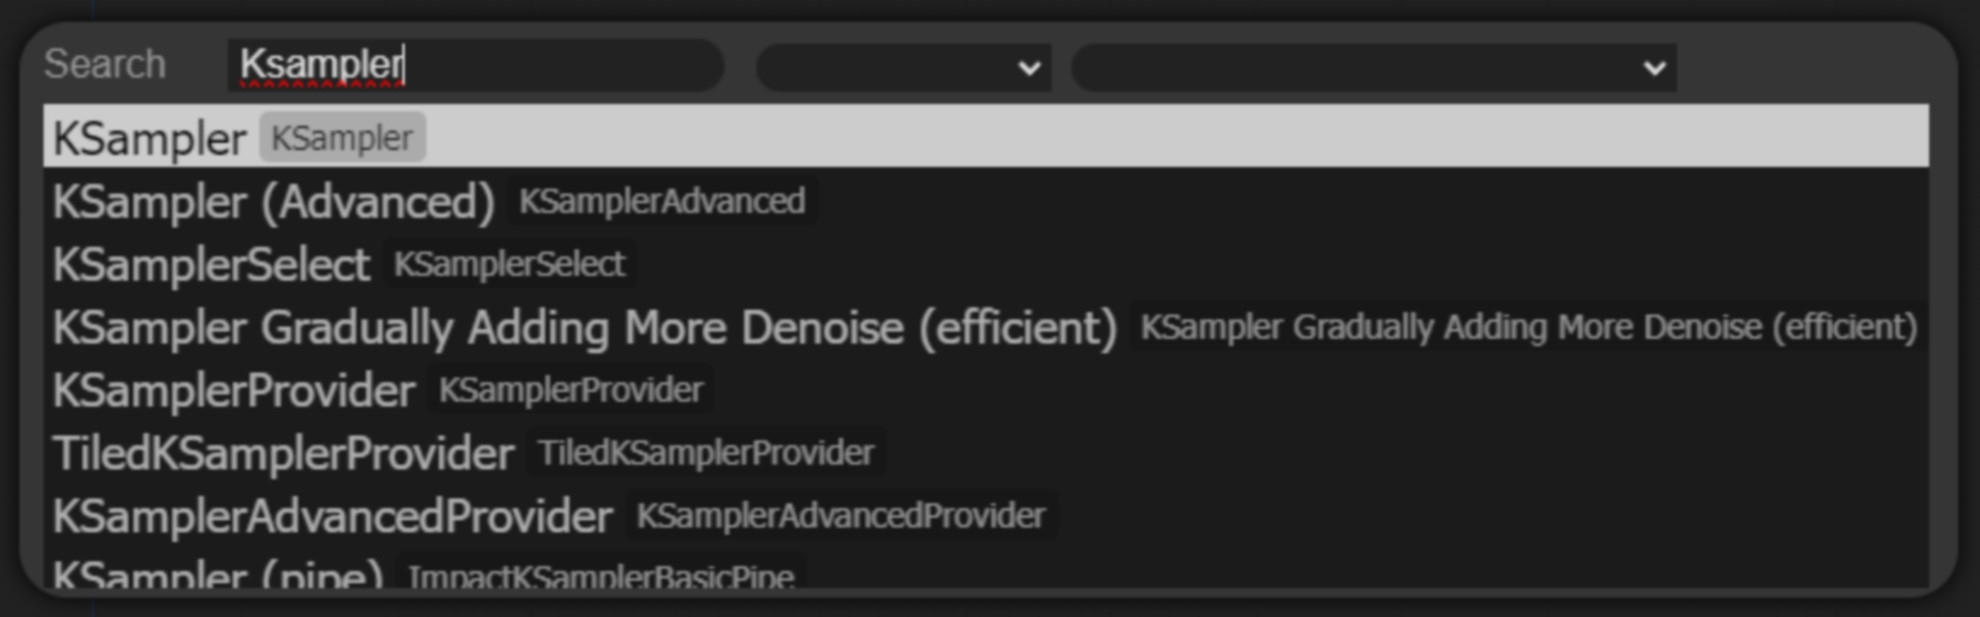
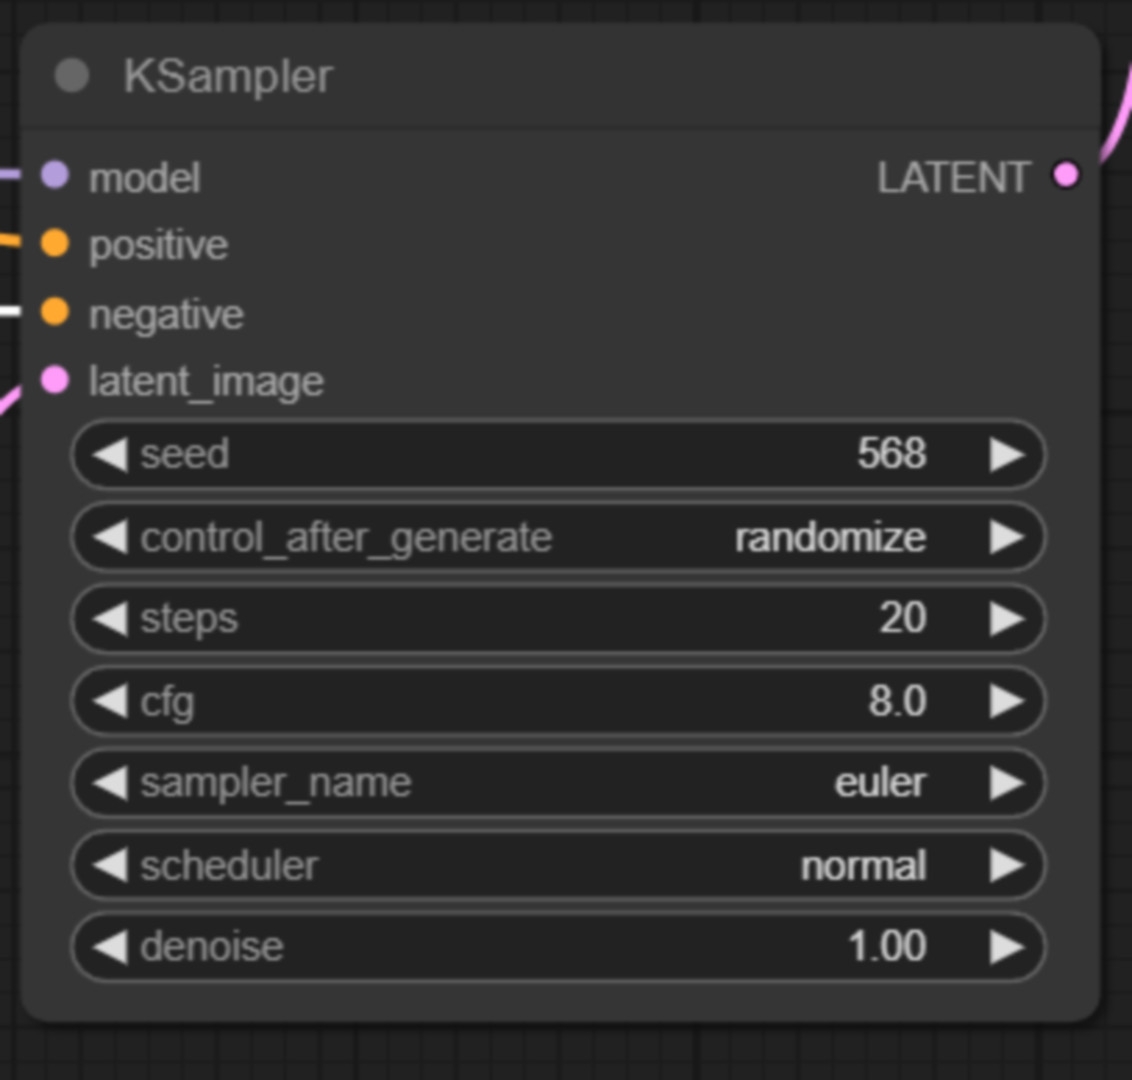
We start ComfyUI and when it has loaded, we double-click on the image and enter “KSampler” in the search field. We create our first node. The KSampler is the centrepiece of every workflow. The KSampler combines our stable diffusion models with our prompts and our idea of what the dimensions and the image should be and generates an image for us. We’ll go into the setting options in more detail in a moment, but first let’s set up the node tree. ComfyUI offers us context-related suggestions as to which node we can plug into which input.
Let’s now create a checkpoint loader node by left-clicking on the “model” input and dragging the mouse into the grey area and releasing it. A small menu opens in which we get suggestions as to what we could put in here. We take the checkpoint loader Simple. Here you can now load the model of your choice under CKPT name, provided you have saved it correctly as described above.
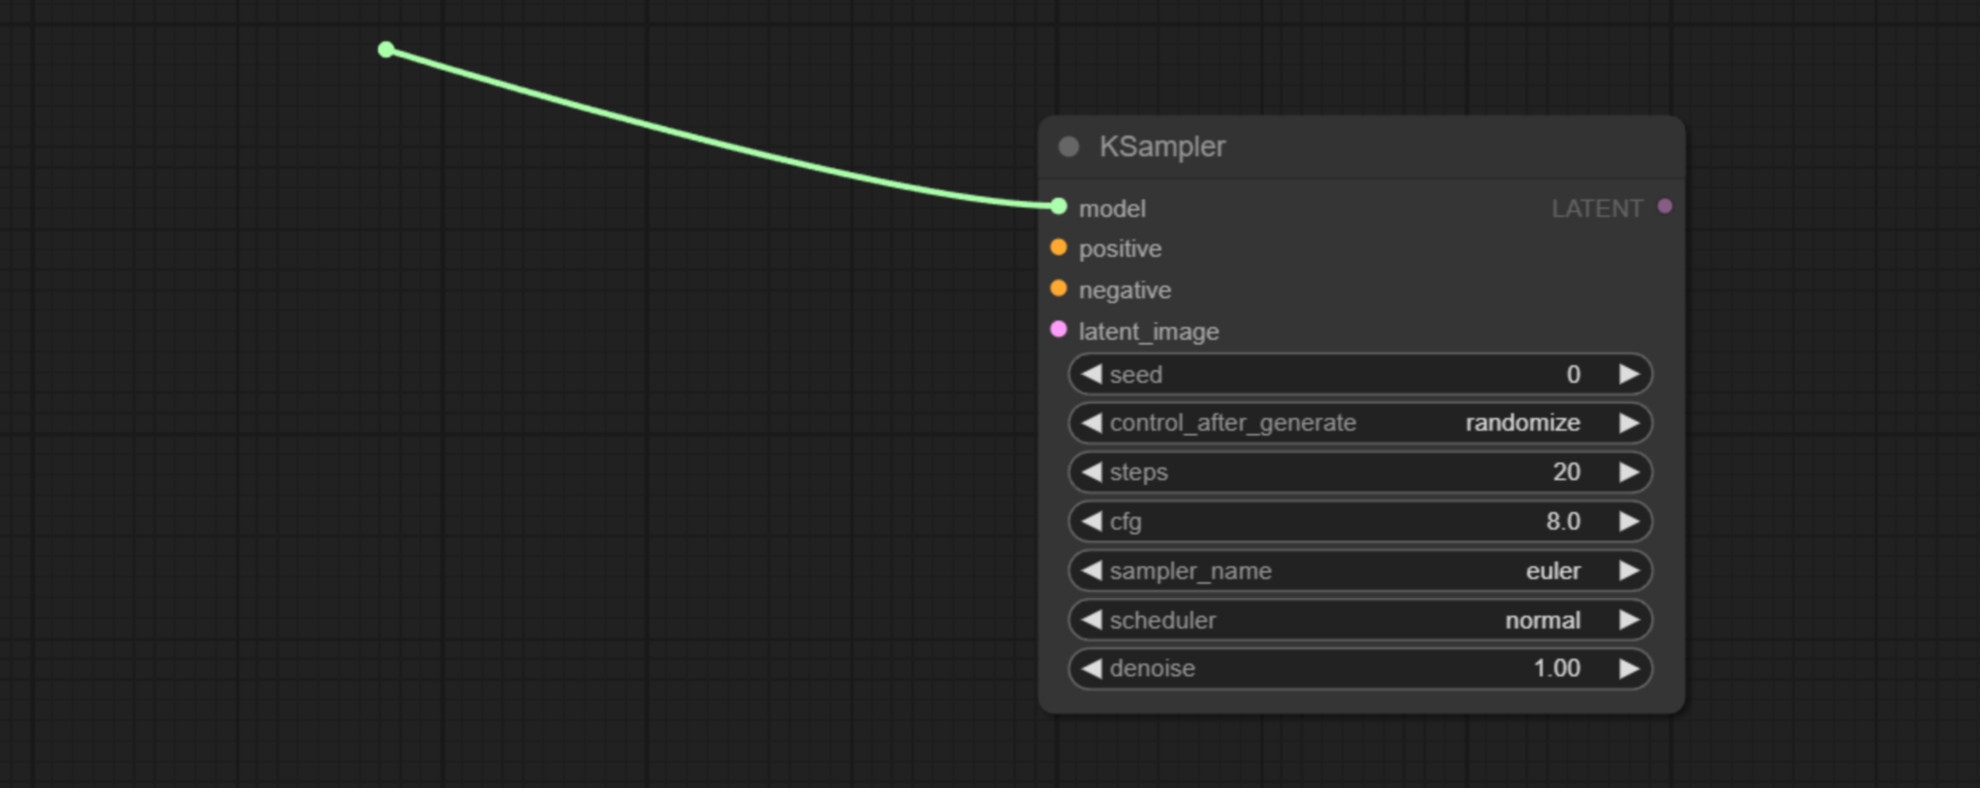
Next, we want to create our text boxes for the positive and negative prompts. To do this, we drag the mouse from the Clip item in the checkpoint loader into the empty space.
Here we select clip “textencode”. We do this twice. We connect the “conditioning” point once with the “positive” point in the KSampler and the other “conditioning” point with the “negative” point in the KSampler. Next, we need a latent_image.
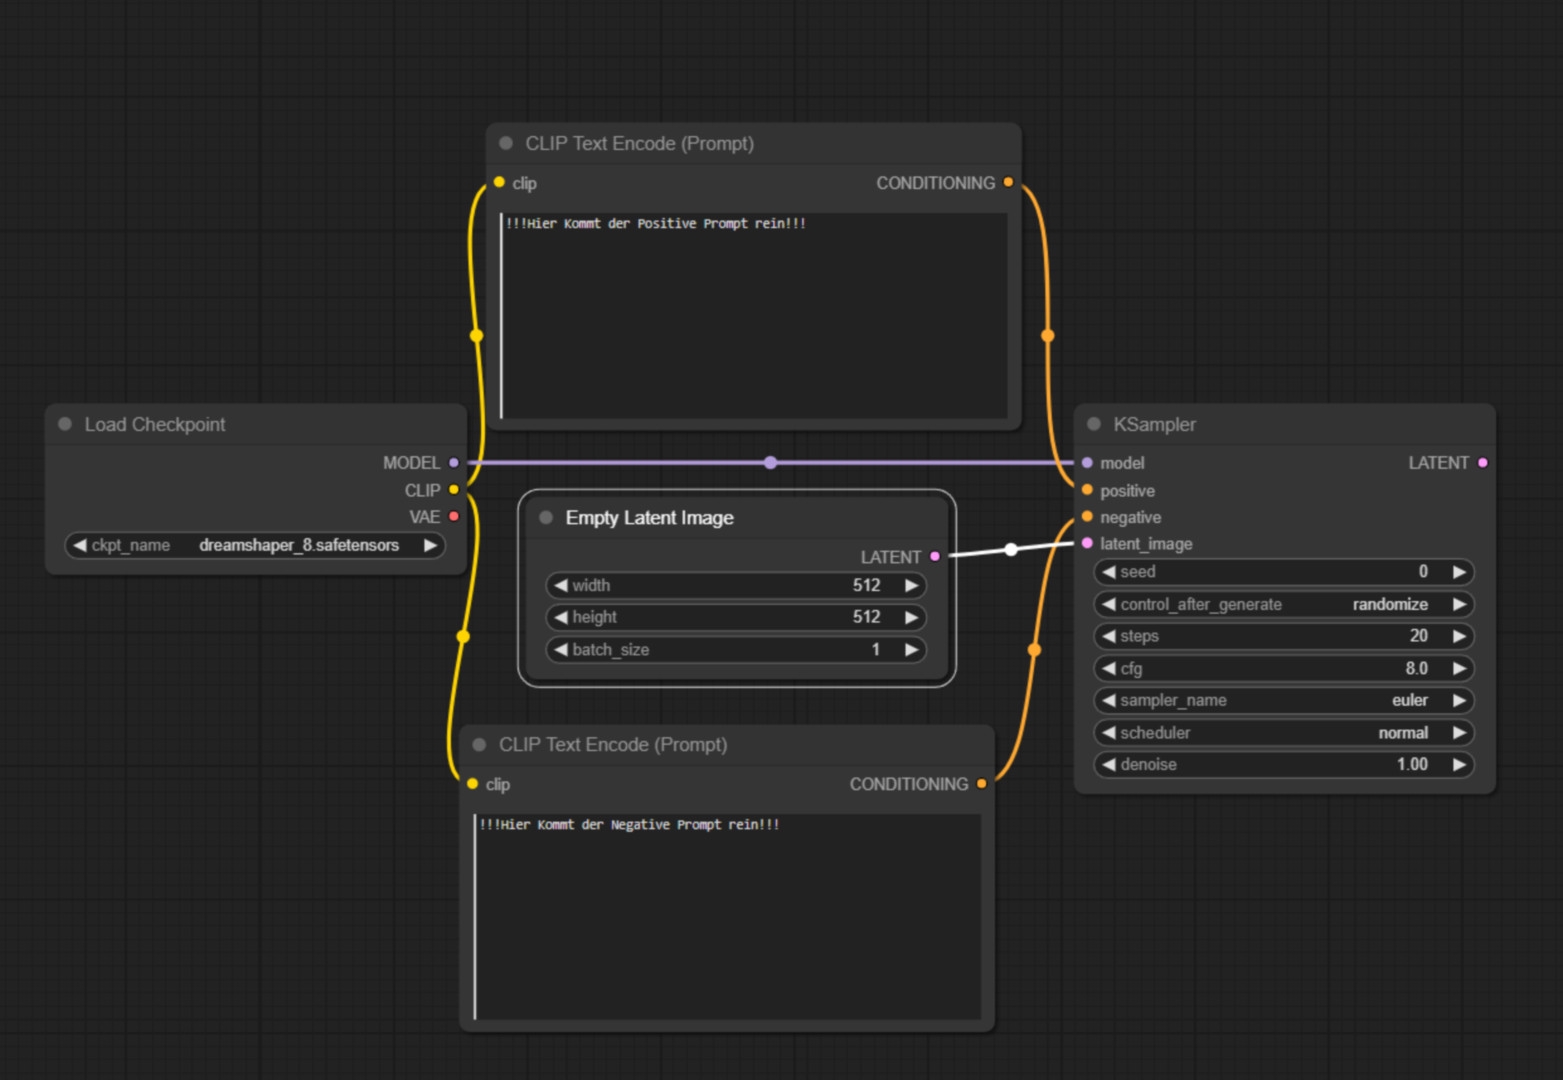
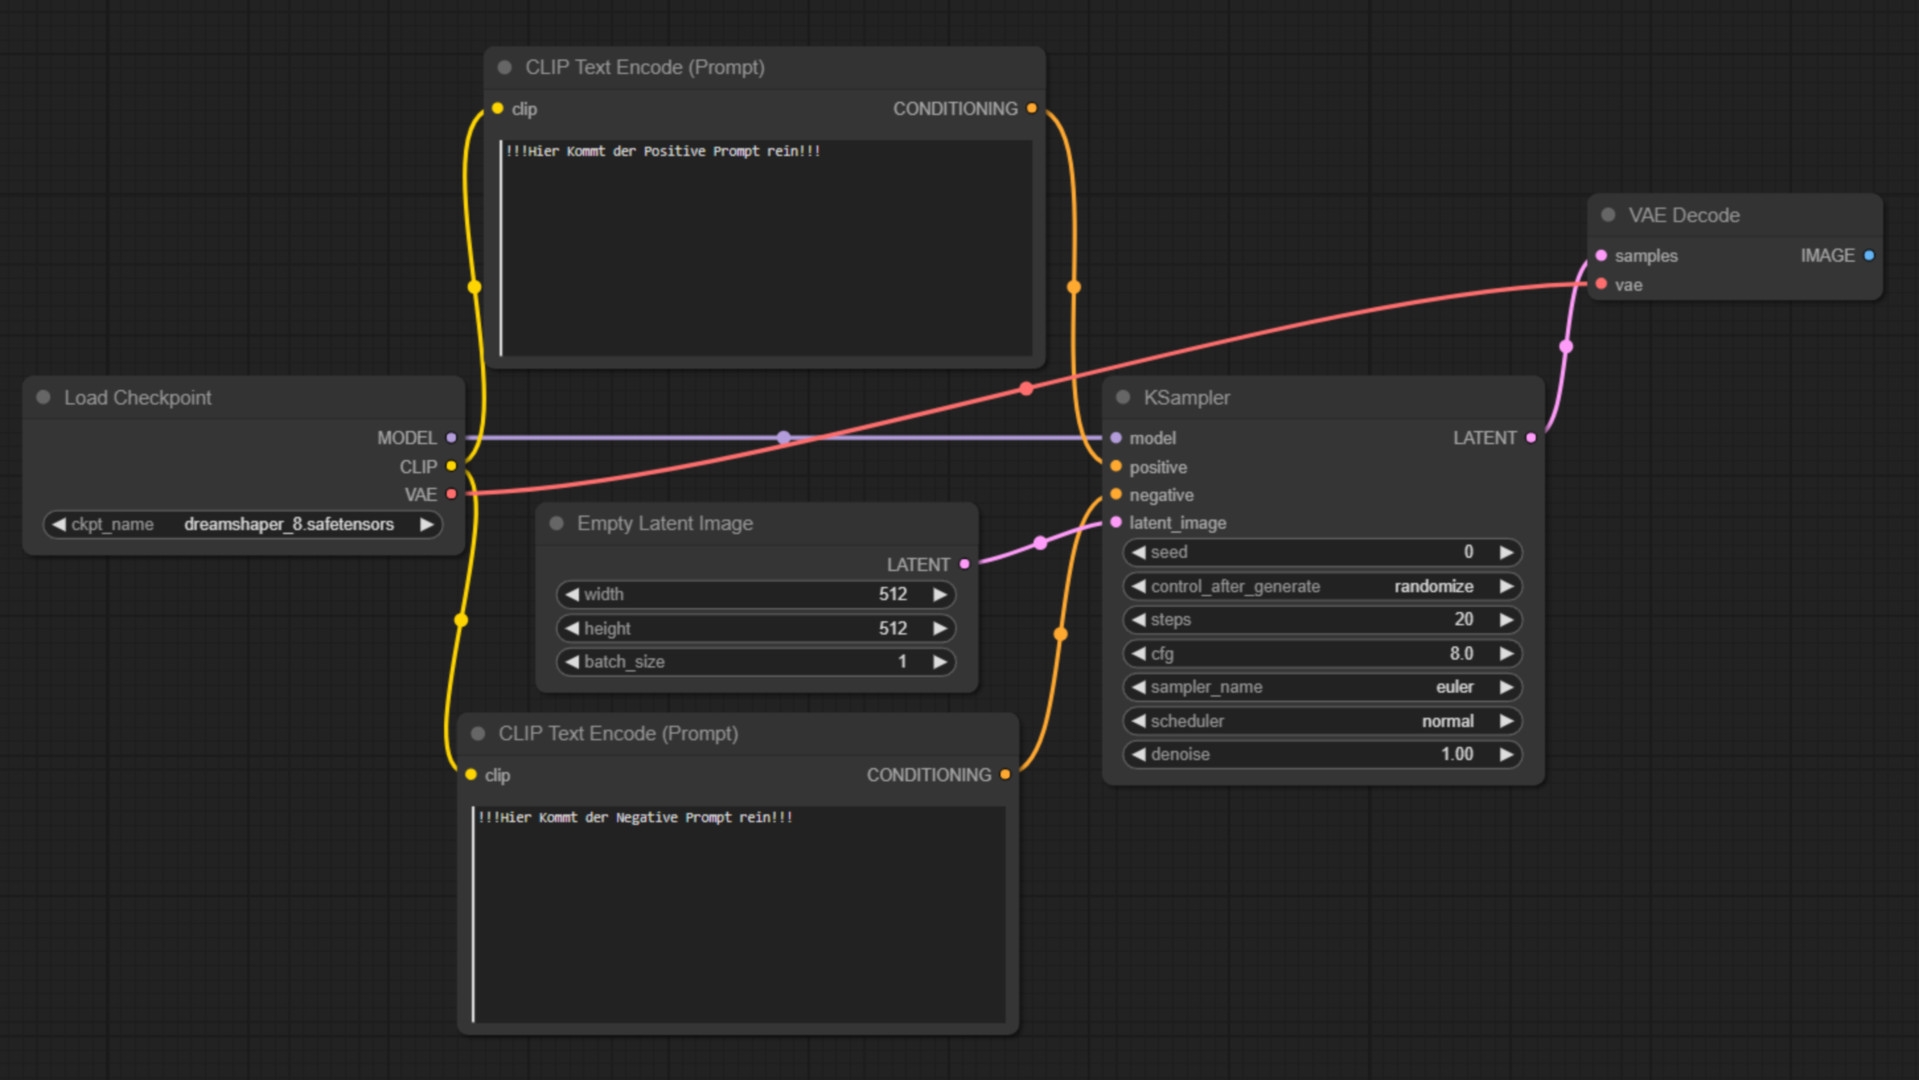
What is important for us is that the latent image determines the resolution of the image we want to generate. (Remember: The native resolution of 1.5 models is 512×512, the native resolution of XL models is 1024×1024.) We set this resolution here. We now move the mouse back to the “latentimage” item in the KSampler, hold down the left mouse button, drag the mouse to empty space and release it again. Here we select empty latentimage. Now we access the “latent” item in the KSampler, drag it into the empty space and select “VAE Decode”.
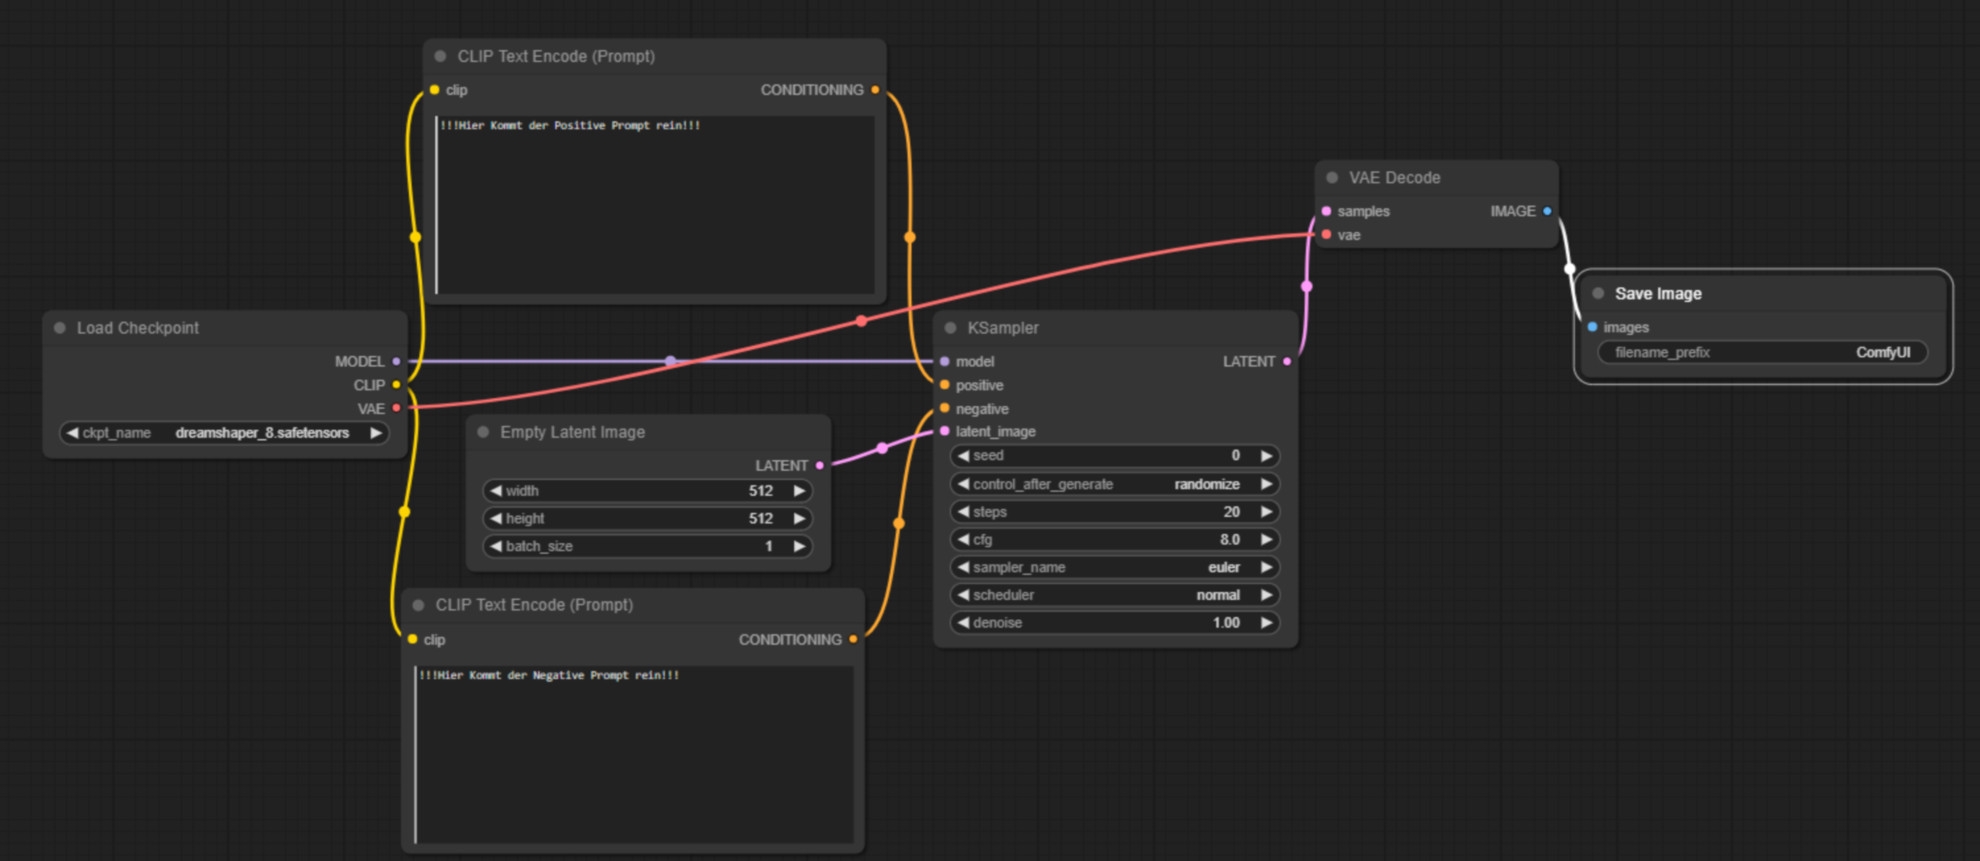
The VAE decoder converts the KSampler data back into visible pixels. We connect the VAE point from the VAE decoder with the VAE point in the checkpoint loader. Next, we extract another new node from the “image” point, this time the safeimage node. We have now created our first functioning node tree. Let’s now look at the most important settings.
The most important settings – positive and negative prompts
First the prompts: The text box in the “positive” item is filled with the information you want to have in your image. If you have loaded an XL model, it is much easier to fill this box because you can describe what you want in a natural English language. In the negative prompt you write in what you don’t want. If a generated image is too ugly and you have not written a negative prompt, this could be the reason. So you write “Beatrix von Storch” in the negative prompt, for example. ComfyUI now also knows that it should avoid anything associated with this term.
Seed
The “Seed” setting is used to define a starting point for the random generator, which enables the reproducibility of results. Using the same seed number should theoretically generate the same image. For variations on each run, this value should be changed or set to “randomise”.
The “control_after_generate” parameter determines what happens after an image is generated. If set to “randomise”, a new random value is taken after each generation, which ensures diversity in the results. This is useful for creating a wide range of variations.
Steps
Defines the number of steps the sampling process should go through. More steps can lead to more detailed results, but can also increase the generation time. A medium number of steps is often a good compromise between richness of detail and speed.
Classifier-free guidance scale
The cfg value influences how closely the model follows the text descriptions. A higher value can lead to more accurate but possibly less creative results. Experiment with different values to find the best compromise between accuracy and creativity.
Sampler Name
Sampler_Name specifies the sampling algorithm to be used. Different samplers can emphasise different properties in the generated image. “Euler” could be an option that offers a good balance between speed and quality.
Scheduler
This controls the schedule according to which the sampling steps are performed. “Normal” could stand for a standard run, but other options could influence the quality or speed.
Denoise
Leave this value at 1 if you are only working with text input but no input images. Yes, images can also be input, we’ll come to that in a moment! The denoise value becomes relevant if we want to control what is generated for us with an image in addition to our prompt. The closer the value is to 1, the more dissimilar the image generation looks compared to the input image.
If you are not sure what to do, leave the settings as they are in the picture. You may want to play with the sampler and switch between Euler and other samplers. Now we have our first node tree and know how to use it. So we are prepared for the conversation with the art director.
Visual ideas through ComfyUI
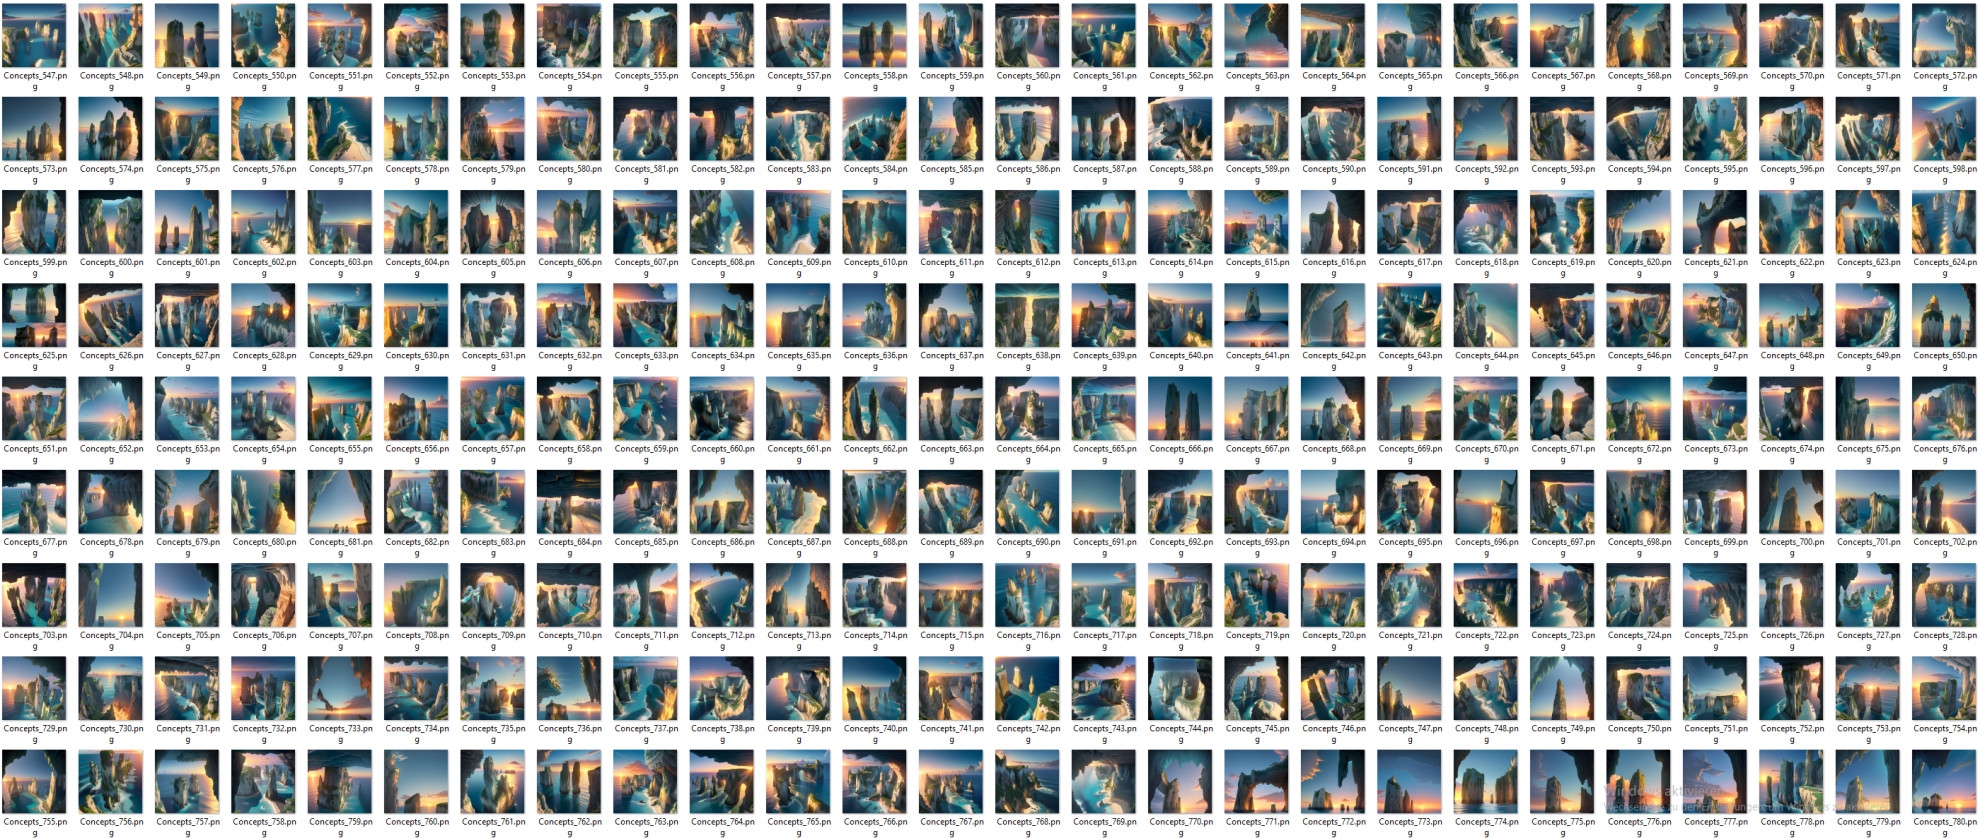
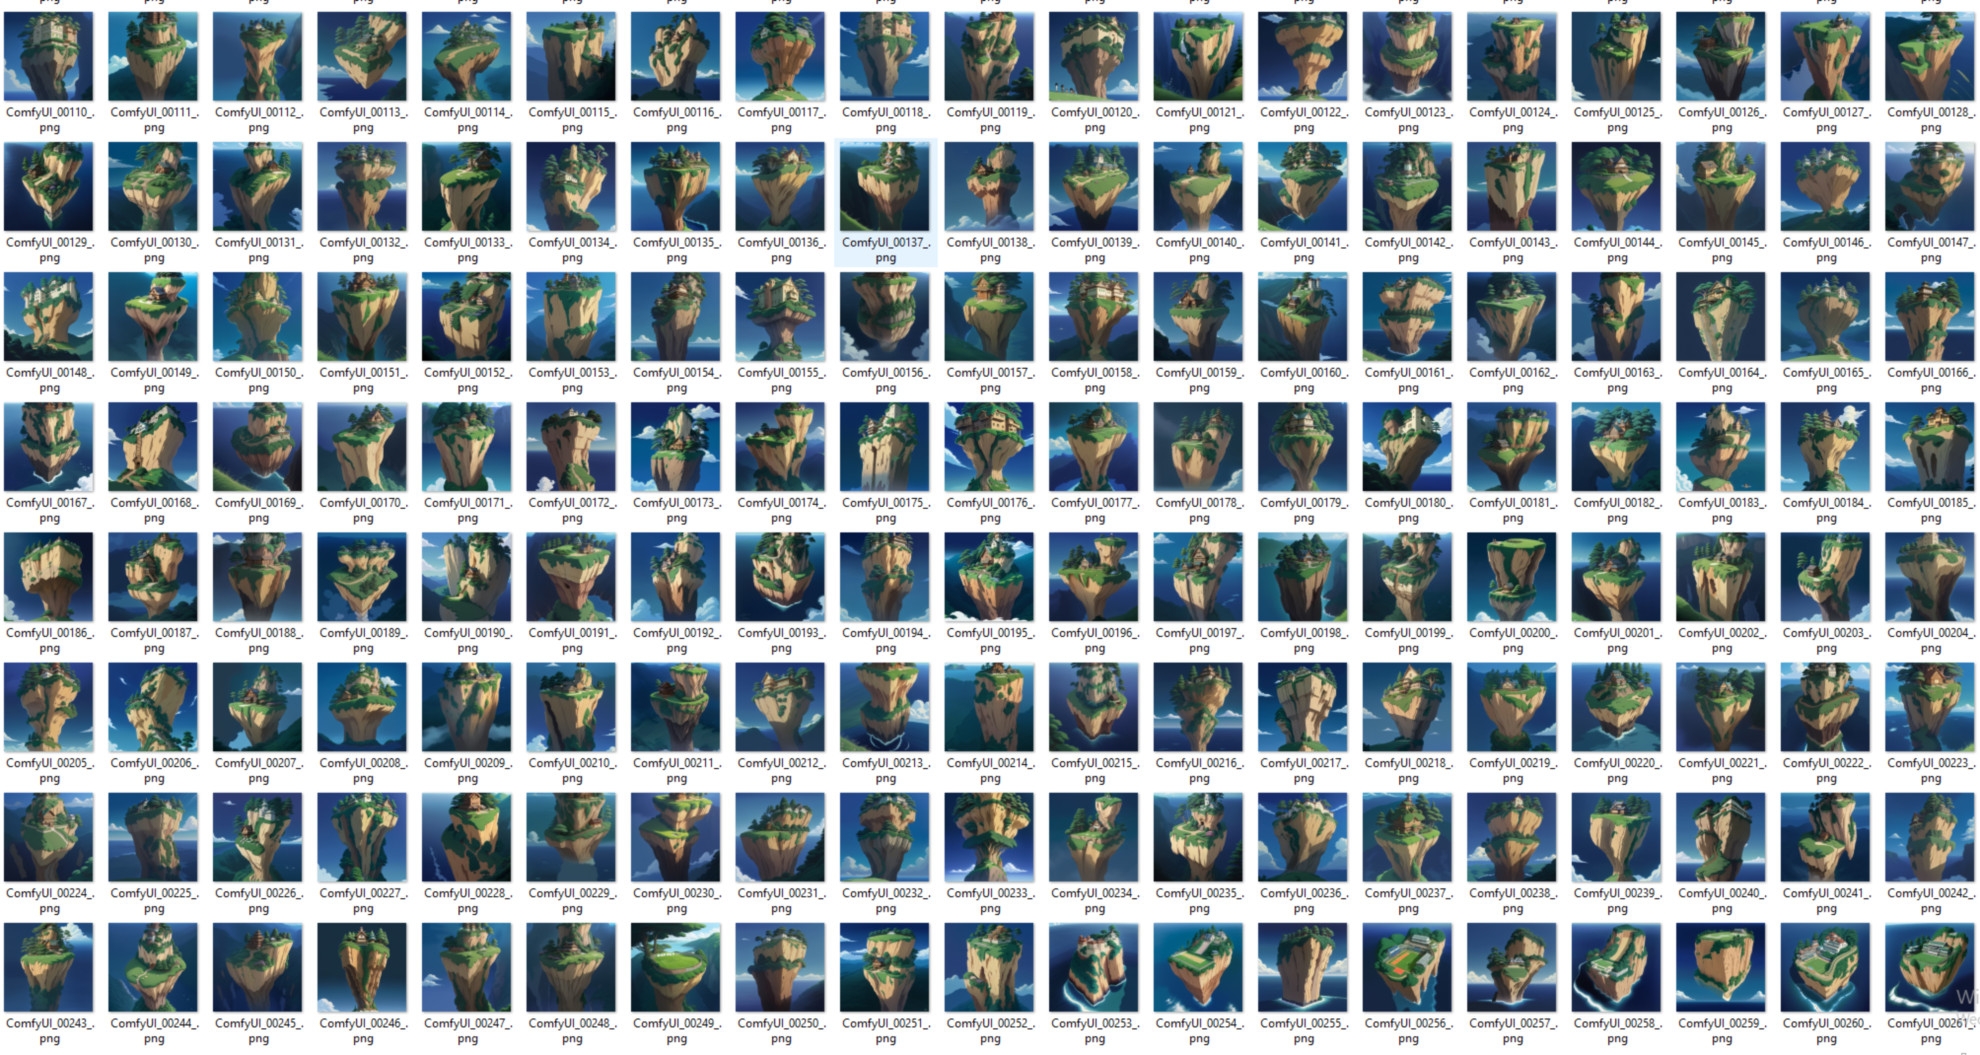
Let’s type into the positive prompt: “anime water village houses on rock pillars.” Then we press “Queue Prompt” in the sidebar on the right and the programme starts to generate an image for us. When the Stable Diffusion Model is activated for the first time, loading the model can take one to two minutes – but it remains loaded until the PC is restarted and then works “instantly”. In the menu bar, we can also switch on Autoqueue and click on Change. This means that if we now press Queue prompt, Stable Diffusion will generate one image after the other. With these settings and a halfway decent graphics card, the generation of an image should not take longer than 2 seconds. The programme will now spit out a large number of images very quickly – on the basis of which you can evaluate with your art director what he actually wants. (Here I show a folder with 200 images that were generated within 2 minutes)
Introduction to the colourful 3D scene
So, let’s assume that we have now agreed on a rough idea with the art director. Next, we want to block the scene, but in colour. To do this, we need 3D models of houses, cliffs with houses on them, boats and maybe a few people. I have provided you with the node tree for this on the DP page. Download it and simply drag it into your ComfyUI interface. (is.gd/comfyUIsetup_plugin) It will automatically recognise it and offer you exactly my workflow – if you want to participate or need a starting point. Your ComfyUI will recognise that plug-ins are required, which you probably haven’t installed yet, and offer to install them. You agree to this and after a few minutes you are ready to go. And if we now go through the various tools, we have a common basis.

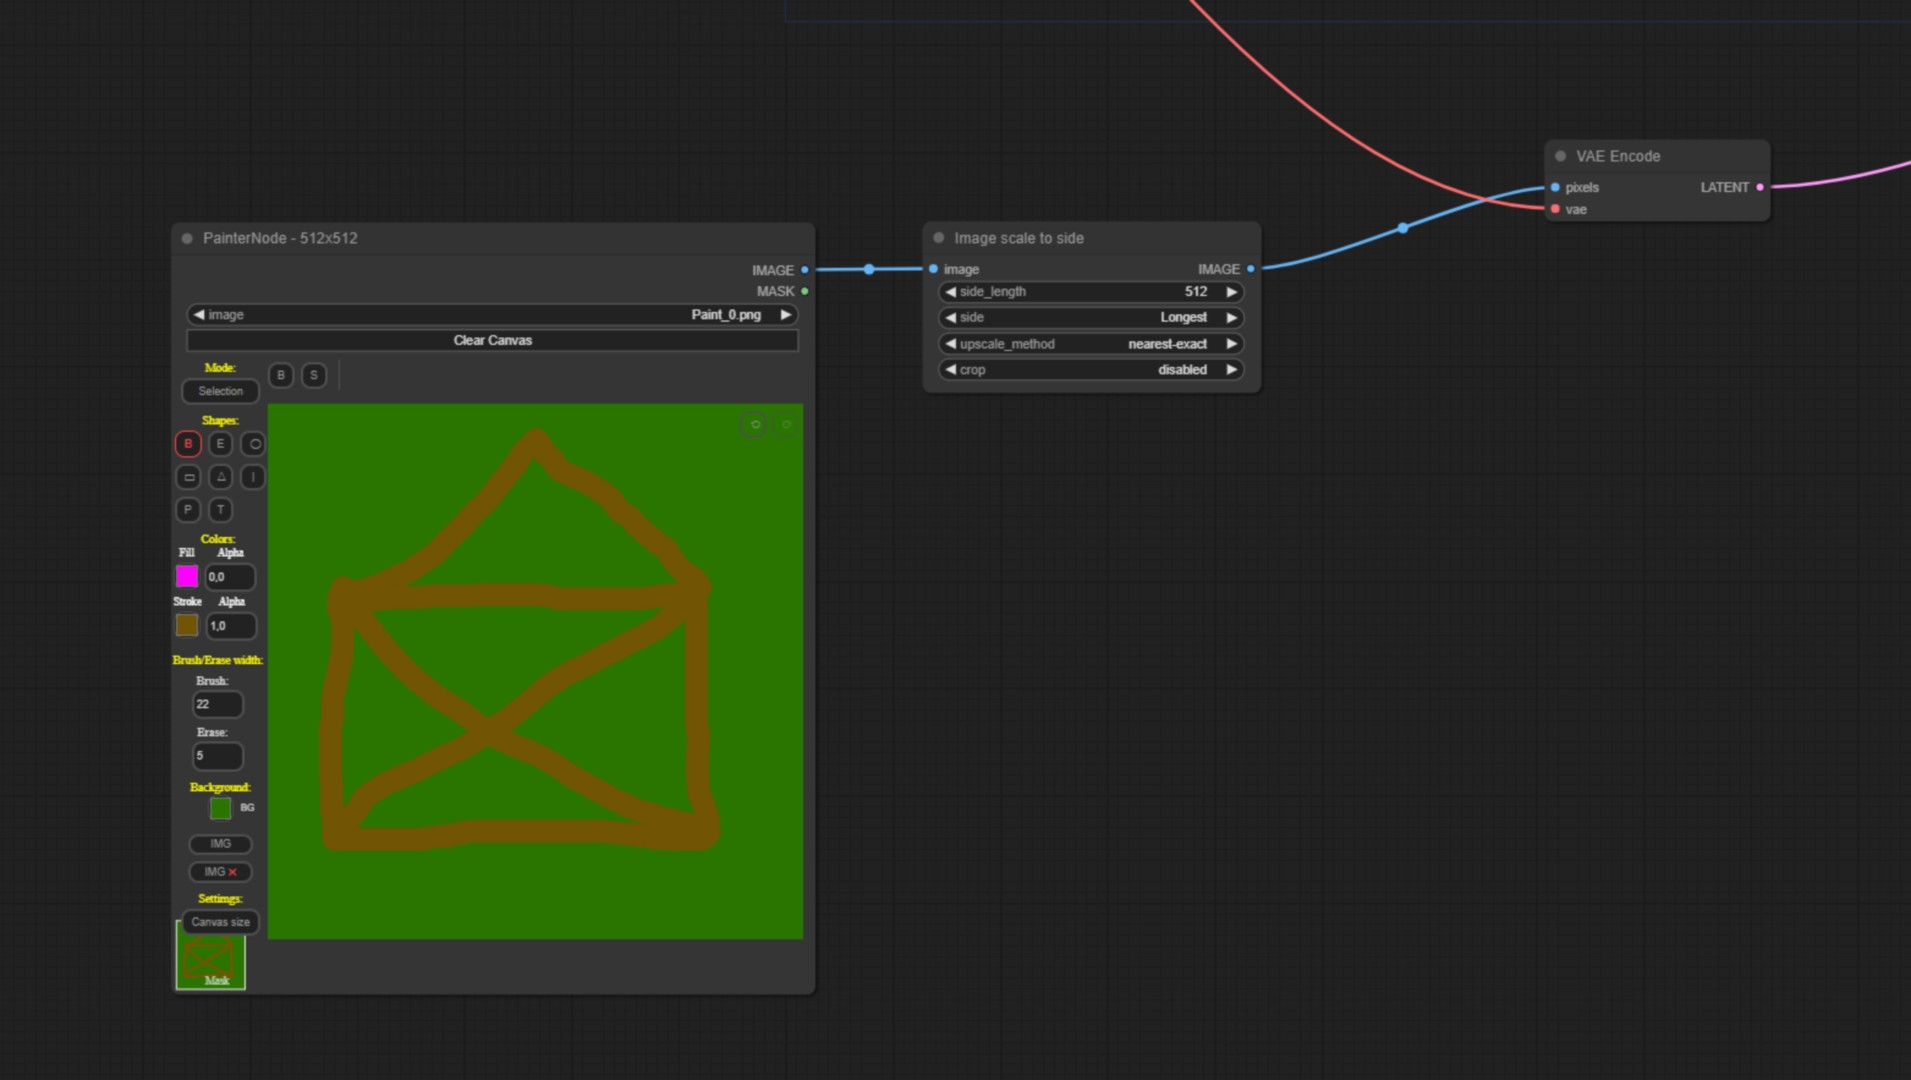
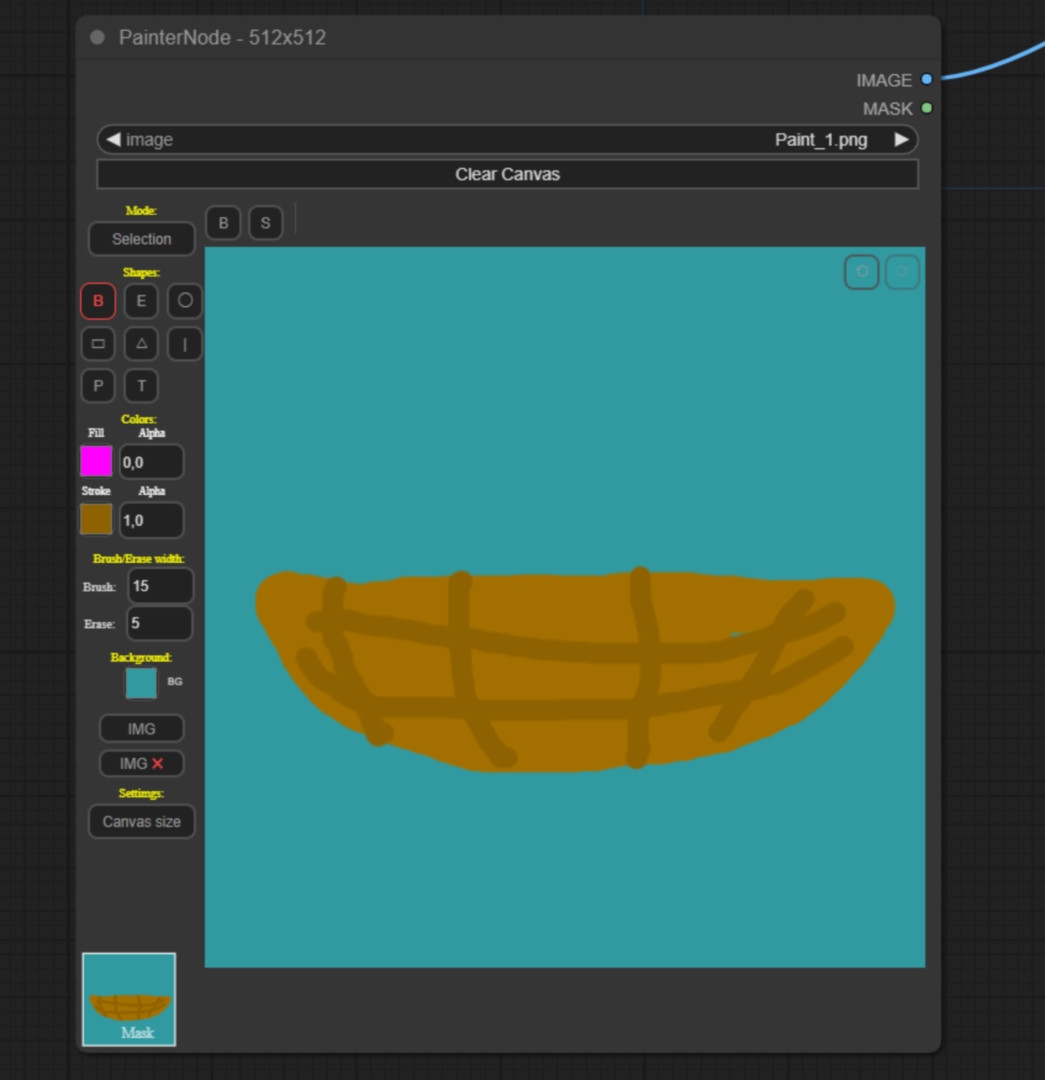
From doodling to 3D model
This is what the nodetree looks like. So that ComfyUI knows that we want to have a house, we promptly write as a positive: “beautiful studio Ghibli Hero House with a lot of details”. Now we doodle a very rudimentary house of St Nicholas so that ComfyUI knows what kind of perspective and what kind of format we want to generate our house in. The image then goes into a VAE node and now serves as a latent image. The Denoise value is very important here. If you set the Denoise value to 0, about 0.1, then ComfyUI will spit out the image pretty much exactly as you have given it. I recommend a value of around 0.8 here so that your 3D world doesn’t just consist of 2-dimensional stick houses.
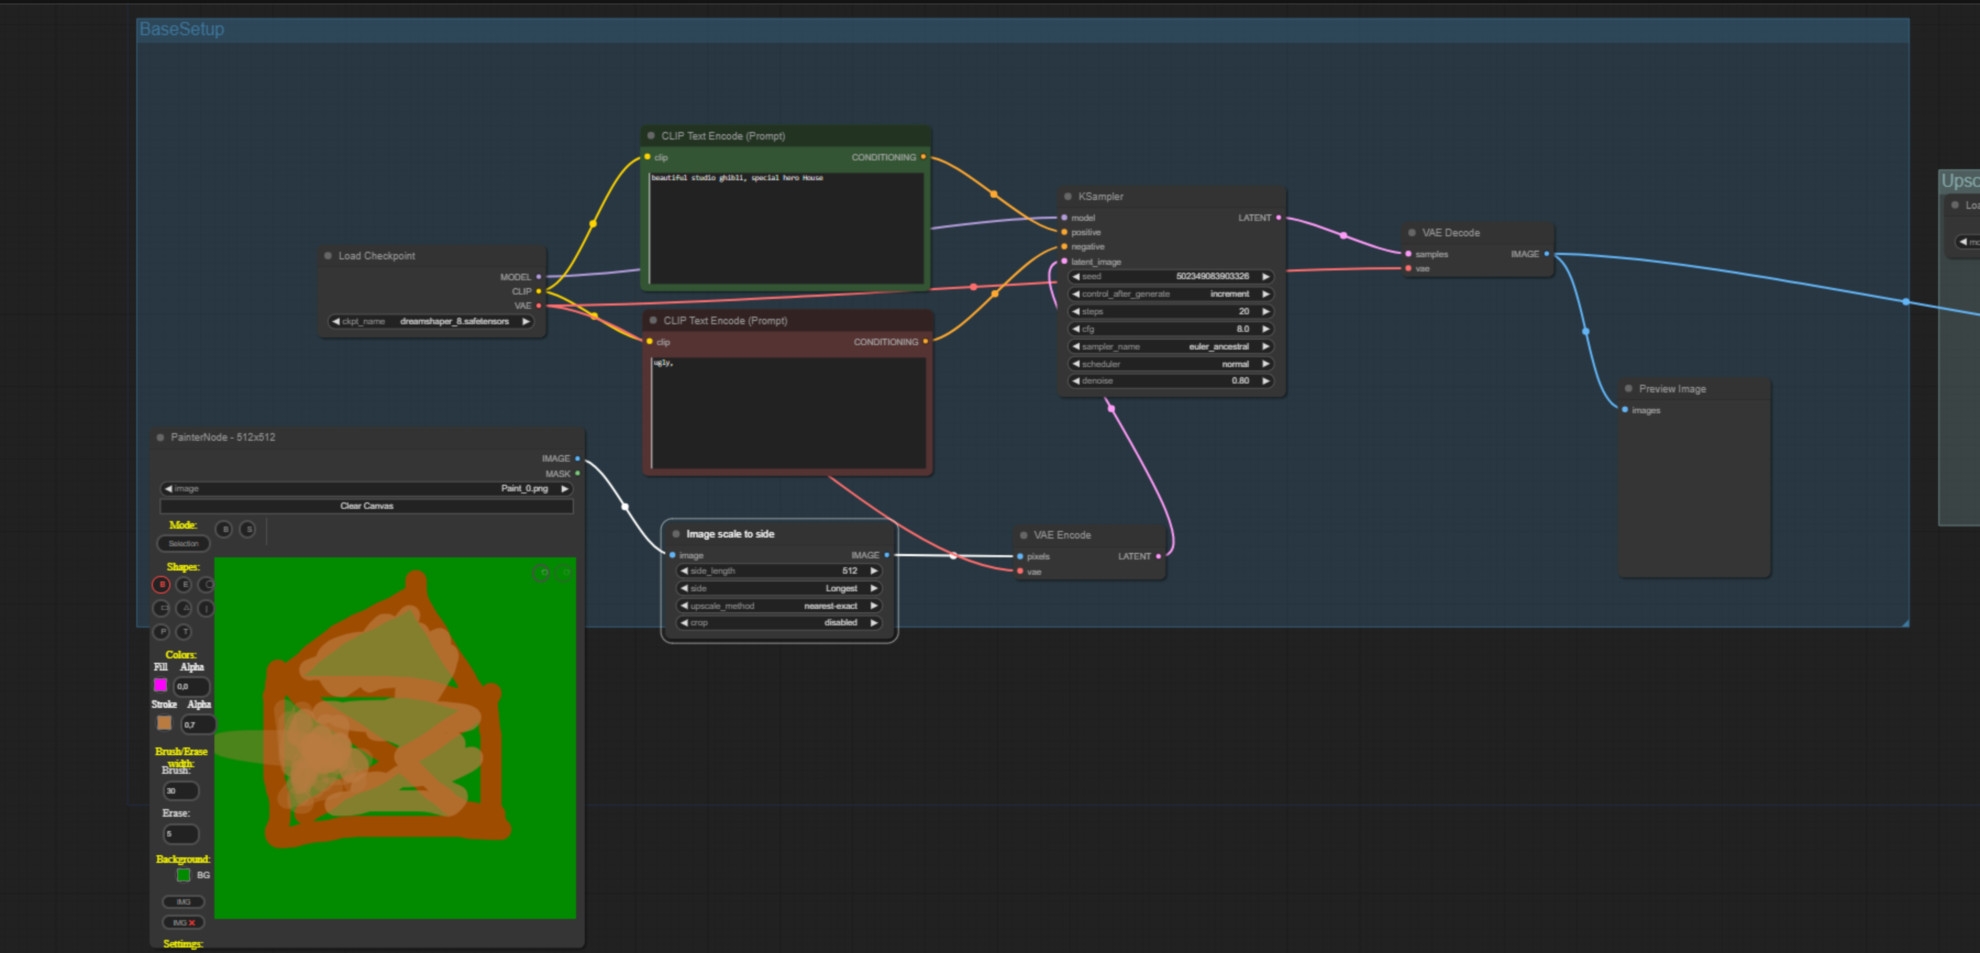
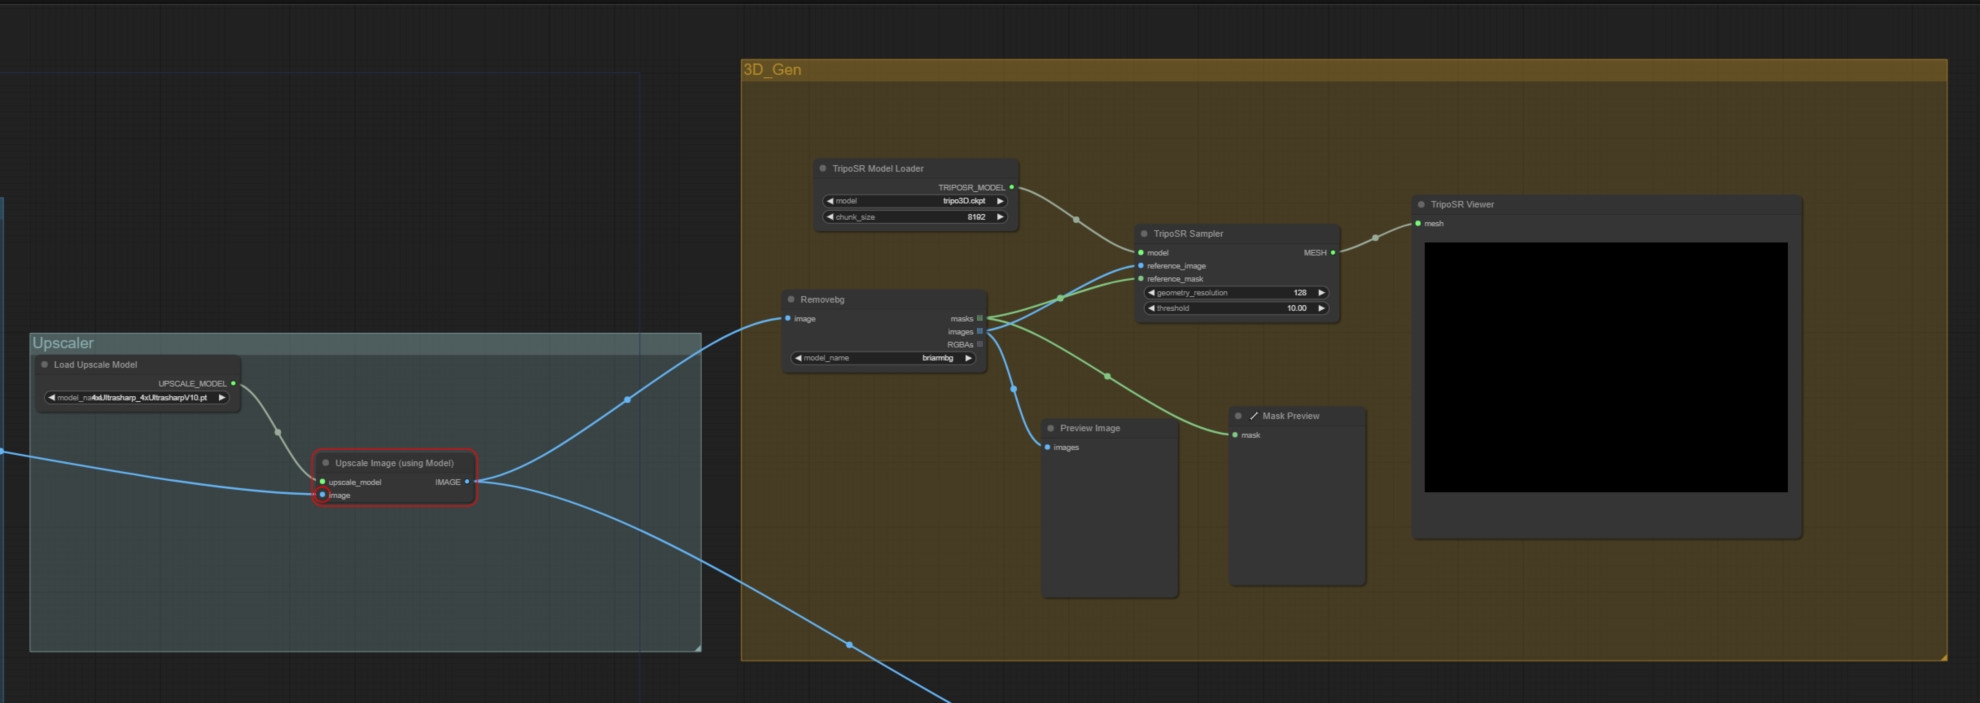
The path to the detailed 3D object
The nodetree goes further and scales up our image so that we get a better resolution than 512×512. To create a 3D object from this, we use the TripoSR plug-in. To do this, we first use the AI to mask the background of the image using the RemoveBackground Node (the AI is quite clever, so it often knows exactly what we want without us having to change anything in the settings) and then we enter the mask and image into the TripoSR sampler, which then spits out a 3D model. You will then find this in the ComfyUI output folder. Remember, the model is not textured, but the colour representation is displayed via a vertex colour attribute, i.e. the level of detail of the texture or the colours depends on the geometry resolution. You can of course also use this workflow for all other objects. I did all the assets for my rendering this way.
Off to Blender! Selecting and creating low-poly models
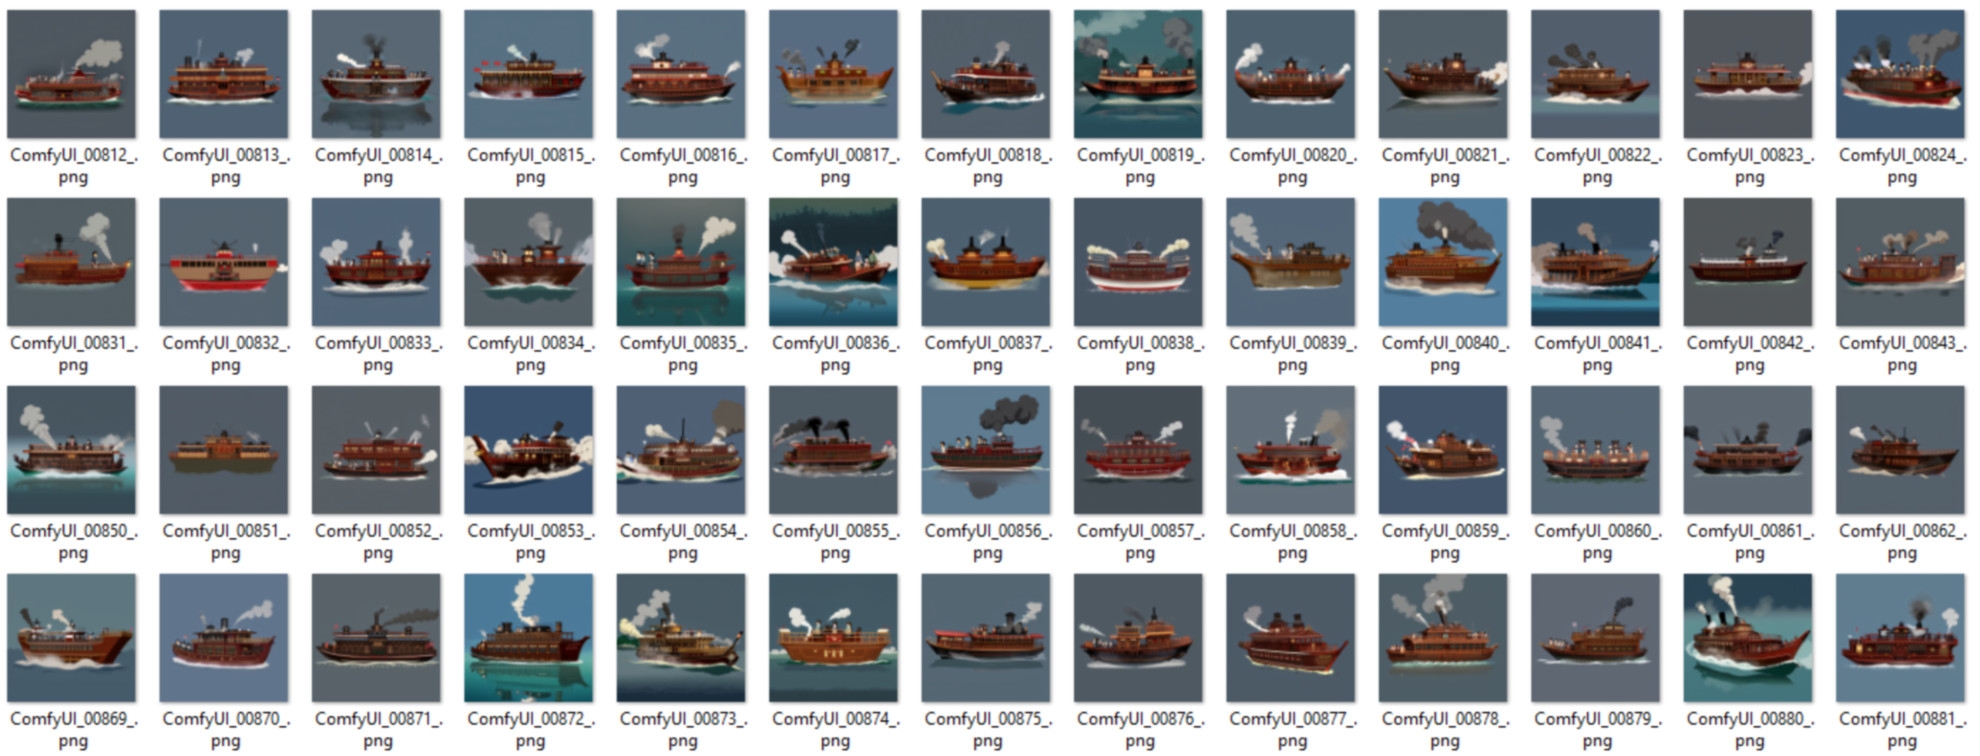
You start by selecting the variants you want to load into Blender. I recommend that you first create a few dozen low-poly models with a very low geometry resolution of 128 using the auto queue function. This will result in models that work very well and represent what you want on the one hand, but also some that only work poorly on the other. But that doesn’t matter. Because we generate one model per second with this technique – with hundreds of objects, it’s not difficult to delete what we don’t want.
Importing into Blender
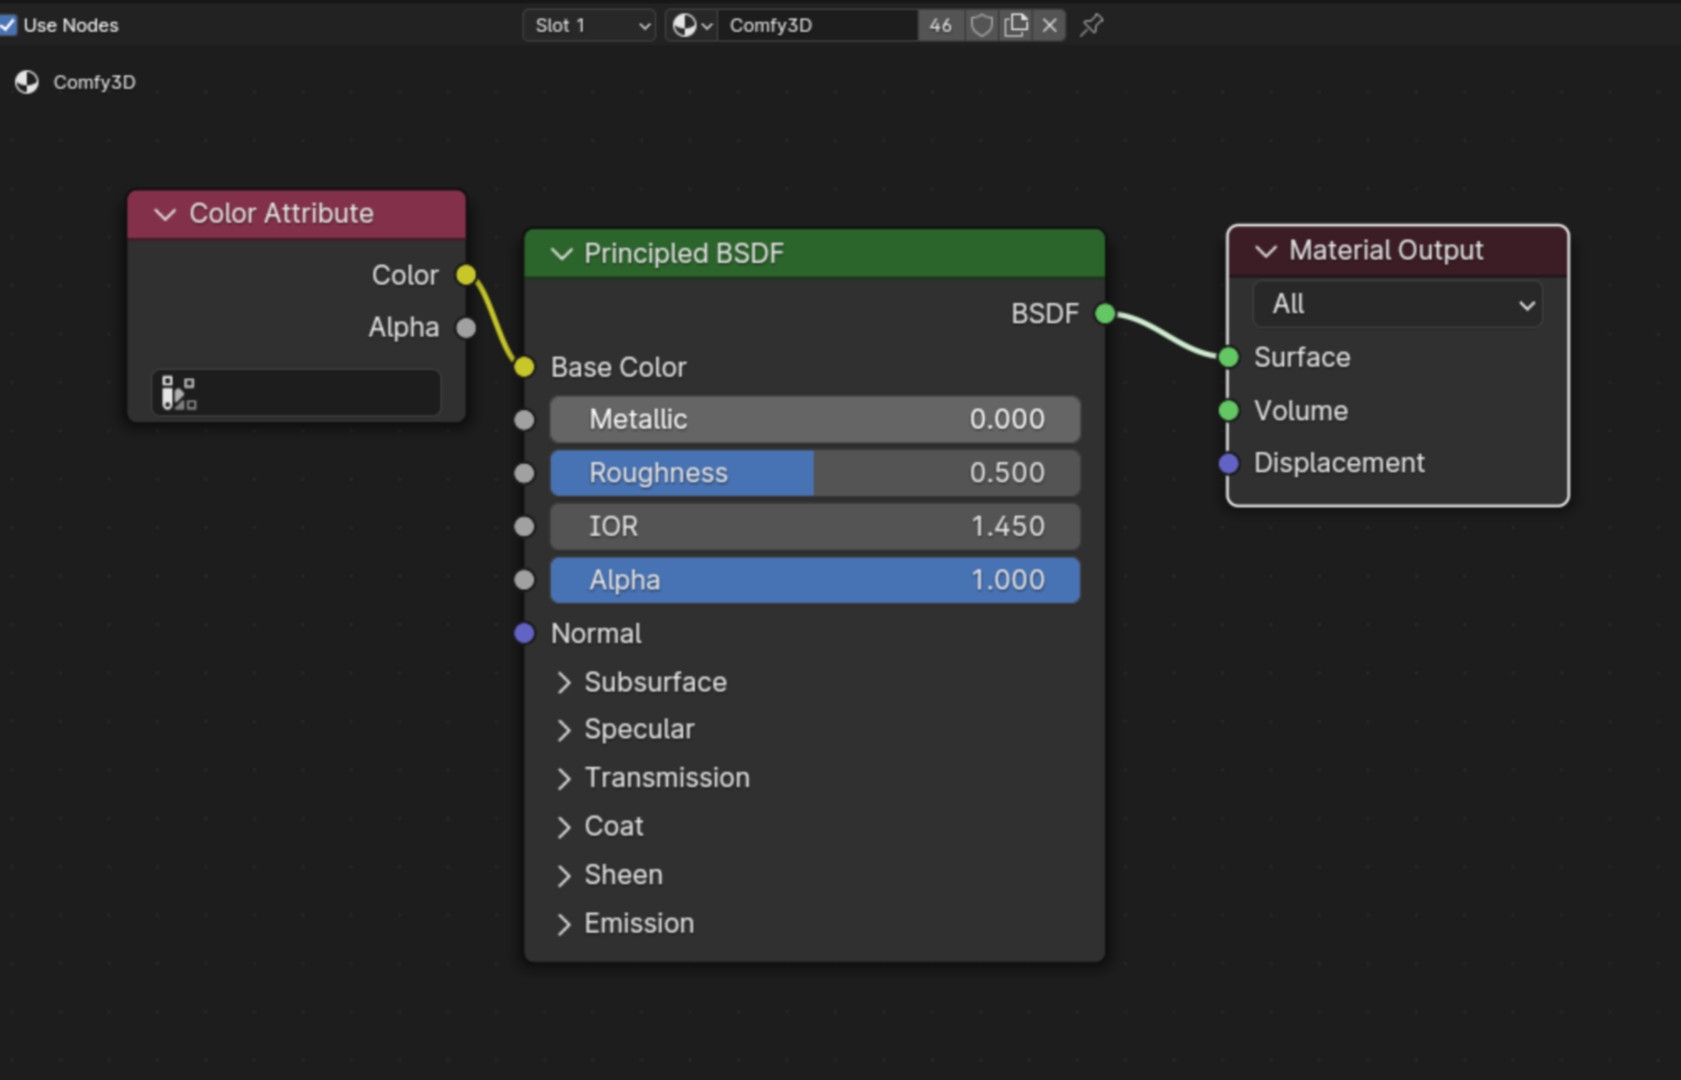
As soon as you have a few models that you like and would like to import into Blender or another 3D programme, you can search for the corresponding image in the output folder. Then drag this image into your ComfyUI interface. The nodetree used to create the image is stored in the metadata of each image. In the ComfyUI interface, you can then generate a geometry resolution of 512 for the selected model. You can then load the corresponding model into Blender as an OBJ file. In the Shader Editor you create a material for it and use the “Color Attribute Node” as colour input to give it back its colour in Blender. This is completely sufficient for a quick colour layout.
Colour resolution and texturing
For those of you who want a texture resolution that corresponds to the input image, I have written a small Blender plug-in (link in the description). With this plug-in you can nicely project the texture from the high-resolution input image onto your 3D model with one click, which in some cases is far more impressive than the vertex colour.
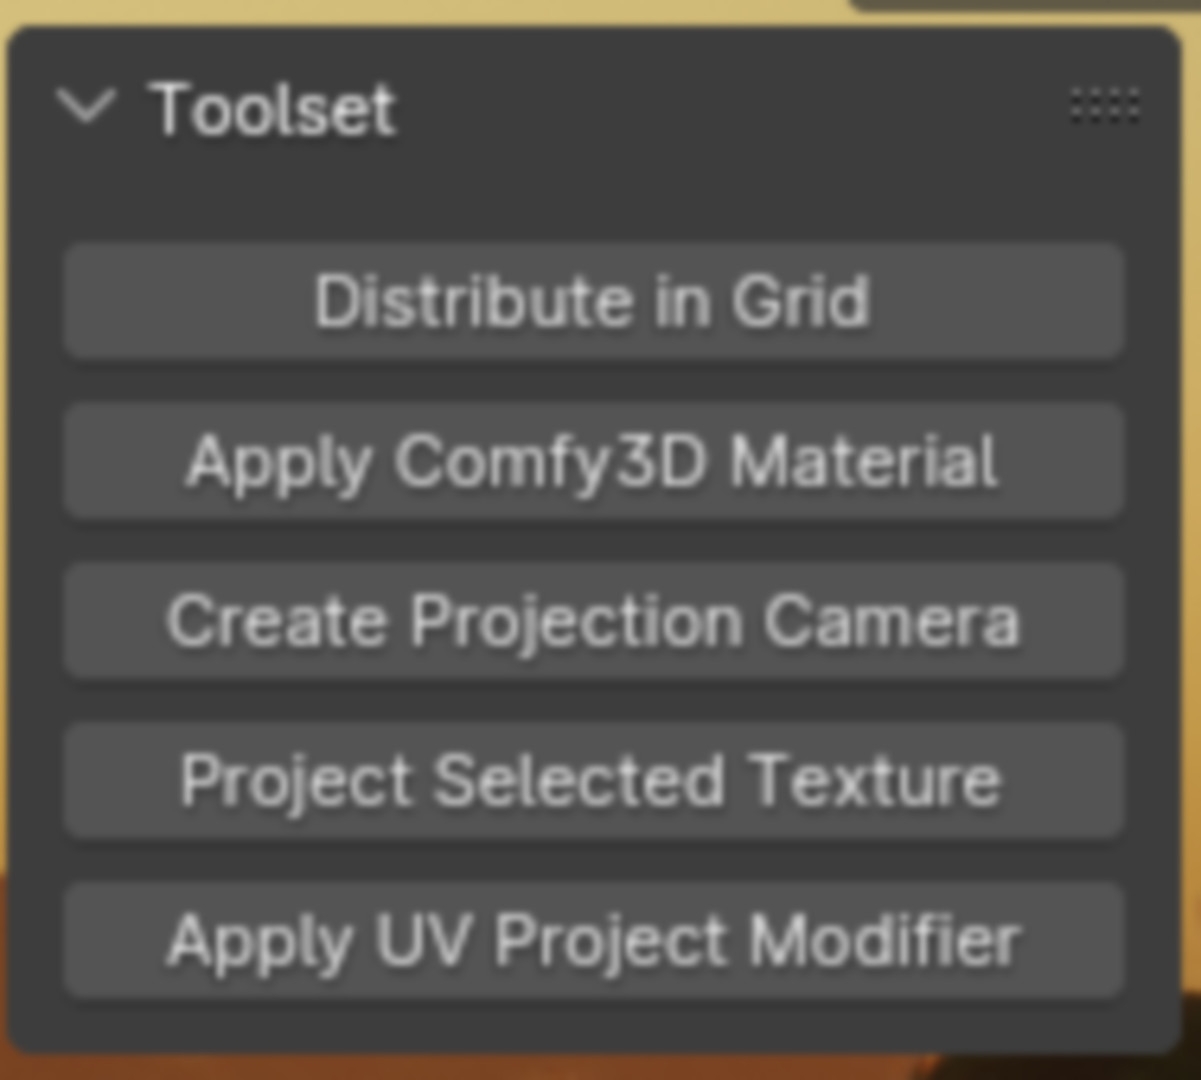
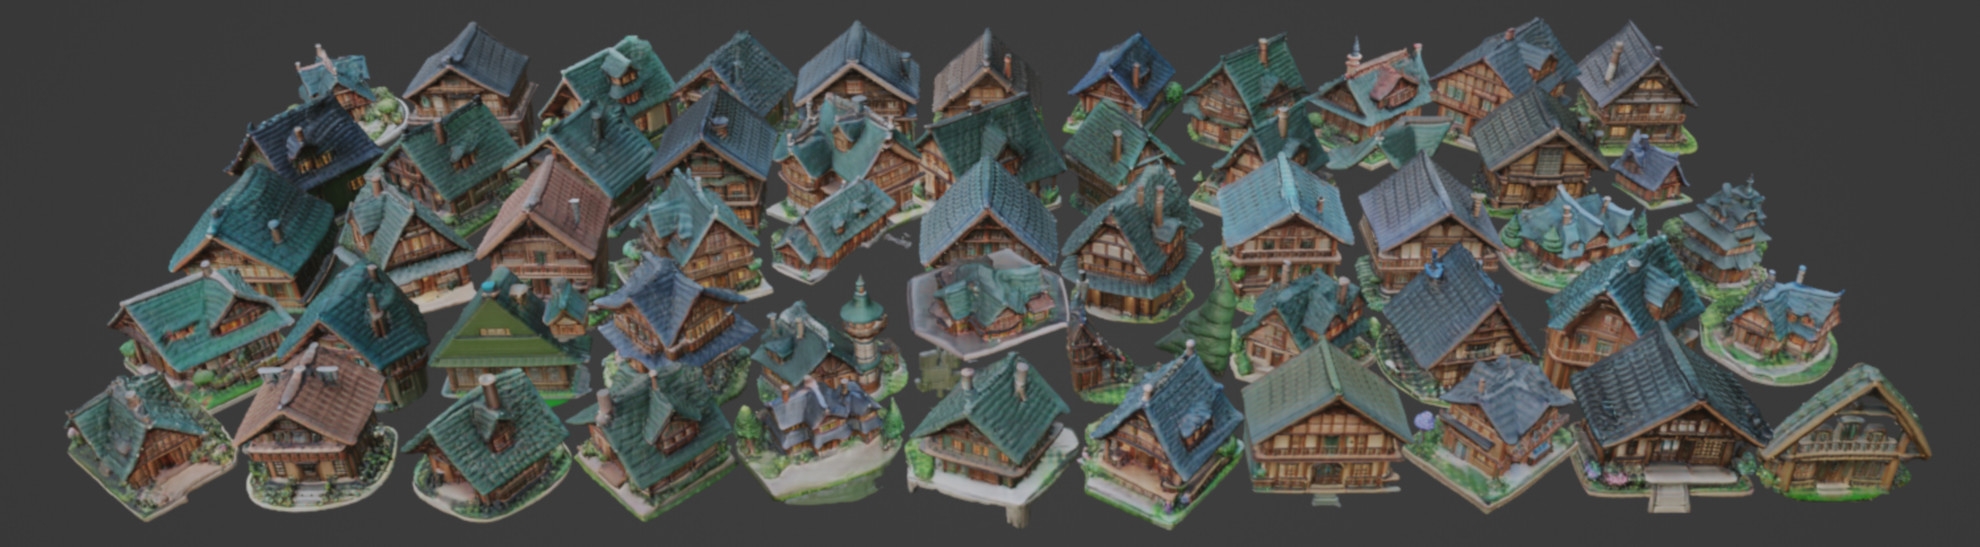
Model factory and distribution
Now to the Blender model factory: Let’s generate 100 models of a house via auto queue. Select all models at the same time and load them into Blender. With my tool you can distribute them with one click and give them the vertex colour at the touch of a button. You can then quickly render these fixed houses in the viewport and send them to your art director. He can then paint circles around the little houses that he likes. You can use the same procedure for cliffs, boats, trees etc.. This will give you some atmospheric images of how the scene should be put together, as well as models that you can place in this scene. Using your imagination, you can then quickly lay out the scene according to your wishes and those of the art director.
Conclusion: Art Director to Artist
ComfyUI can help you overcome your communication barriers within a pipeline. We are moving away from our grey-graded bricks towards an initial layout that is not only more colourful than simply working with grey blocks, but the Proxy3D models could be a real inspiration for the final look of a product. Especially in the initial phase, you can offer the customer a palette of possibilities so that they already know more clearly in which direction the look of their product should go. Nasty surprises in the second half of a project, where the customer wants to completely overturn the look, can be avoided in this way. Well, most of the time.
And as you can see, even if we are dealing with a powerful tool here, it is necessary to have a real CG artist at the keys when using it, as an intern is in a bad position. And if someone thinks that the customer will throw everything into a prompt themselves in future, they forget that they first need to know what they actually want. So our jobs are safe in the medium term.
What happens next?
Well, this was the first article in a series that will continue over the next few issues – there are simply too many ways in which Comfy UI can help an artist in everyday life. In this series, we can expect future articles on PBR materials at the touch of a button, quartered render times, stylised renderers and one or two other delicacies. There’s a lot to look forward to!

Arne Palluck is a 3D generalist and designs 3D animations for German TV programmes such as “TerraX” on ZDF or “PM Wissen” on Servus TV. He is also a 3D layout artist for large VFX studios, where he takes care of the camera and layout for feature films. He brags to his daughter’s friends that he has already worked on Star Wars.