Table of Contents Show
We first take a close look at the new functions and then test various workflows in general. As a special treat we have an interview with Simon Hall from Blackmagic Design about the development of Fusion – which you can read very soon. Stay tuned! But now, let’s start up Fusion and see what’s what.
Native support for Cryptomatte
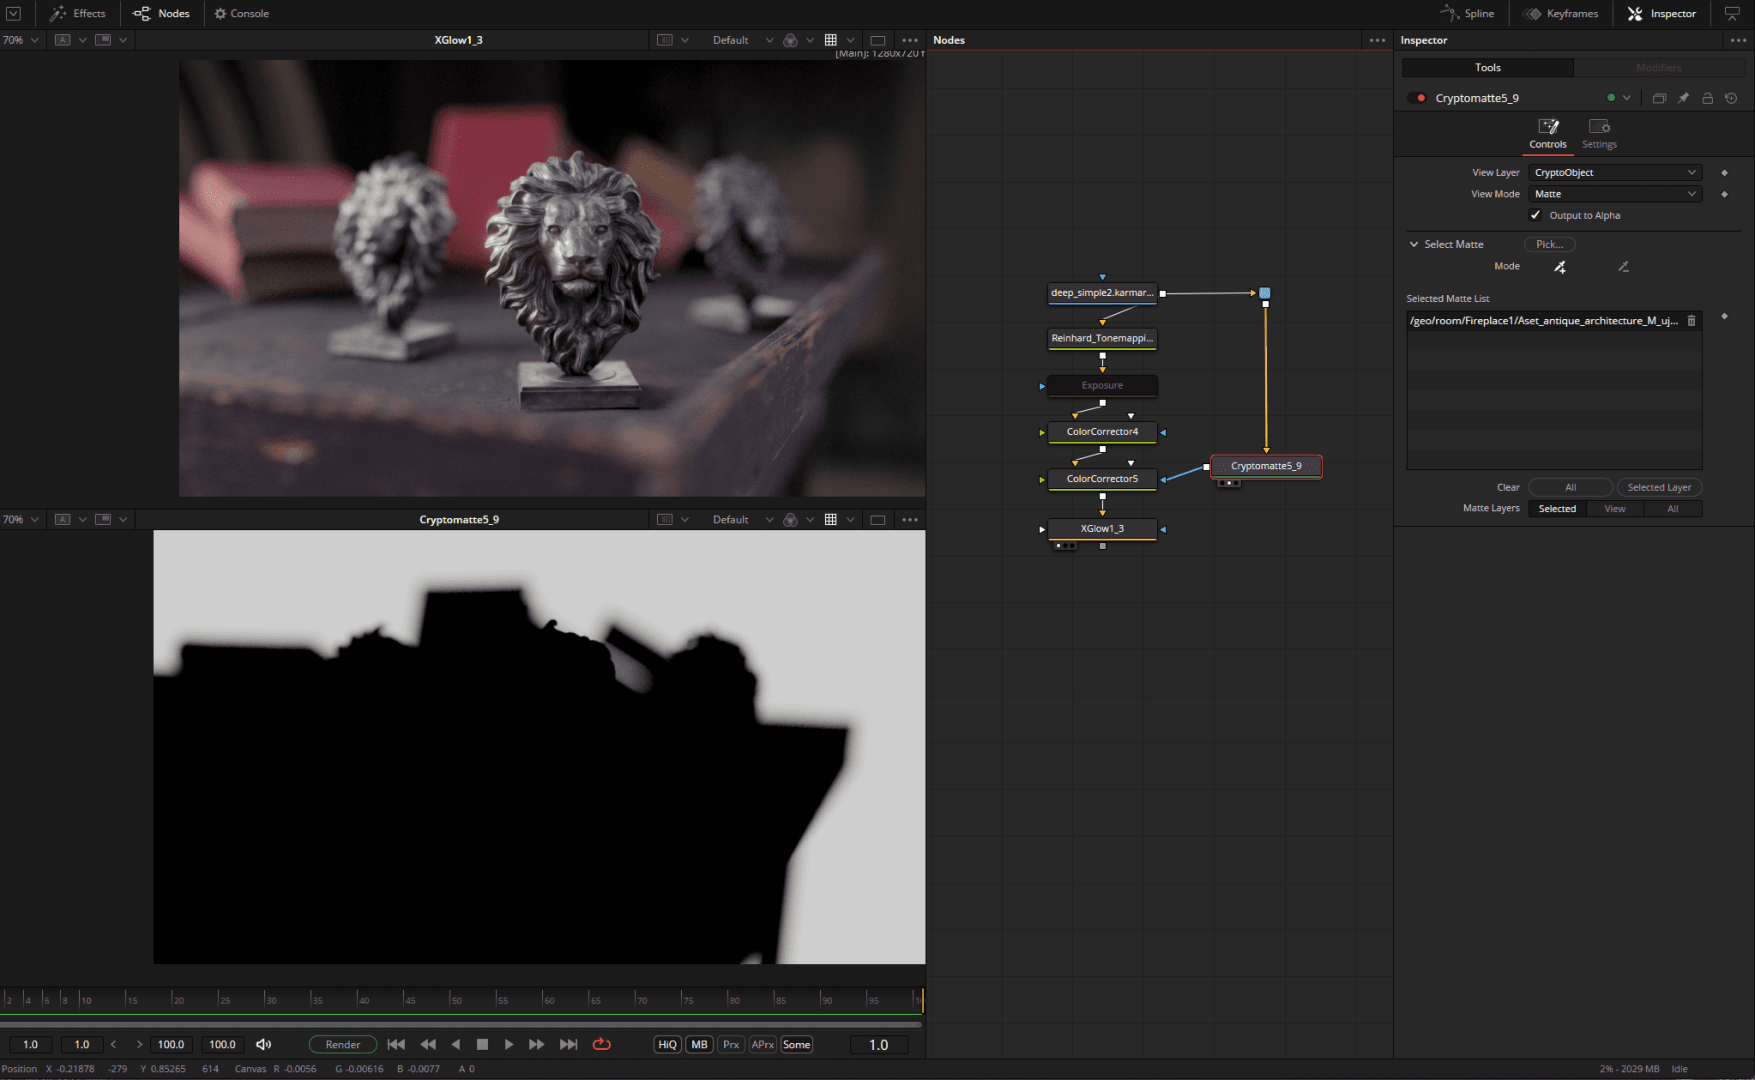
Or the “compositor’s lifesaver” – with a cryptomatte, complex masks can be created quickly and easily from all objects or materials present in a 3D scene. The only prerequisite for this is that Cryptomattes are included when the 3D scene is rendered. Manual object selection or ID assignment is not necessary.
The Cryptonode itself presents these masks as extremely colourful surfaces that can be selected with a simple click and converted into an alpha channel. The mattes can be combined as required and removed again from a simple list view. Complex adjustments such as the colour grading of objects in the blur can be implemented quickly with cryptomattes, although they can also reach their limits here (we will look at a workaround for this special case later in the chapter on multilayers).
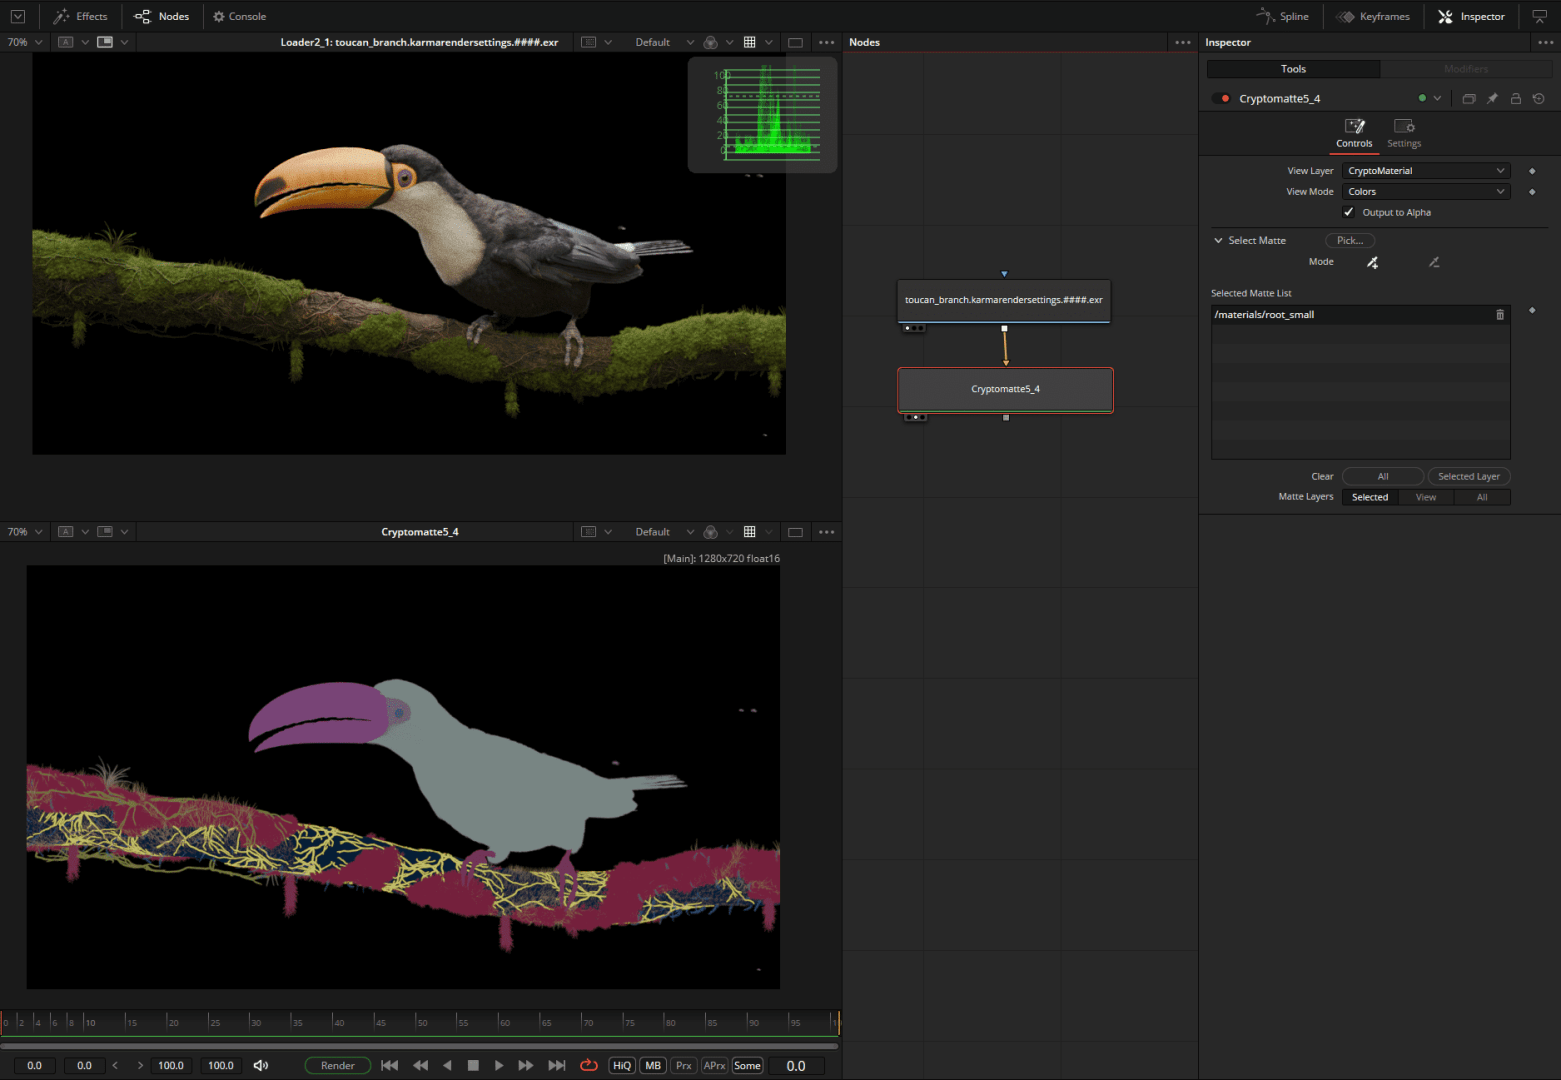
Artwork: Tucan by Dmitrii Vlasenko / SideFX, rendered with Karma XPU


USD & 3D compositing
Let’s stick with this example. Suppose we want to make the light a little more dramatic or add particle FX or text in the room or or or or … Here, in addition to the possibility of masking things to infinity, the fantastic (real) 3D space of Fusion comes into play, which can be fed with all kinds of data from FBX to USD. Let’s take a look at the updated USD workflow.
The USD file generated by Houdini Solaris is simply dragged and dropped into Fusion and is then loaded and ready for use. Incidentally, the 3D space opens automatically as soon as a 3D object is to be displayed on one of the viewers (shortcut “1” or “2”).


To make the rear lion’s head a little brighter, we can now add a USD light and illuminate the head as desired. As we are working with real 3D data, the light is modulated correctly, which is a huge advantage over working with conventional masks. To avoid potentially disturbing influences on other objects, these are faded out using uVisibility. A newly added 3D layer acts as a light blocker to allow the light to flow gently downwards. Finally, this black and white image generated by a uRender Node is added directly over our original rendering – or better, used as a mask for a colour corrector.
3D text can be added in a similarly simple way, and parts of Fusion’s proprietary 3D system can be integrated into the USD Scene – as is the case with a Text3D Node. Particularly nice: If a Z-channel is also output via uRender, Fusion can perform a so-called depth merge, in which the merge node automatically “masks” the objects in the correct order using the Z-channel.

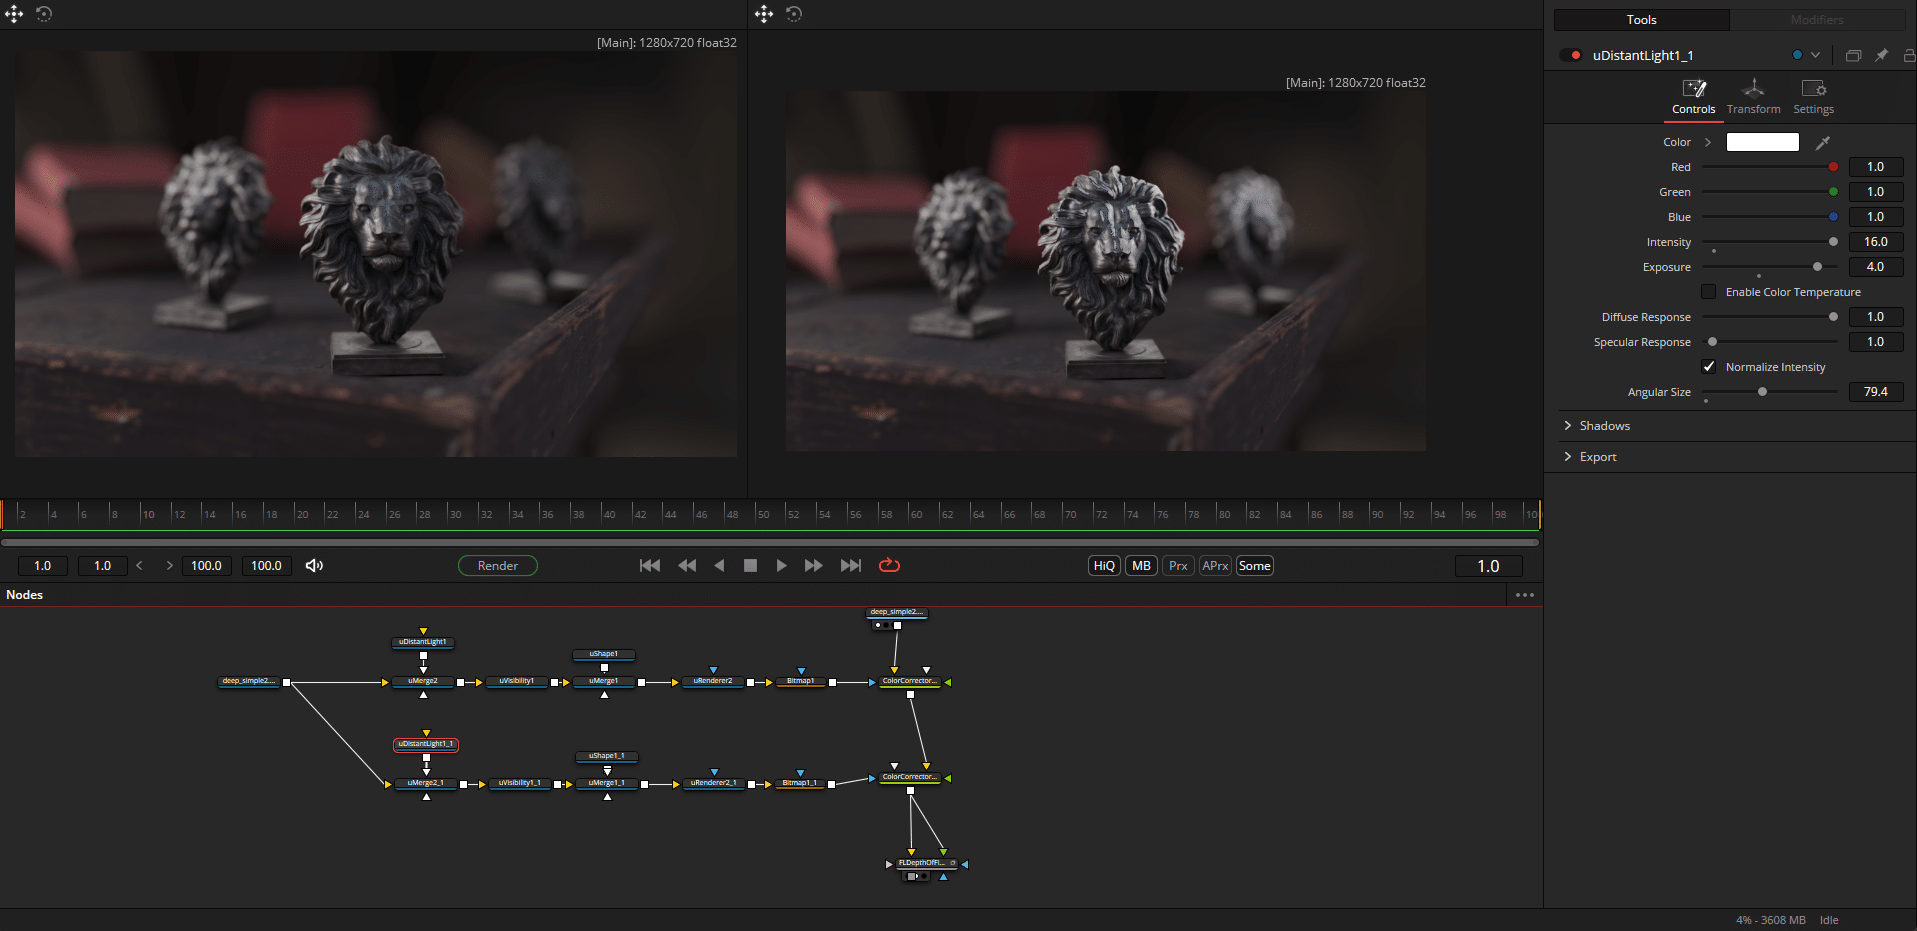
To round off the trip, we export the whole fun as USD and load the file back into Houdini as a sublayer and can access the new light and the Lightblocker here.


What we would like to see in a future update: A USD stage manager and more Hydra delegates aka render engines that support Fusion.
An alternative to relighting via 3D is the relatively new relight node, which uses a rendered or calculated normal map. This is practical if you don’t have a 3D scene to hand and can do without precision.

(Real)Deep Compositing
Deep compositing is a brand-new feature in Fusion for intervening deeply in the image – and completely without 3D. Here, the pixels are also given depth values during rendering so that Fusion now knows where these pixels are located in 3D space.
The decisive advantages are mask- and Z-channel-free merging of objects and the creation of real depth position-based masks (the above-mentioned depth merge accesses a Z-channel, a 2D representation of the depth in space), which, in contrast to the volume mask (which accesses the world position), are very precise and virtually free of edge problems. Volumes such as smoke and explosions can also be handled wonderfully, as objects can interact correctly with volumes. The new freedom comes at the price of larger data volumes and necessarily a render engine that supports deep data (e.g. Karma, Vray, Arnold, Octane, Renderman and Redshift).
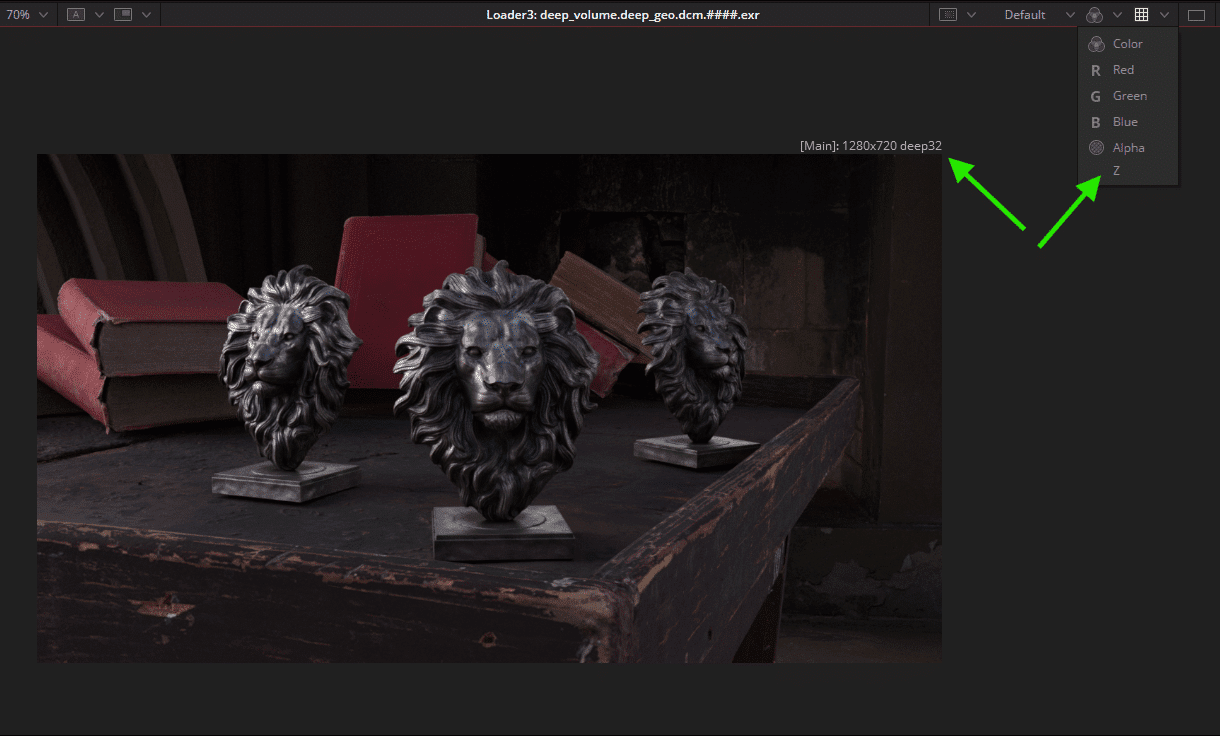
But right from the start – how do we even know that we are dealing with deep rendering? Fusion writes “deep” + colour depth after the resolution in the viewer and shows a cheerful “Z” in the channel selection (not multilayer selection).
The new node “DeeptoPoints” then shows the whole truth – as a point cloud. We do not see “haptic” 3D objects, but the distribution of individual image pixels in space.

Let’s assume we now want to mount a fireball behind the lion heads. In “normal” compositing, volumes (explosions, smoke …) are a guarantee for alpha channel problems – not so in deep compositing.
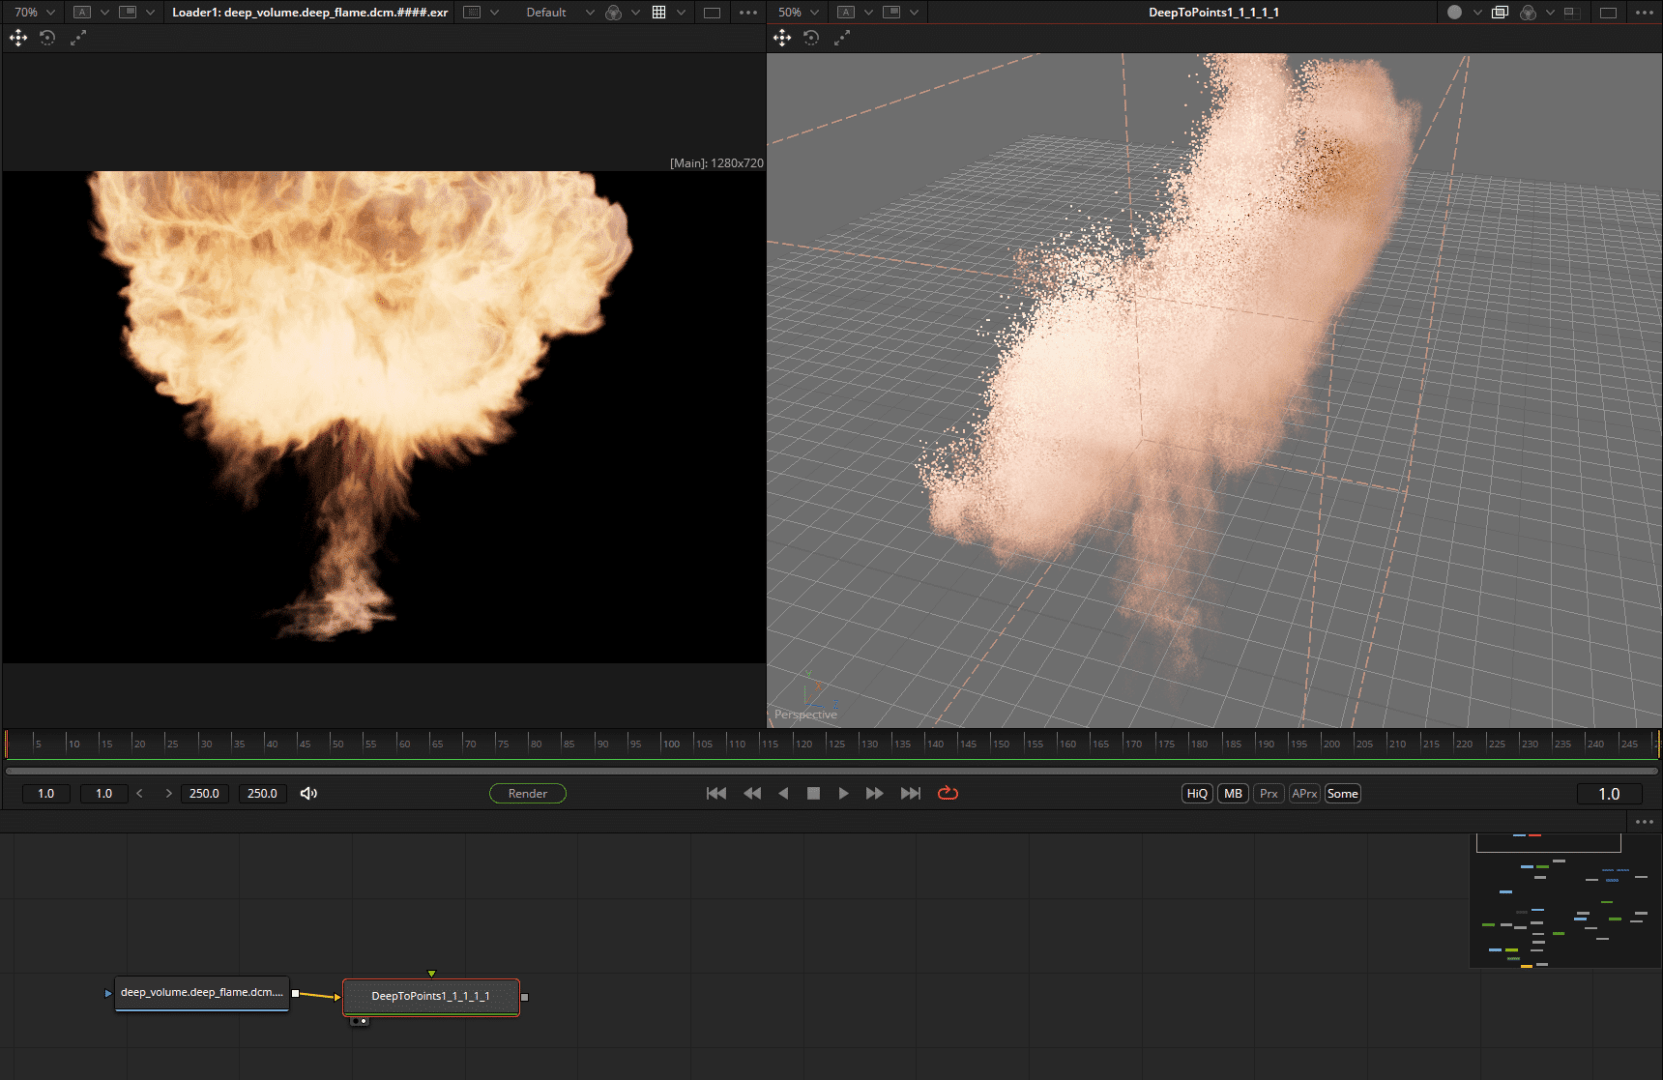
Above: The delivered explosive DeepEXR rendering (via Karma) and the Deep2Points view – the explosion has an actual volume of points, which will be very useful to us in a moment. The two deep renderings are merged using dMerge Node – and automatically know which elements should be in the foreground thanks to the 3D depth information they contain.
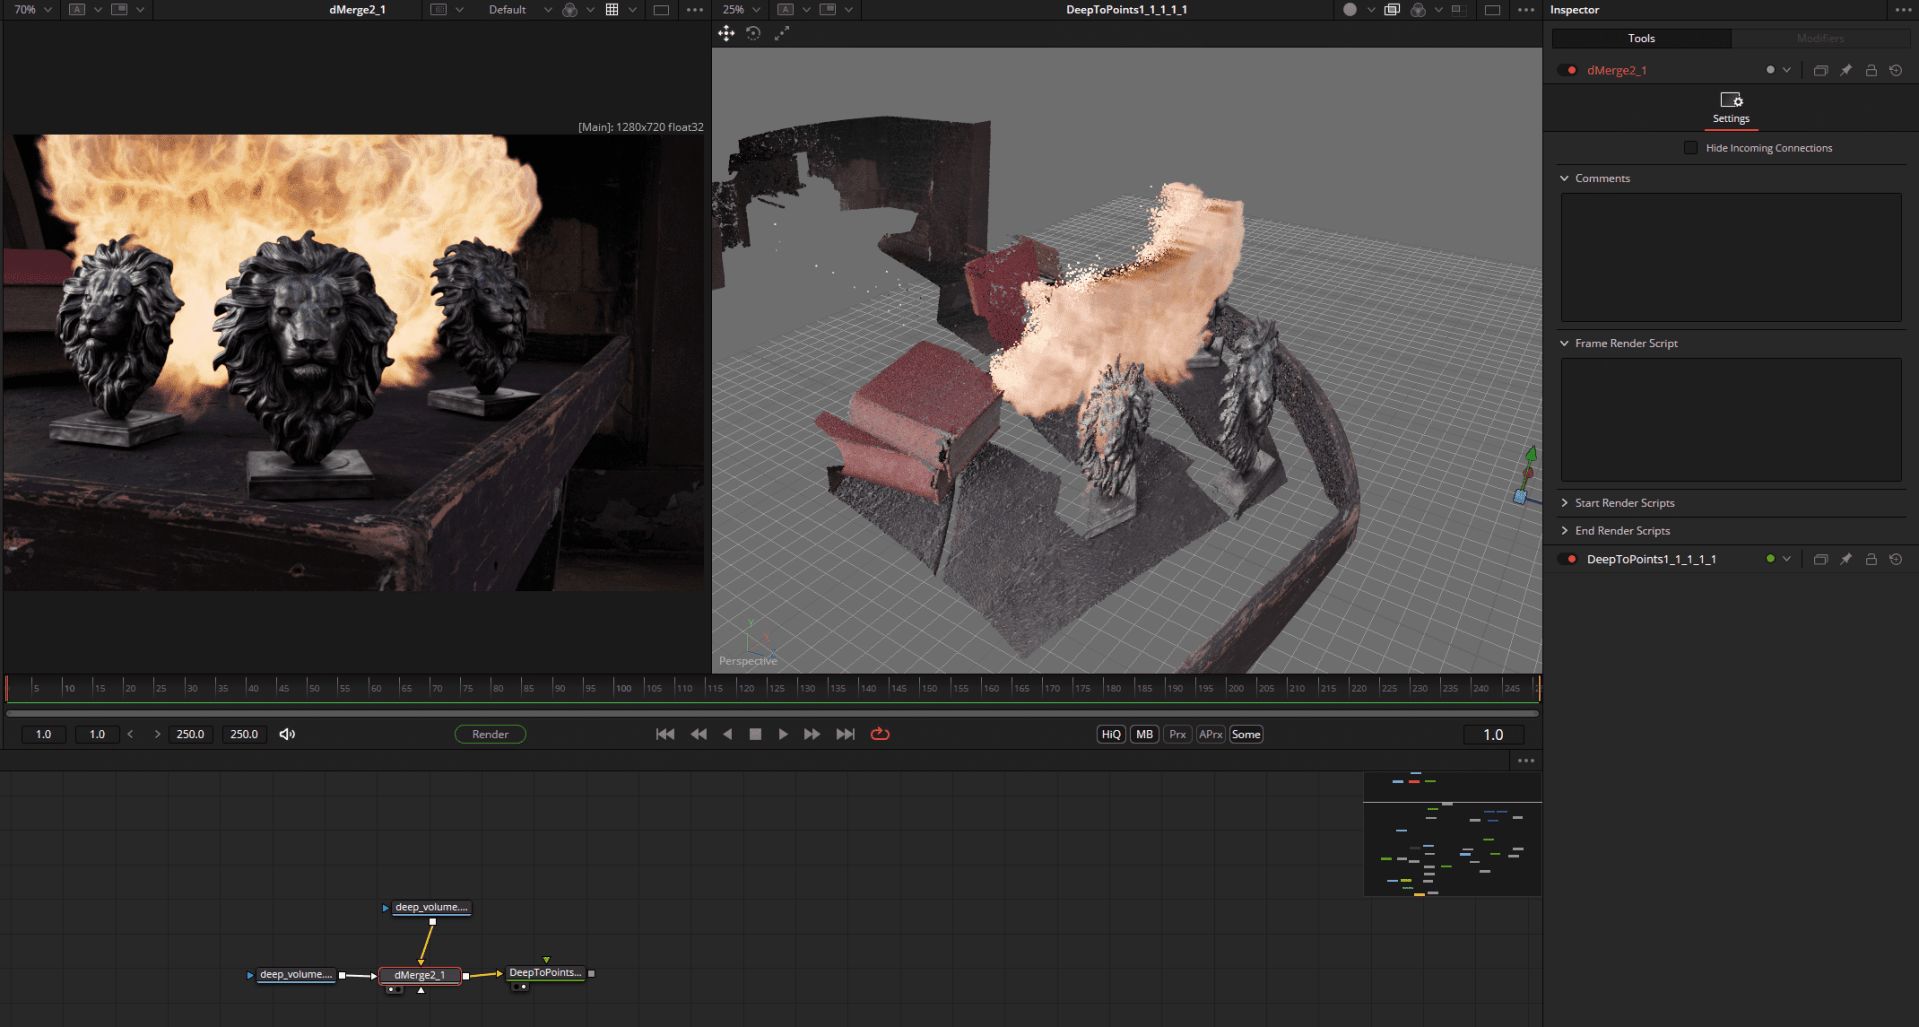
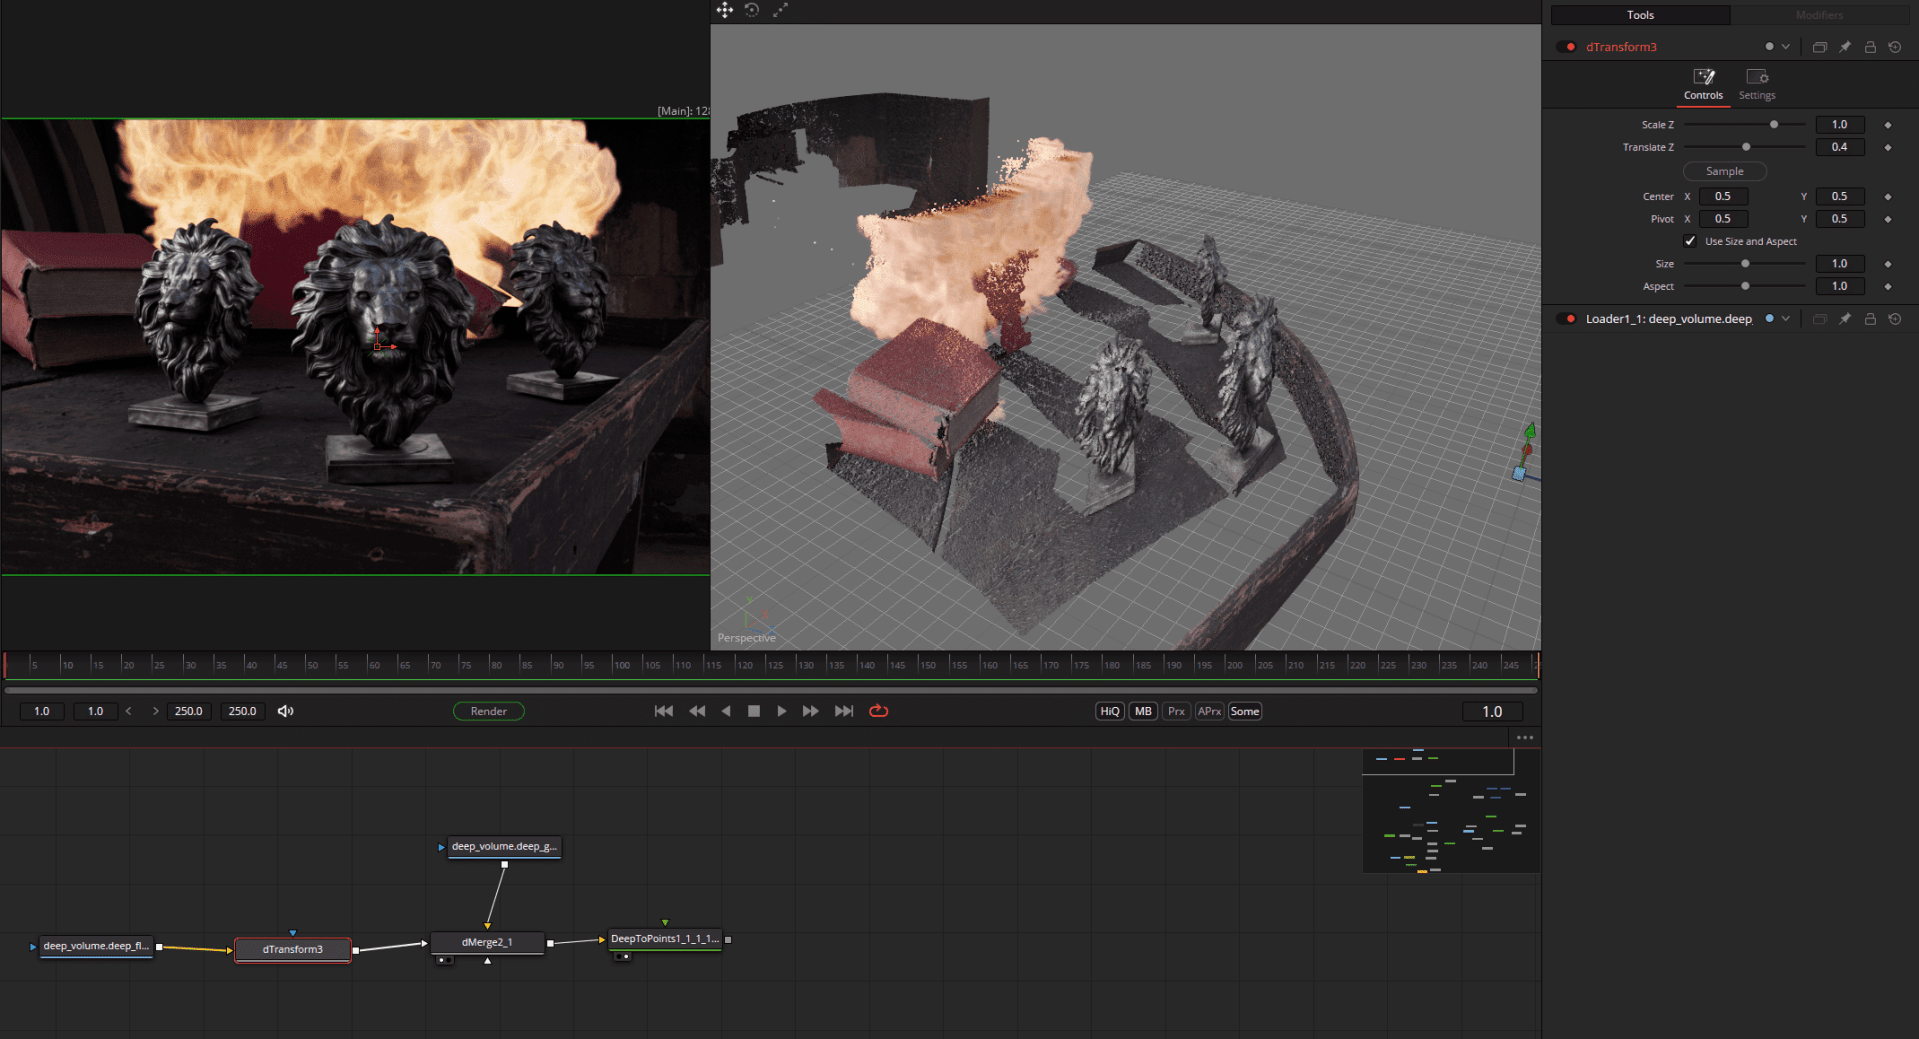
The fireball can even be moved in depth using dTransform and is automatically covered by the corresponding objects – or even partially covers other elements.

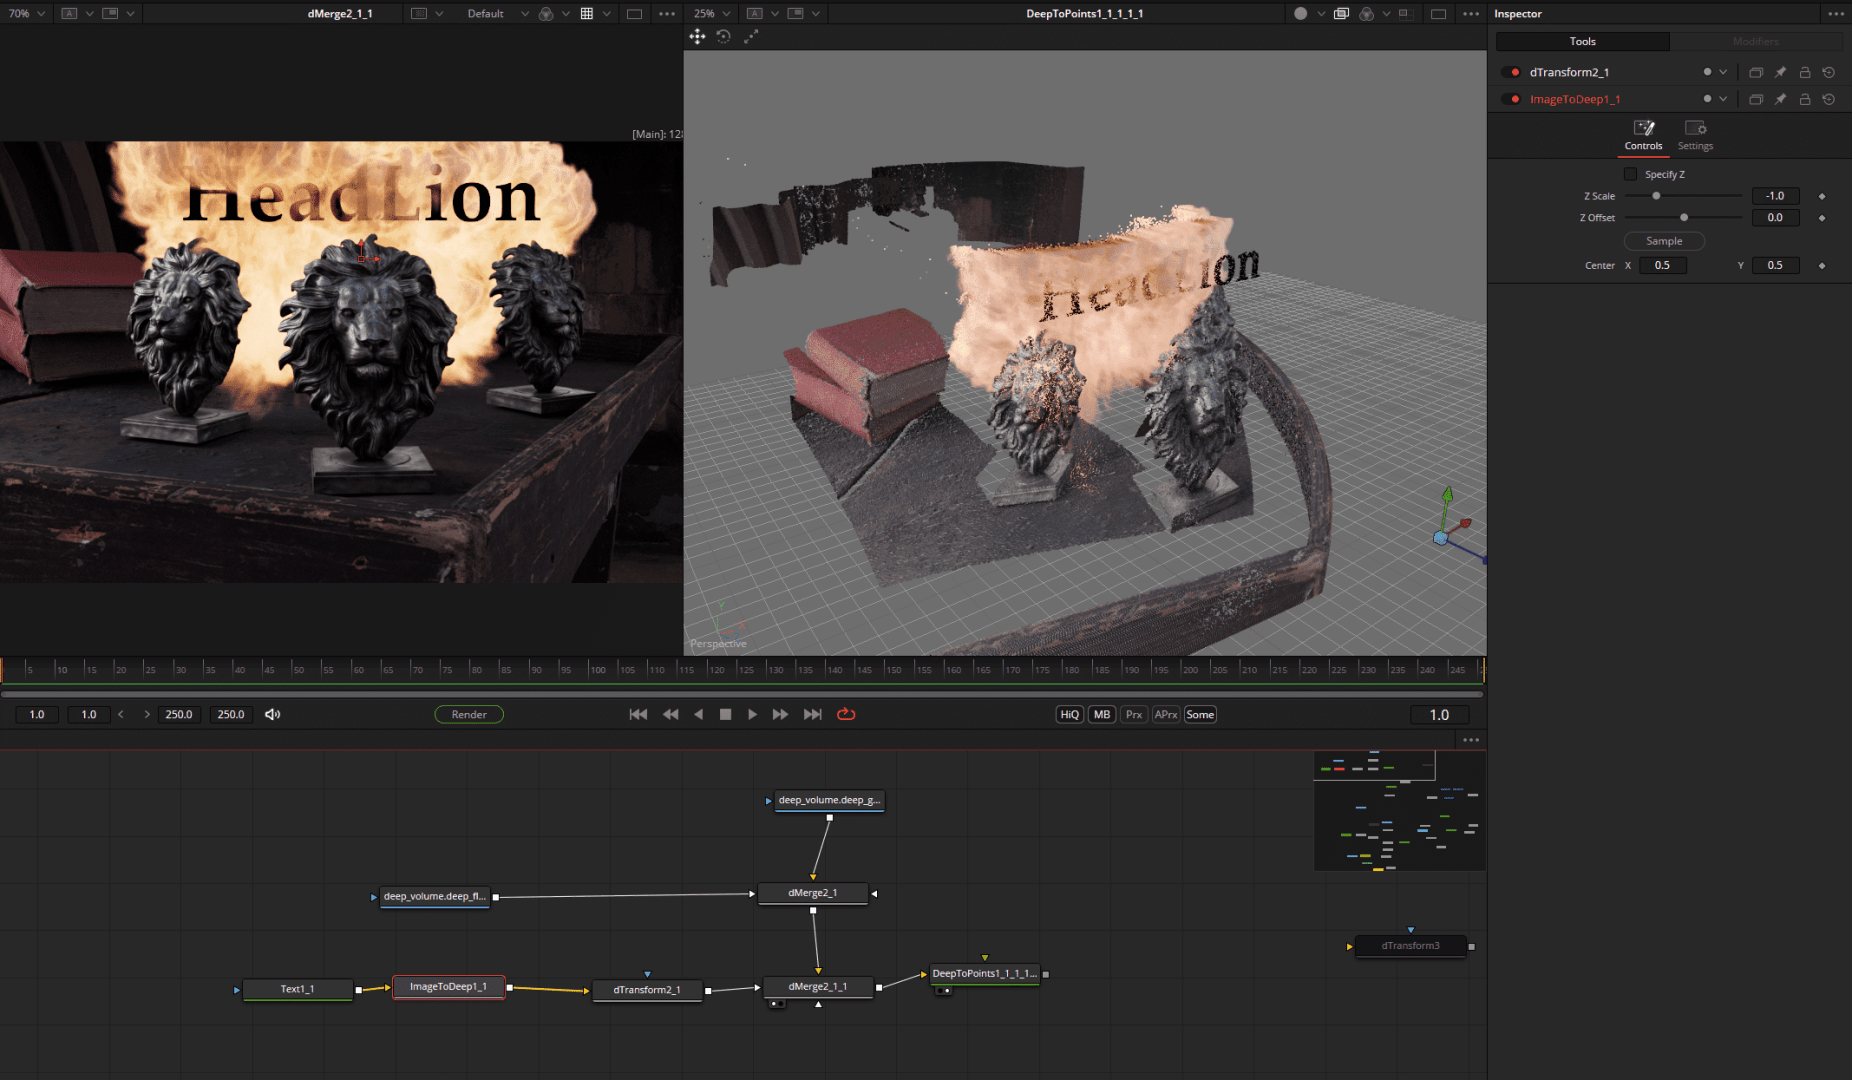
To bring new 2D elements into the deep space, there is the Image2Deep node, which is attached behind all possible 2D nodes such as graphics, footage and renderings. The result is then available in the deepcomp, but of course remains flat itself.
For example, texts can be perfectly integrated into the fireball. Partially concealed, without a mask and the resulting alpha problems.

The final DeepNode is called Deep2Image and brings the deepcomp into the classic 2D space for further processing or output. We have the fireball, but the right reflections are still missing. Let’s take a look at the brand new EXR multilayer workflow.
EXR Multilayer Workflow
For the greatest possible flexibility in compositing CGI renderings, other helpful render layers such as masks, reflections, depth, separate lights and world position are added alongside the actual beauty pass (“the image”), which then allow a number of far-reaching adjustments to be made in compositing.
For reasons of clarity and working speed, these passes, which can be imagined as Photoshop layers, are not rendered separately as individual file sequences, but in a multilayer ERX sequence. This is then split up in compositing – which was also possible in principle in the past, but was very cumbersome.
For Fusion 20, Blackmagic has revised the entire AOV / multilayer system and created a very fast workflow. The first major innovation is the layer dropdown in the viewer, which can be used to view all the layers contained in the EXR or PSD (shortcut: pageUp/Down) – to simplify things, we are using a rendering here that already has the fireball integrated.
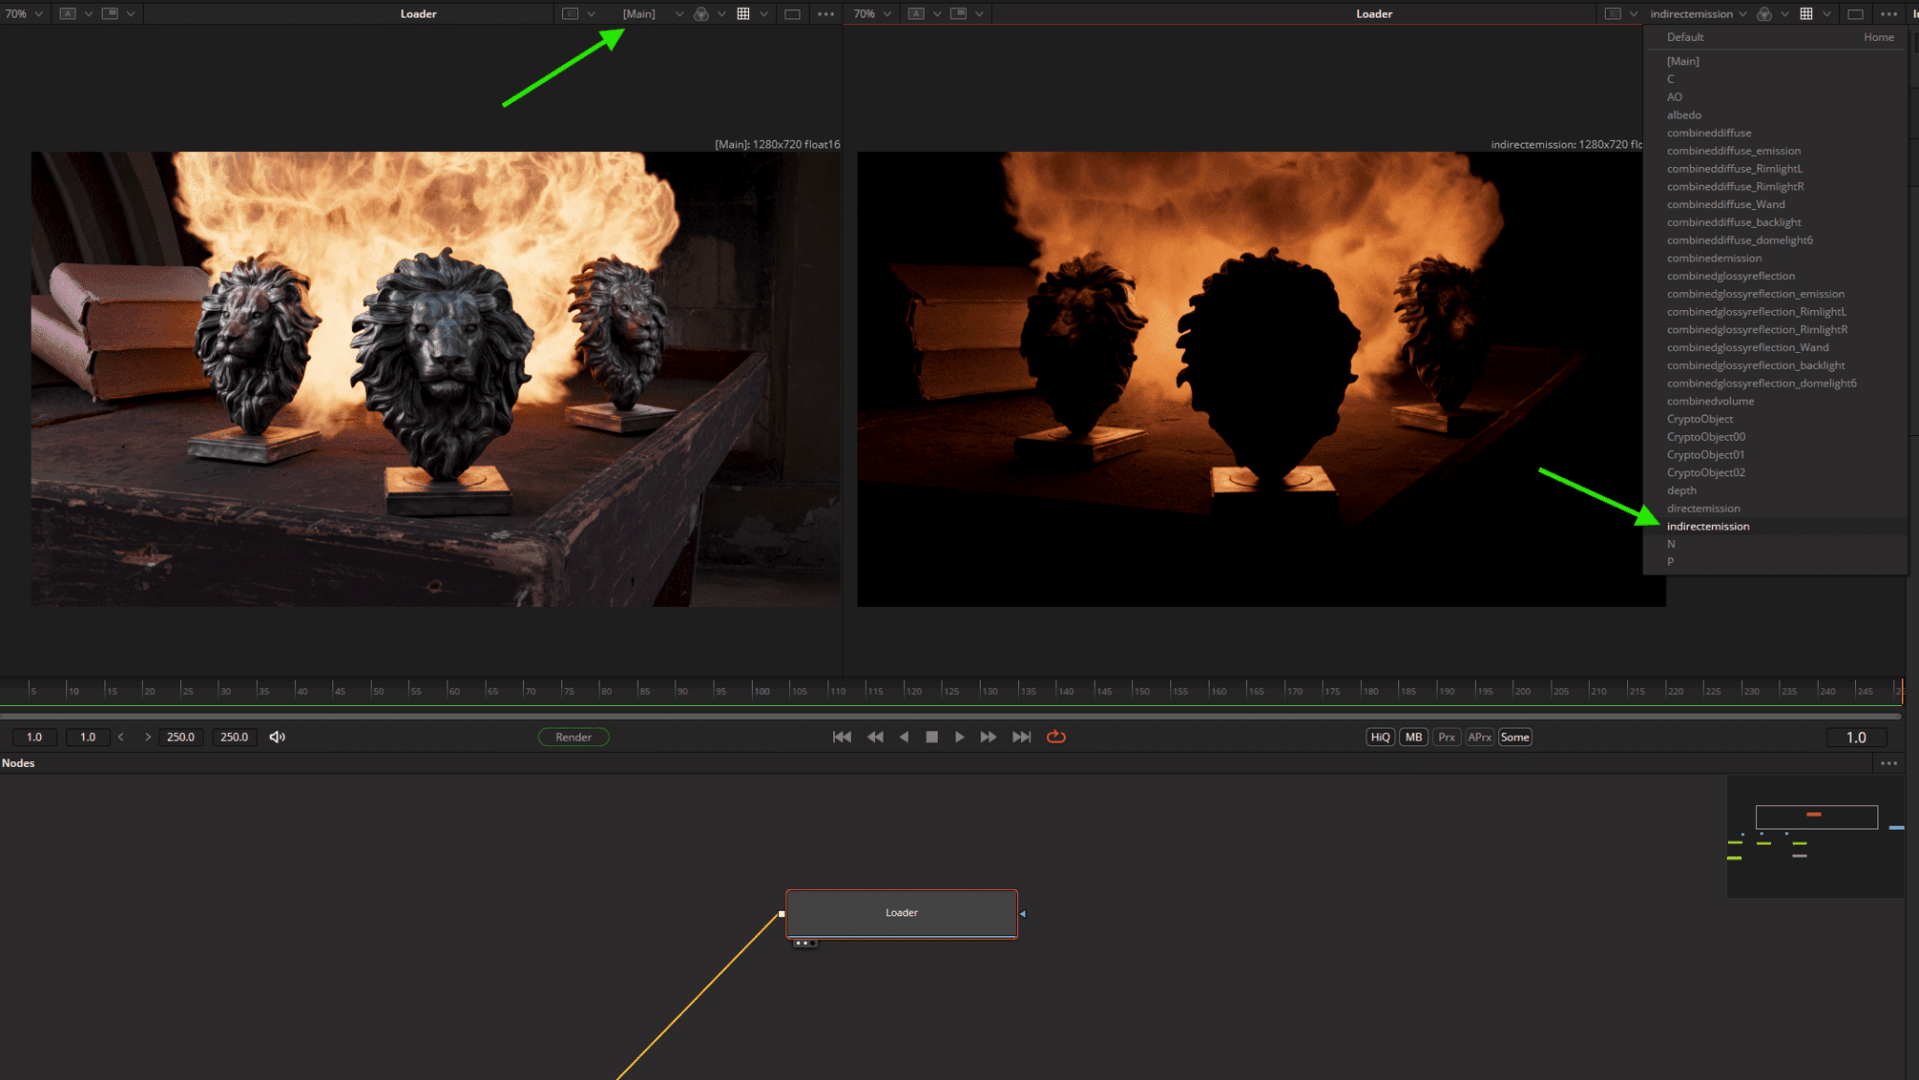
At first glance, there does not appear to be an equivalent to Nuke’s shuffle node for extracting the AOVs. However, to get to the individual layers, we can simply use … any node. For the sake of clarity, we use the ChannelBool node, which can generally be used to swap image channels.
(Update with Beta 4: Blackmagic added a Node called Swizzler which acts more like the shuffle node.)
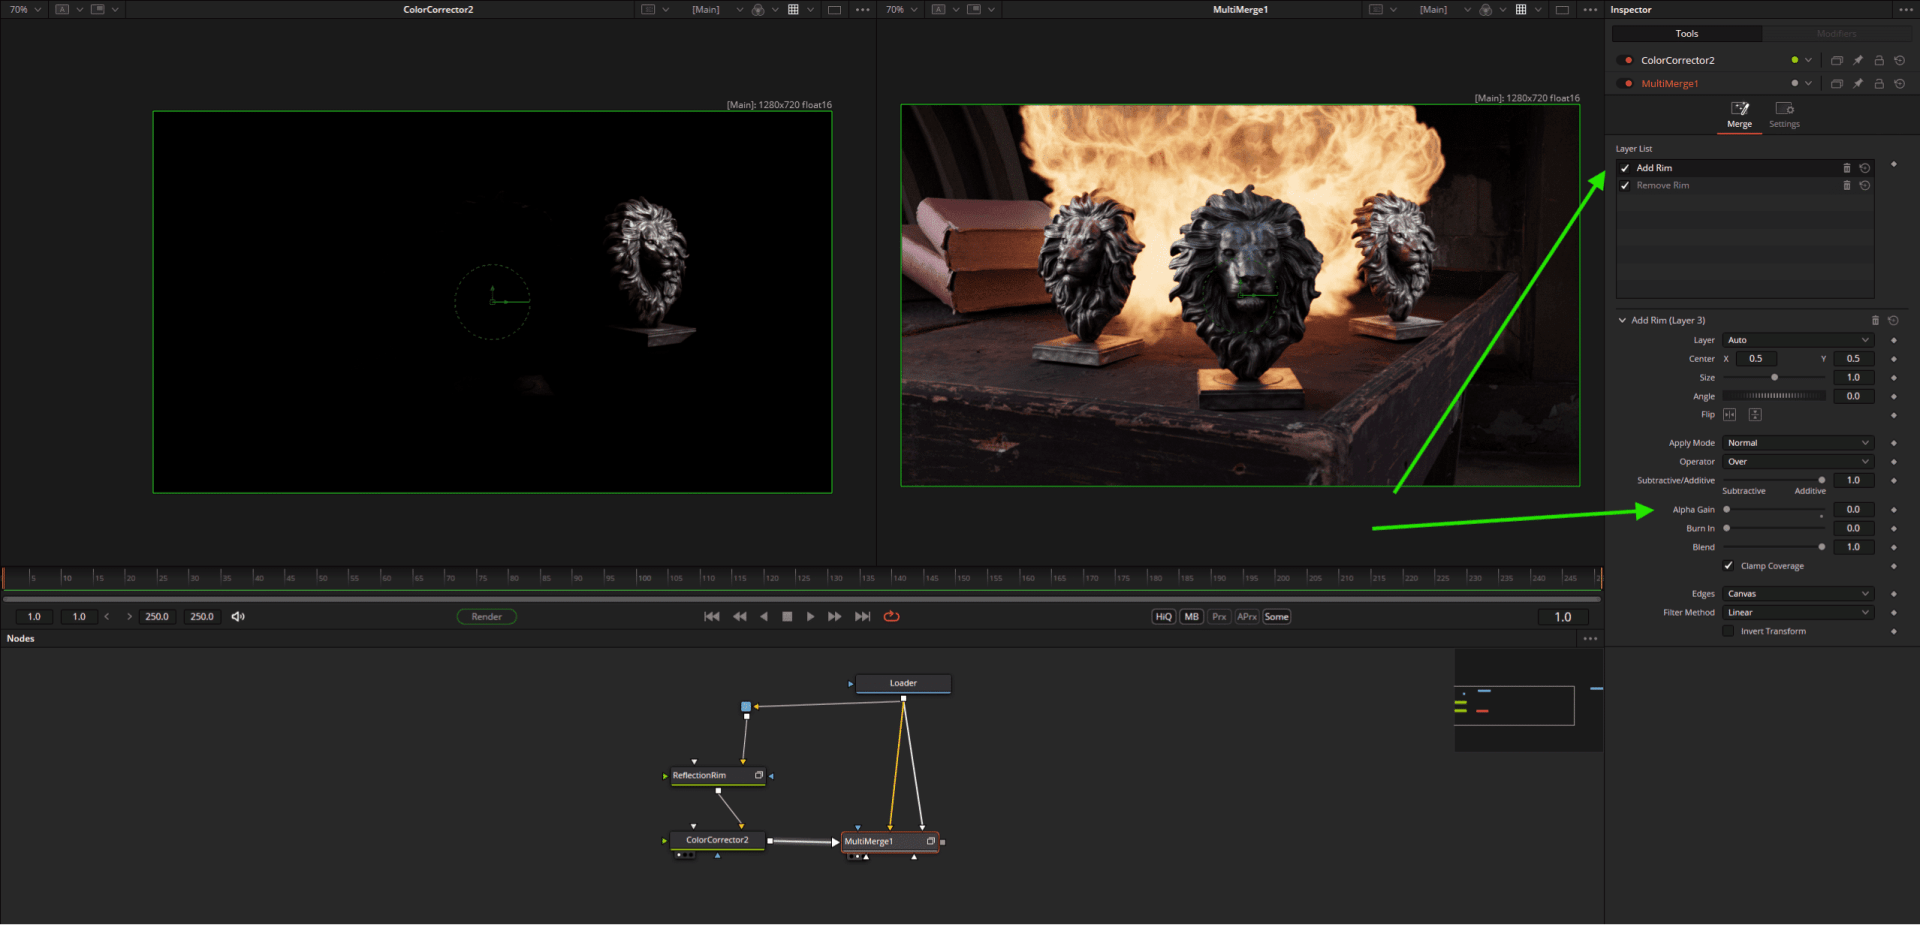
Below on the left viewer we have only extracted the effects of the AOV rimlight on the reflections (LPE rendered from Karma) using Setting > Backgroundlayer and then made them brighter using a ColourCorrector.

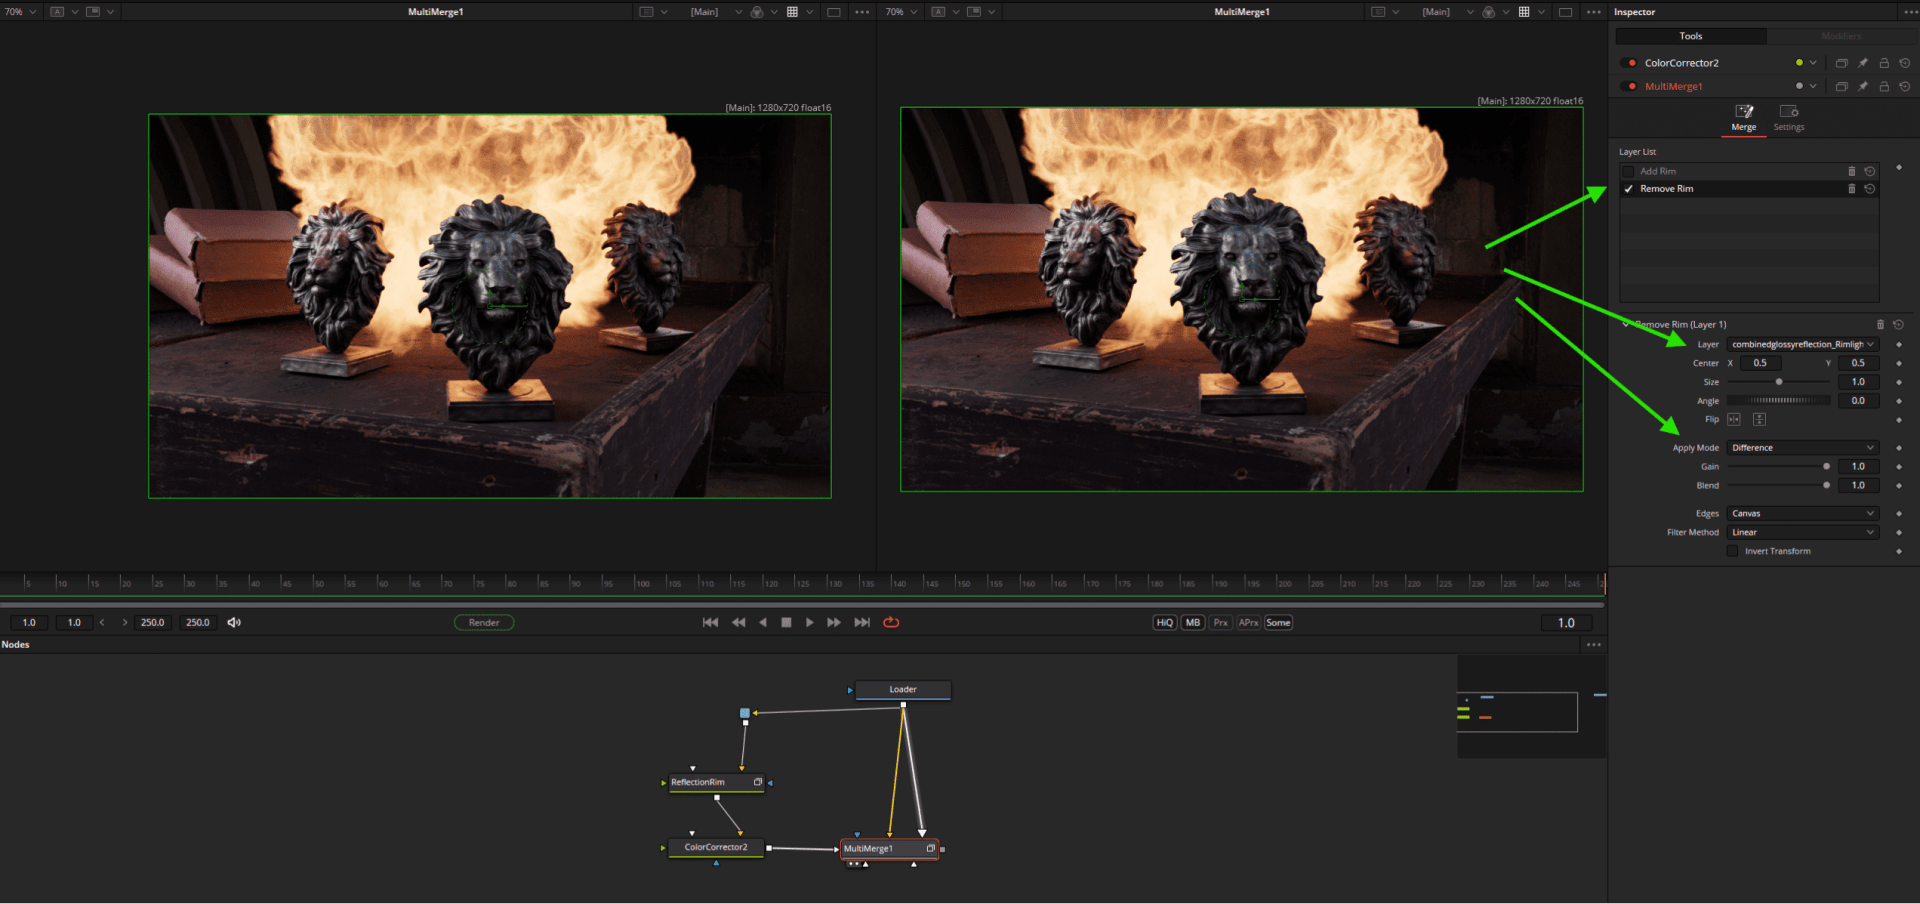
In order to return these to the actual image, we must first remove the rimlight present in the beauty pass, otherwise it will be calculated twice. To do this, we can use the newer Multimerge Node, which allows us to process different layers with different mathematical operations. The layer called “Difference” removes the original rimlight, while the “Add Rim” Layer adds the new processed light using Alphagain = 0 (which is the same as the Nuke plus operation).
Caution: The title “Layerlist” only refers to the sequence in the merge node, not to the EXR layers/AOVs themselves.
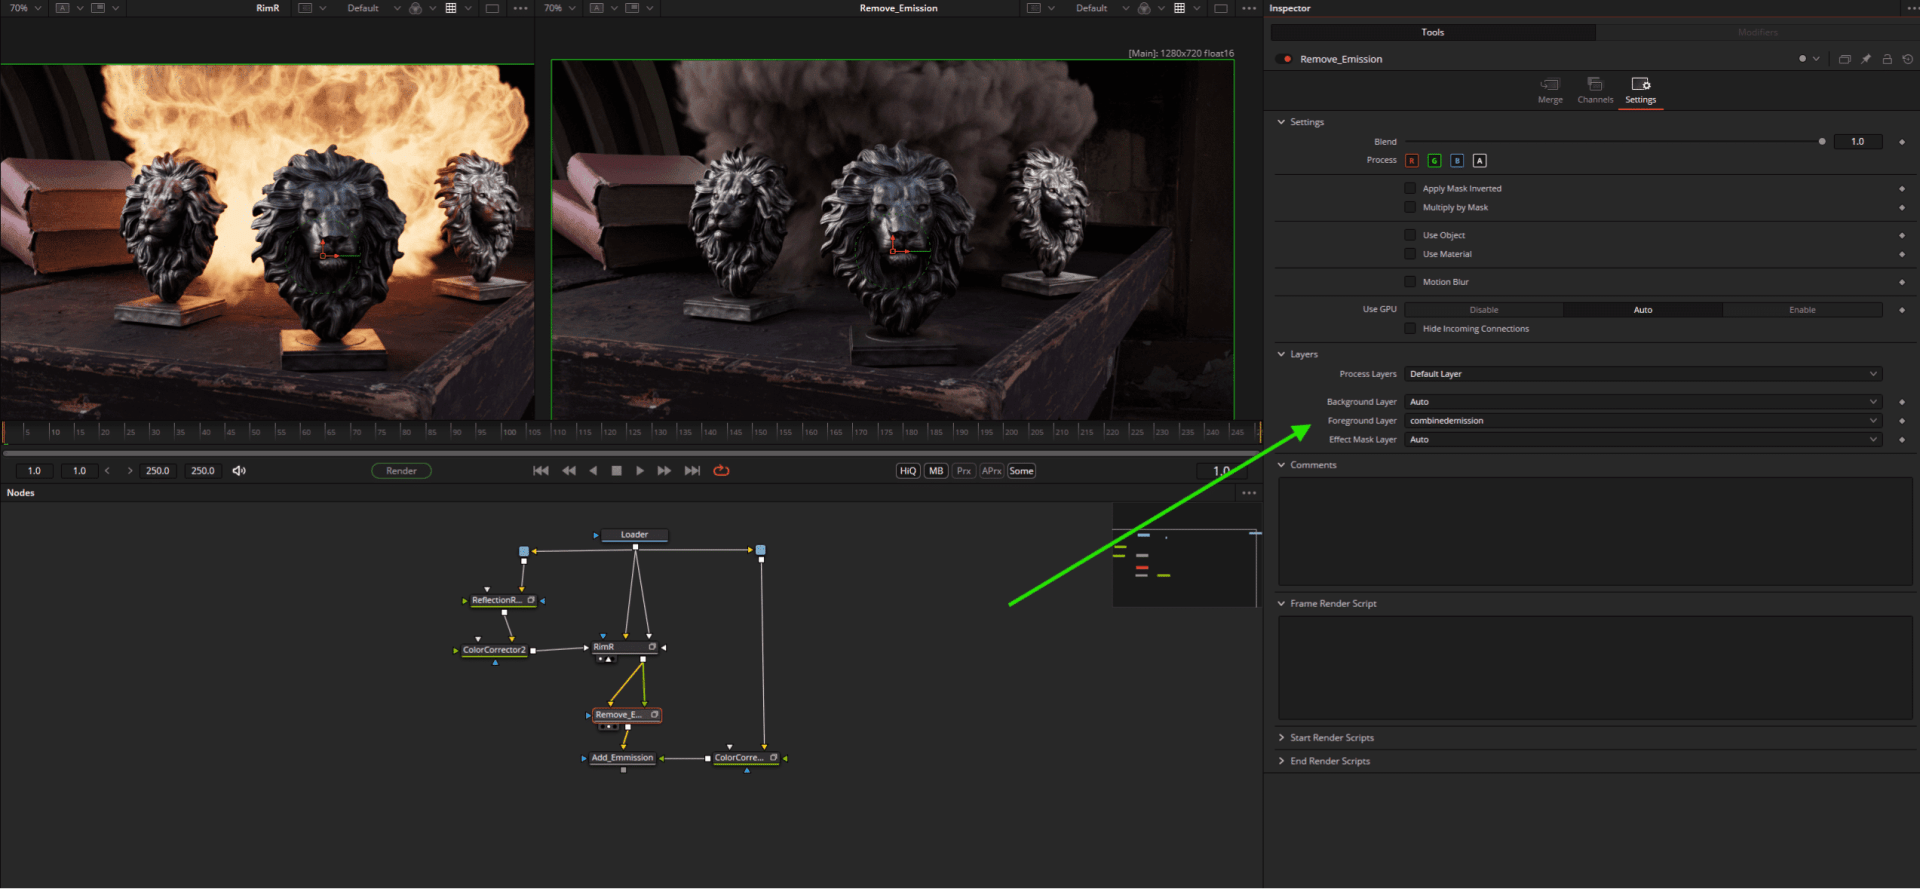
As the nodes can access the AOVs directly, nothing needs to be extracted for simpler operations such as a Hueshift. The colour corrector can access the layer directly, in this case the emission pass. The rest happens as usual, a merge removes the previous emission pass, a second merge adds the new, blue-coloured pass.

Further application examples: The books on the left are too shiny? Simply subtract the reflection layer (limited to the books by crypto)!

To give only the explosion a glow, the “DirectEmission” pass can be selected directly in the X-Glow Node as an area mask. Last but not least, we add a camera blur using fresh air Depth of Field. Conveniently, the depth map can also be read directly from the stream here.

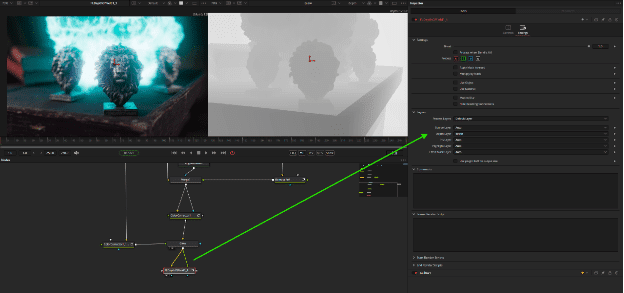
By the way, if you want to add new layers to the flow, you can do this with the LayerMux node. LayerRegex allows layers to be removed or renamed. The new workflow not only supports EXR, but also Photoshop layers.
What about ML?
Blackmagic has always been well positioned when it comes to machine learning tools. First and foremost the extremely practical Magic Mask, which can significantly speed up rotoscoping tasks. Version 2.0 is already integrated in Resolve 20, while Fusion still has to make do with version 1.0 in the current beta.
In the Magic Mask Node, lines are simply drawn on a reference frame over the objects to be masked and then tracked. The mask itself can be refined or blurred using the “Matte” tab. As the whole operation is quite computationally intensive, the result is best cached (by right-clicking on the node).

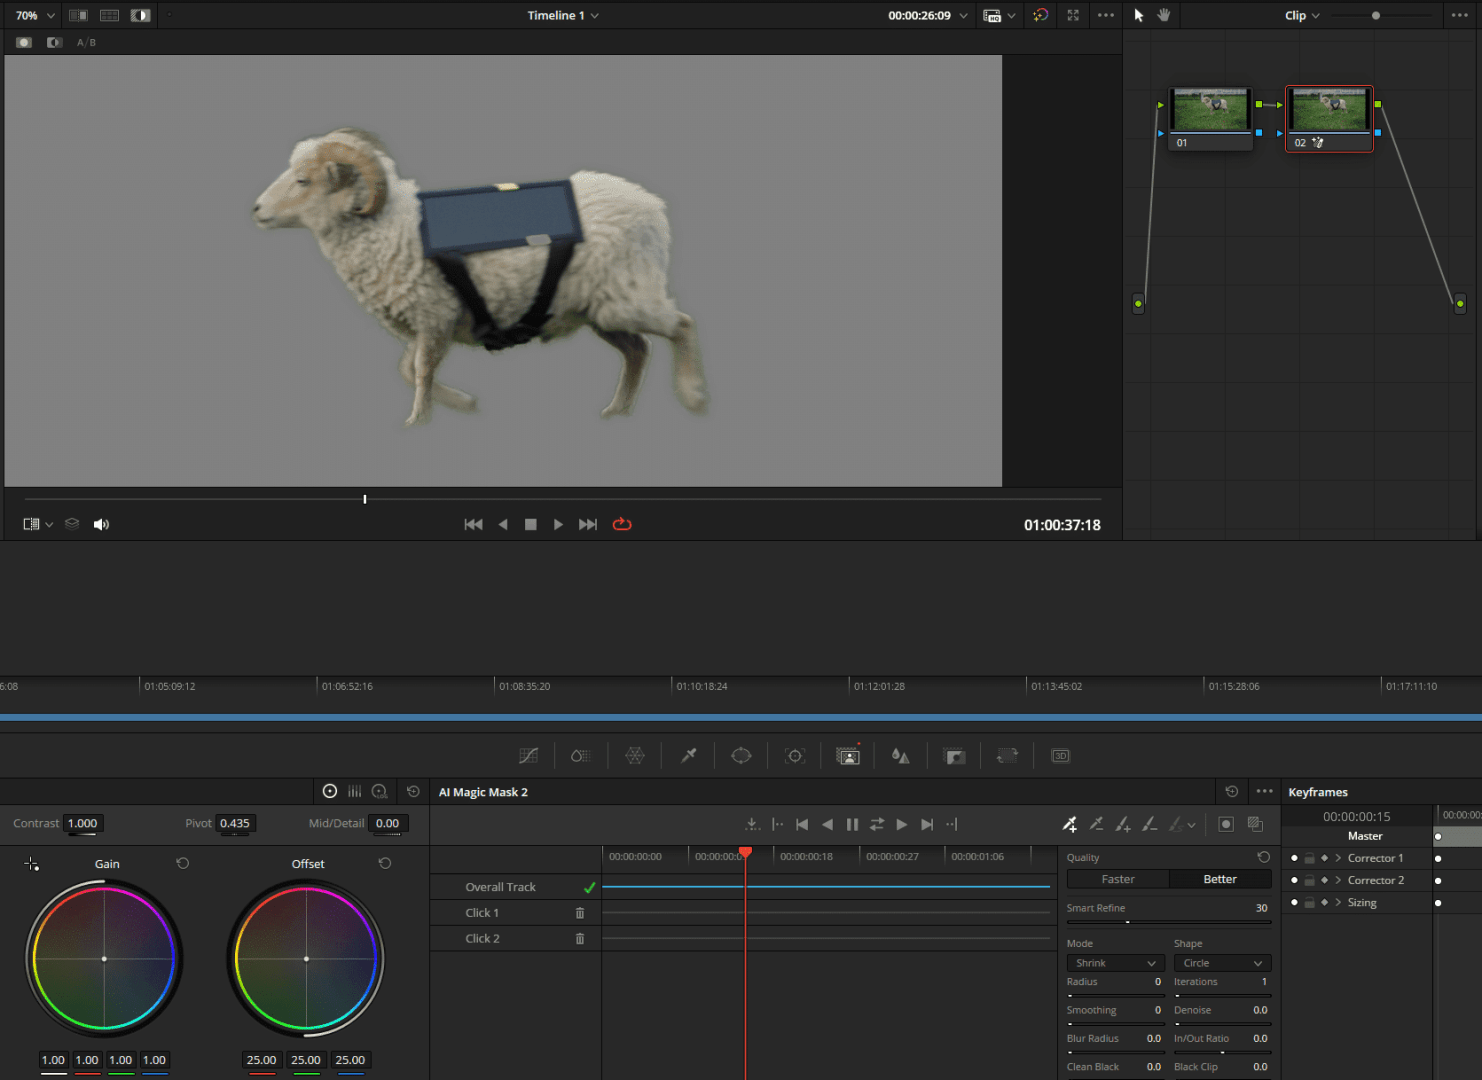
To whet your appetite, let’s take a look at the new version, which has been simplified and improved in terms of precision. With our woolly friend, 2 clicks instead of strokes (the sun collector is precisely recognised as a separate object) are enough to create the mask. After tracking, a temporally stable mask is ready for use.

Intellitracker
Another well-functioning machine-learning tool is the Intellitracker, which copes well with even the most jagged movements such as that of this flower in the wind – as can be seen from the movement path aka the green wild line. The Intellitracker is the new default tracker and is automatically selected as soon as the tracking node is called up.
It is usually not necessary to do more than move the tracker to the desired area and press “Track Forward then Reverse”. The tracker automatically selects the most appropriate colour channel, in this case the red channel (see bar chart below the tracker list). In this case, the text was not attached directly to the tracker. A downstream transform node, whose coordinates are linked to the tracker position, offers the flexibility to position the text anywhere in the image. The tracking path can be adjusted directly in the viewport frame by frame like a normal spline or in the Spline(Curve) Editor.


Let’s continue tracking, even without ML tools – with the Surface Tracker. This practical node is able to track intrinsically deforming objects such as clothing, newspapers or flower petals in the wind with a kind of fine grid and transfer the movement of the individual points to any graphics or text so that they follow the complex deformation. In this example, the text was only positioned on a reference frame using classic gridwarp; all other deformations are handled by the surface tracker.

For the sake of completeness, the planar tracker should also be mentioned – neither new nor ML, but tried and tested and easy to use: draw a spline around the area to be tracked, set the operation to e.g. Cornerpin, adjust to the area and define the new insert as the tracker foreground.

Multitext
One node to … surprise them all with beautiful typography. You can think of this innovation a bit like any number of classic text layers, with all the trimmings: transparencies, transitions, extensive typographical settings such as (manual) kerning, modifiers (more on this in a few staggered lines). This was also possible in the past, but a separate node was required for each text element. However, the dynamic frame and circle text familiar from DTP has never been available.

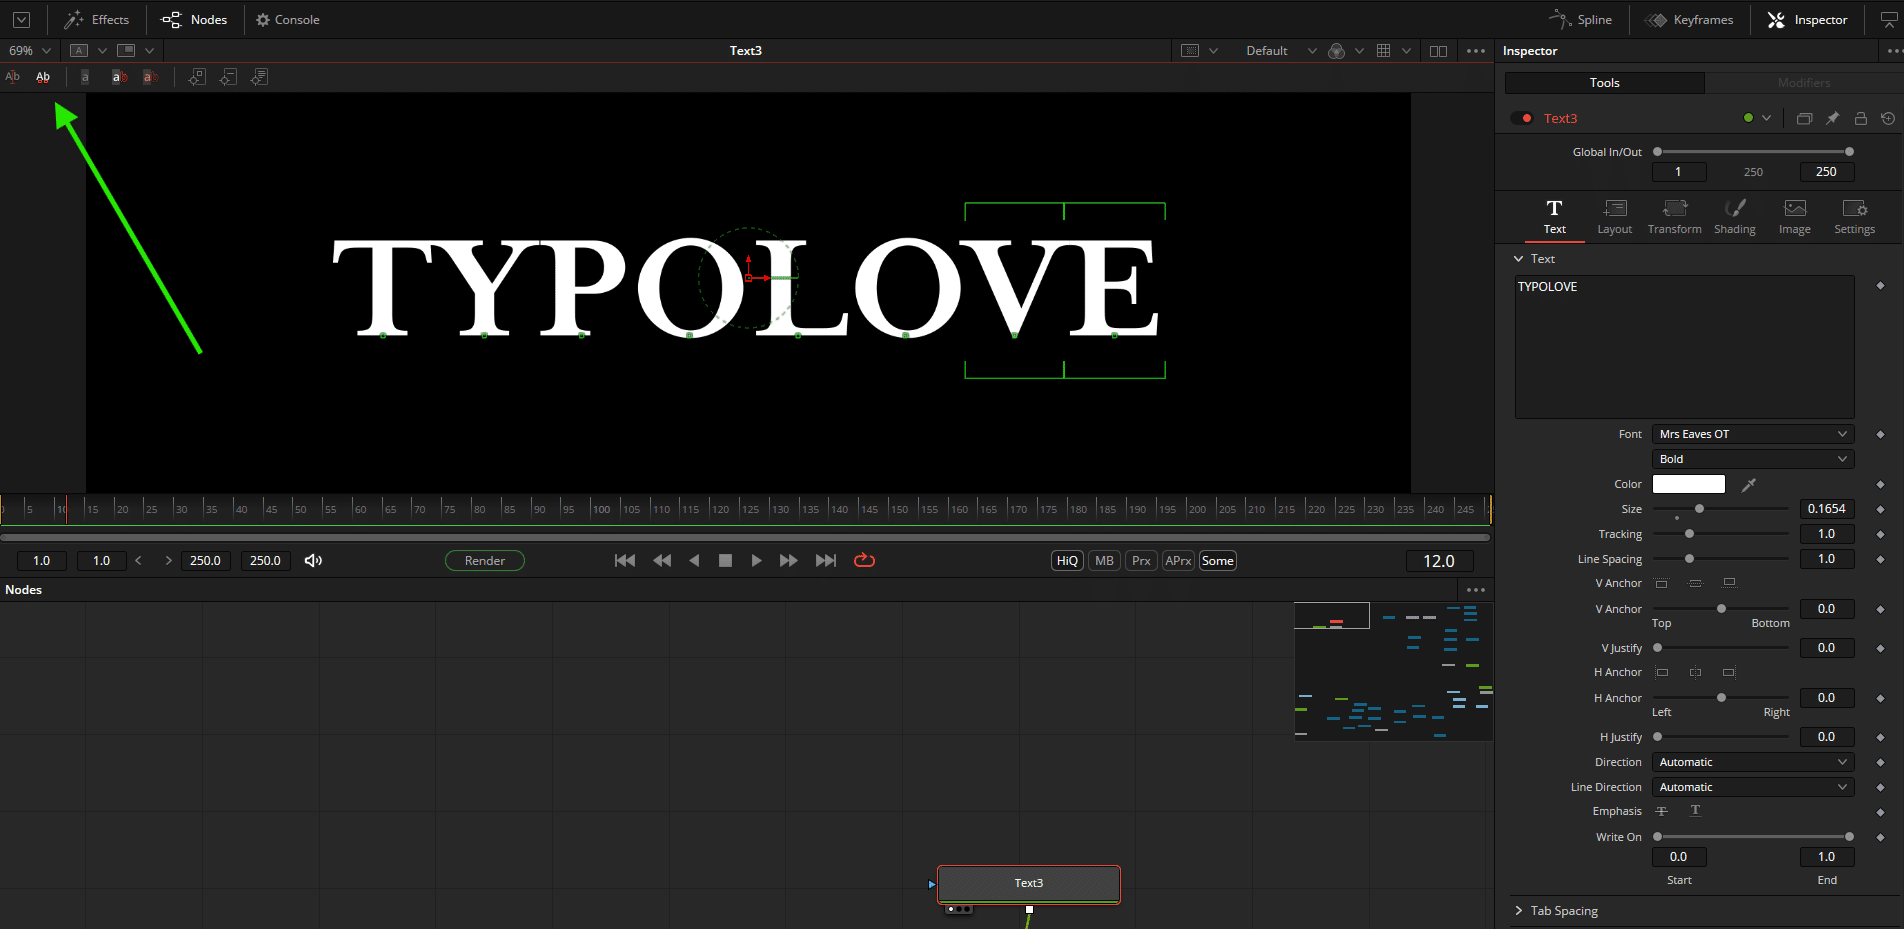


To quickly create procedural animations, you can of course write expressions (more on this later) and link parameters, but you can also add a modifier to the respective parameters by right-clicking and thus quickly create procedural effects such as random movement (wiggle sends its regards).
The modifiers are not just limited to the text node, but can be applied to almost all parameters in almost all nodes (and also linked to each other). For example, a master random modifier can control the opacity of different merge nodes at the same time.
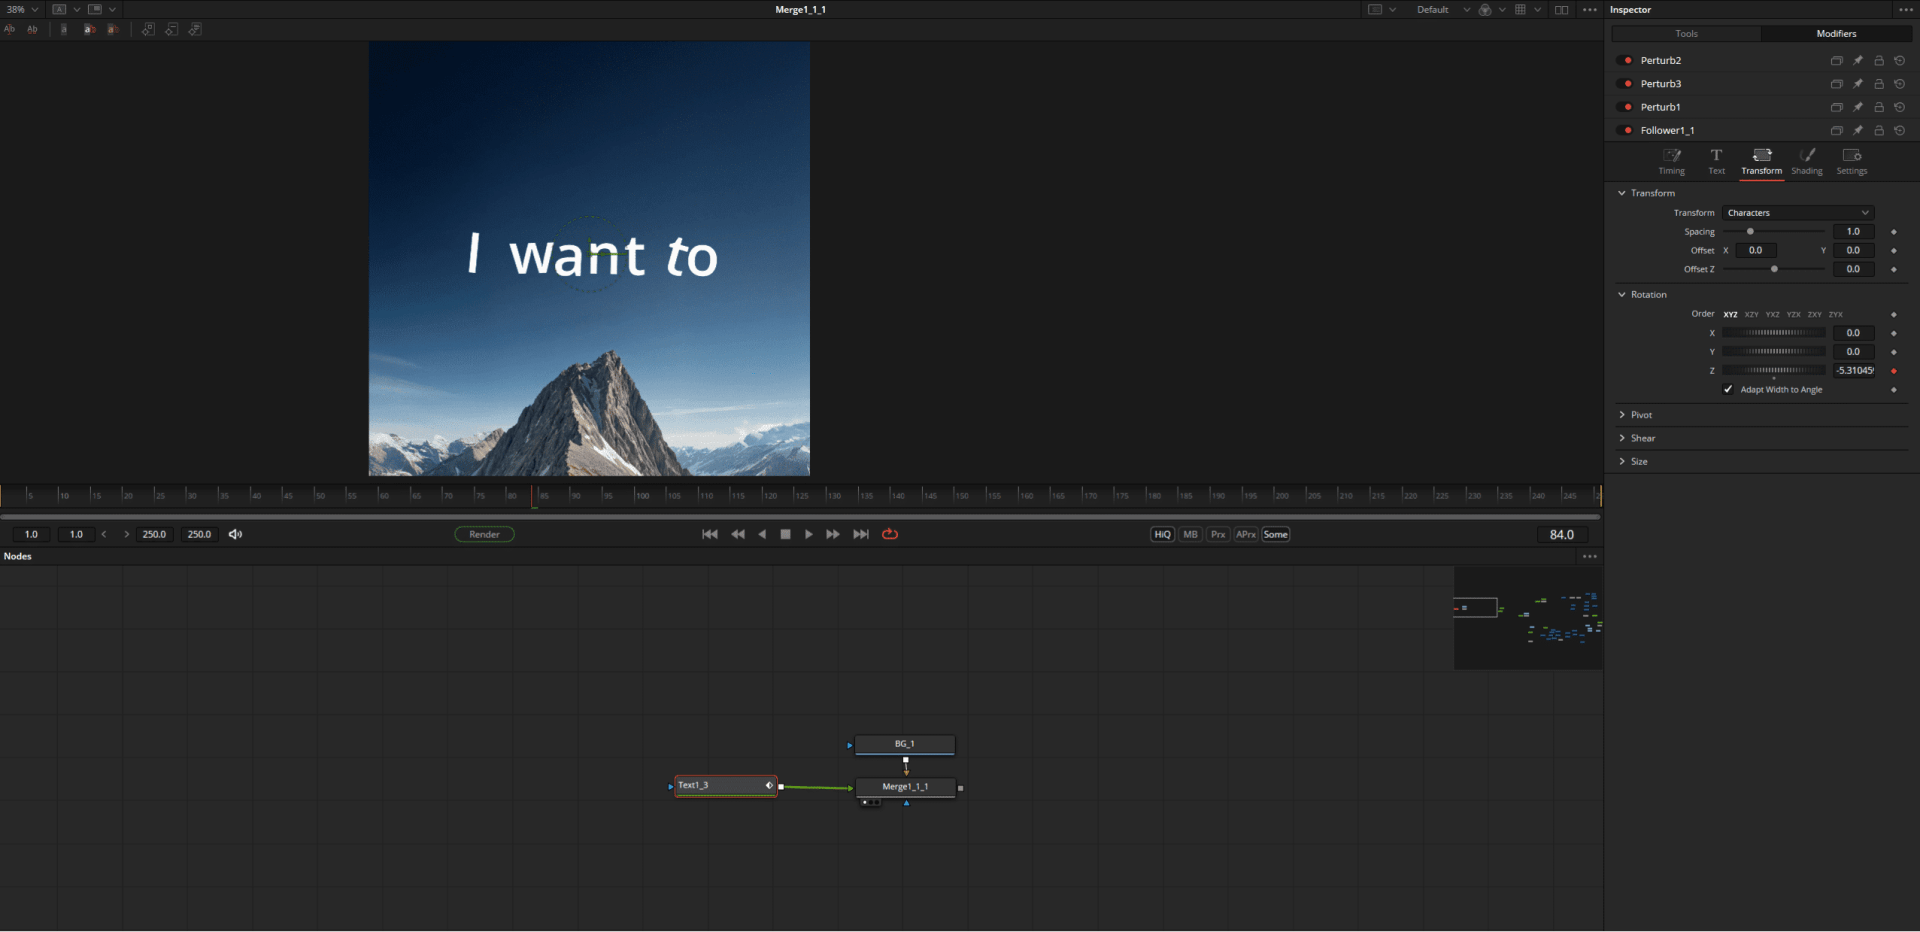
The modifier “Follower”, responsible for “character-by-character” animation, is exciting for moving typographers. This allows you to animate letter by letter in opacity, colour, size, etc. – not only in 2D, but also in 3D, as Fusion has an extensive 3D text node, including bevel and extrude.

Shape Tools
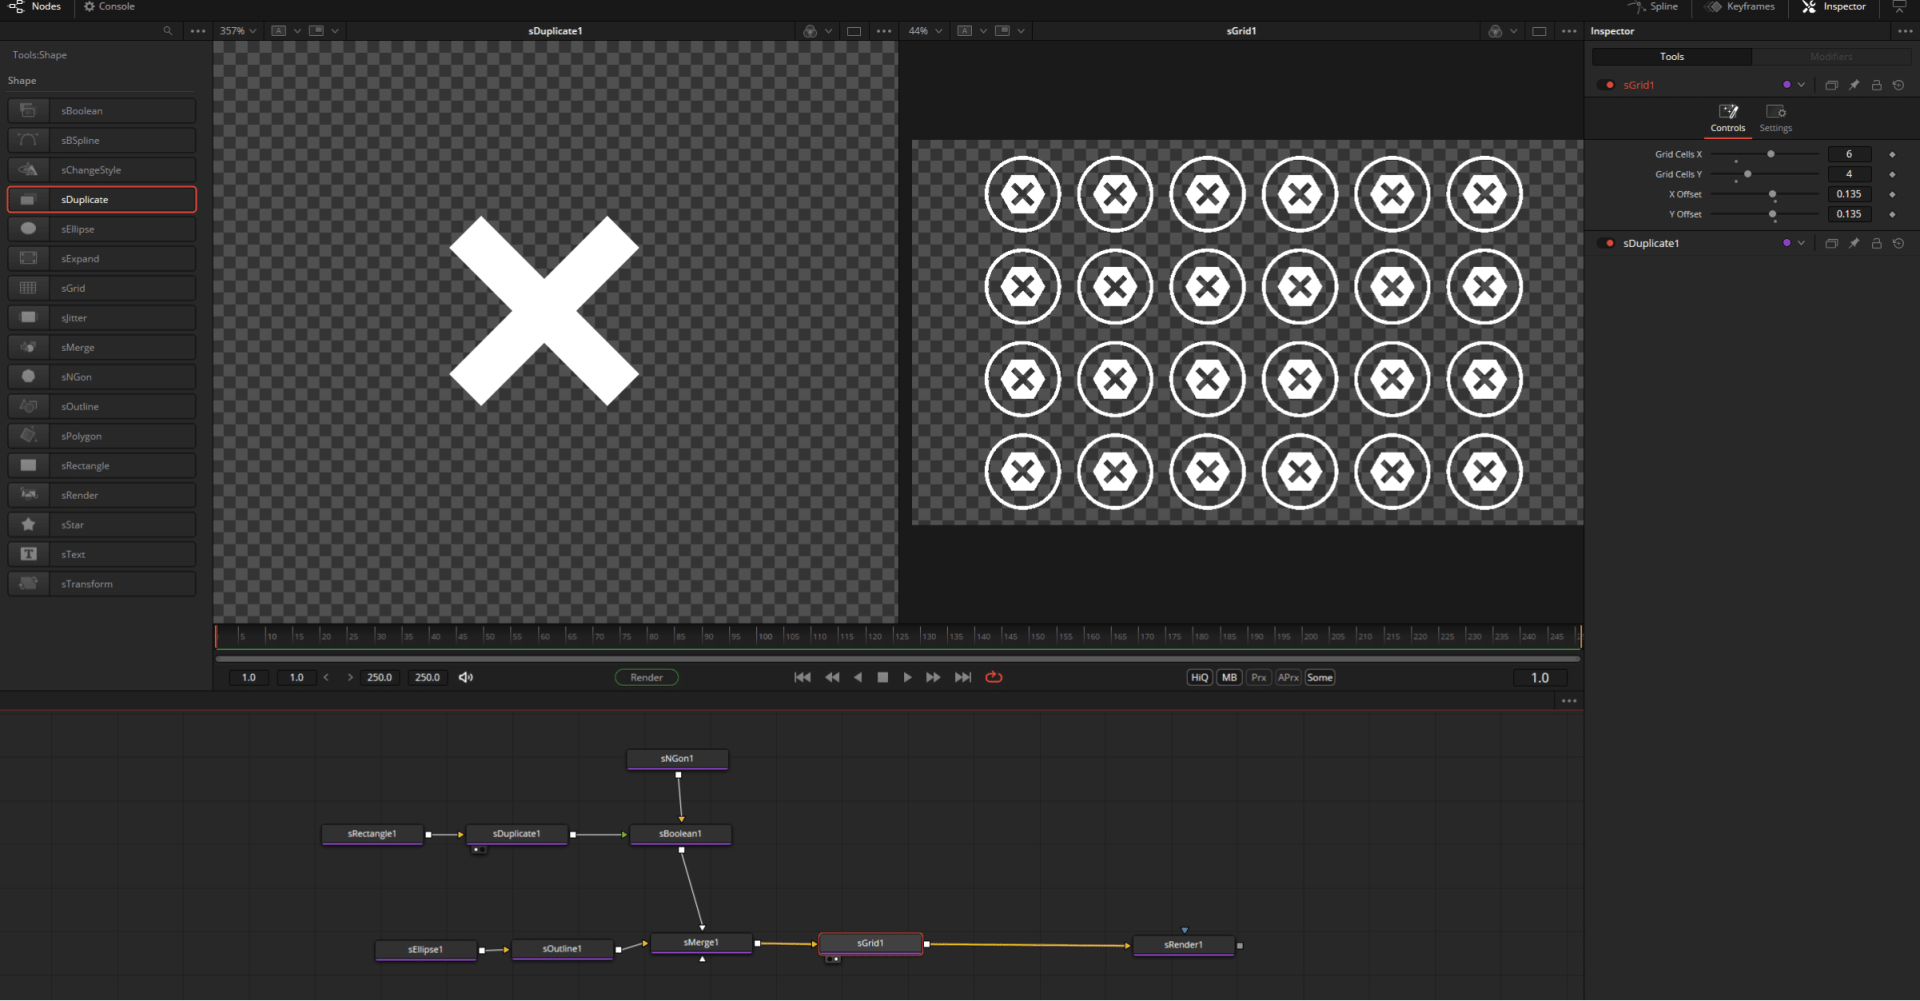
Primarily intended for motion graphics, the Shape Tools are characterised by a vector-like workflow. In contrast to the other 2D systems from Fusion, they are basically resolution-independent and are only cast in pixels using a shape render node.
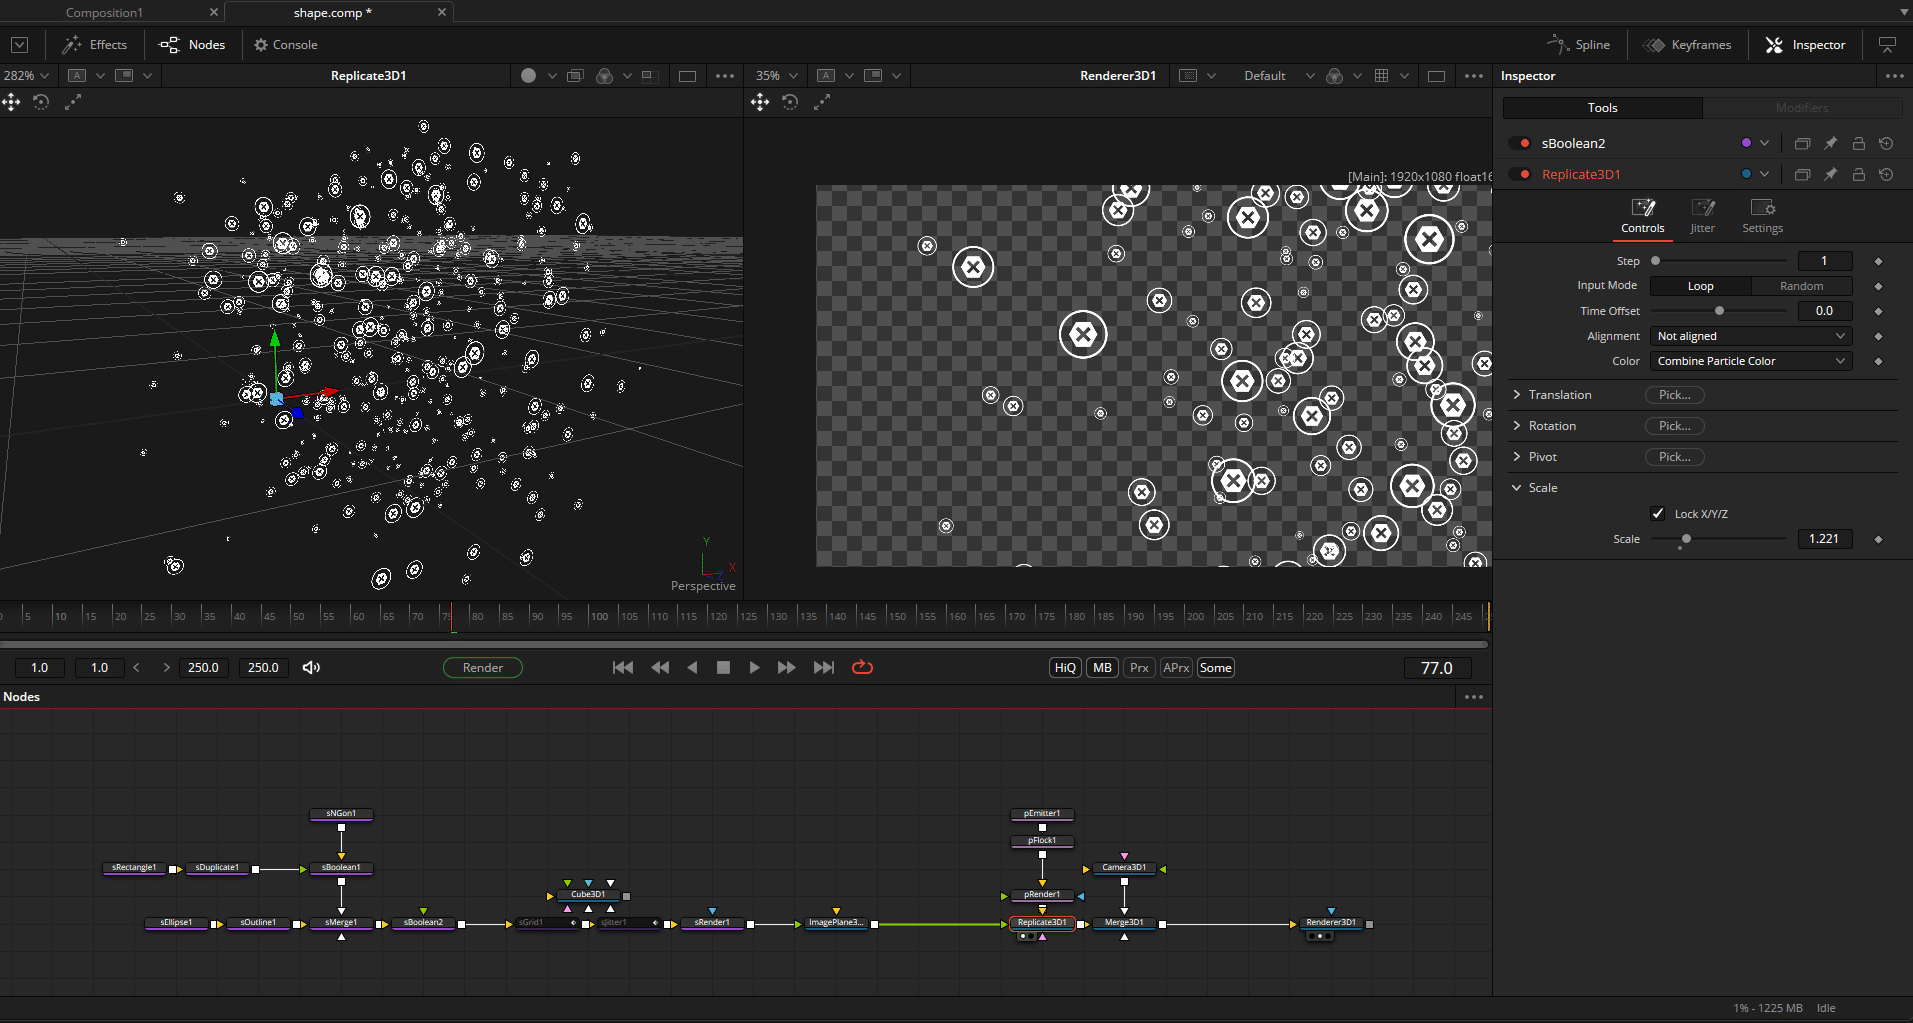
With the shape tools, various basic shapes and paths can be drawn, combined, duplicated, created as a grid and, of course, animated. Linking individual parameters with the above-mentioned modifiers offers great possibilities. The jitter node ensures random movements. For even more control (or chaos), the shape can be instantiated directly on a particle system.


Expressions
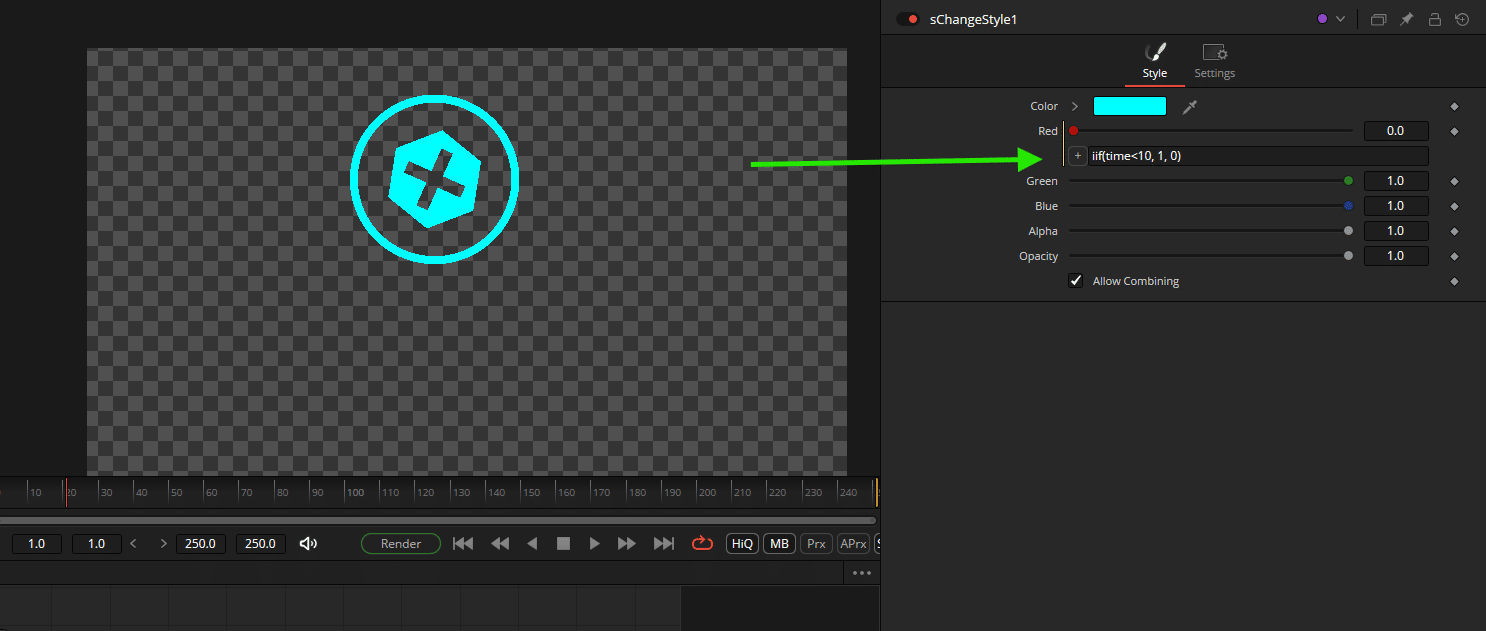
Many motion (and VFX) tasks can be significantly accelerated or automated with simple expressions. To access the expression editor, simply right-click on the relevant parameter field > Expression. For example, as the simplest of all possibilities, values can be changed by the pure passage of time(value “Time”) or linked and nested in complex ways. Parameters can be linked interactively using the small “+” icon.


You can find more examples here:
https://www.steakunderwater.com/VFXPedia/96.0.243.189/index4aa9.html?title=Simple_Expressions
Of masks and multipoly
The aim of the various ways of creating a mask is always the same – to create an alpha channel. Fusion is quite flexible in its use of masks, which are created using rectangles, ellipses, polygon splines or paint nodes. The individual masks can be easily combined, animated and attached to trackers. Individual mask points (if created by path) can be “published” and the parameters of other nodes can be linked to them. The bitmap node converts individual colour channels or the luminance of footage or graphics into masks (more precisely: into an alpha channel). Thanks to the new layer system, AOVs can now also be selected directly as masks here. Thanks to the node system, a mask can be reused or instantiated (copy>shift-v) as often as required.
A few examples:

Above: A simple vignette with ellipse mask node and strongly blurred mask edge aka softedge. In the right viewer the alpha channel of the mask.

Complex shapes are possible by linking individual mask nodes. Alternatively, the newer Multipoly tool can also be used for this, although this is limited to polygon and BSpline masks.
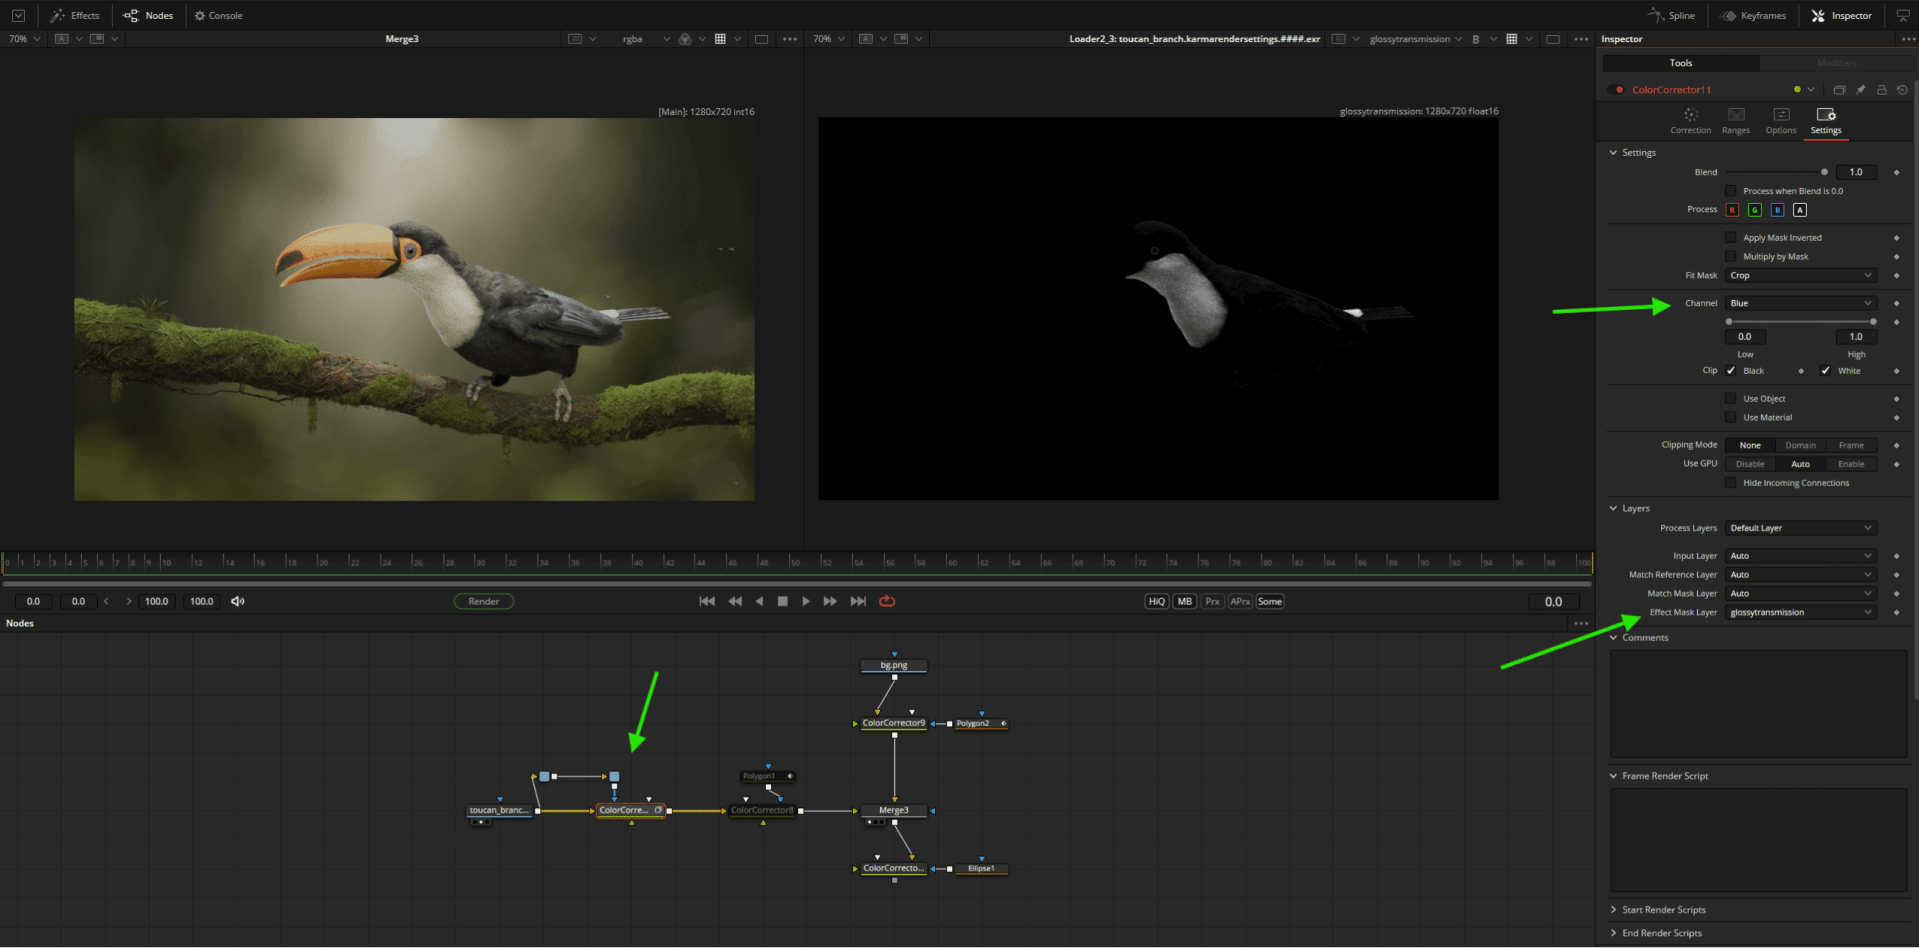
Quick and easy thanks to the new layer system: the blue channel of the AOV glossy transimission as a mask for a colour corrector. Connect the footage loader to the ColorCorrectNode as an input AND as a mask (blue input), set the effect mask layer to the desired AOV under Settings and select a channel under Channel if necessary.
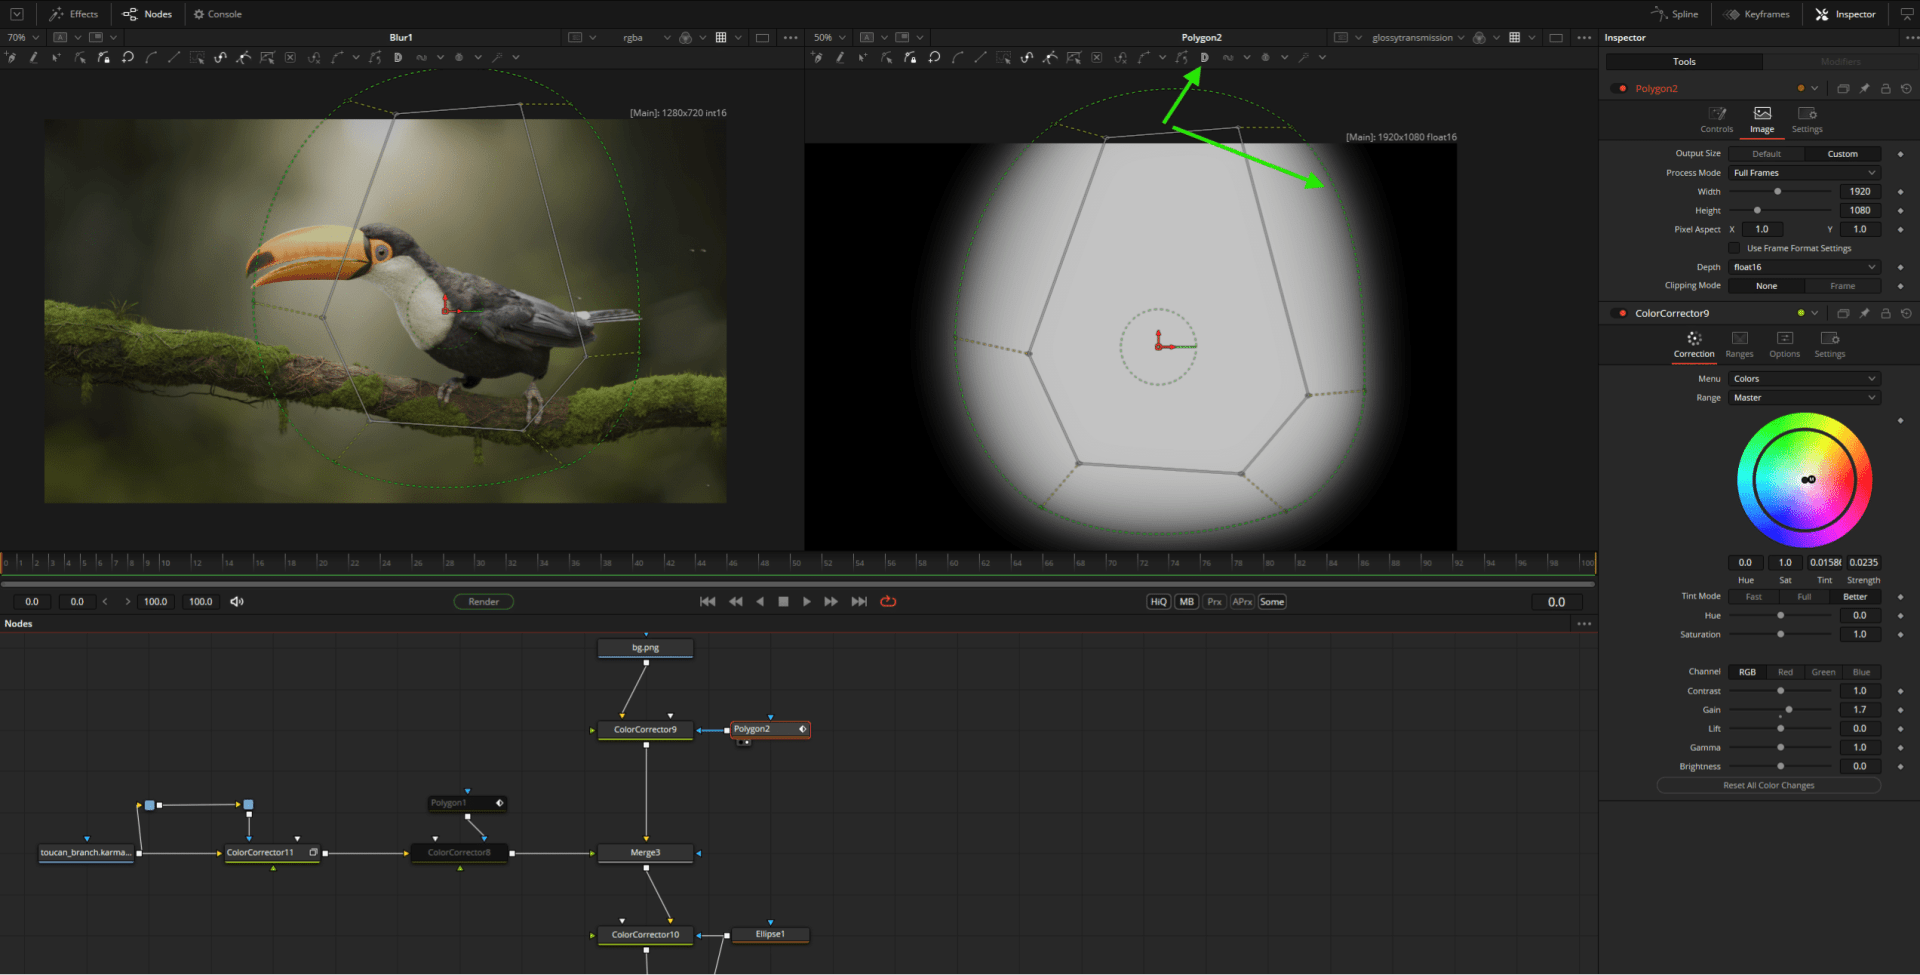
A simple polygon mask in “DoublePoly” mode. The outer outline defines a soft edge gradient, which can be set in addition to the global “soft edge”.

Timesaver: The Multiframe option allows you to change mask points for all keyframes simultaneously – similar to Mocha’s Überkey.
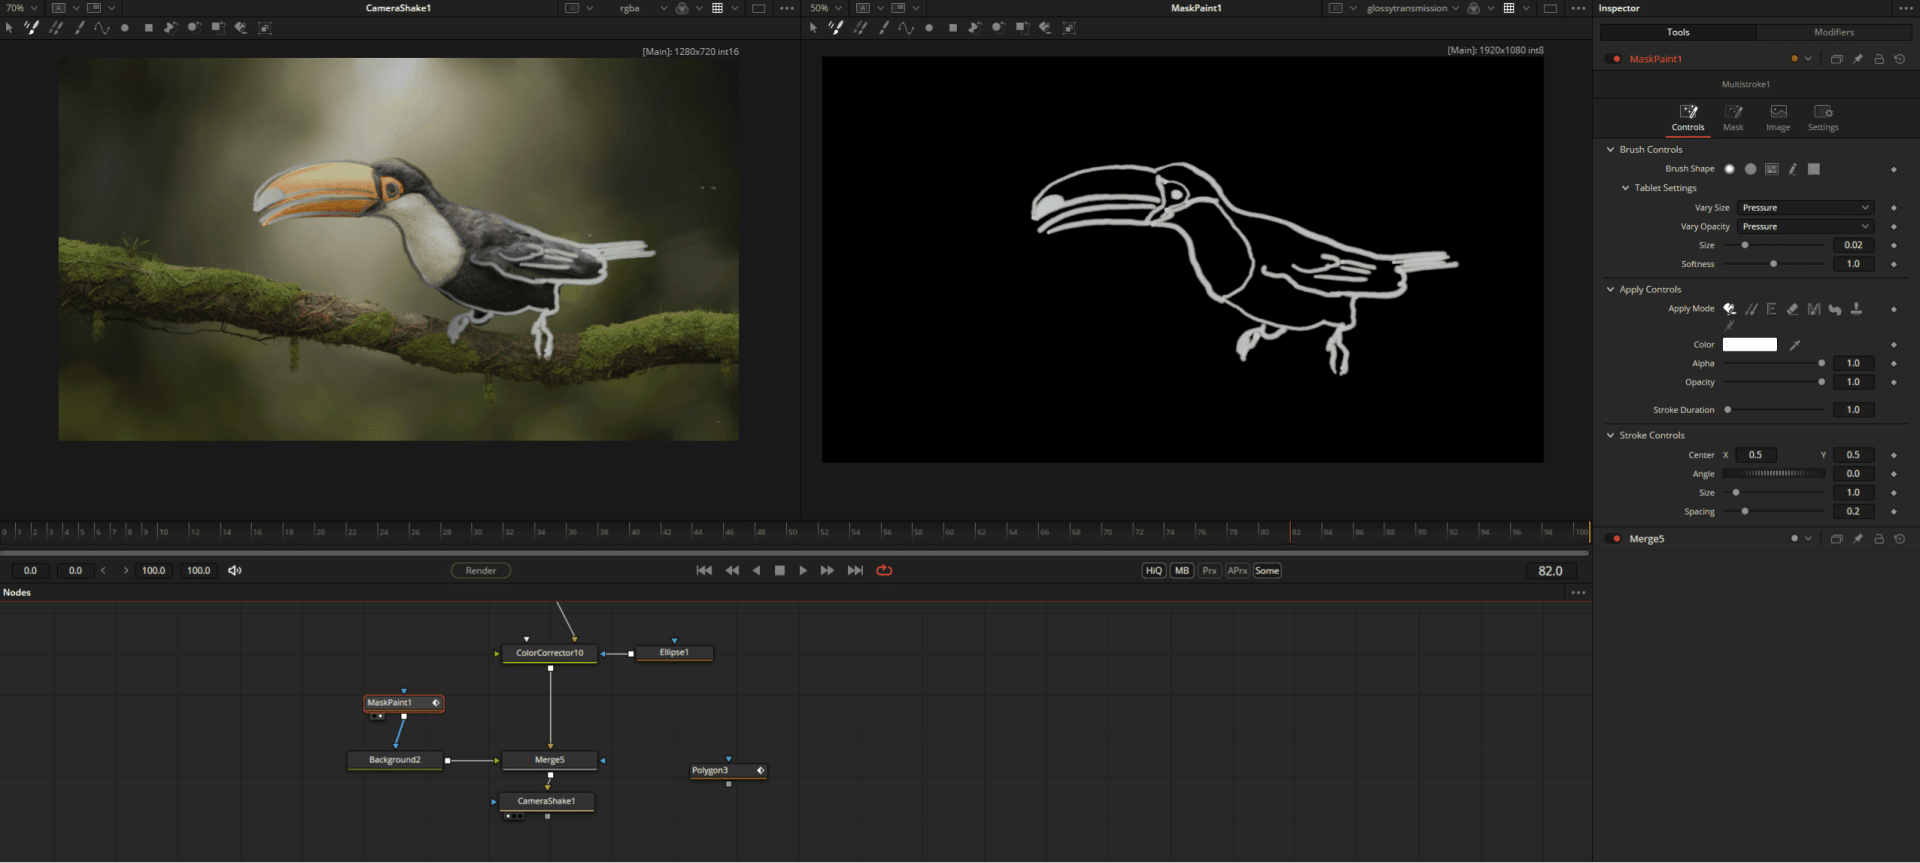
Masks can of course also be drawn beautifully and even support graphic tablet pen pressure …
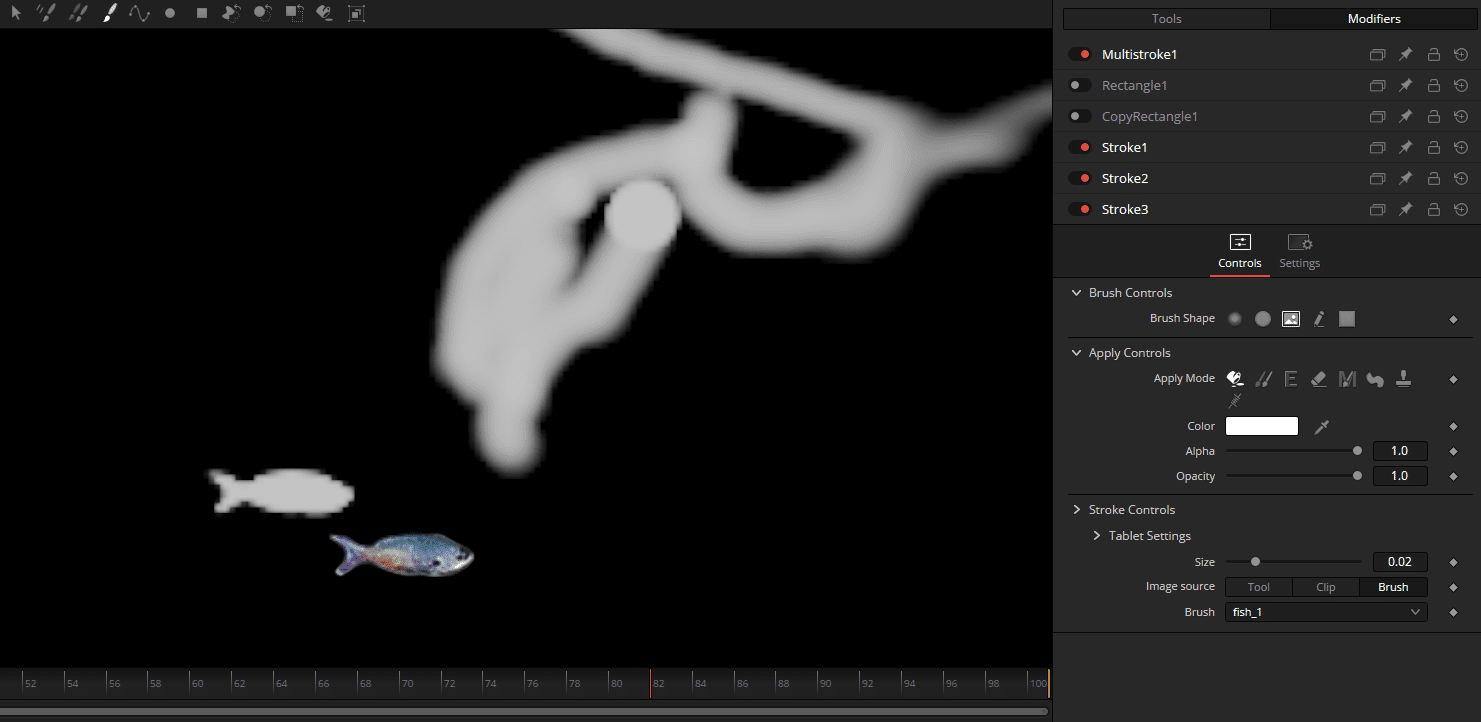
… and brushes such as this useful fish (available as a preset).
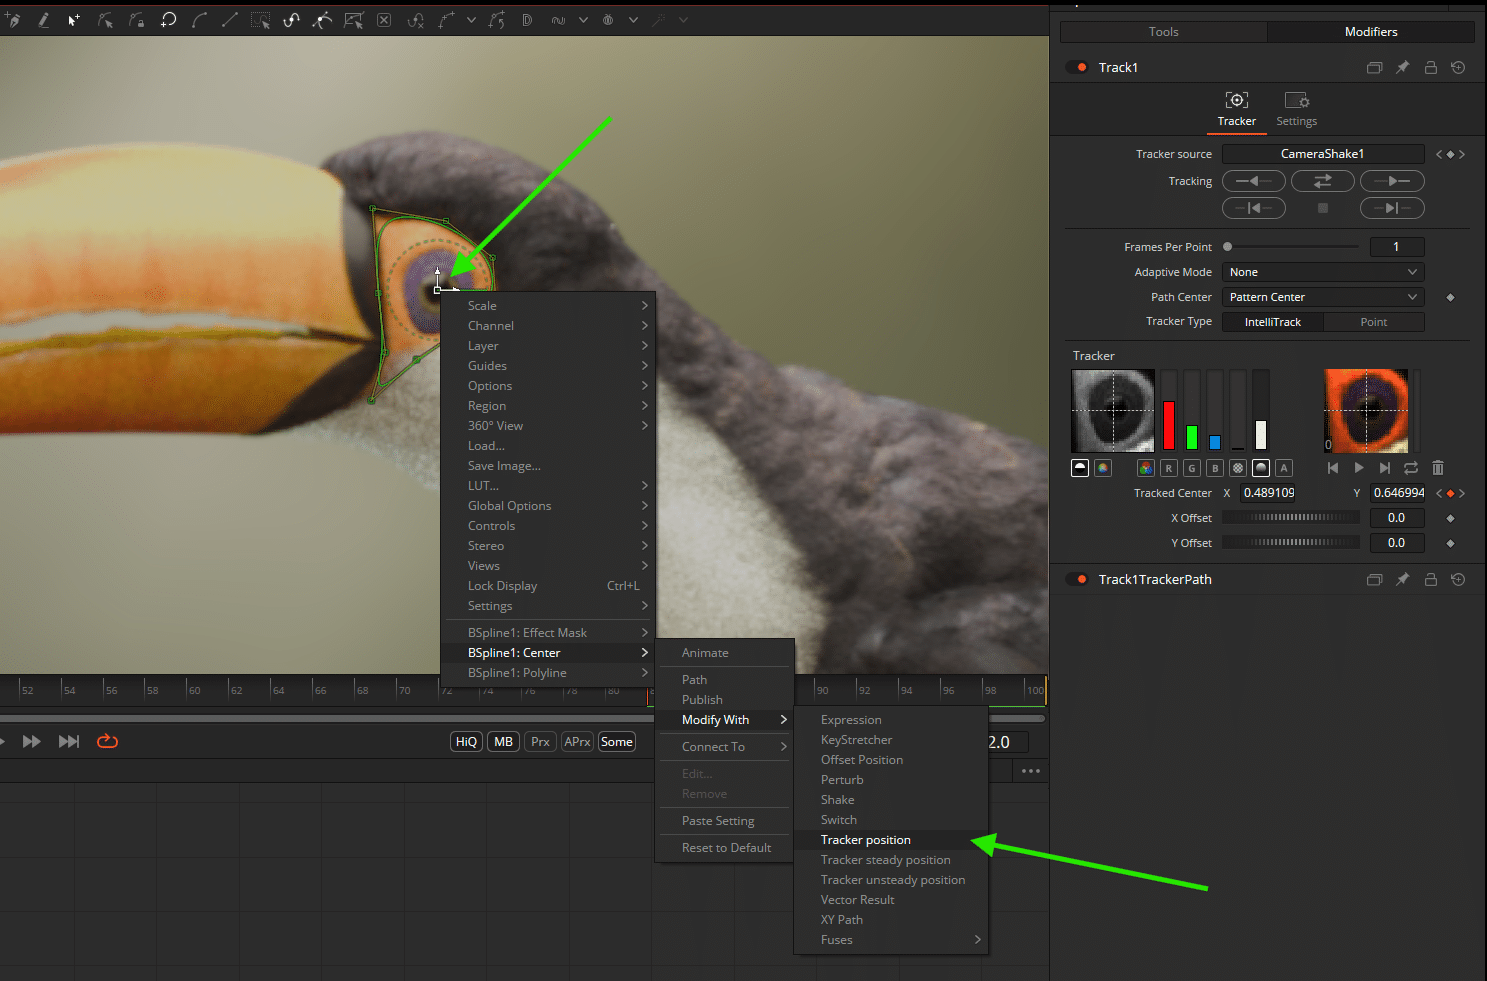
To track a mask, the mask centre can be linked to a tracker modifier. The actual mask path can then still be adjusted or even animated, as only the centre position of the node is actually attached to the tracker.
Particles
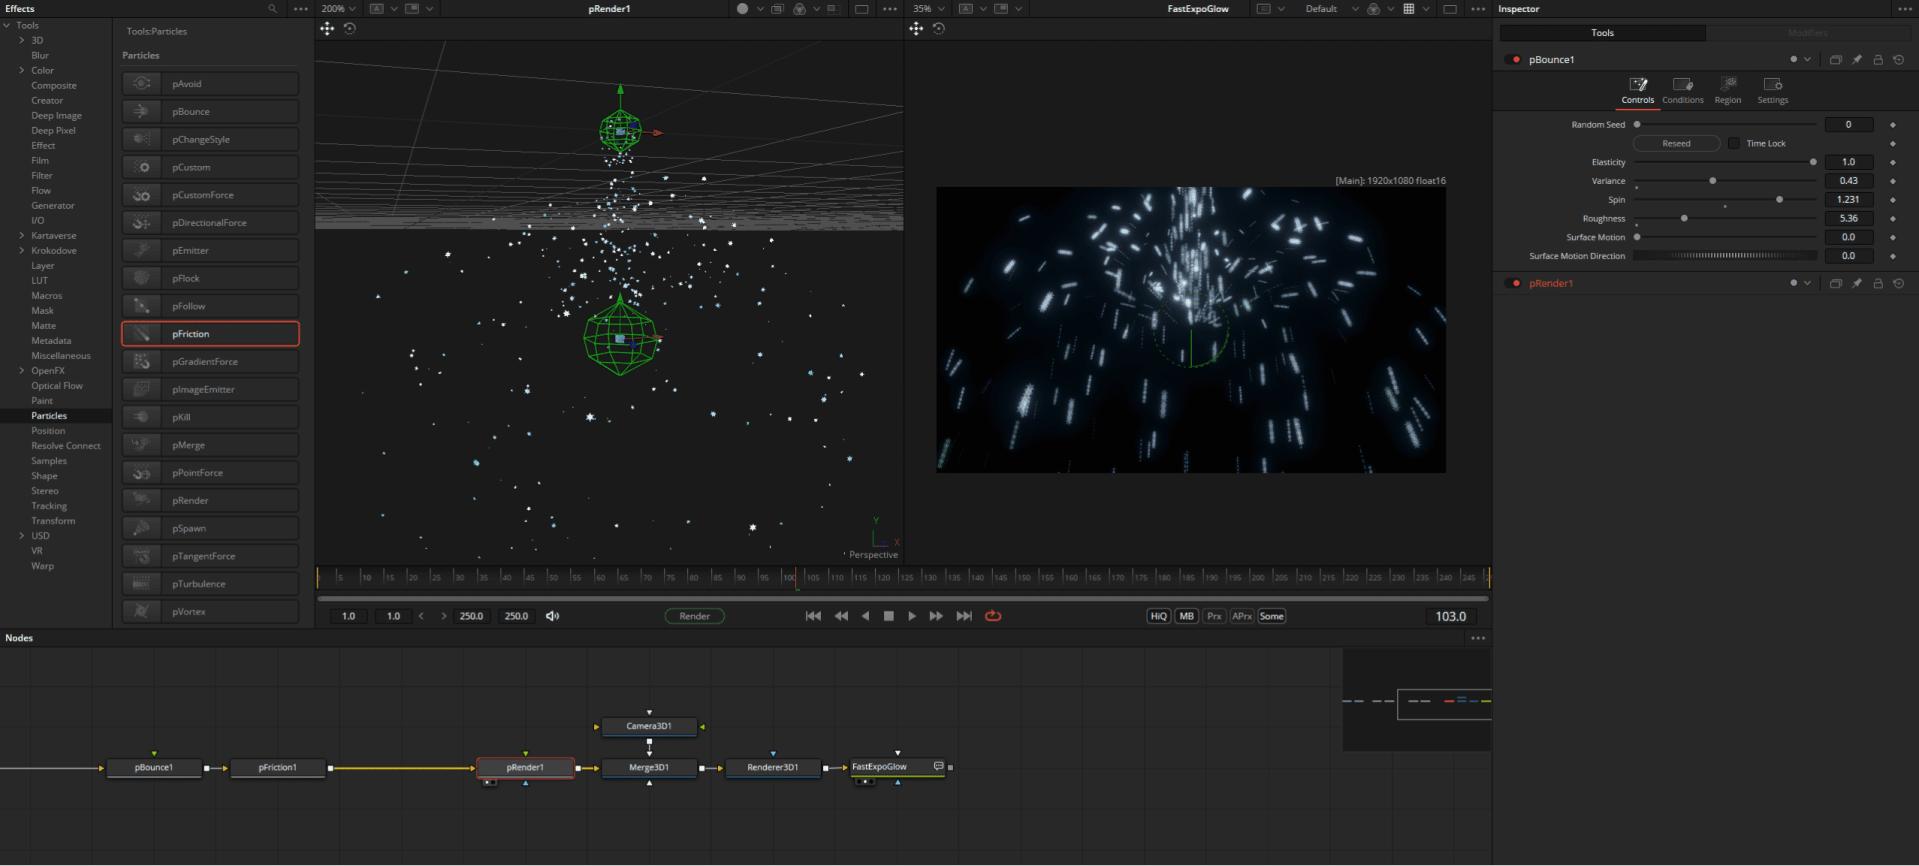
Fusion comes with a very powerful and intuitive native particle system. The setup is very simple: The basis for every ParticleFX is the pEmitter Node. As a starting point, it can assume various basic shapes, use 3D shapes (see text example above) or an image input (see crypto example above) and the pRenderNode, which displays our particle system either in 3D space or as 2D pixels.

The particles created in this way can now be subjected to various forces, e.g. the extremely popular turbulence. The effect strength can be set using a 3D mask (region), probability, particle groups or particle age.

Although the particles are not really simulated in comparison to Houdini, they can mimic many effects such as gravity and bouncing of objects
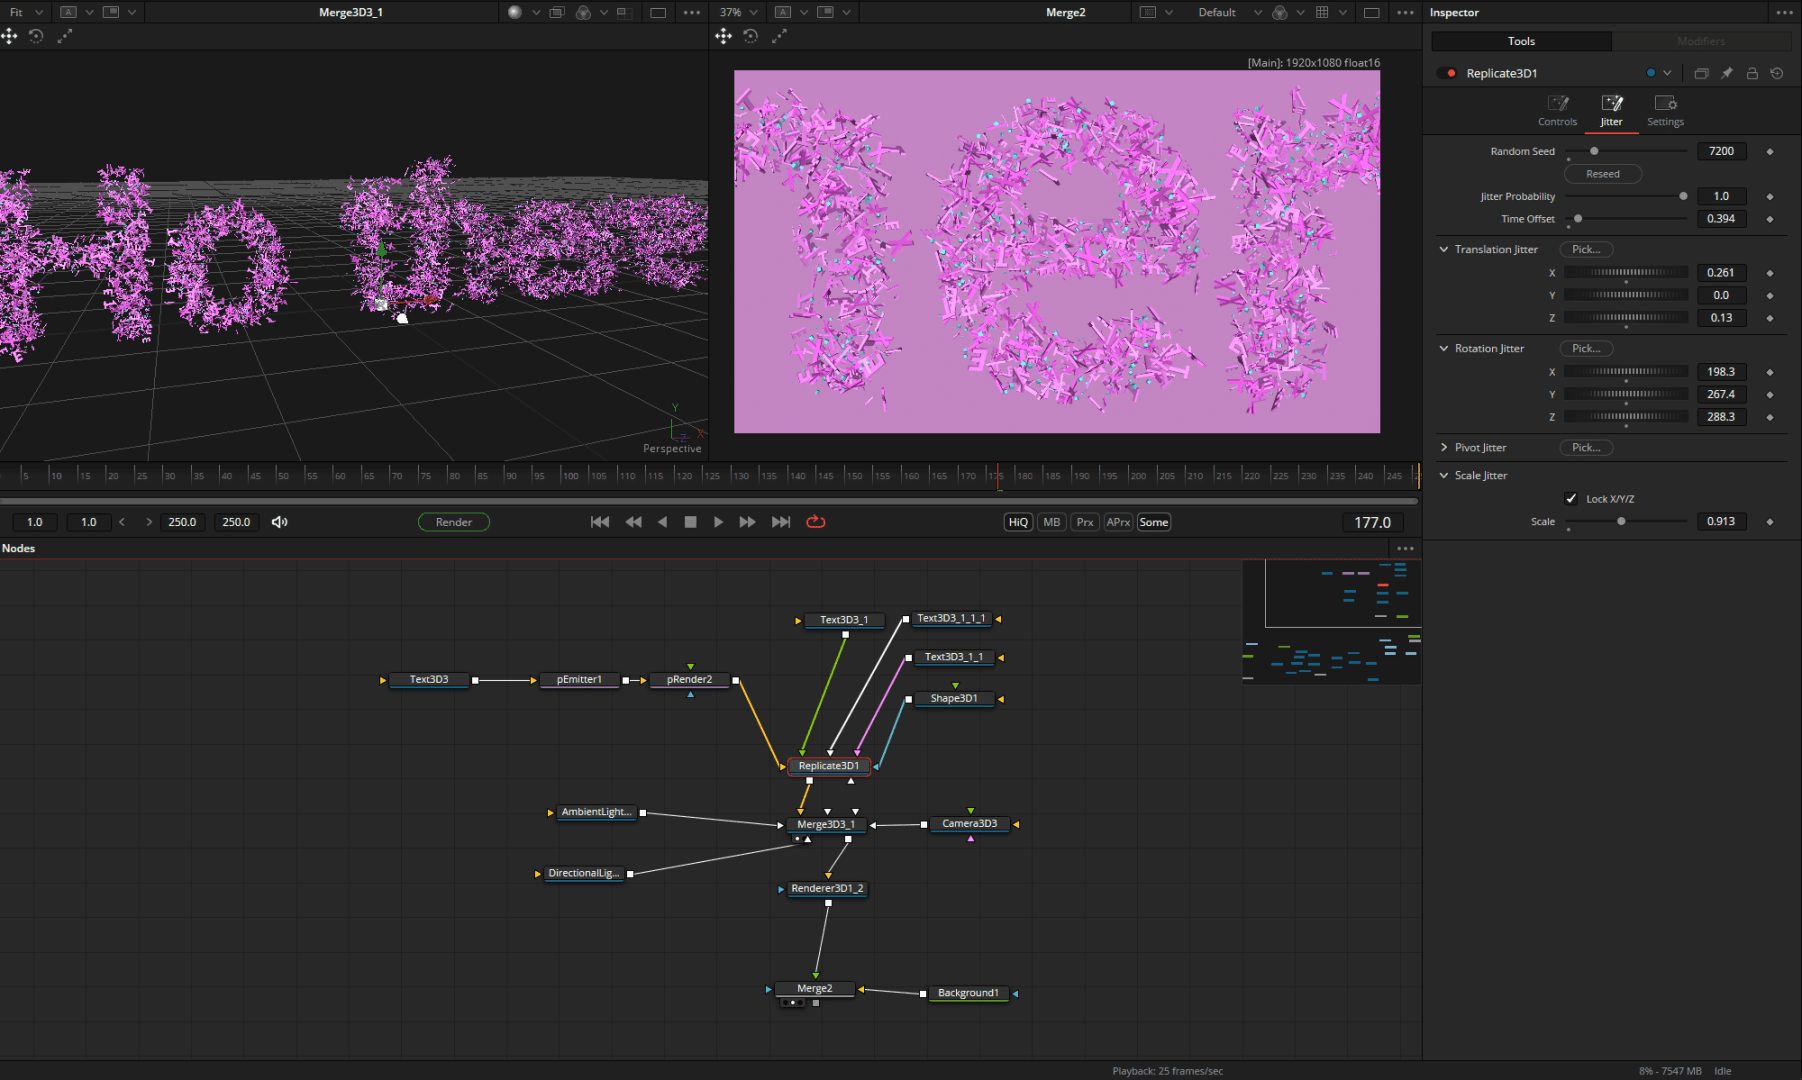
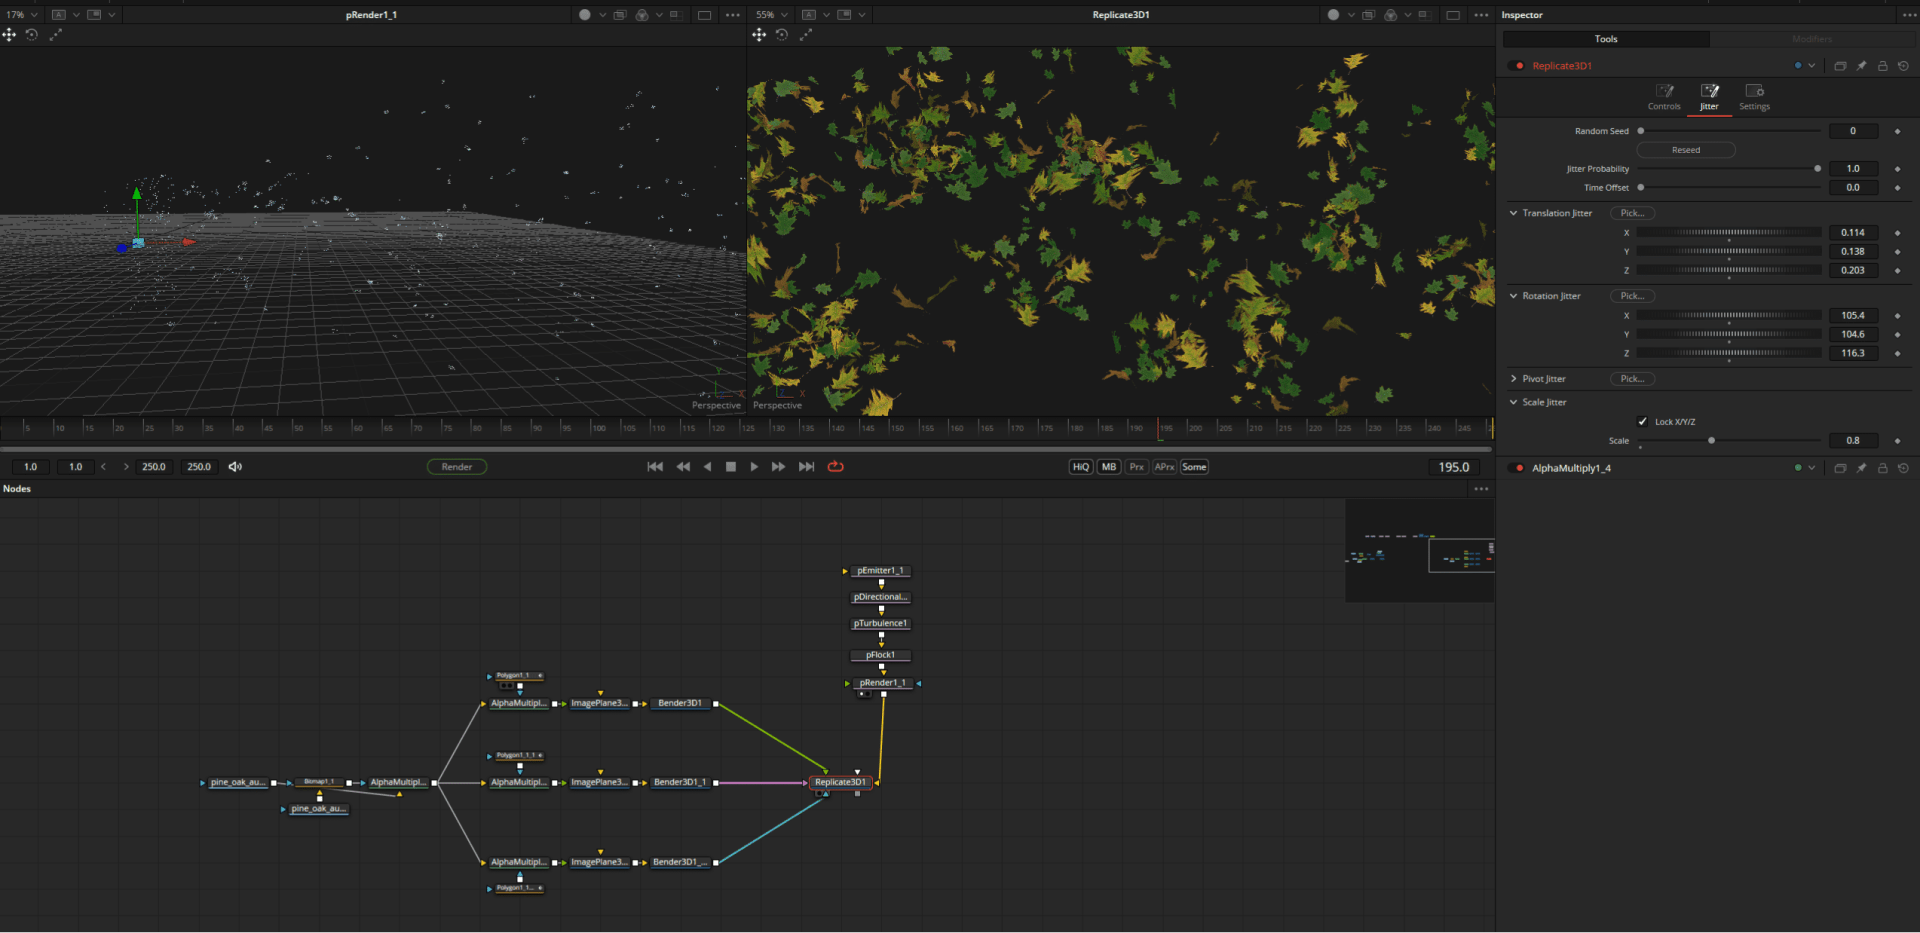
One of the most powerful nodes is the “replicate3D”, which can instantiate any 3D objects on the points and vary their size, rotation and position randomly.
ACES 2.0
Fusion 20 now supports ACES 2.0 & OCIO 2.4.2. Let’s take a look at what this looks like in practice.

The loaded rendering was created in ACEScg, which can be seen in the metadata (hotkey “V”, right-click and display metadata). The display is too dark without display transform.

The small raster icon (1) leads to the Display LUT/Transform menu. Here we select ACES Transform (2) and edit (3) the input & output transform (4) depending on the pipeline, here ACEScg in, sRGB Gamma 2.2 out.
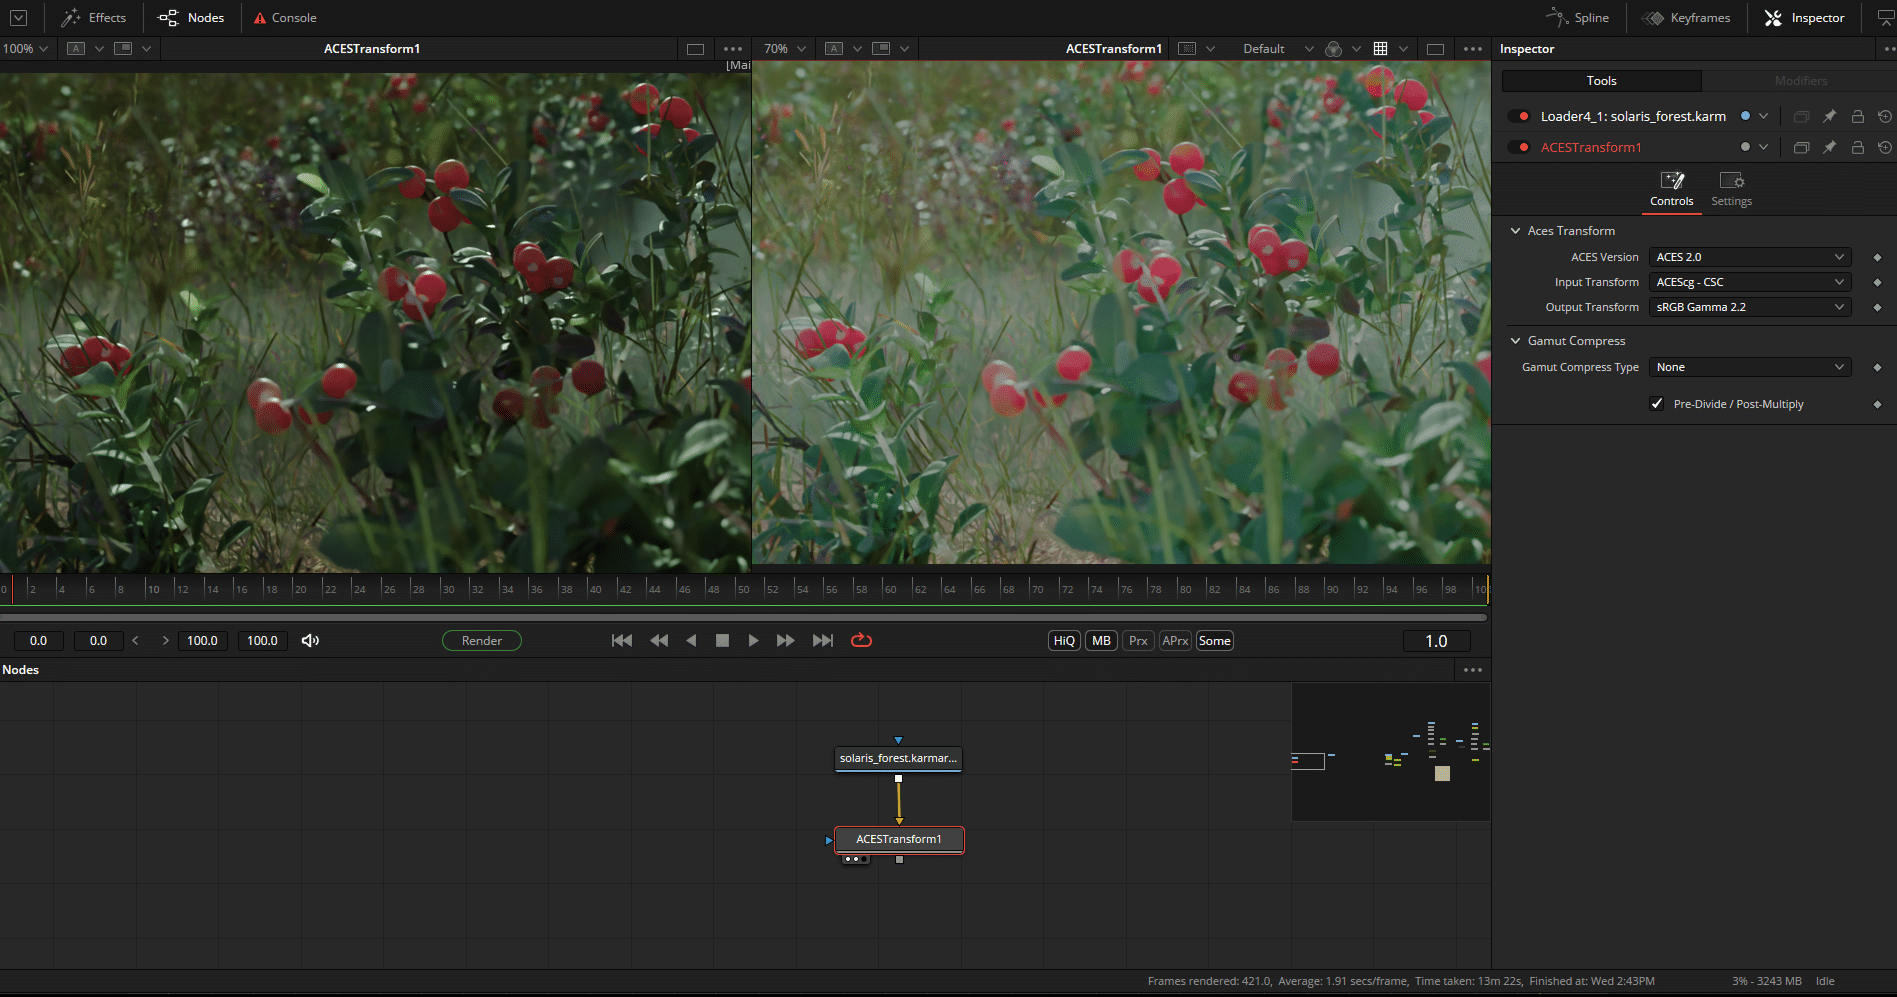
Now we see the image correctly displayed in the viewers (but only displayed, the image itself is not sRGB!) and can continue to perform all operations in ACEScg.
For the final output as e.g. ProRes 4444, however, we have to apply these values via ACES Transform Node.

If you would like to work with AGX / Filmic and co, proceed as follows: Again via the ViewLut menu (1), this time select OCIO Display (2) and edit with the following settings (4). The conversion for the final output is carried out this time via the OCIO Colourspace or Ocio Display (!) node, with the same values as in the ViewLut. The necessary config comes this time from: https://github.com/Joegenco/PixelManager
So much for the application in Fusion. If you want to read more about ACES or argue about it, you can do the former here: https: //chrisbrejon.com/cg-cinematography/chapter-1-5-academy-color-encoding-system-aces
Vector Warp
The new vector tools are based on analysing the movement of the image pixels. Fusion knows what happens to which pixel and can therefore apply complex deformations or retouching quickly and usefully. Areas of application include digital make-up or the insertion of new objects.
The basic prerequisite is motion vectors, which can be supplied externally or generated via an optical flow node (cache without any need!).
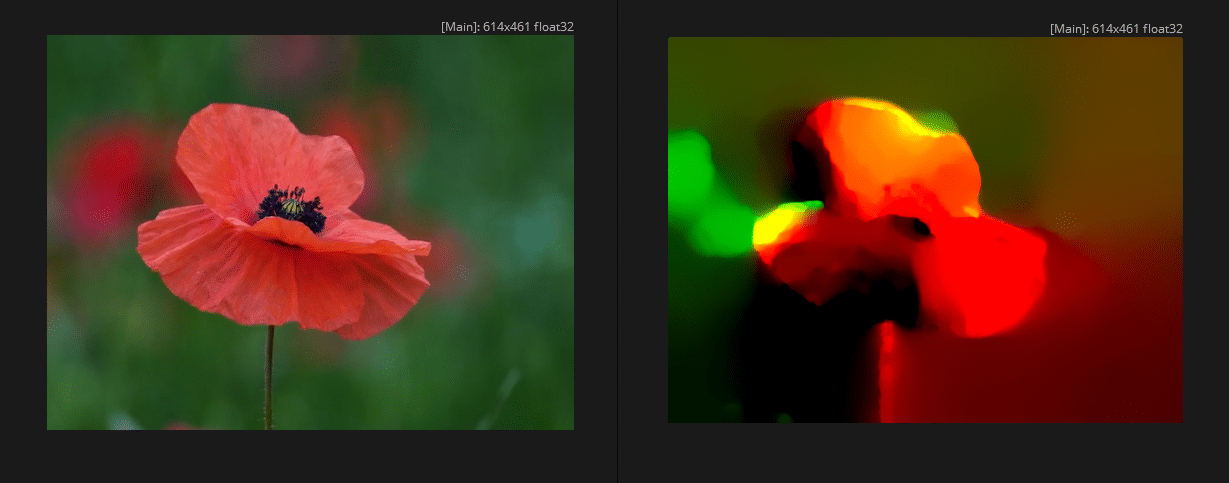
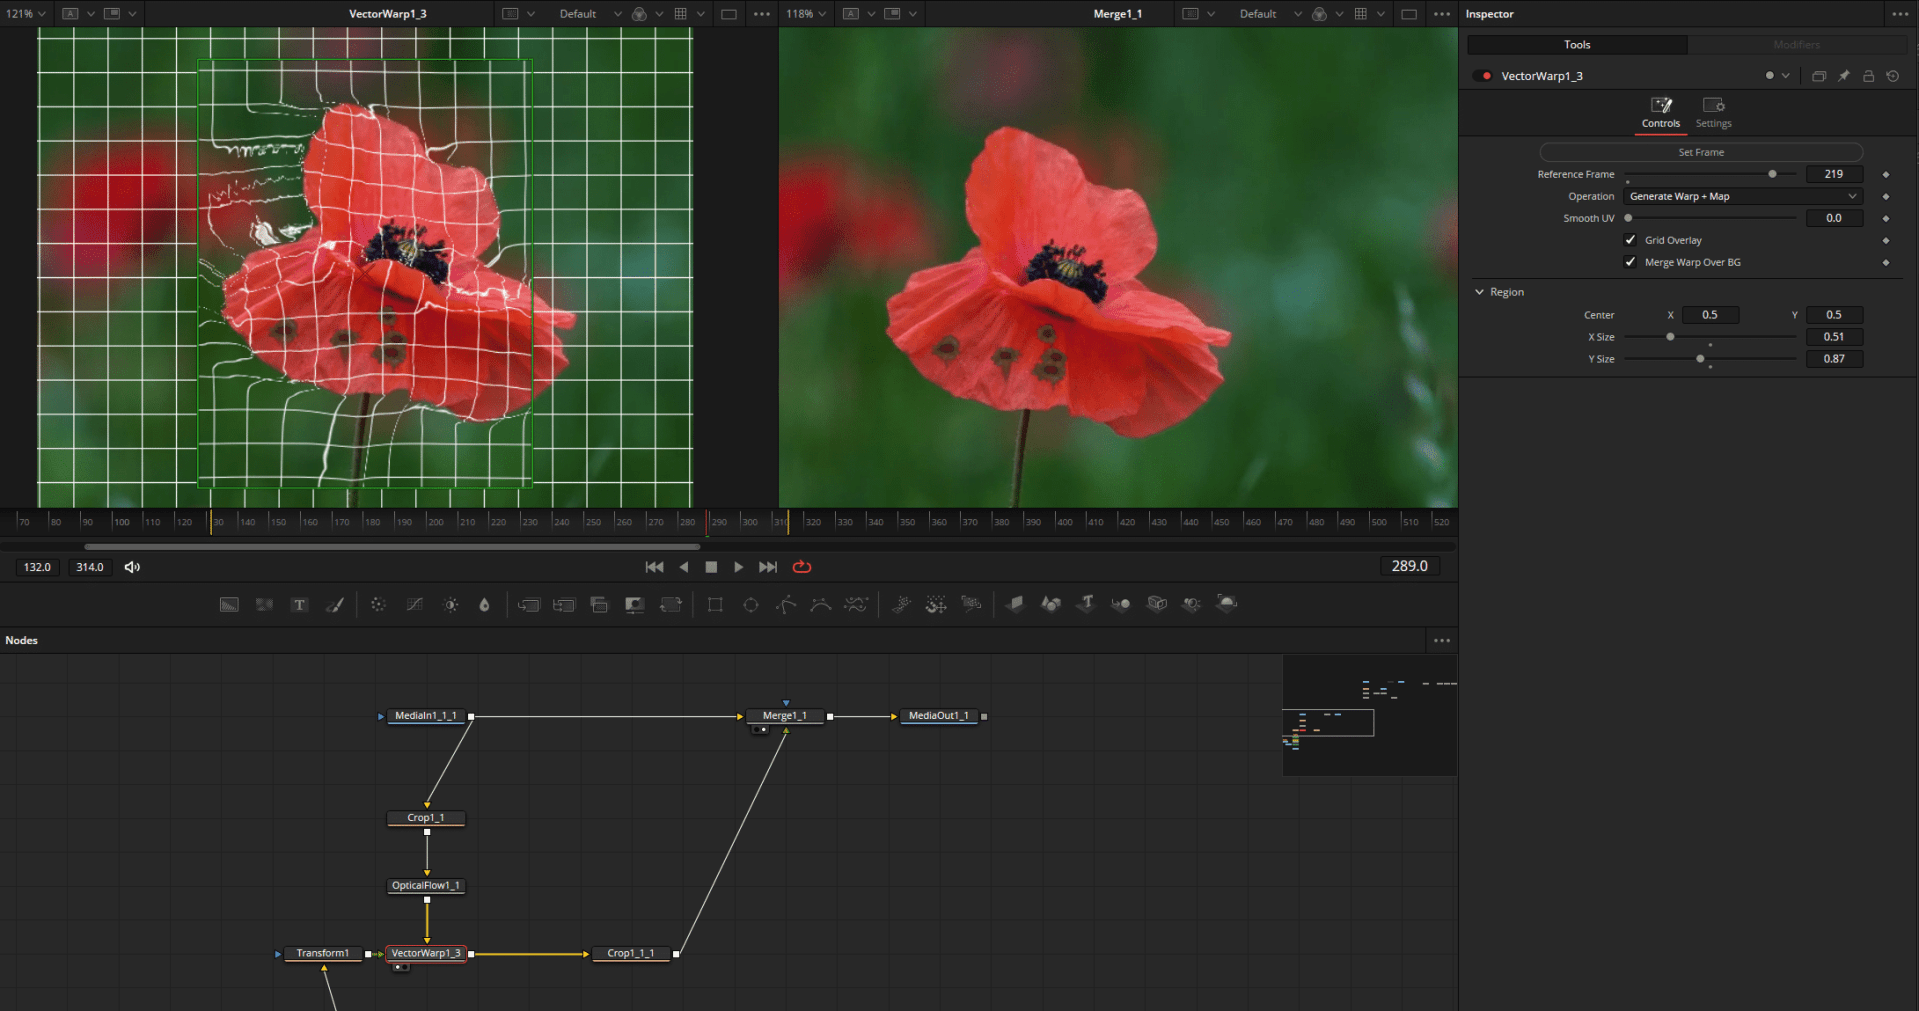
To simply place new objects on the background, the new VectorWarp node in “Generate Warp Map” mode is sufficient. The deformed result is placed over the background again using the Merge Node.
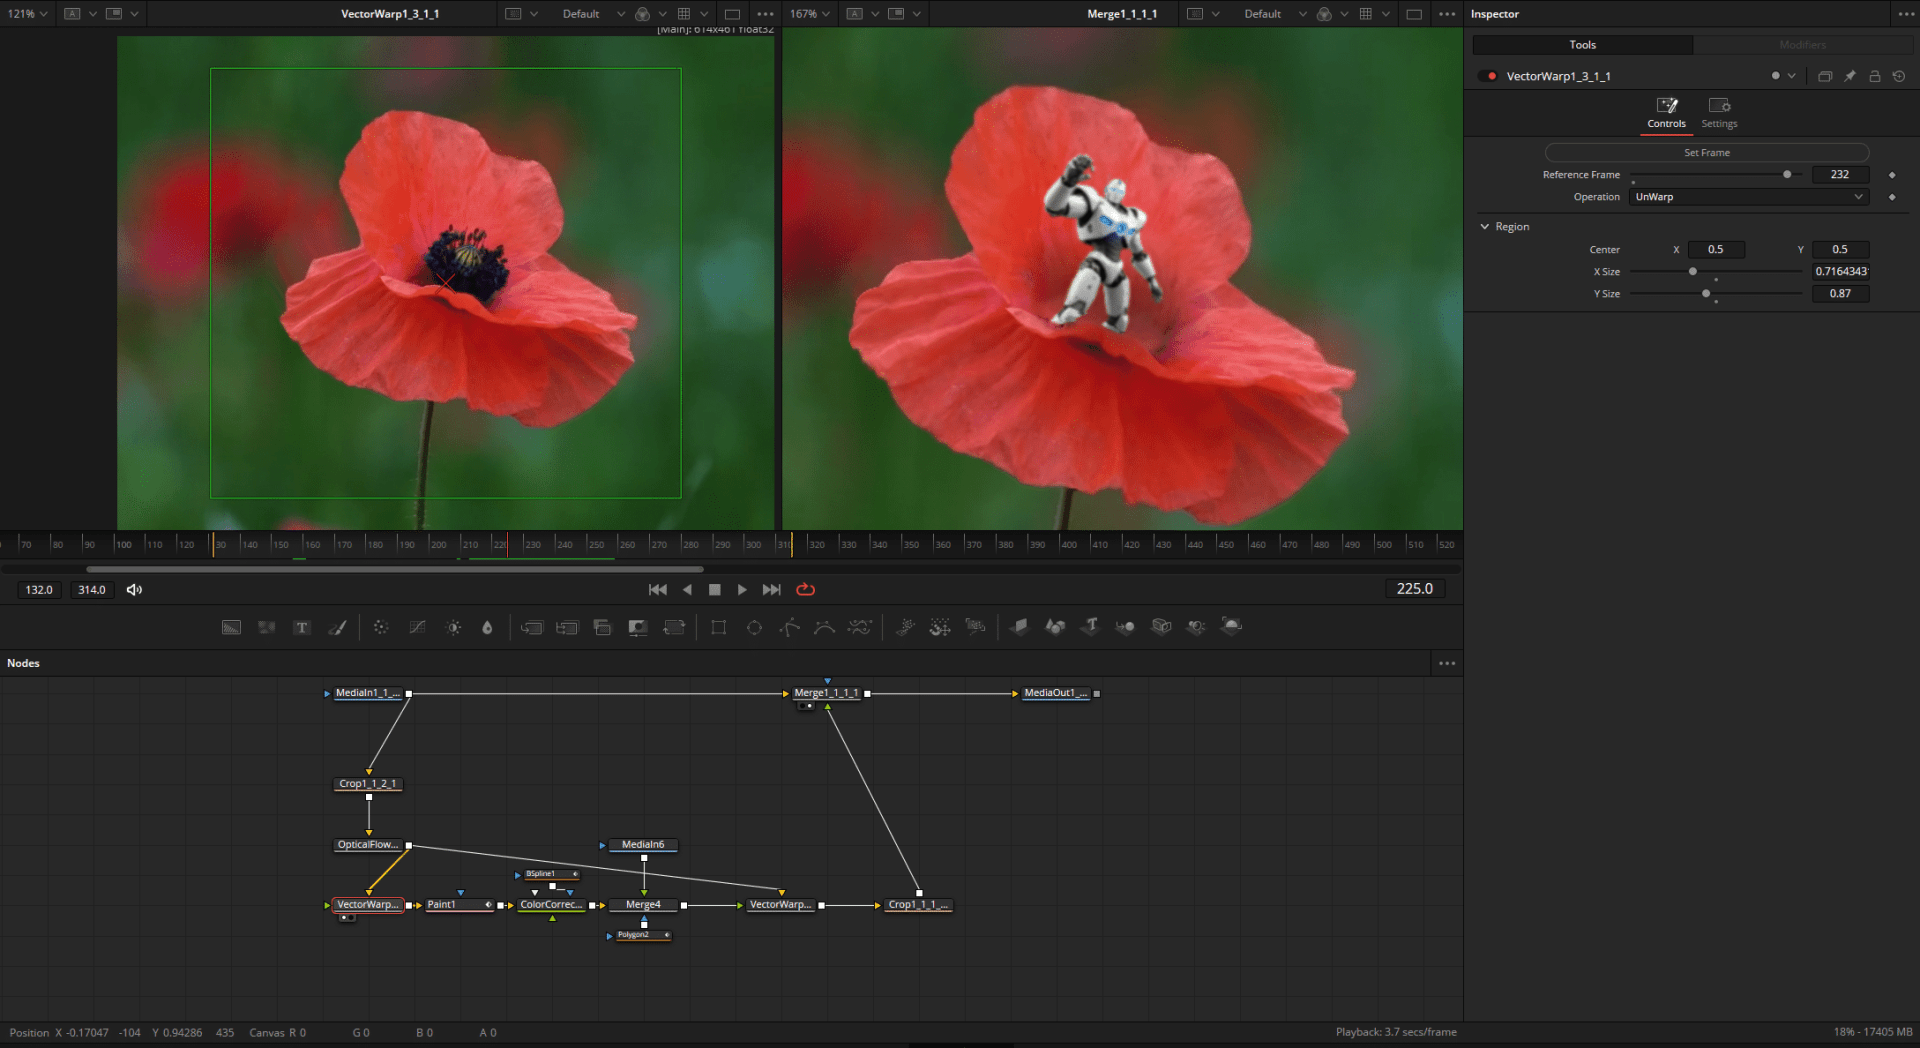
For more complex retouching, the VectorWarp node can be set to “Unwarp” and “freezes” the object in time. In this way, objects can be retouched or new ones added using the Paint Node. The result then flows into a 2nd Vector Warp Node, which brings the image back into motion using “Generate Warp Map”.
Curve Warp
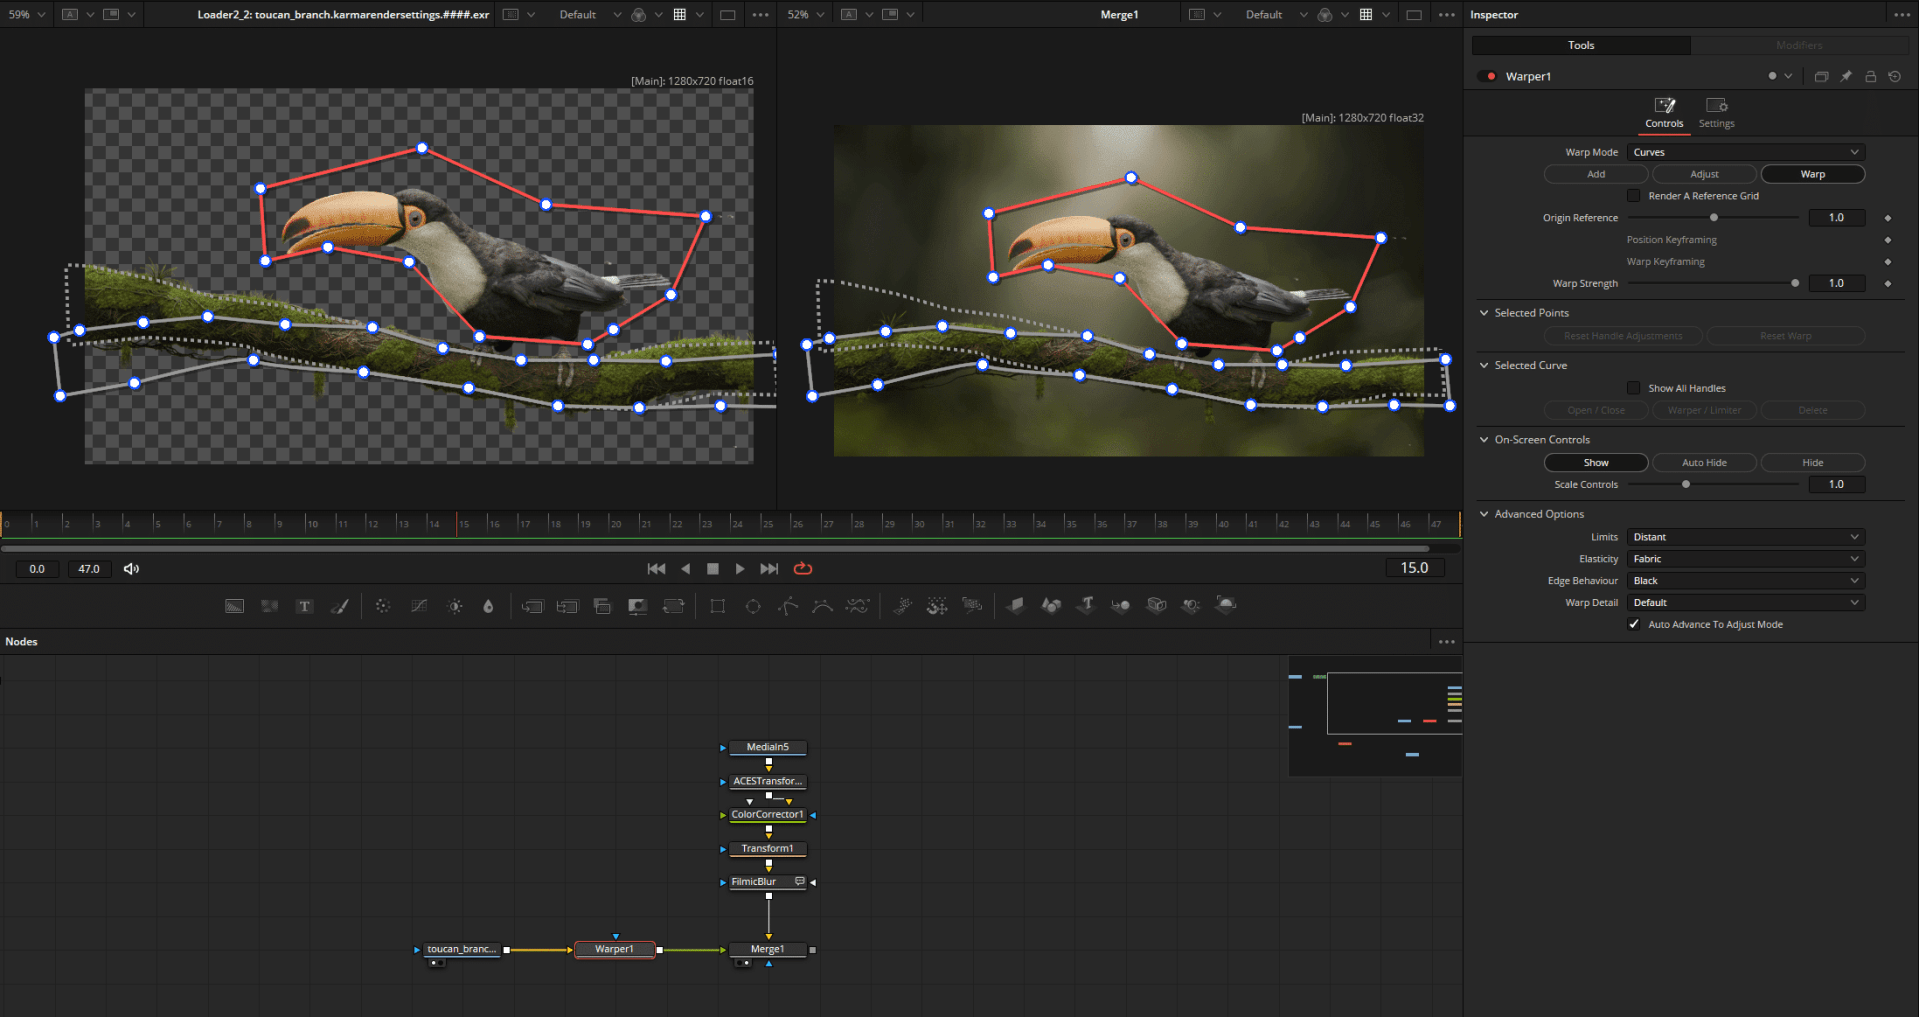
The warper previously only available in Fusion Reoslve can now also be controlled using curves. Simply draw a line or an outline, set limits if necessary and bring the object into the desired shape.
Node versioning
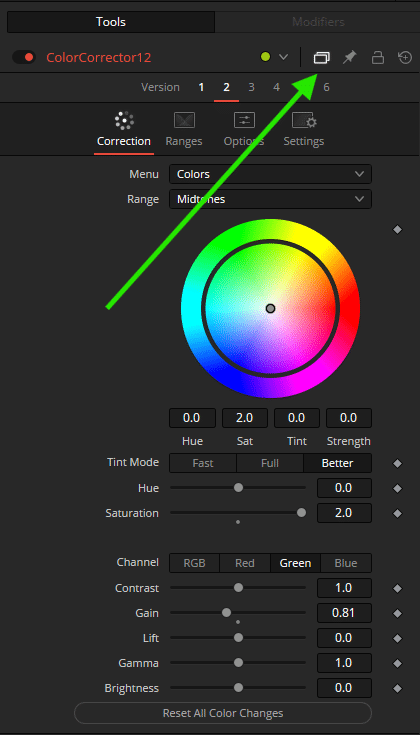
A very small and extremely practical function is the somewhat hidden versioning of a node. Up to 6 different settings can be saved to quickly try out different looks. These are not presets, but can be created as such by right-clicking on the node name and Save Settings.
Performance optimisation
Fusion offers various optimisation options to keep performance high despite complex effects and comps:

1. The render area selection (region of interest) limits the calculation to a selectable part of the image
2. Proxy mode reduces the preview resolution (click on the PRX button on the right for further options)
3. High Quality Preview and Motionblur can be switched off for faster previews
4. Framestep skips every frame and leads to faster previews (right click on the play icon for more options)
5. Cache to disc renders and saves the flow up to the selected node (right-click on the desired node)
Reactor
Reactor, which can be downloaded free of charge from the unofficial official Fusion forum, is the counterpart to Nukepedia and lets you install all kinds of macros, scripts and fuses, also commonly known as user-created plug-ins, directly from within Fusion. From exponential glows, edge blur and complete mograph solutions (Krokodove!), everything is included – including the Nuke2Fusion project, which bases shortcuts and settings on Nuke as far as possible.
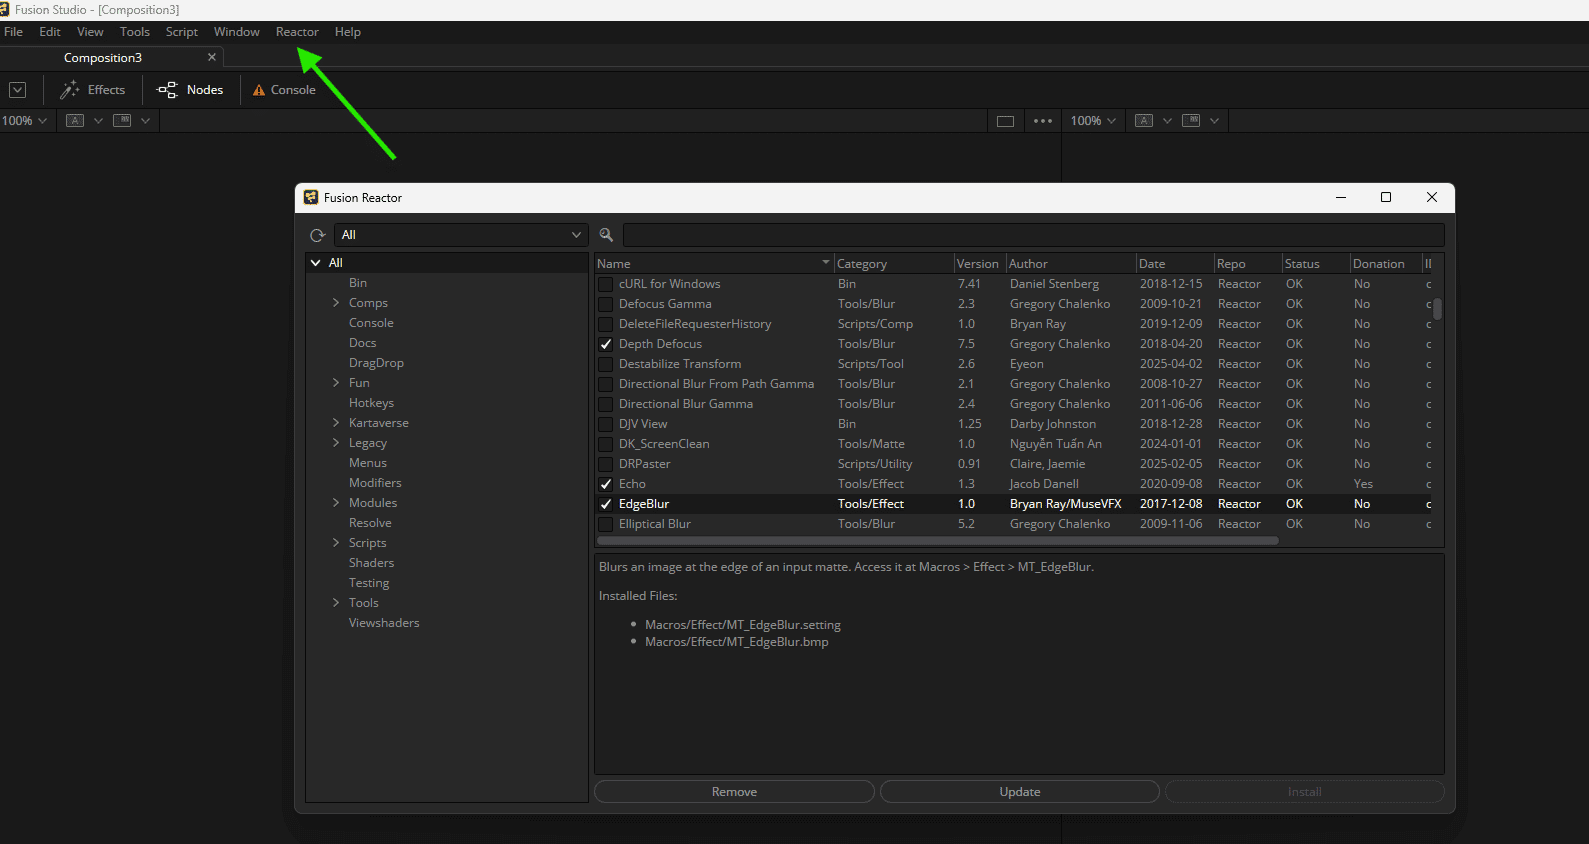
Installation and instructions: https://www.steakunderwater.com/wesuckless/viewtopic.php?t=2159
Top nodes to try:
X-Glow for wonderful exponential glow
FTL tools for modular lens flares
Krokodove adds many motion graphics nodes to Fusion
OIDN denoiser to be able to use the Intel Open Image Denoiser directly in Fusion.
Last news but not least news: Fusion inside Resolve only: The option you have been waiting for since the integration in Resolve: You can now display the grading applied in the colour page in Fusion and set the start frame count independently of the footage.
Fusion Resolve (Studio) integrated vs. Fusion Studio Standalone
A quick look at the possible versions and versions of Fusion – the standalone is only (still) available as Studio and therefore costs just €355. However, for that money you not only get Fusion, but also Resolve Studio. Or vice versa.
The free Resolve version has Fusion integrated, but has to do without a few really practical Studio OpenFX such as Lens Blur, Termporal Denoise and the new Neural Engine FX such as Magic Mask II. For this reason, the Studio version is highly recommended, especially because it is a perpetual licence. No subscription. For Resolve Fusion. As you can see, it’s worth it.
If you don’t need the other Resolve tools for your current task, it’s better to use the standalone version for performance reasons – it’s simply faster and more flexible as it doesn’t have the Resolve overhead and also offers network rendering (with unlimited render clients). By the way: Before Blackmagic times Fusion alone cost around 2500 $ …
Conclusion
Fusion offers a powerful complete package for compositing / visual effects and also a lot of core power for motion graphics, if you can get involved with the NodeSystem and do without direct integration of Adobe Illustrator files. Working with the programme is fun and quick. The price of the programme is unbeatable, and Resolve Free is even free – just give it a try.
The beta is available immediately and can be downloaded from the Blackmagic website. A Resolve or Fusion dongle or key is required for operation. This is available as a one-off purchase for 355€ – as a perpetual licence.


