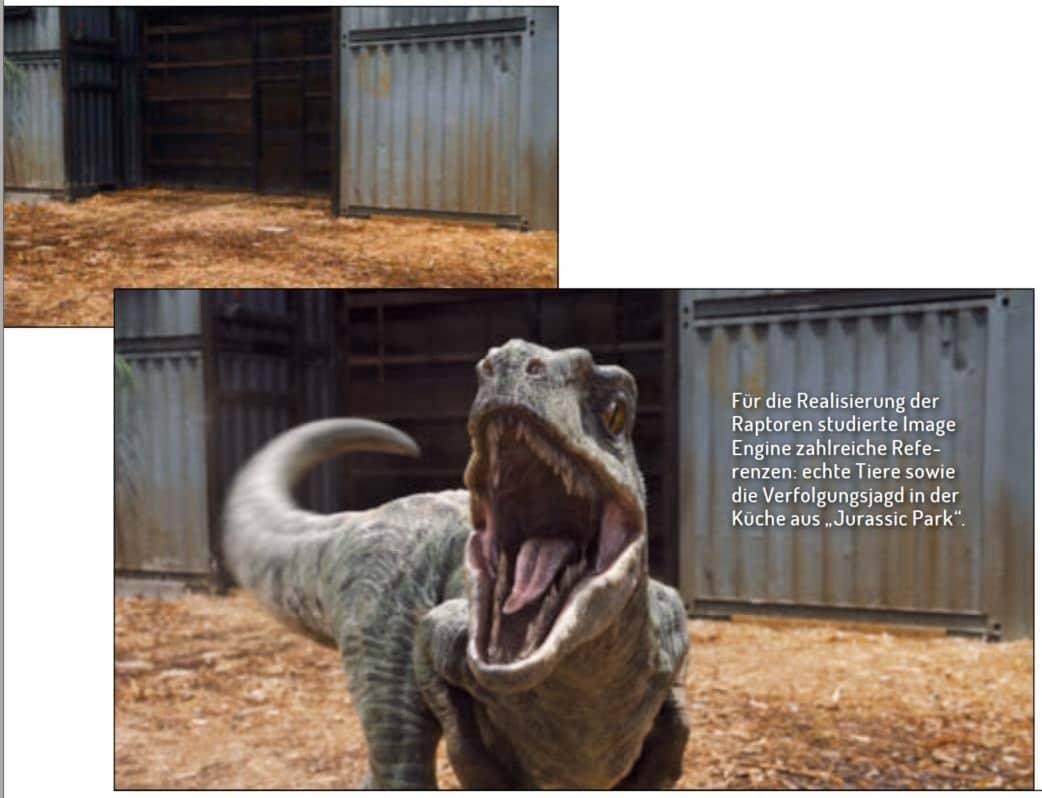
As with “Jurassic Park”, ILM was of course the studio responsible. The team was supported by Image Engine, Hybride and Ghost VFX, among others. A good twenty years later, CG dinosaurs were once again drawing audiences to cinemas in their droves: With 208 million on its first opening weekend, the film achieved the best box office result of all time and even surpassed “The Avengers”.
During filming, real dinosaur models were used as references – primarily the heads of the animals with which the actors interacted. These were created by Legacy Effects, which was founded more than twenty years ago by “Jurassic Park” artist Stan Winston. While numerous animatronics were used in “Jurassic Park”, only one was used in “Jurassic World”, in the scene with the dying Apatosaurus. This was used as a tribute to Winston’s special effects artistry; Legacy created this giant animatronic in an elaborate process lasting around three months. The optimal lighting and texture references provided by the animatronics in “Jurassic Park” are one of the main reasons why the effects of the 22-year-old film are still convincing today – in comparison with other works from the time.
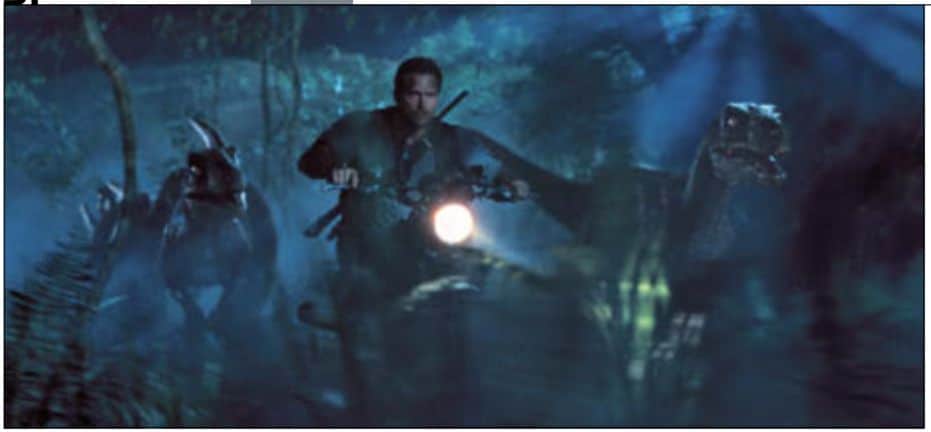
Image Engine from Vancouver created around 280 VFX shots for “Jurassic World”, 200 of which were shots with the four raptors Blue, Charlie, Delta and Echo. Owen Grady (Chris Pratt) trains the velociraptors in the film by conditioning them; they are around 4 metres long and 2 metres high. There is no palaeontological evidence that these animals once actually existed in this size. The depiction of them as highly intelligent hunting animals is also controversial at best. Image Engine realised the arena scenes with the training of the animals, the scenes in which their heads are in the fixation of the boxes and the chase in the jungle, in which the team also implemented the CG environment. Image Engine also helped ILM with the raptors in the final fight scene. In total, 120 Image Engine artists worked on the project for almost 11 months. The animation of the raptors in particular was very complex due to the many small nuances in the movement that were required for the realism of the dinosaurs. VFX supervisor Martyn Culpitt from Image Engine told us about the work on “Jurassic World” and revealed how the legendary VFX print of “Jurassic Park” influenced the team’s work.
DP: How did you come to work on the dinosaur project?
Martyn Culpitt: We’ve worked with ILM on a few feature films before, most recently on “Teenage Mutant Hero Turtles”. ILM asked me to be the VFX supervisor for Image Engine on “Jurassic World”. As “Jurassic Park” is one of my favourite films, I was very excited to be involved.
DP: What was your pipeline like for a project of this scale?
Martyn Culpitt: Our pipeline has been around for a while and we work on it continuously. So we didn’t have to rebuild anything for “Jurassic World”. Our in-house, self-developed asset system called Jabuka allowed us to track all assets through every department, which is absolutely necessary for a project of this size in order to work efficiently. For Jurassic World, we used a lot of bundles in Jabuka so we could track all the assets and files used in a shot and make sure all the data was correct throughout the shot process. This allowed us to work efficiently and keep the project on track.
DP: What other tools were there?
Martyn Culpitt: We also used Shotgun for our dailies, shot details and production. We built our pipeline so that we could pull a lot of information from the database. Another tool that is important for our workflow was built by the lighting department: the node-based lighting tool Caribou. Before “Jurassic World”, we had already tested it in an early beta version on projects, and this is the first time we have used it in a full version. Caribou is based on our open source project Gaffer, which was started by John Haddon; David Minor developed it into a Maya plug-in together with our R&D team. This enabled us to manage full CG environments, characters, effects and props in the complex lighting scenes incredibly well. With Caribou, the lighting of the full CG shots was much faster and we were able to transfer templates to shots much more easily. The R&D team spent a lot of time optimising the lighting workflow, which gave the artists a lot of freedom to be creative.
DP: Did you exchange assets with ILM?
Martyn Culpitt: ILM gave us a lot of assets: The raptor models and textures, the Apatosaurus as well as a bunch of foliage and lots of other bits and pieces. We adapted our shaders to match those of the ILM models. The raptors in particular often changed their look and characteristics during the course of the project, including the models and textures. Every time ILM gave us updates, we also had to update our scenes. ILM has a very strict naming and texturing convention; we used scripts to adapt our workflow to their specifications so that the exchange went smoothly.
DP: Did you also work on shots with other studios?
Martyn Culpitt: Hybride did some of the backgrounds that we used the raptors in. In a few scenes we also used holograms of Hybride, which we layered over the raptors – the studio sent us various layers and nuke scripts to help us put them together.
DP: How important was the look of “Jurassic Park” for you? What specific references did you use?
Martyn Culpitt: The first “Jurassic Park” film was the first stop in collecting references. We kept comparing our work to certain key scenes from the old film to make sure we matched the cinematic tension and movement of the dinosaurs from the original. We used the herd behaviour of the Gallimimus dinosaurs in the original as a benchmark for our Gallimimus shot. The scene in “Jurassic Park” when the raptors chase the children through the kitchen and entrance area was our reference for the posing of the raptors in the training arena. we watched “Jurassic Park 2 and 3” once for inspiration, but didn’t use either scene as a reference.
DP: How did you go about creating the raptors?
Martyn Culpitt: In terms of the physicality and locomotion of the raptors, Director Colin Trevorrow and ILM Animation Supervisor Glen McIntosh were very keen to make the dinos look believable and our team used animals from the real world as a guideline: For the leg movement we mainly studied ostriches and emus, from lions and tigers we adapted the predatory behaviour and for alligators, lizards and ravens the focus was on specific characteristics such as head movements, jaw snapping, eye blinking and tail movements. From a performance point of view, the shots with the training of the animals in the arena were complex, because we had to show that the raptors were vicious and scary, but at the same time thoughtful and intelligent. It was also the first time the raptors were shown on film, so we wanted to portray their characters properly and not make them look like just any four dinosaurs. We found that for their performance, less is more and the emotions could not be exaggerated. Videos of animals fighting and stalking provided a solid foundation as a guide – lions in particular, when they just stand and stare at their prey before attacking, are hugely intimidating. Capturing this look and the silence before the attack for the raptors helped to create the tension and emotion for the sequence.
DP: How was motion capture used for the animals?
Martyn Culpitt: With motion capture, we captured the beat of the story from each shot; the footage helped us find the shot composition and general movement. The motion capture data was great as a first blocking pass – it gave us a complete sequence quickly and ensured we could tell the story to the director’s vision before we started the time-consuming work on the final animation. This saved a lot of time. The biggest challenge with this approach, however, was to transfer the motion capture data with the movements of humans to a raptor with its size, weight and speed and to adapt the data to an extreme degree. The numerous animal references helped with the development of the movement, after which we spent a lot of time giving each individual raptor its thinking, intelligence and specific character traits. Once we had a lock on the animation, we added the muscles, skin sliding and the trembling of the muscles and tendons, which was crucial for the animalistic features and realism of the creature.
DP: How did the lighting and compositing for the raptors work?
Martyn Culpitt: These steps played a big part in the realism of the animals. We worked out the details of the raptors very finely and also added lots of subtle FX elements to the environment such as dust, flying bugs, wood shavings and dirt. Sometimes the original plates didn’t make the raptors really stand out because they were very well lit. In these cases, we adjusted the lighting of the VFX shots so that it differed from the lighting of the real plates – so it usually looked much better.
DP: Which set extension was the most complicated for you and why?
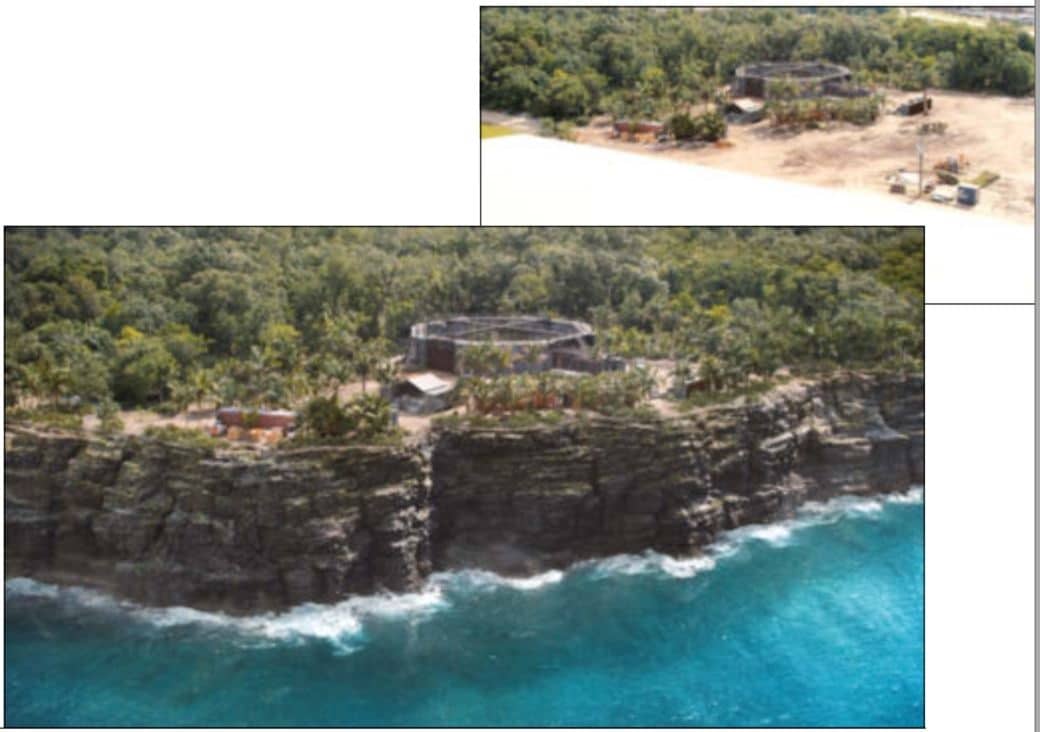
Martyn Culpitt: Adding the jungle to the plates was the most challenging because the CG plants had to integrate seamlessly with the real ones, as did the other aspects of the environment such as fog, volumes and light beams. We invested a lot of time in the look development of the CG plants and their ambient lighting to ensure they matched the filmed plants in the plate. The full CG environments were also complicated, but once we had nailed the look of the filmed plates, the full CG shots were quite easy to create. One of our biggest concerns was that we would have to simulate thousands of leaves individually as the raptors passed through, so we thought carefully about how to proceed beforehand – simulating all the leaves per raptor was not an option.
DP: What did you do?
Martyn Culpitt: We ended up with a library solution with pre-simulated plants: Each had different directions of impact to the left or right side, in the centre, upwards, or the whole plant was moved. We simulated the plants for longer than necessary, so we could change the timing in the scene and achieve many variations. We first created complete jungle layouts for the shots with all the plants we needed in the scene. Then we replaced the static plants with the simulated ones based on the walk path of the raptor animation. A few times the same plant interacted with two raptors, which we then simulated completely. We also replaced plants that were very close to the camera with fully simulated ones. As we were able to use the same simulation for some plants, this saved a lot of time and memory.
DP: Which tool did you use to generate the 3D plant models?
Martyn Culpitt: Most of the plant models started with Speedtree, then we modified them and refined the look development and modelling to make them all look the way we needed them to. ILM gave us some leaf assets, but as they had to match the movements of the raptors, we recreated and rigged them. For the layout of the scene, we used a custom-built flexible system that reads complex assets, creates a preview of them and uses very little cache in Maya. The plant models had a size between 50,000 and 200,000 polygons, the trees even had up to half a million polygons. Our system allows us to preview these assets with a lot of additional information as full geometry, proxy models or simply as bounding boxes. This makes it easier for us to organise sets with over 10,000 plants while still being able to see fine details. The set can either be populated using Python tools or manually with the preview caches. The transformation values and the links to the associated assets are stored in a reference file, which only instantiates the high-resolution assets during rendering.
DP: How big was the jungle file in the end?
Martyn Culpitt: The base data wasn’t particularly large because we often duplicated the same plants, which was partly to do with how our layout system works. In total we had about 20 to 30 different plants including trees, lianas, plants and grass clumps. The texture data was also small because a relatively low resolution was sufficient and we decided against working with Mari for this reason. The final layout was very large, but the possibility of instantiation allowed us to reduce the amount of memory required for the render.
DP: How did you texturise and shade to achieve a realistic natural look?
Martyn Culpitt: We tried to be clever during the look development as we didn’t have any special tools to realise this. The entire jungle had a standardised look development with one shader and the same texture library. The jungle setup was based on an exact structure arrangement of the plants, naming convention of the objects and creation of the UVs so that we could place the correct texture and shader. We calibrated all the plant textures together, so there was no discrepancy when using different plant models. The management of the jungle was very straightforward, we didn’t have any significant extra work in terms of textures or shaders. The lighting of the night situation in particular ensured that we didn’t have to be overly careful when texturing and shading. We also used the same setup in some of the daytime shots and it worked reasonably well there too.
DP: How was the jungle lit?
Martyn Culpitt: The lighting was created with a normal environment HDRI setup and additional lights with gobos. Numerous spotlights placed in the scene created beams of light that shone through the leaves. It was a mix of actual geo shadows and texture gobos. We also created lights just for the guidance of the fog. In cases where the character key light didn’t work in the fog, we duplicated it and adjusted it to make the fog and light beams look better. We had a lot of plate references – but it took us a long time to hit them in the look development scenes, which we could then hand over to the lighting artists to adapt their specific shots.
DP: Which VFX scene was the most challenging and why?
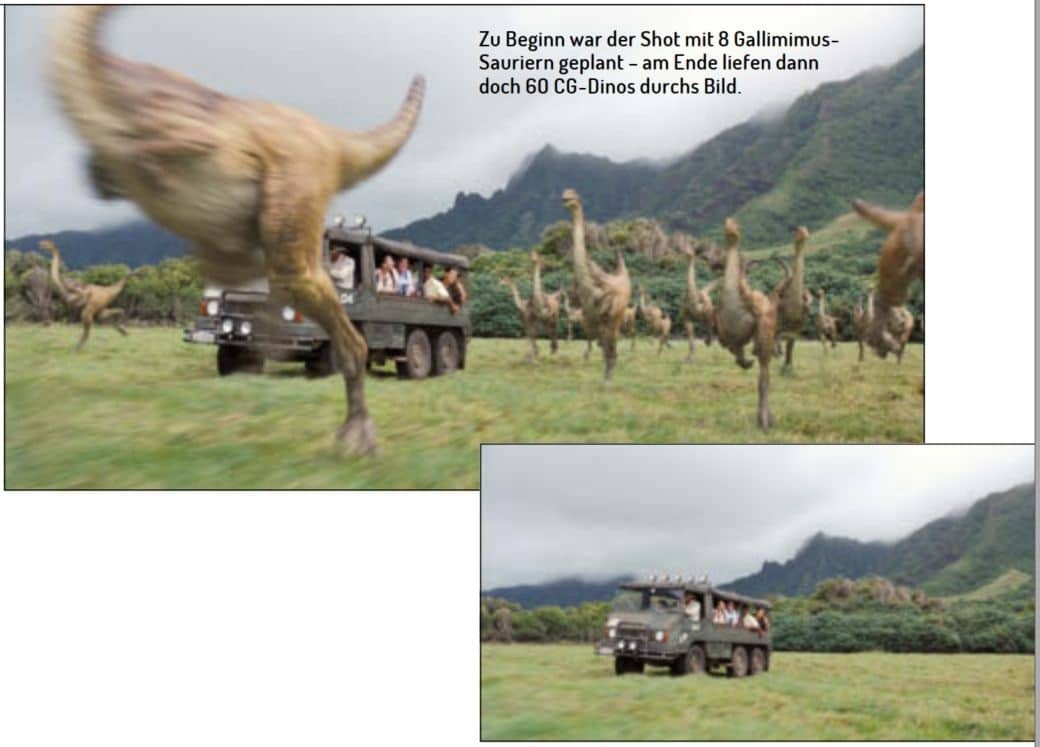
Martyn Culpitt: A difficult scene was the Gallimimus shot for a variety of reasons. This shot was one of the first we worked on and also one of the last. The main reason for this was because we initially assumed that there would only be eight to ten characters. During production, however, there were more and more and in the end there were 60 dinosaurs running through the picture. If we had known at the beginning that there would be such a large number, we would have approached the shot differently, for example with a crowd tool. But as we had started the shot with keyframe animation, we simply increased the number of characters with each revision and adapted our layout and the animation to the higher number accordingly. From a rendering point of view, the shot was complex due to its length and extremely many layers – every single Gallimimus dino with its associated effects including stereo conversion – and fast iterations were time-consuming.
DP: There are also a few mutated animals in the film. Where did the inspiration for these come from?
Martyn Culpitt: Before we could start work, we had to decide what they would look like. I developed some interesting concept ideas with our concept artist Rob Jensen, which we showed to the director and ILM. These were then used to finalise the look. For the mutated animals, the team shot real animals, we just augmented and edited them in the plate: Fur on one, one arm to another or another tail. Only the snake was a full CG replacement, as it has two heads. In terms of animation, we only had to orientate ourselves on the real models, so the animation work was manageable.
Links
– Imagine Engine Studio Tour
– Jurassic World Breakdown Reel


