Table of Contents Show
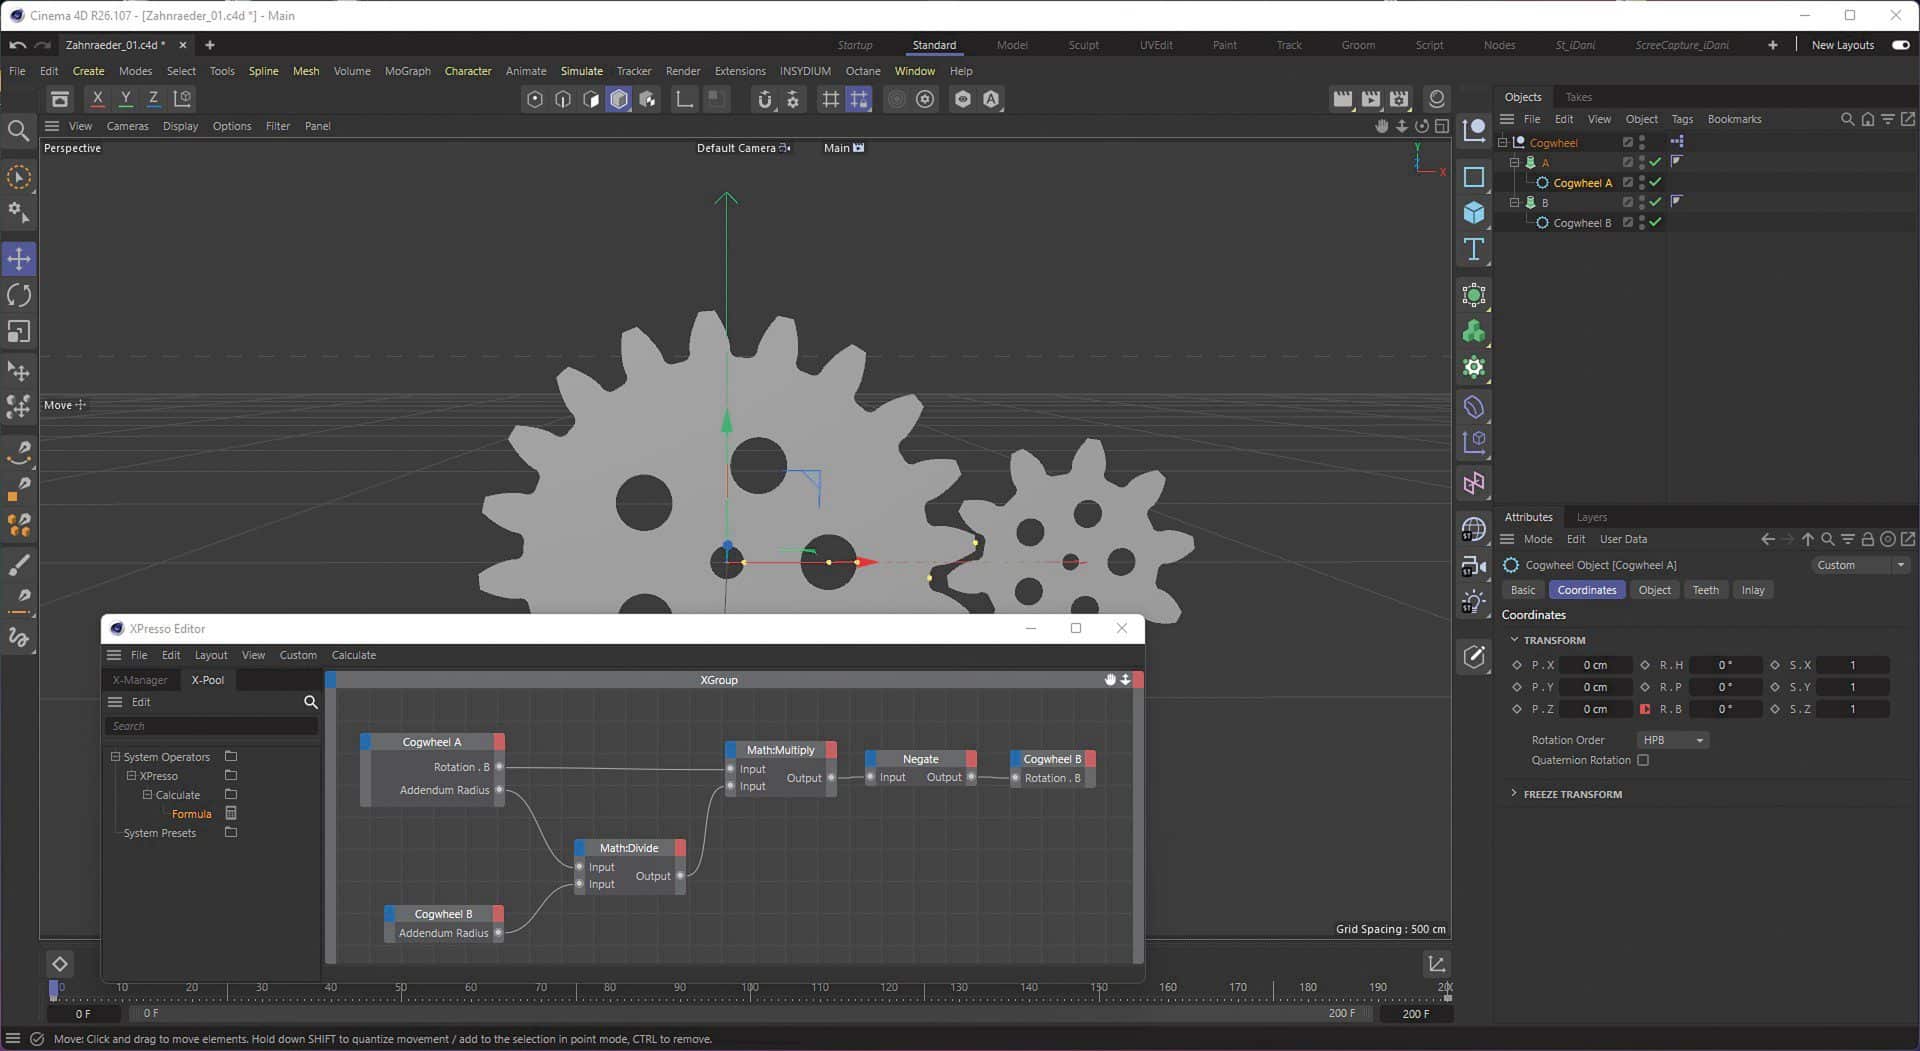
With XPresso, small setups and complex processes can be significantly simplified. XPresso really comes into its own when it comes to the technical animation of entire machines, for example. For example, by setting 2 keyframes, you can specify a machine cycle and align/animate all other machine parts to this cycle without ending up with a timeline full of confusing keyframes – and when you want to change the speed/cycle, chaos breaks out. Here it helps to simply change the beat in the XPresso circuit and everything is automatically transferred to the other areas of the machine. Even turning a car tyre when moving the car from left to right, for example, is no problem with XPresso.

Road Generator
If you often have to stage cars, you usually need a road. But roads are very different. You can imagine a simple country road, or perhaps even a multi-lane motorway, or maybe there is a specification from a customer. Here it is helpful if you can simply click together such a road or motorway and also design the course of the road according to your own ideas.
Application in everyday life
As mentioned, XPresso helps enormously with small circuits, especially for technical animations, e.g. to animate a tyre or 2 gear wheels at the correct rotation/speed. It is even possible to assemble individual strings for a formula effector, for example, which can then be quickly varied with specific user data. For example, you can address a specific ID range for a clone object with a formula effector and define this ID range using XPresso. This is particularly helpful if you have many clones with this ID range in your scene so that you don’t have to set each clone individually.
You can do this too!
As XPresso is a node-based system, very simple circuits can be assembled/programmed in XPresso without writing a single line of code. It is simple, quick to understand and easy to learn. You can find many tutorials on Cinema 4D and XPresso on YouTube if you want to learn more about it. Here are a few examples: Maxon’s Cineversity (bit.ly/cineversity), Rocketlasso (bit.ly/rocketlasso) and of course at ExpressoMechanicTV (bit.ly/expresso_mechanic). But let’s start from the beginning.
First steps
Math Node and Rangemapper are “king”. These two nodes are the most frequently used nodes. The Math Node can be used to perform simple calculations such as adding, subtracting, dividing and multiplying. The Rangemapper is a real power tool. It can be used, for example, to apply a percentage slider to a rotation. If you move the slider from 0-100 per cent, for example, a tyre can rotate once through 360 degrees. The conversion can even be controlled via a spline curve and the Rangemapper also has a module function.

Object hierarchy
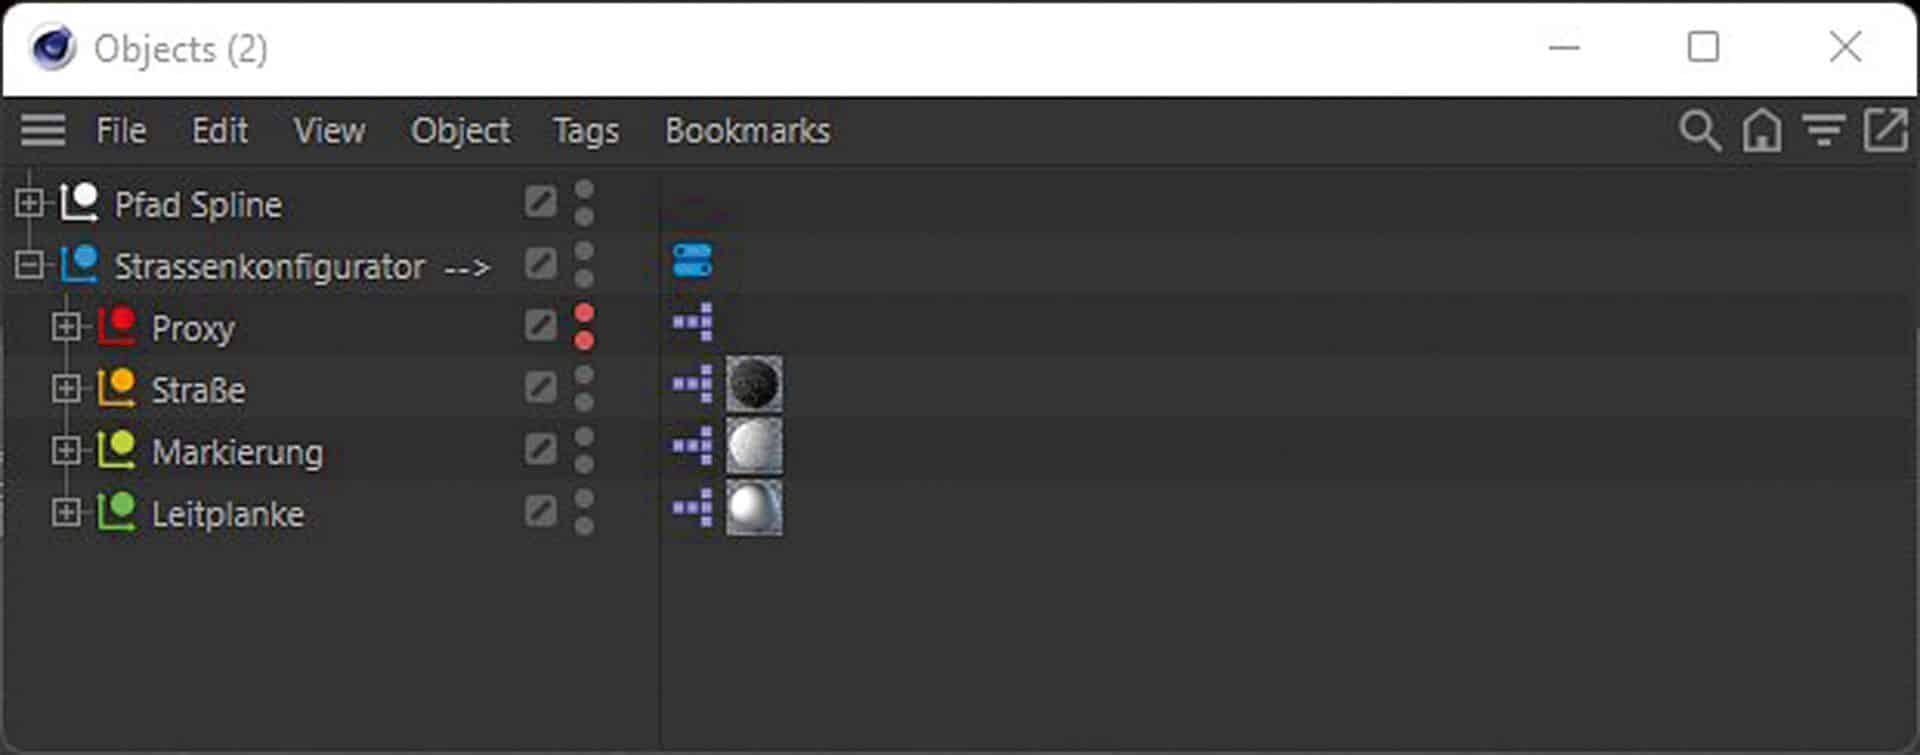
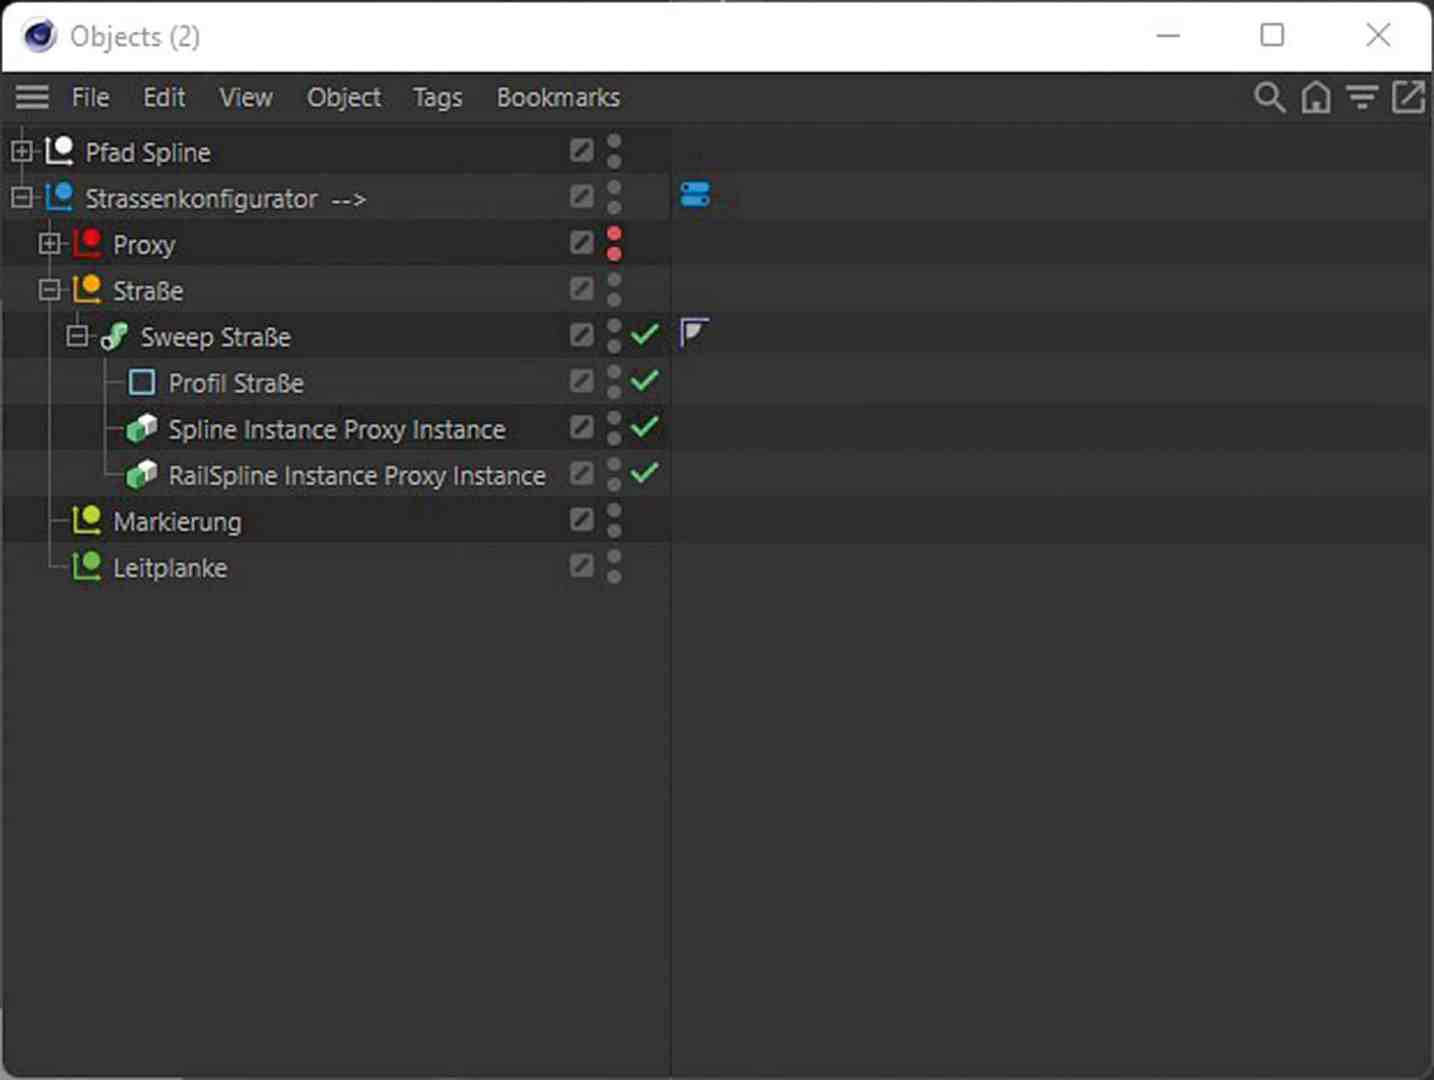
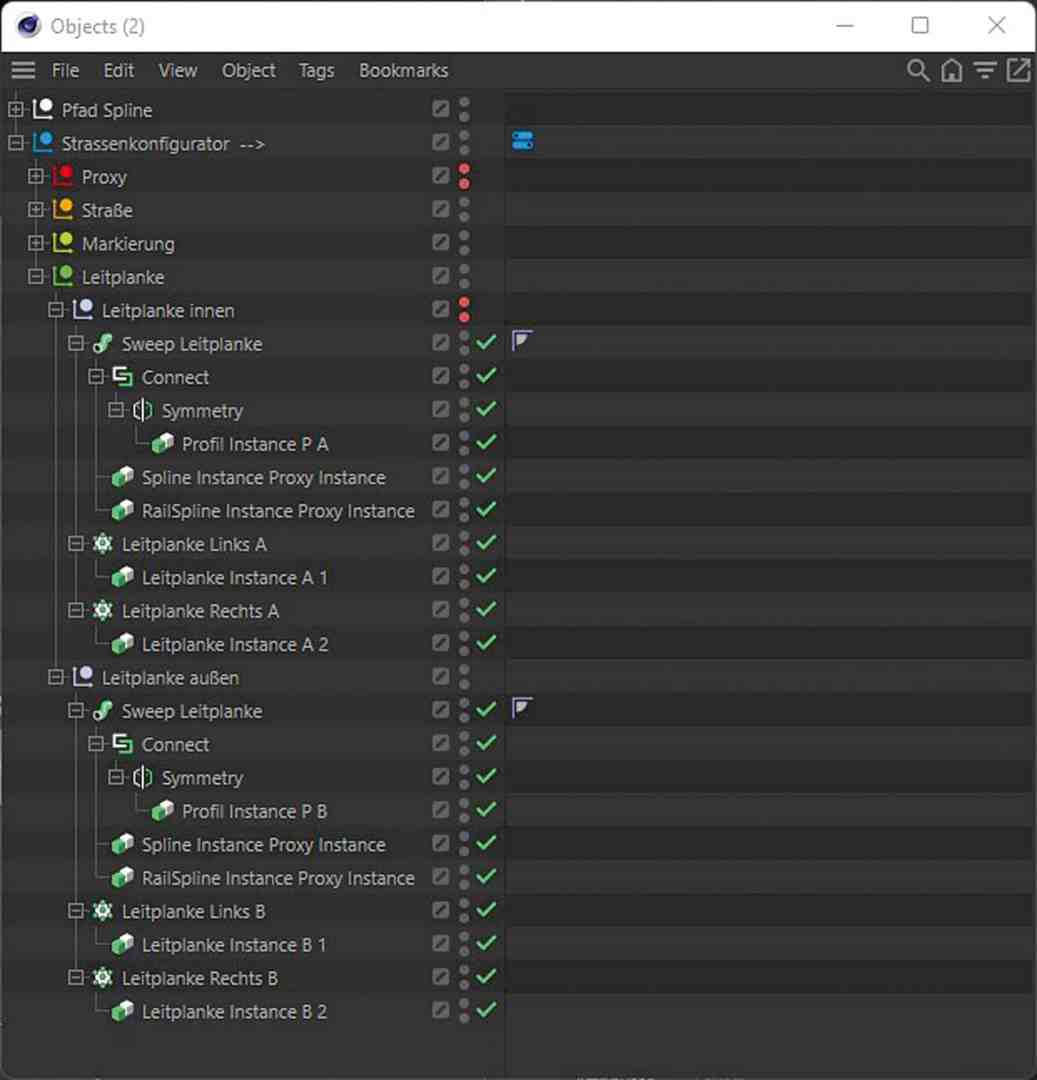
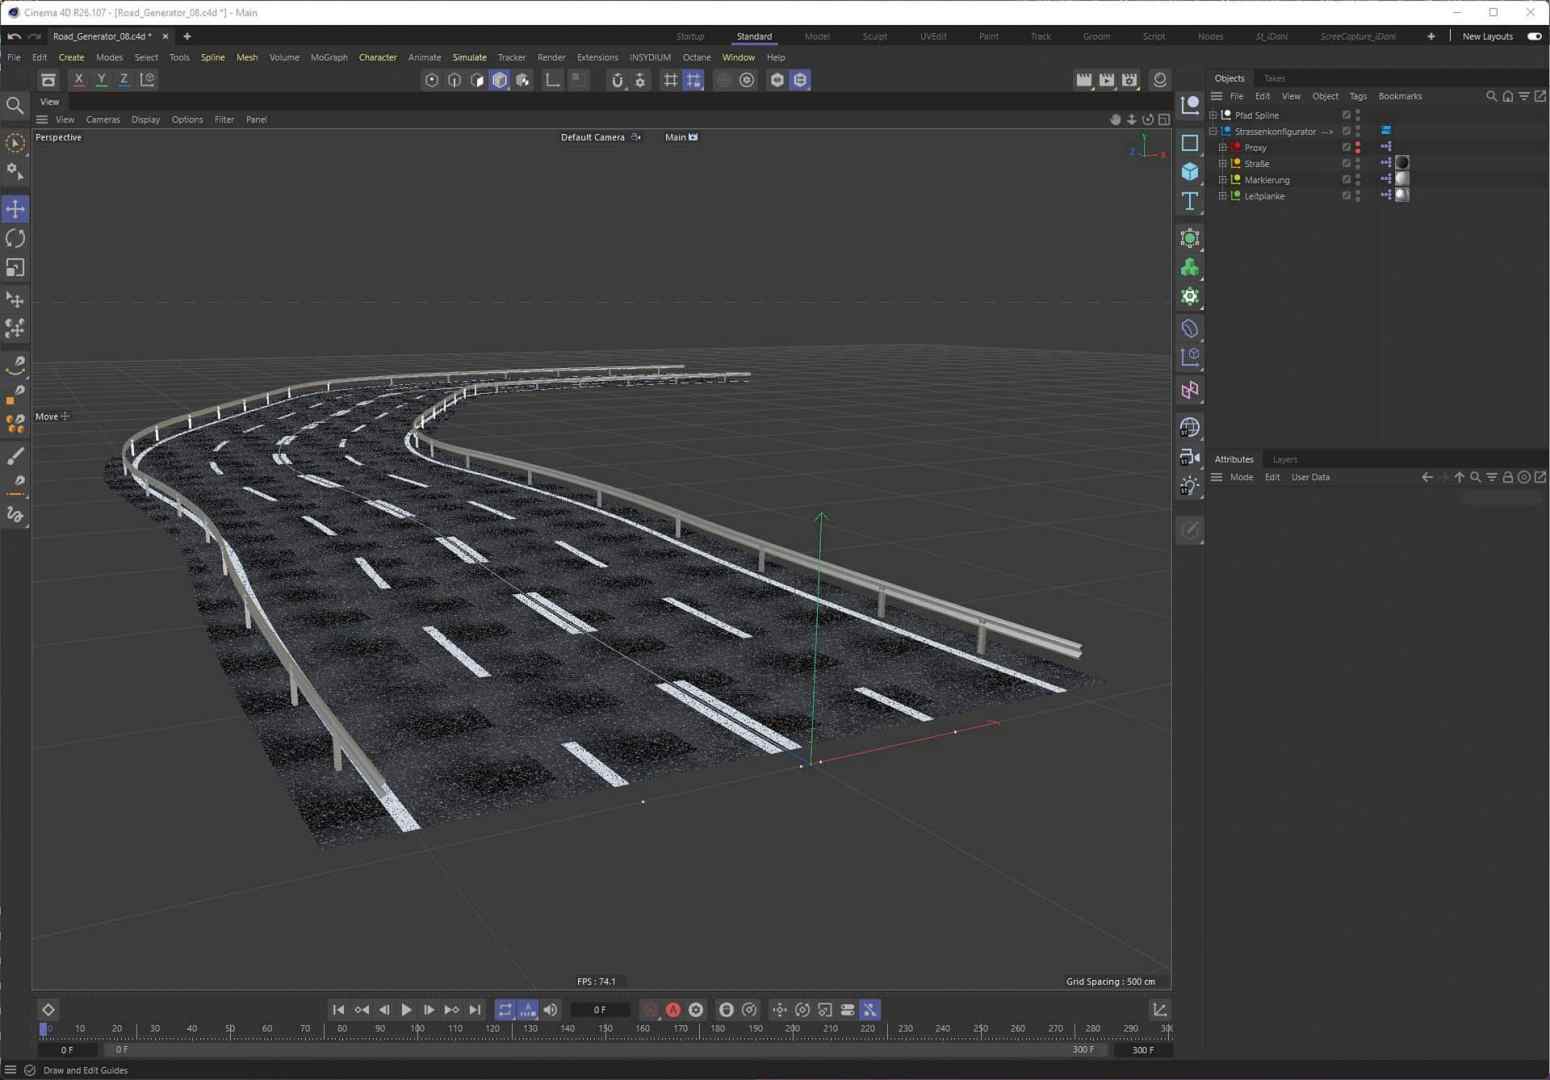
Firstly, we create an object hierarchy from null objects. We name the main null object Street Configurator. Under this null object we create 4 further null objects with the names Proxy, Road, Marking and Guardrail.
User data
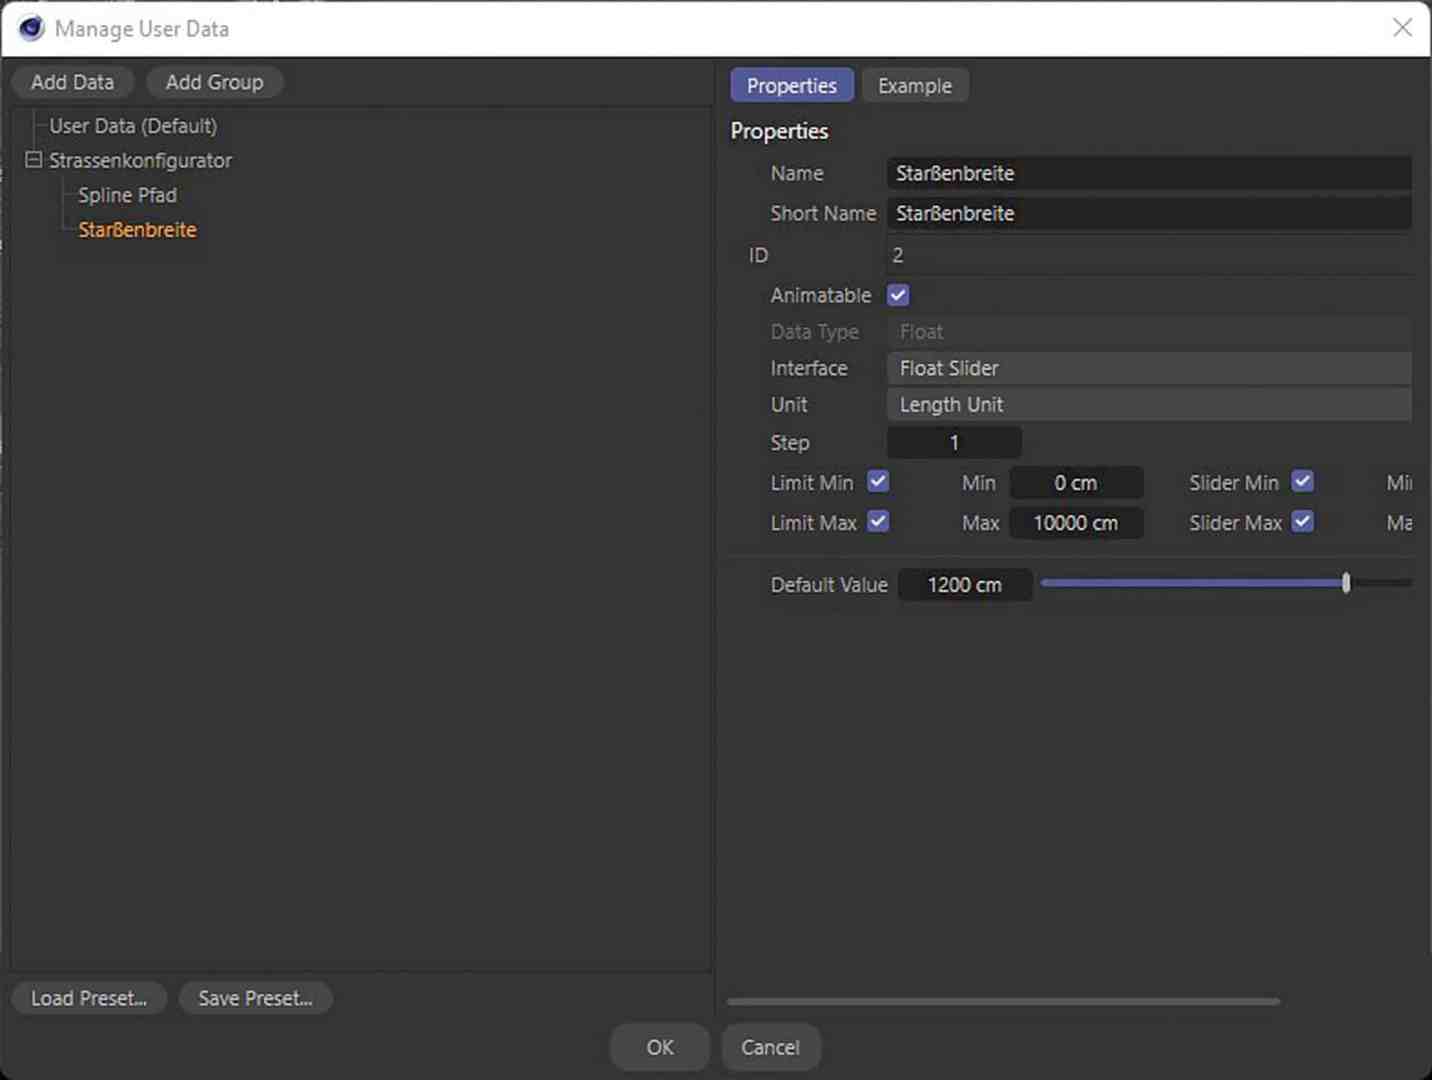
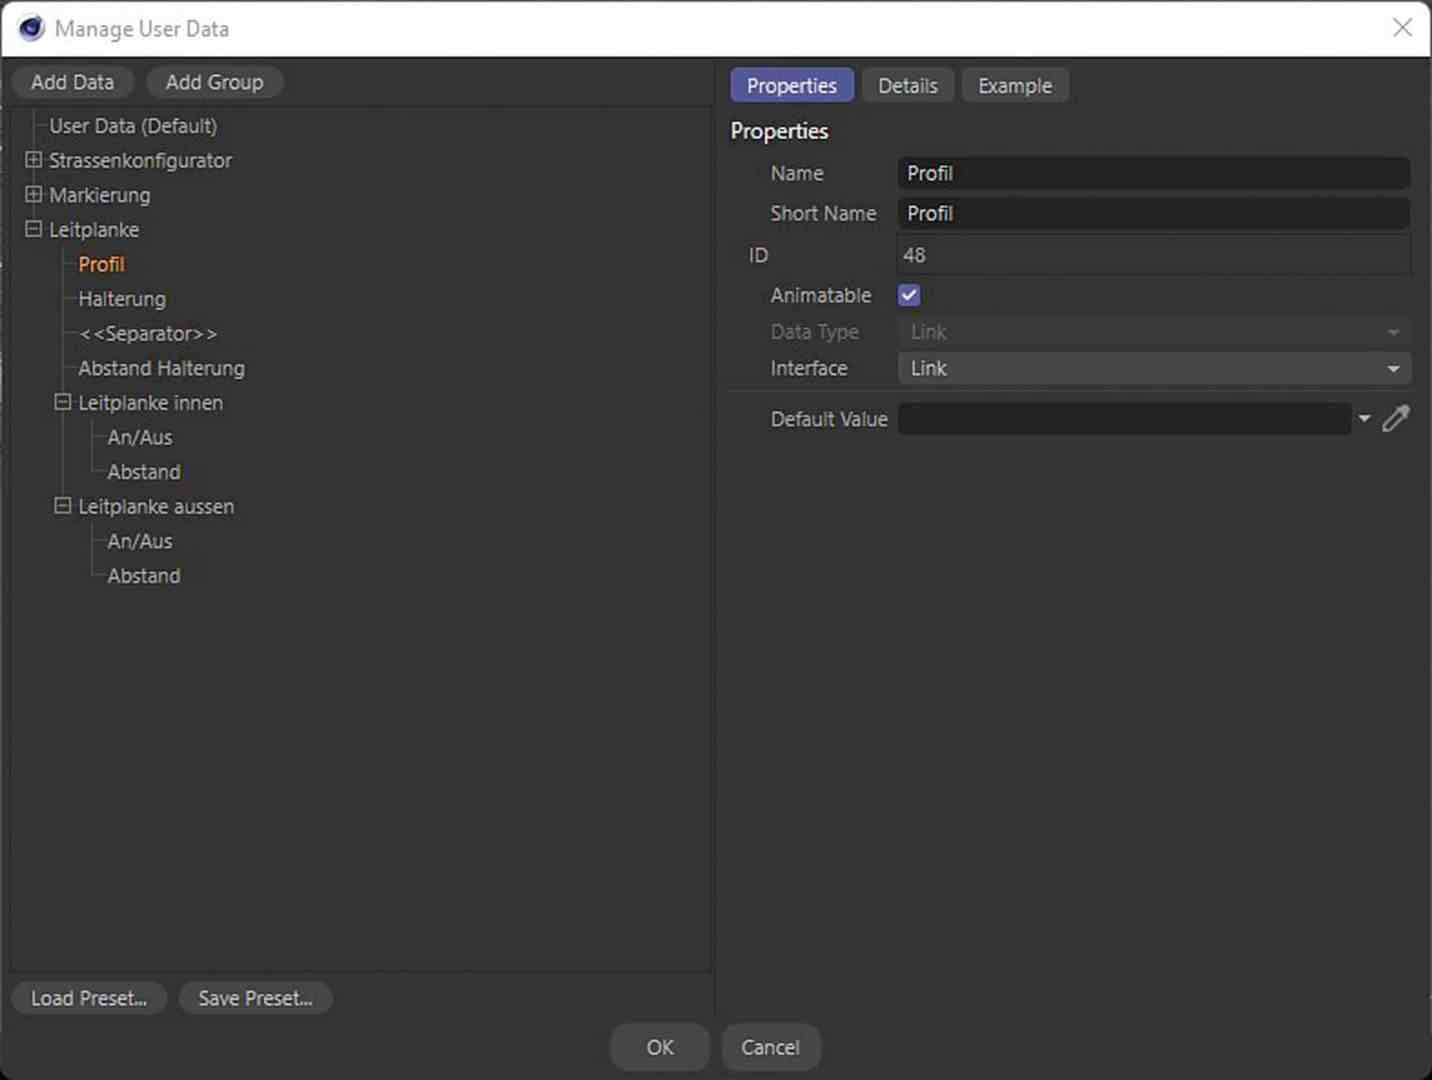
Next, we create a user data tag on our main null object Road configurator. The menu item Add user data takes us to the user data menu where we can create the data/slider we need for our small road configurator. Here we can create groups/tabs, sliders, selection boxes, dropdowns and so on according to our needs. We need a whole series of groups and sliders for our street configurator. First, we create a group (road configurator), where we create a link field (spline path) to define which spline we want to use for the road, and a slider (road width) to define how wide our road should be. We set the unit for this slider to “cm”.
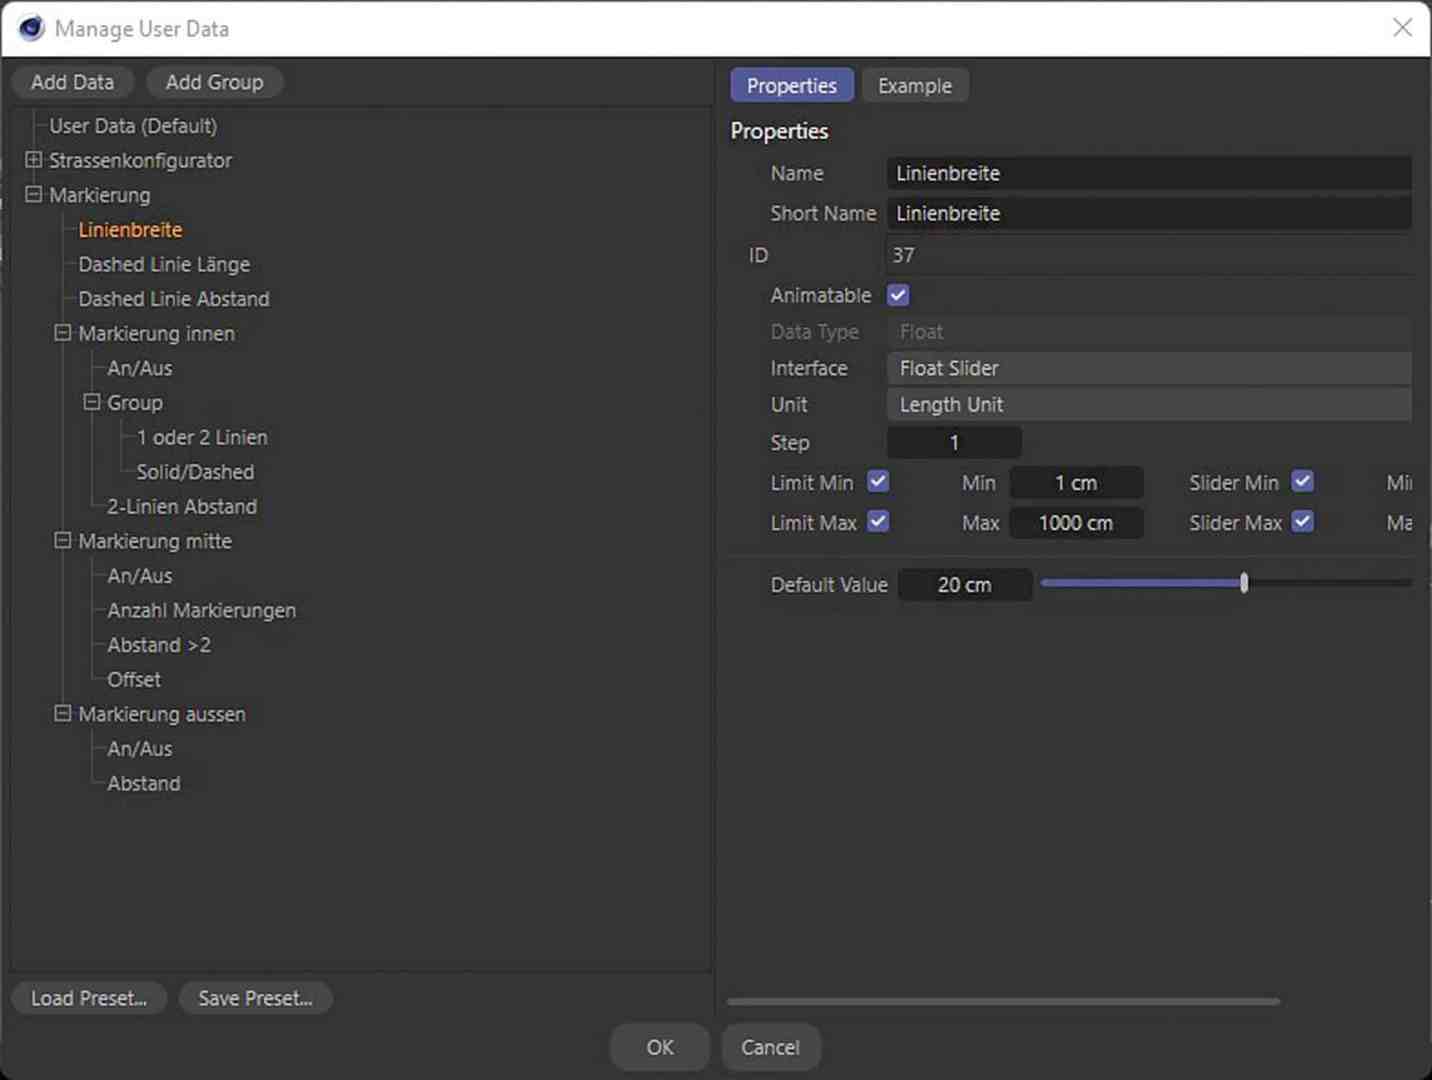
We create a second group with the name “Markings”. In this group, we create three further groups with the names (Marking inside, Marking centre, Marking outside). In each of these groups, we create a checkbox with the value Boolean and name it On/Off so that we can switch off markings that are not required. In the group Marking inside we create another checkbox with the name (1 or 2 lines), as well as a slider with the name (2-line distance), in order to be able to set the marking in the centre of the lane according to our wishes. In the second group (centre marking), we create 3 sliders with the name (number of markings, distance >2 and offset). In the third group (markings outside) we create a slider with the name (distance) to be able to adjust our lines to the road width.
We create a third group with the name (guardrail). Here we create 2 link fields with the name (guardrail profile and guardrail bracket) so that we can assign our guardrail spline and the bracket
and can easily exchange them. We also need a slider with the
Name (distance guardrail bracket) to be able to set the distances again according to our needs. Then we create 2 further subgroups with the names crash barrier inside and crash barrier outside. For both groups, we again create an (On/Off) Boolean checkbox and a slider with the name Distance. Now your finished user data should look something like this:
Objects
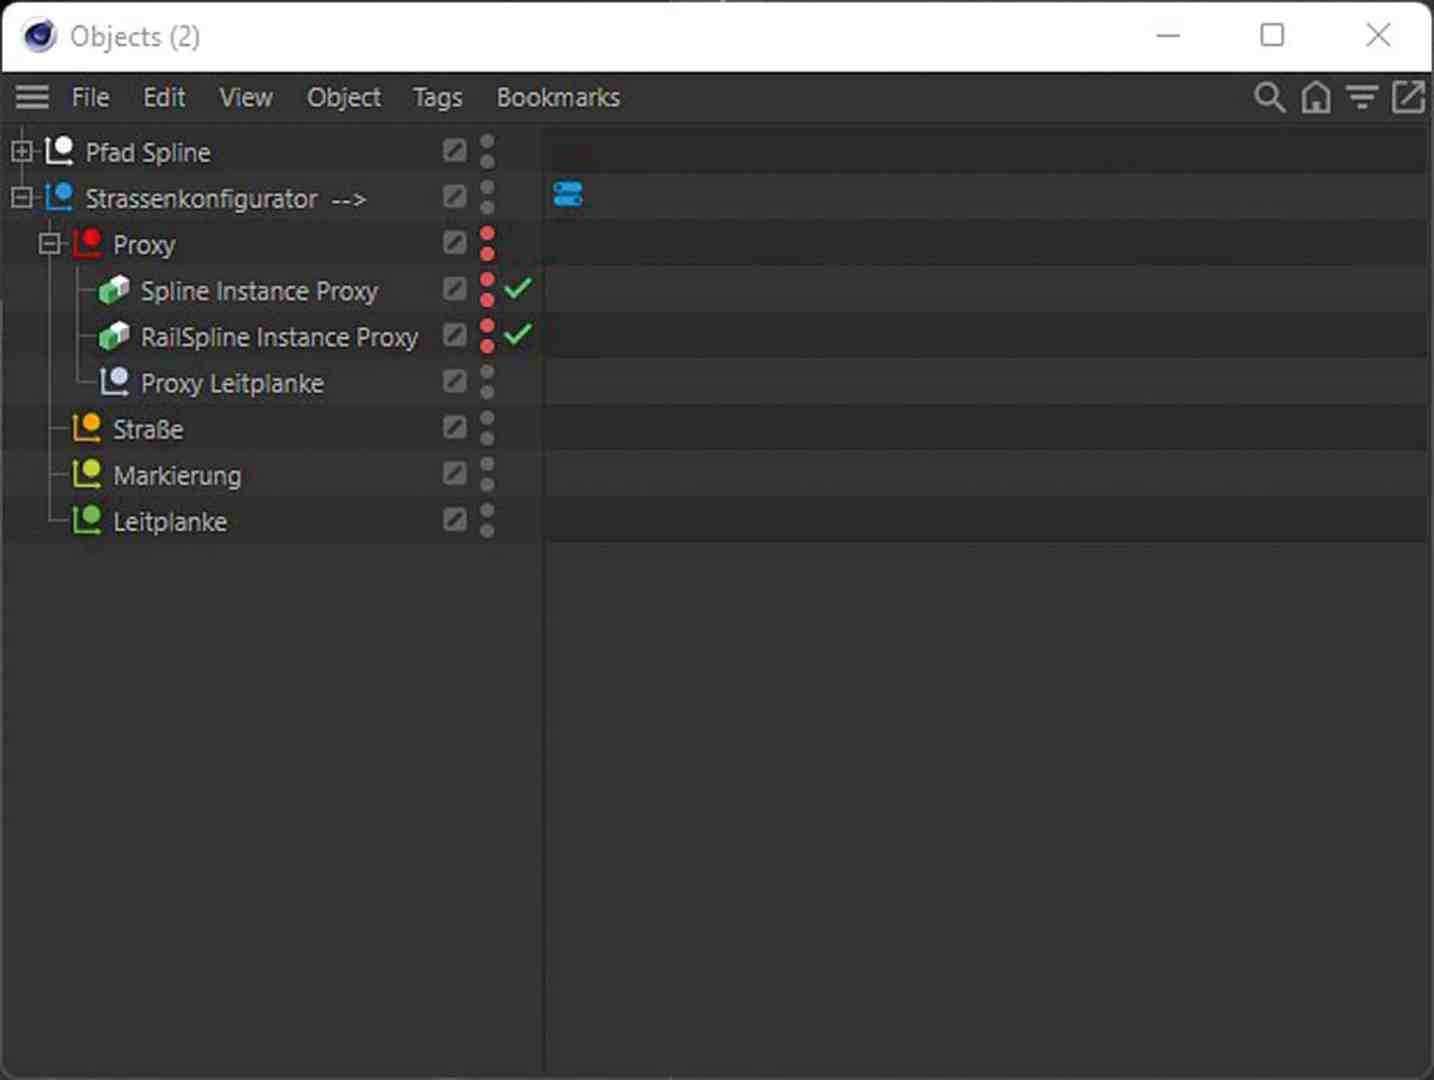
Next, we create the objects we need for the road configurator. To do this, we first draw a spline to represent the course of our road in the top view. From this spline, we create an instance and another instance for our rail spline. We move the instance of our rail spline by approx. 5000 cm in the Y-axis, switch the rail spline to “not visible” and move both instances in the hierarchy under the proxy null object.
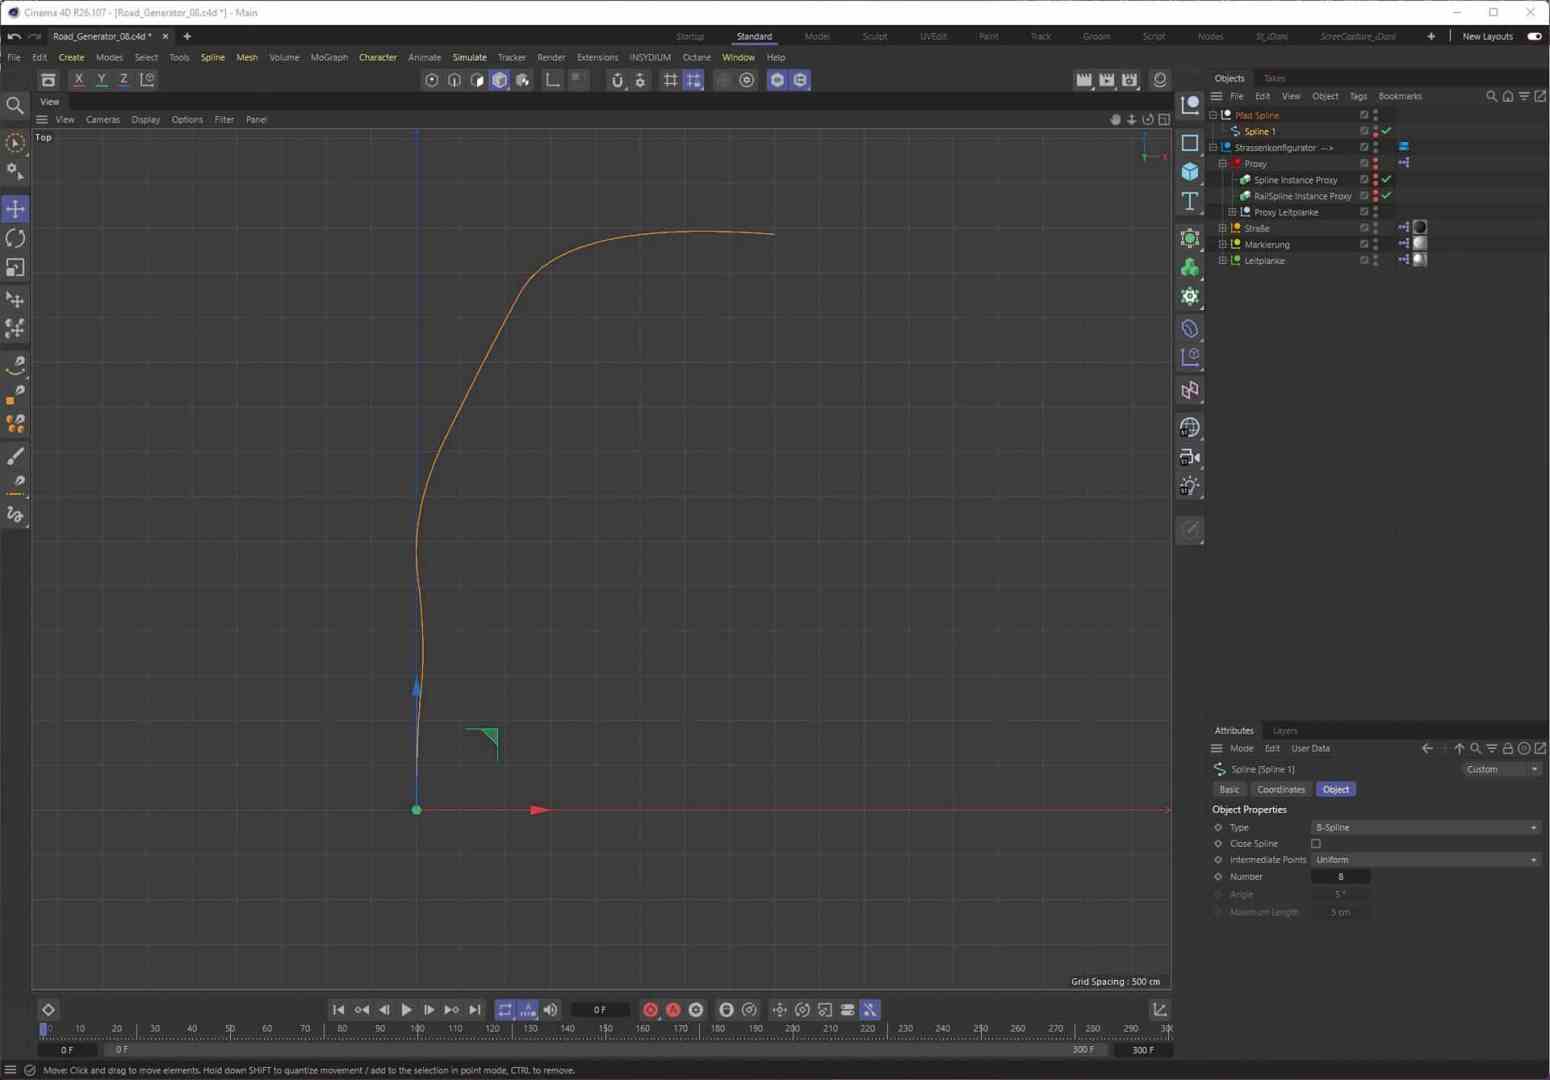
Under the proxy null, we create another null object with the name Proxy guardrail for the objects and/or splines that we want to use for our guardrail. Here we create a profile spline. Now we need a support for the crash barrier. We create an H-spline and assign it to an Extrude-Nurbs.
Then we create a sweep object under the road null. We assign a rectangle spline with a width of approx. 1200 cm and a height of 0.1 cm to this sweep. We create another instance of our path spline instance and assign it to the sweep, as well as another instance of our rail spline instance. We need the multiple instances of the splines so that it is easier to exchange our path splines later.
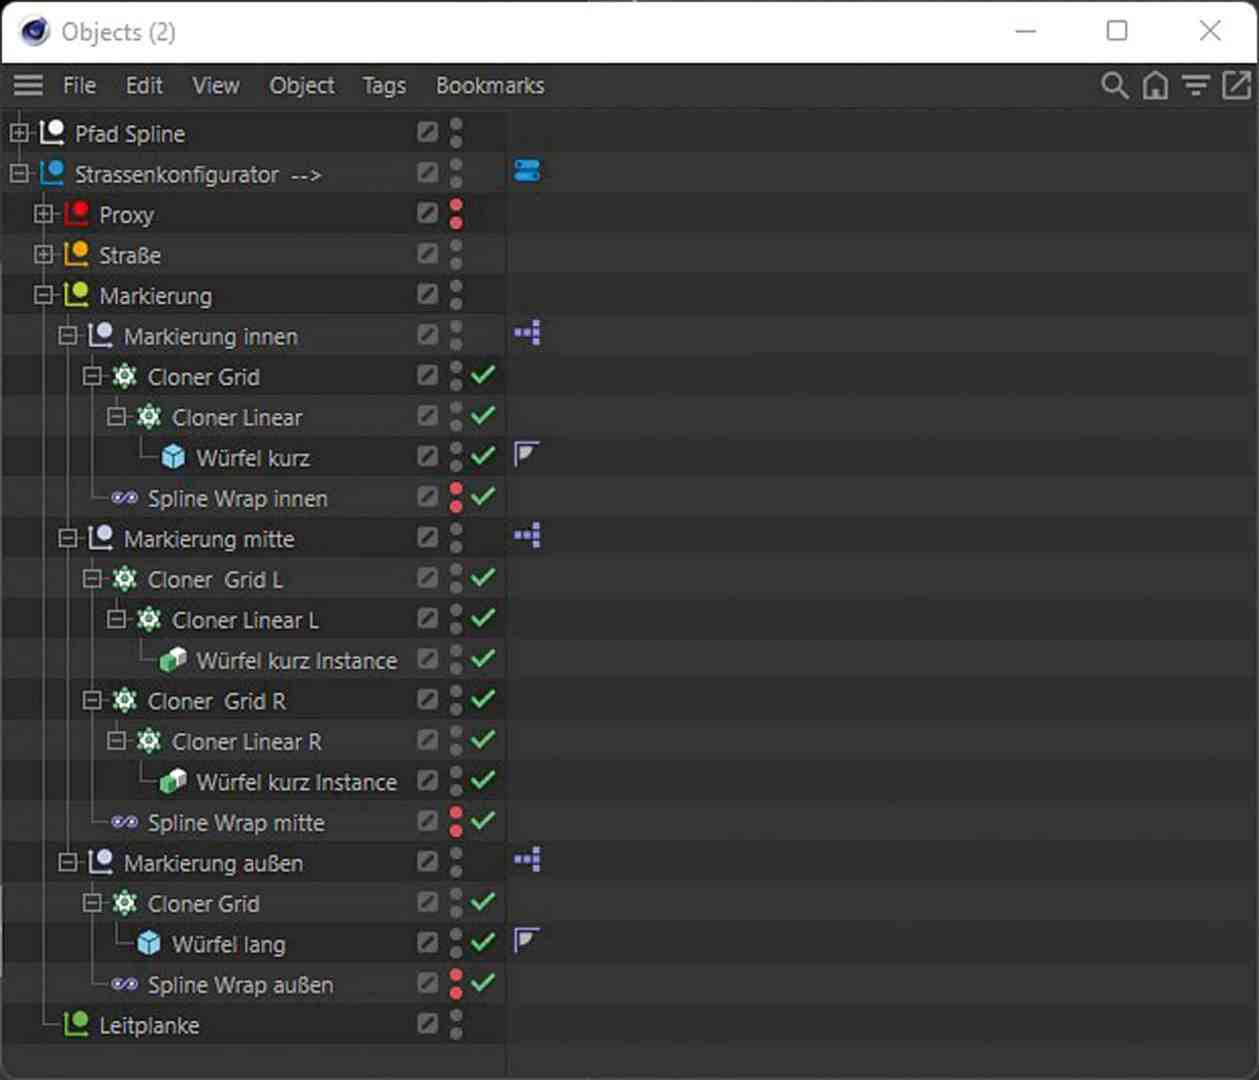
Now we go to the markings: Here we create a null object with the name Marking inside and below it a cube with a width of approx. 20 cm, a height of 0.5 cm and a depth of 1000 cm as well as 10 subdivisions in the Z direction. We assign this cube to a clone object (Cloner A) with the attributes (Mode: Linear, Number: 15, P.Z: 600 cm). We assign this cloner to another clone object (Cloner B) with the attributes (Mode: Grid, Number: 2/1/1, Size: 30cm/0cm/0cm). On the same hierarchy level in which cloner B is located, we create a spline wrap deformer with the following attributes (Spline: “Our path spline”,
Rail: “Our rail spline instance”, Axis: Z, Mode: Keep Length, End Mode: Clamp).

We copy the null object Marking inside, paste it directly below and rename it to (Marking centre). Here we rename the clone object (cloner A) to cloner A left and copy it directly below and rename the copy to cloner A right. We copy the zero object (marker inside) once again and rename it to marker outside. In the two clone objects, we move the cube one up in the hierarchy and delete clone object Cloner A.

Then we create another null object with the name (inner guardrail) under the guardrail null. Here we assign a Sweep object underneath, a Connect object underneath, a Symetry object underneath and an instance of our guardrail profile Spline underneath. We then assign an instance of the path spline instance and an instance of the RailSpline instance to the sweep in order to generate our guardrail. Under the null object (guardrail inside), we add a clone object with the name (Guardrail Left A) and the values (Mode:Object, Instance Mode: Render Instance and Distribution: Step) for our guardrail support. We create a copy of the clone object and rename it (guardrail right A). We add an instance of our crash barrier support object to both clone objects. Now we copy the complete zero object Guard rail inside and rename it to Guard rail outside. We also rename the corresponding sub-objects with (A) to (B).

XPresso Proxy!
Now we have everything we need to build a road or our XPresso circuit. We create an XPresso tag on each of the three null objects Road, Marker and Guardrail.
We now open the XPresso tag on the Proxy null object. We first drag our user data tag into this. We need the spline path on the output side of the tag. Then we drag our two proxy splines (Spline Instance Proxy and RailSpline Instance Proxy) into the XPresso Editor. For the inputs, we select Reference Object in each case and now connect the output (spline path) with the
Inputs (reference object) of the two spline nodes.
XPresso road
Double-click to open the XPresso tag on our road null object and insert our user data tag again using drag and drop. We then select the (road width) on the initial page. Now we drag in our (profile road) spline and select (width) on the input side and connect the two ports. If we have now done everything correctly, we can use the slider in the user data tag (road width) to set the width of our road.
XPresso markings
We open the XPresso tag on the null object (marker), drag in our user data tag again and add the following ports (line width and dashed line length). Now we drag the object (cube short) into the editor and add the input ports (Size.X and Size.Z). We connect the port (line width) to the port (Size.X) and the port (dashed line length) to the port (Size.Z).
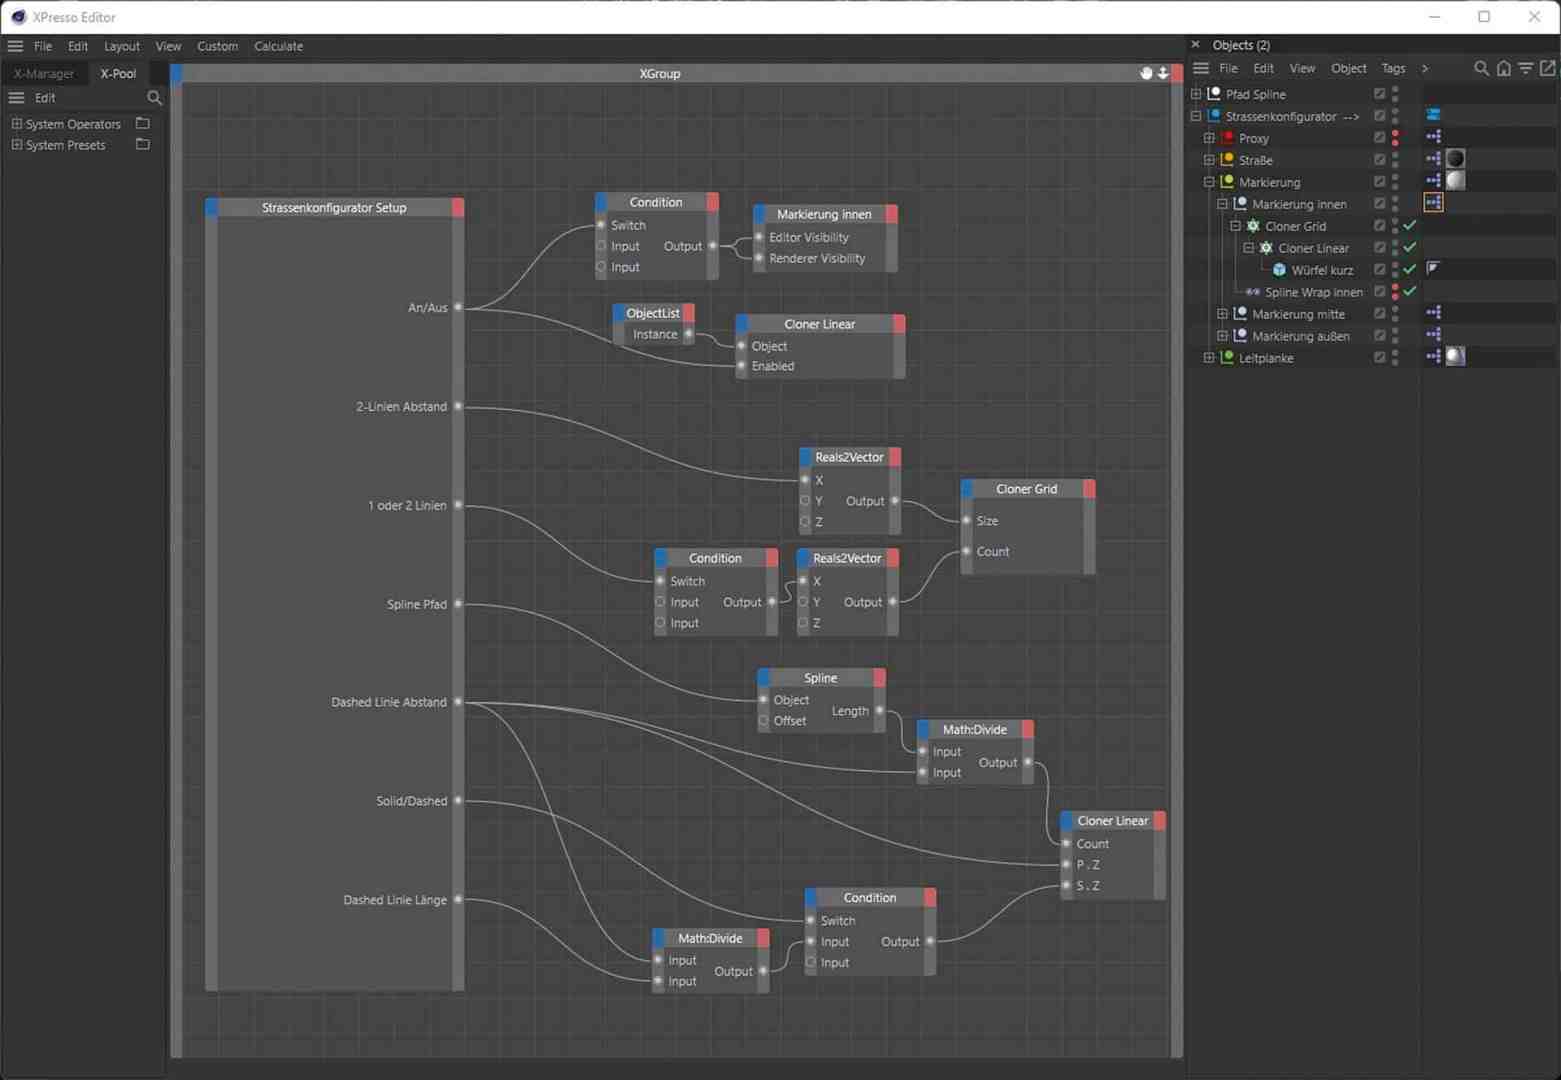
We create another XPresso tag on the null object (marker inside) and open it directly. Here we drag in our user data tag again and add the following ports (On/Off, 2-Line Distance, 1 or 2 Lines, Spline Path, Dashed Line Distance, Solid/Dashed and Dashed Line Length). We create a Condition Node from the XPresso Node – Logic Nodes. We connect the on/off port to the (switch) input on our condition node; we set input 1 to the value “1” and input 2 to the value “2”.
Now we drag in the null object (marker inside) and create the two ports (Editor Visibility and Renderer Visibility).
We connect the output port of the condition node to the two ports of our null object that we have just created (marker inside). Now we need (Cloner B) in the editor, and create 2 input ports for (Size and Count). We copy our condition node and create two Reals2Vector nodes from the XPresso/Adapter menu. We create a connection from the output (2-line distance) to the input (X) of the Reals2Vector Node and from there a connection to the (Cloner B) input (Size). From the input (1 or 2 lines) we draw a connection to the condition input (Switch). From there to the input (X) of the second Reals2Vector Node and from there to the (Cloner B) input (Count).
Spline Node and Cloner

Now we create a Spline Node from the XPresso/General menu and connect our output (Spline Path) to the input (Object) of the Spline Node. Next, we need a Math Node from the XPresso/Calculate menu and set it to “Divide”. We create the output (Length) on the spline node and connect it to the first input port of the math node. We connect our output (Dashed Line Distance) of our user data tag to the second input port of the Math Node. Now we drag the cloner object (Cloner A) into the editor and create three inputs for (Count, P.Z and S.Z). We connect the input Count to the output of our Math Node and the input P.Z to the output – Dashed Line Distance.

We copy the Math Node and connect Input 1 to the output (Dashed Line Distance) and Input 2 to the output (Dashed Line Length). We create another condition node and connect input (Switch) to output (Solid/Dashed). We connect Input 1 to the output of the Math Node we have just created; and we set Input 2 to the value (1). We connect the output of the condition node to the input (S.Z) on (Cloner A).

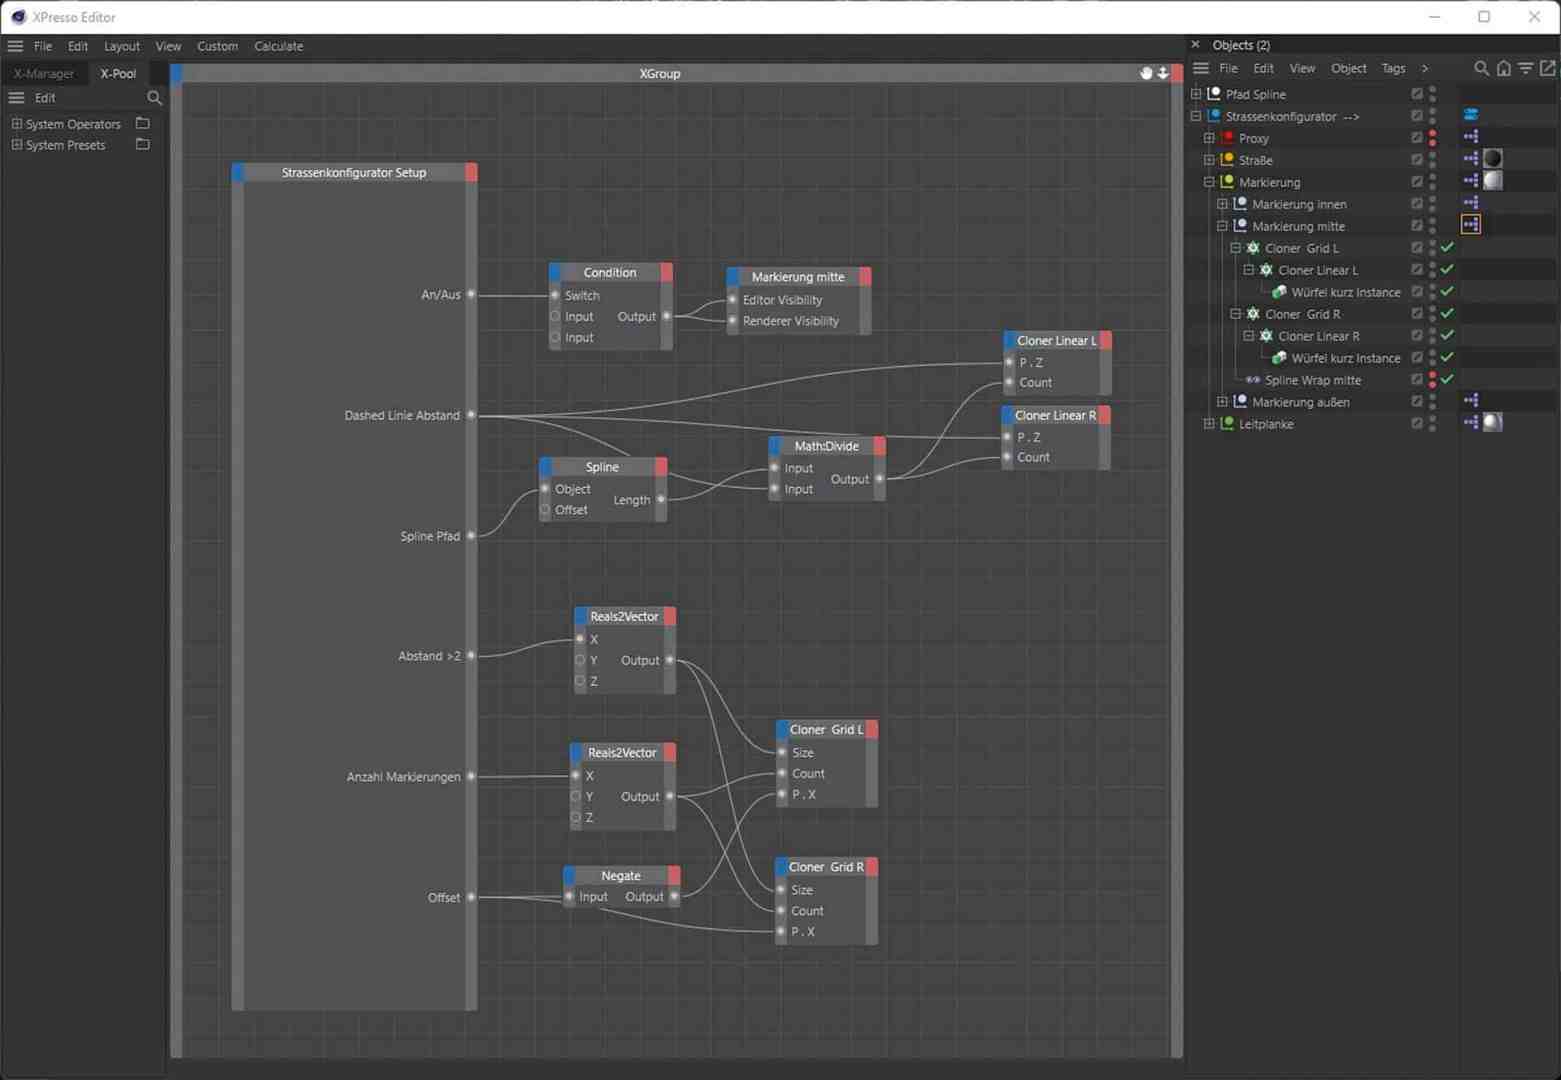
We create another XPresso tag on the null object (centre marker) and open it directly. Here we drag in our user data tag again and add the following ports (On/Off, Spline Path, Dashed Line Distance, Distance>2, Number of Markers and Offset). We create a Condition Node from the XPresso Node/Logic Nodes. We connect the on/off port to the (switch) input on our condition node and set input 1 to the value “1” and input 2 to the value “2”. Now we drag in the null object (centre marker) and create the two ports (Editor Visibility and Renderer Visibility).
We connect the output port of the Condition
Node to the two ports of our null object that we have just created. We drag (Cloner A L) and (Cloner A R) into the editor and add the inputs (P.Z and Count) to both. We connect the ports (P.Z) of both cloners to the input (dashed line distance). Now we need another spline node with a connection from (spline path) to (object). Now we need another (Math) node with the setting (Divide) and connect the upper input to the input (Length) of the spline node and the lower input to the output (Dashed line distance) of our user data tag.
Next, we create two (Reals2Vector) nodes, one (Negate) node and drag the two cloners (Cloner Left and Cloner Right) into the editor where we create three inputs each with (Size, Count and P.X). We connect the output (Distance>2) to a (Reals2Vector) node at the (X) port and connect the output port to the two clone objects at the input (Size). We connect the input (number of markers) to port X of the other (Reals2Vector) node. We connect its output to the (Count) input of the two cloner nodes. We connect the output (Offset) once directly to the input (P.X) of the (Cloner Right) and at (Cloner Left) we place our (Negate) node in between.
We create another XPresso tag on the null object (outside marker) and open it. Here we drag in our user data tag again and add the following ports (on/off, road width, distance and line width). We create a condition node from the XPresso Node/Logic Nodes. We connect the on/off port to the (switch) input on our condition node and set input 1 to the value “1” and input 2 to the value “2”.

Now we drag in the null object (outside marker) and create the two ports (Editor Visibility and Renderer Visibility). We connect the output port of the condition node to the two ports of our null object that we have just created. Next, we need a (Math) Node in (subtract) mode. We connect the road width port to the upper port on the (Math) Node and the (distance) port to the lower port on the (Math) Node. We connect the output of the (Math) node to a new (Reals2Vector) node on the X port. We drag Cloner C into the editor and create a port for Size. We connect this to the output of the (Reals2Vector) node. We also need (Cube 2) in the editor with an input port Size.X and connect this to the Line width output.
XPresso guard rail
We open our XPresso tag on the zero object guardrail. Here we drag in our user data tag again and add the following ports (profile, support, distance support and spline path). We drag the inner and outer guardrail profile instance object from the guardrail hierarchy into the editor. Both instance nodes are given an input (reference object) and we connect this to the input (profile). Now we drag our guardrail instances from all clone objects into the editor and select (Reference object) as the input. We connect this input to the output (bracket). Now we drag our 4 clone objects into the editor and add 3 inputs each (Step, Rail and Object). We connect the inputs (step) to the output (distance bracket). We connect the inputs (object) to the output (spline path). For the inputs (Rail), we still need our (RailSpline Instance Proxy) object in the editor with an output (Object).

We create another XPresso tag on the null object (inner guardrail) and open it. Here we drag in our user data tag again and add the following ports (on/off and distance). We create a condition node from the XPresso menu/logic nodes.

We connect the on/off port to the (switch) input on our condition node and set input 1 to the value “1” and input 2 to the value “2”. Now we drag in the null object (guard rail inside) and create the two ports (Editor Visibility and Renderer Visibility). We connect the output port of the condition node to the two ports of our null object that we have just created.
Now we drag the object (Profile Instance P A) with one input (Position.X) and the two cloners (Guardrail Left A and Guardrail Right A), each with one input (P.X), into the editor. We create another (Negate) Node and connect the input to the output port (Distance). We connect the output port of the Negate Node to the created input of the (Profile Instance P A) and the clone object (Guardrail Right A) at the (P.X) port. We connect the clone object (guard rail left A) directly to the output port (distance).
We create another XPresso tag on the zero object (guardrail outside) and open it. Here we drag in our user data tag again and add the following ports (on/off, road width and distance). We create a condition node from the XPresso menu/logic nodes. We connect the on/off port to the (switch) input on our condition node and set input 1 to the value “1” and input 2 to the value “2”.
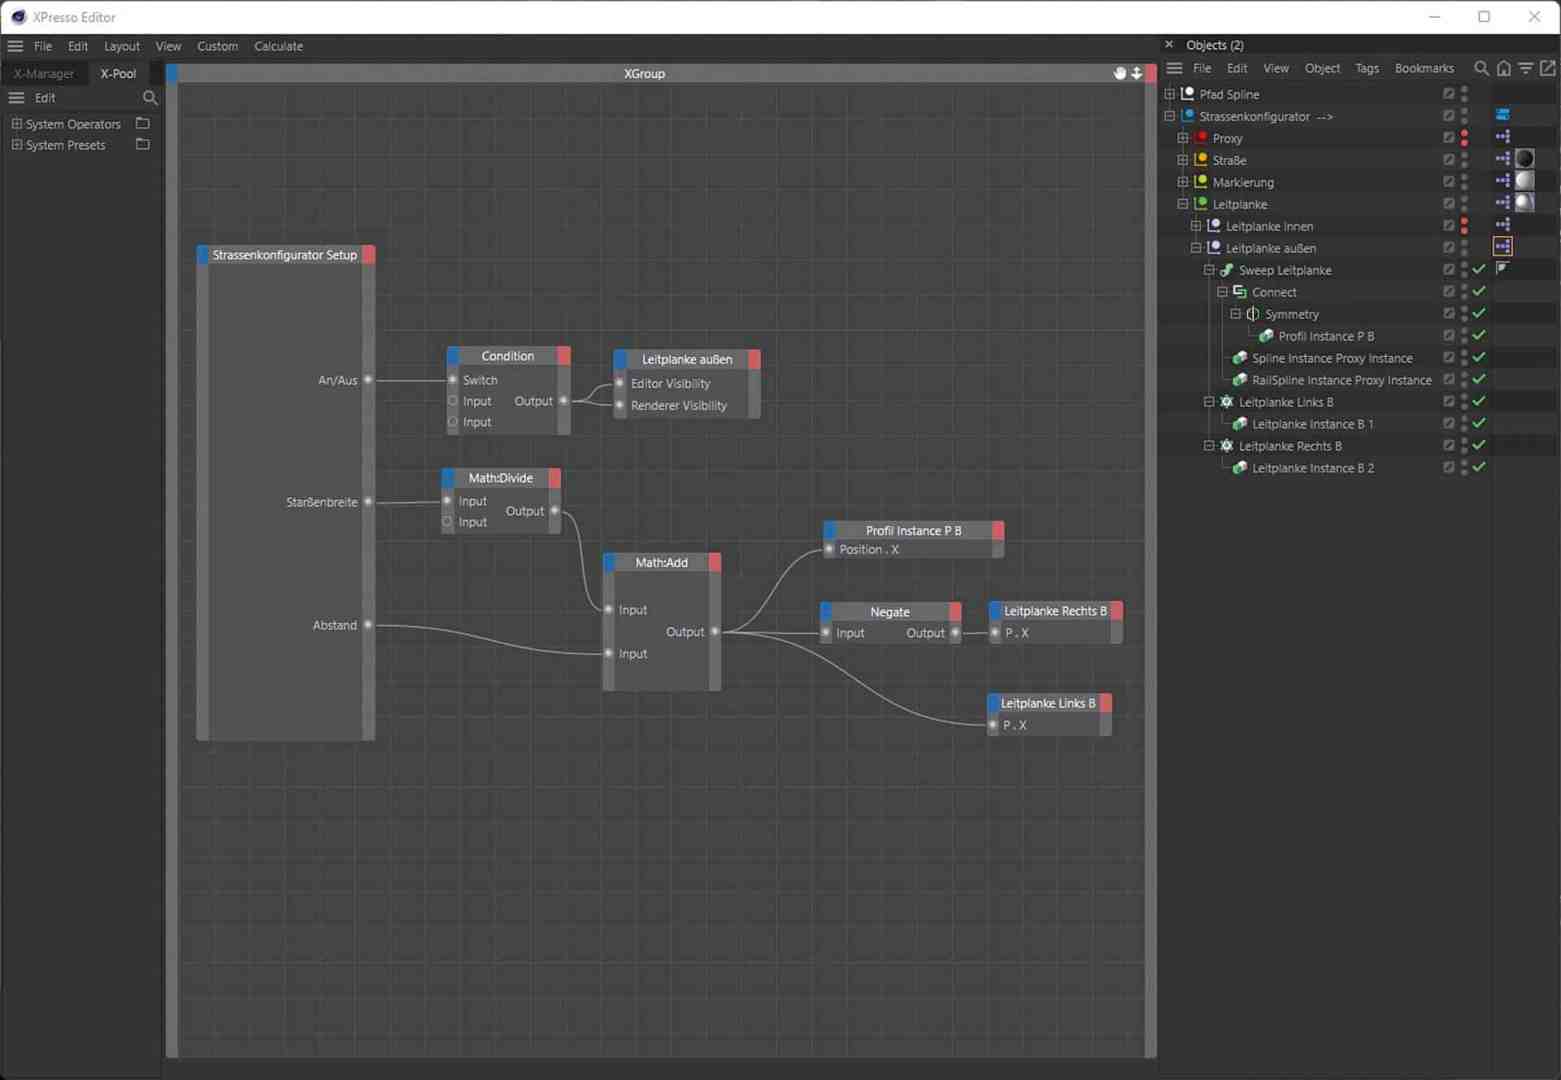
Now we drag in the null object (guardrail outside) and create the two ports (Editor Visibility and Renderer Visibility). We connect the output port of the condition node to the two ports of our null object that we have just created.
We create a math node with the setting (divide). For input 1, we create a connection with the port (street width) and for input 2, we enter the value “2”. We create another math node with the setting (add) and connect input 1 with the output of the previously created math node. We connect Input 2 to the port (distance).
We drag the object (Profile Instance P B) into the editor with a port in (Position.X) and connect it to the output of the Math:Add Node. Now we still need our two clone objects (guardrail left B and guardrail right B), each with an input (P.X). We connect the first input (guardrail left B) directly to the output of the Math:Add Node and for (guardrail right B) we connect a (Negate) Node in between.
Finale!
Our little tutorial is now complete. With this knowledge you can now expand your road generator yourself. For example, you can add a kerb or pavement using steps similar to those we have used together. Or you can take a look at “If you want the whole thing faster…” – where you can also purchase my Road Generator with additional functions and procedural materials for Octane.
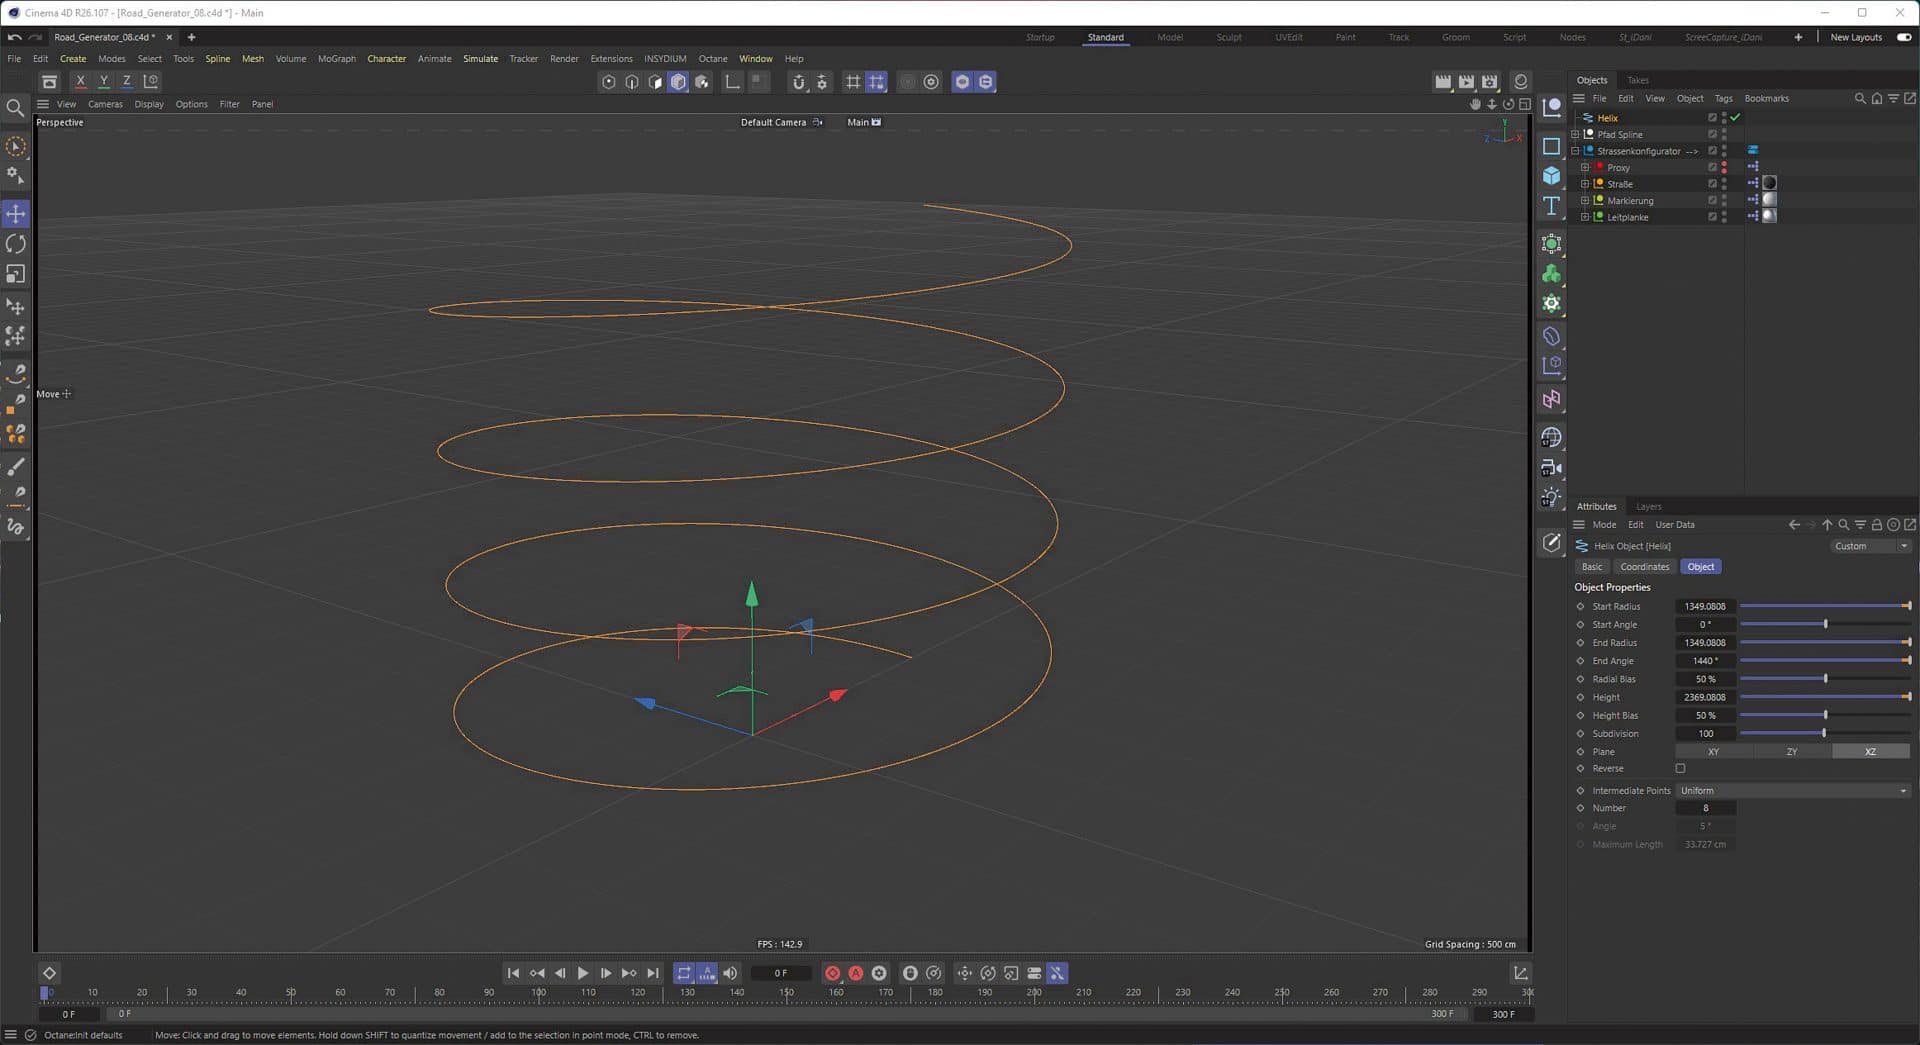
If you want the whole thing faster..
Under the following link on my website you can buy and download the complete Road Generator with additional functions, as well as Cinema 4D standard material and optimised procedural Octane materials for 18 euros. With the discount code “digitalproduction” you get an additional 5 Euro discount on the Road Generator. If you don’t want Xpresso, but just need to create roads.

Conclusion
Even if the XPresso system in Cinema 4D does not develop any further, it remains an integral part of Cinema 4D for building small helpers or complex circuits. XPresso is indispensable for technical animations in particular – and it is not difficult to learn XPresso. With a little logical thinking and some experience with the individual nodes and their functions, complex circuits or setups can be created very quickly.


